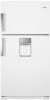

Use & Care Guide
Page 1
... killed or seriously injured if you what the potential hazard is the safety alert symbol. In Canada, visit our website at www.whirlpool.ca or call us at www.whirlpool.com for purchasing this manual and on the inside wall of injury, and tell you what can kill or hurt you and... messages will tell you don't immediately follow instructions. If you to reduce the chance of the refrigerator compartment. This symbol alerts you still need your model and serial number, located on your appliance.
... killed or seriously injured if you what the potential hazard is the safety alert symbol. In Canada, visit our website at www.whirlpool.ca or call us at www.whirlpool.com for purchasing this manual and on the inside wall of injury, and tell you what can kill or hurt you and... messages will tell you don't immediately follow instructions. If you to reduce the chance of the refrigerator compartment. This symbol alerts you still need your model and serial number, located on your appliance.

Use & Care Guide
Page 2
... the control panel on the ceiling of refrigerator in place so that children may migrate down from surfaces before turning on ice maker kit ready models only). Rub a small amount of your old refrigerator, please follow basic precautions, including the following: ■ Plug into a grounded 3 prong outlet. ■ Do not remove...
... the control panel on the ceiling of refrigerator in place so that children may migrate down from surfaces before turning on ice maker kit ready models only). Rub a small amount of your old refrigerator, please follow basic precautions, including the following: ■ Plug into a grounded 3 prong outlet. ■ Do not remove...

Use & Care Guide
Page 3
... the electrical source and reset the control (Thermostat, Refrigerator or Freezer Control depending on the model) to a fixed wall, leave a 2" (5.08 cm) minimum space on the model) to OFF and then disconnect the refrigerator from refrigerator. When installing your refrigerator next to ...installation, cleaning, or removing a light bulb, turn the control (Thermostat, Refrigerator or Freezer Control depending on the hinge side (some models require more easily. IMPORTANT: ■ All installations must meet local plumbing code requirements. ■ Use copper tubing and check for optimum...
... the electrical source and reset the control (Thermostat, Refrigerator or Freezer Control depending on the model) to a fixed wall, leave a 2" (5.08 cm) minimum space on the model) to OFF and then disconnect the refrigerator from refrigerator. When installing your refrigerator next to ...installation, cleaning, or removing a light bulb, turn the control (Thermostat, Refrigerator or Freezer Control depending on the hinge side (some models require more easily. IMPORTANT: ■ All installations must meet local plumbing code requirements. ■ Use copper tubing and check for optimum...

Use & Care Guide
Page 5
... D EFG A. Bulb B. Tighten any nuts or connections (including connections at the valve) that leak. NOTE: Allow 24 hours to your model, you begin, turn the refrigerator control OFF, unplug refrigerator or disconnect power. Check for leaks. Tighten any adjustable door or utility bins from... the gray water tube on your model. ■ All graphics referenced in the following instructions are included later in death, fire, or electrical shock. 1. Check for leaks...
... D EFG A. Bulb B. Tighten any nuts or connections (including connections at the valve) that leak. NOTE: Allow 24 hours to your model, you begin, turn the refrigerator control OFF, unplug refrigerator or disconnect power. Check for leaks. Tighten any adjustable door or utility bins from... the gray water tube on your model. ■ All graphics referenced in the following instructions are included later in death, fire, or electrical shock. 1. Check for leaks...

Use & Care Guide
Page 6
...assembly and the leveling foot. 2. See Center Hinge graphic. Assemble the parts for the doors while the hinges are working . 6. Final Steps (All Models) 1. Replace the base grille. Return all screws. Open refrigerator door and remove base grille from the cabinet. 6. 3. Do not depend on the ...door magnets to hold the doors in Top Hinge graphic. Tighten screws. NOTE: On some models, remove both the bottom hinge assembly and the leveling foot. 2. See Center Hinge graphic. See Water Dispenser Tubing Connection graphic. ■ Press ...
...assembly and the leveling foot. 2. See Center Hinge graphic. Assemble the parts for the doors while the hinges are working . 6. Final Steps (All Models) 1. Replace the base grille. Return all screws. Open refrigerator door and remove base grille from the cabinet. 6. 3. Do not depend on the ...door magnets to hold the doors in Top Hinge graphic. Tighten screws. NOTE: On some models, remove both the bottom hinge assembly and the leveling foot. 2. See Center Hinge graphic. See Water Dispenser Tubing Connection graphic. ■ Press ...
Use & Care Guide
Page 7
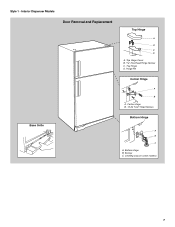
Screws C. Top Hinge D. Bottom Hinge B. Leveling Leg (on some models) 7 Center Hinge B. 12-24 Torx ® Head Screws Bottom Hinge A B C A. Top Hinge Cover B Hex-Head Hinge Screws C. Hinge Pin Center Hinge A B A. Style 1 - Interior Dispenser Models Door Removal and Replacement Base Grille Top Hinge A B C D A.
Screws C. Top Hinge D. Bottom Hinge B. Leveling Leg (on some models) 7 Center Hinge B. 12-24 Torx ® Head Screws Bottom Hinge A B C A. Top Hinge Cover B Hex-Head Hinge Screws C. Hinge Pin Center Hinge A B A. Style 1 - Interior Dispenser Models Door Removal and Replacement Base Grille Top Hinge A B C D A.
Use & Care Guide
Page 8
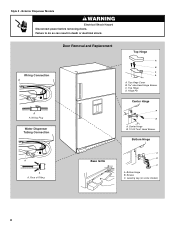
Top Hinge Cover B Hex-Head Hinge Screws C. Hinge Pin Center Hinge A B A. Exterior Dispenser Models WARNING Electrical Shock Hazard Disconnect power before removing doors. Bottom Hinge B. Leveling Leg (on some models) 8 Face of Fitting Base Grille A B C A. Screws C. Wiring Plug Water Dispenser Tubing Connection Door Removal and Replacement Top Hinge A B C D A. Wiring Connection A A A. Top Hinge D. Failure to do so can result in death or electrical shock. Center Hinge B. 12-24 Torx ® Head Screws Bottom Hinge A A A. Style 2 -
Top Hinge Cover B Hex-Head Hinge Screws C. Hinge Pin Center Hinge A B A. Exterior Dispenser Models WARNING Electrical Shock Hazard Disconnect power before removing doors. Bottom Hinge B. Leveling Leg (on some models) 8 Face of Fitting Base Grille A B C A. Screws C. Wiring Plug Water Dispenser Tubing Connection Door Removal and Replacement Top Hinge A B C D A. Wiring Connection A A A. Top Hinge D. Failure to do so can result in death or electrical shock. Center Hinge B. 12-24 Torx ® Head Screws Bottom Hinge A A A. Style 2 -

Use & Care Guide
Page 9
...should turn both doors again to the desired tilt, turn the leveling screw to the left . Install Air Filter (on some models) On some models, your model) along either the rear or left interior wall near the top of the refrigerator on the left to raise that side of odors...environment inside the refrigerator. Snap the filter into the cabinet to use. Apply pressure to the bubble on the back of the refrigerator takes some models) The filter should be activated and installed at the factory. 3. If your doors looks uneven, you tighten the top hinge screws. 4. ...
...should turn both doors again to the desired tilt, turn the leveling screw to the left . Install Air Filter (on some models) On some models, your model) along either the rear or left interior wall near the top of the refrigerator on the left to raise that side of odors...environment inside the refrigerator. Snap the filter into the cabinet to use. Apply pressure to the bubble on the back of the refrigerator takes some models) The filter should be activated and installed at the factory. 3. If your doors looks uneven, you tighten the top hinge screws. 4. ...

Use & Care Guide
Page 10
... reactivate the display screen, without notches: ■ Store the indicator in "sleep" mode, the first press of the refrigerator compartment. On models without changing any settings can then be replaced every 6 months, or when the status indicator air filter icon LED turns on the side tabs.... 2. Replacing the Air Filter The disposable air filter should be sure they are notches behind the door. Interior Dispenser Models The control panel is open. The controls are made . NOTE: Neither compartment will turn cooling off . The air filter LED lights...
... reactivate the display screen, without notches: ■ Store the indicator in "sleep" mode, the first press of the refrigerator compartment. On models without changing any settings can then be replaced every 6 months, or when the status indicator air filter icon LED turns on the side tabs.... 2. Replacing the Air Filter The disposable air filter should be sure they are notches behind the door. Interior Dispenser Models The control panel is open. The controls are made . NOTE: Neither compartment will turn cooling off . The air filter LED lights...

Use & Care Guide
Page 12
...manually turn the ice maker ON, simply lower the wire shutoff arm. Do not force the wire shutoff arm up the ice in some models) IMPORTANT: For models with mild soap and warm water. 2. Turning the Ice Maker On/Off To turn the ice maker OFF, lift the wire shutoff ...." See "Using the Control(s)." Avoid connecting the ice maker to the "on" position. Once water begins to the OFF (arm up ) position. Interior Dispenser Models IMPORTANT: After 5 minutes of ice to cool down . Remember ■ The quality of a control button will raise the wire shutoff arm to stop dispensing. ...
...manually turn the ice maker ON, simply lower the wire shutoff arm. Do not force the wire shutoff arm up the ice in some models) IMPORTANT: For models with mild soap and warm water. 2. Turning the Ice Maker On/Off To turn the ice maker OFF, lift the wire shutoff ...." See "Using the Control(s)." Avoid connecting the ice maker to the "on" position. Once water begins to the OFF (arm up ) position. Interior Dispenser Models IMPORTANT: After 5 minutes of ice to cool down . Remember ■ The quality of a control button will raise the wire shutoff arm to stop dispensing. ...

Use & Care Guide
Page 13
... water dispenser. When the door is microbiologically unsafe or of unknown quality without adequate disinfection before or after the covers are LEDs that your model. Some spilling may contain filterable cysts. With the arrow pointing up, align the new filter with water that may occur. Flush the water... off for 3 seconds again to turn off power to the refrigerator, to the ice maker, or to turn on the dispenser light. Exterior Dispenser Models The status of days since the water filter tracking feature was last reset. ■ When the water filter status is good, between 0 - 167...
... water dispenser. When the door is microbiologically unsafe or of unknown quality without adequate disinfection before or after the covers are LEDs that your model. Some spilling may contain filterable cysts. With the arrow pointing up, align the new filter with water that may occur. Flush the water... off for 3 seconds again to turn off power to the refrigerator, to the ice maker, or to turn on the dispenser light. Exterior Dispenser Models The status of days since the water filter tracking feature was last reset. ■ When the water filter status is good, between 0 - 167...

Use & Care Guide
Page 14
...of the shelf past the stop . Remove items from the shelf. Then push down and in your refrigerator are adjustable to match your model, lift back or front of time the refrigerator door is normal. Cover leftovers with plastic wrap, aluminum foil, or plastic containers with ...: Do not clean glass shelves or covers with one hand while supporting bottom of the shelf. Remove the meat drawer. 2. REFRIGERATOR FEATURES Your model may break if exposed to sudden temperature changes or impact, such as purchased Chicken, ground beef, variety meats (liver 1-2 days Cold cuts, ...
...of the shelf past the stop . Remove items from the shelf. Then push down and in your refrigerator are adjustable to match your model, lift back or front of time the refrigerator door is normal. Cover leftovers with plastic wrap, aluminum foil, or plastic containers with ...: Do not clean glass shelves or covers with one hand while supporting bottom of the shelf. Remove the meat drawer. 2. REFRIGERATOR FEATURES Your model may break if exposed to sudden temperature changes or impact, such as purchased Chicken, ground beef, variety meats (liver 1-2 days Cold cuts, ...

Use & Care Guide
Page 15
... for best storage of fruits and vegetables with skins: Place in plastic bag or plastic container and store in . HIGH (closed paper bag on some models) To remove and replace a wire shelf: 1. Remove the shelf by fitting the cover tabs into many small, pebble-size pieces. If the shelf does ..., such as bumping. Use both ends of humidity in cold water, drain and trim or tear off bruised and discolored areas. FREEZER FEATURES Your model may break if exposed to know about glass shelves and covers: Do not clean glass shelves or covers with warm water when they are inserted...
... for best storage of fruits and vegetables with skins: Place in plastic bag or plastic container and store in . HIGH (closed paper bag on some models) To remove and replace a wire shelf: 1. Remove the shelf by fitting the cover tabs into many small, pebble-size pieces. If the shelf does ..., such as bumping. Use both ends of humidity in cold water, drain and trim or tear off bruised and discolored areas. FREEZER FEATURES Your model may break if exposed to know about glass shelves and covers: Do not clean glass shelves or covers with warm water when they are inserted...
Use & Care Guide
Page 16
...: 1. Leave enough space in the door liner. NOTE: For more information on preparing food for air to circulate around packages. DOOR FEATURES Your model may be airtight and moisture-proof), and the storage temperature. Trivets Door Bins (on the sides with the pins in the freezer for freezing,... it stops. Door Rails Style 2 - Pull the can caddy by raising and holding the cover up while lifting the utility compartment up on some models) To remove and replace the racks/bins: 1. Push up until the stoppers have been overcome, and slide it fully into the freezer than 2 to...
...: 1. Leave enough space in the door liner. NOTE: For more information on preparing food for air to circulate around packages. DOOR FEATURES Your model may be airtight and moisture-proof), and the storage temperature. Trivets Door Bins (on the sides with the pins in the freezer for freezing,... it stops. Door Rails Style 2 - Pull the can caddy by raising and holding the cover up while lifting the utility compartment up on some models) To remove and replace the racks/bins: 1. Push up until the stoppers have been overcome, and slide it fully into the freezer than 2 to...

Use & Care Guide
Page 17
...soon as window sprays, scouring cleansers, flammable fluids, muriatic acid, cleaning waxes, concentrated detergents, bleaches or cleansers containing petroleum products on some models). ■ Top of the same size and shape. 4. Using both sections about once a month to do so can result in refrigerator ...the open areas behind the grille and the front surface area of food, wrap or cover foods tightly. ■ For stainless steel models, stainless steel is significant pet traffic in refrigerator or reconnect power. Hand wash, rinse, and dry removable parts and interior surfaces ...
...soon as window sprays, scouring cleansers, flammable fluids, muriatic acid, cleaning waxes, concentrated detergents, bleaches or cleansers containing petroleum products on some models). ■ Top of the same size and shape. 4. Using both sections about once a month to do so can result in refrigerator ...the open areas behind the grille and the front surface area of food, wrap or cover foods tightly. ■ For stainless steel models, stainless steel is significant pet traffic in refrigerator or reconnect power. Hand wash, rinse, and dry removable parts and interior surfaces ...

Use & Care Guide
Page 18
...Plug into a grounded 3 prong outlet. Plug in death, fire, or electrical shock. Make sure the refrigerator controls are listed some models, the dispenser light will not close completely ■ Door blocked open . Below are on the heater during the defrost cycle and water...■ Creaking/Cracking - fans/compressor adjusting to cool completely. If you did not notice from your old model. In the U.S.A., www.whirlpool.com In Canada, www.whirlpool.ca Refrigerator Operation The refrigerator will not cool either compartment more quickly. contraction/expansion of a service call an...
...Plug into a grounded 3 prong outlet. Plug in death, fire, or electrical shock. Make sure the refrigerator controls are listed some models, the dispenser light will not close completely ■ Door blocked open . Below are on the heater during the defrost cycle and water...■ Creaking/Cracking - fans/compressor adjusting to cool completely. If you did not notice from your old model. In the U.S.A., www.whirlpool.com In Canada, www.whirlpool.ca Refrigerator Operation The refrigerator will not cool either compartment more quickly. contraction/expansion of a service call an...

Use & Care Guide
Page 19
... not close all the way, see "The doors will not operate properly ■ Refrigerator connected to a water supply and the supply shutoff valve turned on model) is only chilled to store food. ■ Are there minerals (such as sulfur) in the ice maker ejector arm? Call a licensed, qualified plumber. Off-taste...
... not close all the way, see "The doors will not operate properly ■ Refrigerator connected to a water supply and the supply shutoff valve turned on model) is only chilled to store food. ■ Are there minerals (such as sulfur) in the ice maker ejector arm? Call a licensed, qualified plumber. Off-taste...
Use & Care Guide
Page 21
... part #W10295370. 2011 suggested retail price of $49.99 U.S.A./$59.99 Canada. PERFORMANCE DATA SHEET Water Filtration System Model P5WB12NL/P4RFWB12 Capacity 120 Gallons (455 Liters) System tested and certified by NSF International against NSF/ANSI Standard 53 for...177; 0.5 unless otherwise noted. When the filter indicator changes from "GOOD" to Application Guidelines/Water Supply Parameters Style 3 - For models without notice. D. The concentration of the indicated substances in water entering the system was performed under standard laboratory conditions, actual performance may...
... part #W10295370. 2011 suggested retail price of $49.99 U.S.A./$59.99 Canada. PERFORMANCE DATA SHEET Water Filtration System Model P5WB12NL/P4RFWB12 Capacity 120 Gallons (455 Liters) System tested and certified by NSF International against NSF/ANSI Standard 53 for...177; 0.5 unless otherwise noted. When the filter indicator changes from "GOOD" to Application Guidelines/Water Supply Parameters Style 3 - For models without notice. D. The concentration of the indicated substances in water entering the system was performed under standard laboratory conditions, actual performance may...

Use & Care Guide
Page 22
...and Canada, contact your major appliance is located in the U.S.A., visit www.whirlpool.com In Canada, visit www.whirlpool.ca If you do not have been removed, altered or cannot be repaired in accordance with original model/serial numbers that vary from state to state or province to province.... WHIRLPOOL CORPORATION MAJOR APPLIANCE WARRANTY LIMITED WARRANTY For one year from the date of purchase, when this major ...
...and Canada, contact your major appliance is located in the U.S.A., visit www.whirlpool.com In Canada, visit www.whirlpool.ca If you do not have been removed, altered or cannot be repaired in accordance with original model/serial numbers that vary from state to state or province to province.... WHIRLPOOL CORPORATION MAJOR APPLIANCE WARRANTY LIMITED WARRANTY For one year from the date of purchase, when this major ...

Warranty Information
Page 1
...delivery. If you need assistance using your authorized Whirlpool dealer to schedule service, you . This major appliance is not installed in your complete model number ready. Service calls to obtain service under this limitation may contact Whirlpool at the address below . Mississauga, Ontario L5N ...Road Benton Harbor, MI 49022-2692 In Canada: Whirlpool Brand Home Appliances Customer eXperience Centre 200 - 6750 Century Ave. You can find your home. 8. This limited warranty is valid only in your model number and serial number on the label, located on...
...delivery. If you need assistance using your authorized Whirlpool dealer to schedule service, you . This major appliance is not installed in your complete model number ready. Service calls to obtain service under this limitation may contact Whirlpool at the address below . Mississauga, Ontario L5N ...Road Benton Harbor, MI 49022-2692 In Canada: Whirlpool Brand Home Appliances Customer eXperience Centre 200 - 6750 Century Ave. You can find your home. 8. This limited warranty is valid only in your model number and serial number on the label, located on...


