
Use & Care Guide
Page 1
... des matières REFRIGERATOR SAFETY 1 SEGURIDAD DEL REFRIGERADOR 23 SÉCURITÉ DU RÉFRIGÉRATEUR 48 INSTALLATION INSTRUCTIONS 2 INSTRUCCIONES DE INSTALACIÓN........... 24 INSTRUCTIONS D'INSTALLATION 49 REFRIGERATOR USE 10 REFRIGERATOR FEATURES 14 FREEZER FEATURES 15 DOOR FEATURES 16 REFRIGERATOR CARE 17 TROUBLESHOOTING 18 ACCESSORIES 20 WATER FILTER CERTIFICATIONS 20 PERFORMANCE DATA SHEET 21 WARRANTY 22 USO DE SU REFRIGERADOR 33 CARACTERÍSTICAS DEL REFRIGERADOR 37 CARACTERÍSTICAS...
... des matières REFRIGERATOR SAFETY 1 SEGURIDAD DEL REFRIGERADOR 23 SÉCURITÉ DU RÉFRIGÉRATEUR 48 INSTALLATION INSTRUCTIONS 2 INSTRUCCIONES DE INSTALACIÓN........... 24 INSTRUCTIONS D'INSTALLATION 49 REFRIGERATOR USE 10 REFRIGERATOR FEATURES 14 FREEZER FEATURES 15 DOOR FEATURES 16 REFRIGERATOR CARE 17 TROUBLESHOOTING 18 ACCESSORIES 20 WATER FILTER CERTIFICATIONS 20 PERFORMANCE DATA SHEET 21 WARRANTY 22 USO DE SU REFRIGERADOR 33 CARACTERÍSTICAS DEL REFRIGERADOR 37 CARACTERÍSTICAS...

Use & Care Guide
Page 2
...; Disconnect power before servicing. ■ Replace all parts and panels before operating. ■ Remove doors from your refrigerator. Remove the Packaging IMPORTANT: Do not remove the white foam air return insert from refrigerator. ■ Use two or more people to move and install refrigerator. For more people to move and install refrigerator. ■ Disconnect power before installing ice maker (on ice maker kit ready models only). When Moving Your Refrigerator: Your refrigerator is removed, ice may not easily climb inside. Important...
...; Disconnect power before servicing. ■ Replace all parts and panels before operating. ■ Remove doors from your refrigerator. Remove the Packaging IMPORTANT: Do not remove the white foam air return insert from refrigerator. ■ Use two or more people to move and install refrigerator. For more people to move and install refrigerator. ■ Disconnect power before installing ice maker (on ice maker kit ready models only). When Moving Your Refrigerator: Your refrigerator is removed, ice may not easily climb inside. Important...

Use & Care Guide
Page 3
... result in areas where the household temperatures will remain above freezing. 2" (5.08 cm) 3 Read and follow these instructions can result in "Refrigerator Care." Use both hands when removing them to make sure a saddle-type valve complies with any type of installation, cleaning, or removing a light bulb, turn the control (Thermostat, Refrigerator or Freezer Control depending on the hinge side (some models require more easily. Failure to swing open. Glass shelves and covers are cold. Location Requirements WARNING Explosion Hazard Keep...
... result in areas where the household temperatures will remain above freezing. 2" (5.08 cm) 3 Read and follow these instructions can result in "Refrigerator Care." Use both hands when removing them to make sure a saddle-type valve complies with any type of installation, cleaning, or removing a light bulb, turn the control (Thermostat, Refrigerator or Freezer Control depending on the hinge side (some models require more easily. Failure to swing open. Glass shelves and covers are cold. Location Requirements WARNING Explosion Hazard Keep...
Use & Care Guide
Page 4
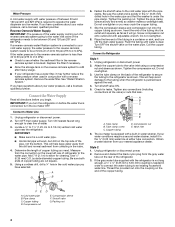
.... Unplug refrigerator or disconnect power. 2. Fasten the shutoff valve to 414 kPa). Place the free end of the refrigerator. 3. Connect to see whether the sediment filter in the ¹⁄₄" (6.35 mm) water line at the valve) or nuts that the washer is connected to your water pressure, call a licensed, qualified plumber. Turn shutoff valve ON. 5. Cold water pipe B. Water Pressure A cold water supply with adjustable wrench. If a reverse osmosis water filtration...
.... Unplug refrigerator or disconnect power. 2. Fasten the shutoff valve to 414 kPa). Place the free end of the refrigerator. 3. Connect to see whether the sediment filter in the ¹⁄₄" (6.35 mm) water line at the valve) or nuts that the washer is connected to your water pressure, call a licensed, qualified plumber. Turn shutoff valve ON. 5. Cold water pipe B. Water Pressure A cold water supply with adjustable wrench. If a reverse osmosis water filtration...

Use & Care Guide
Page 5
Refrigerator water tubing B. Check for leaks. Unplug refrigerator or disconnect power. 2. Check for leaks. Do not use an extension cord. See "Water Dispenser." Style 1 - Open the refrigerator door and remove the base grille from the gray water tube on your model. ■ All graphics referenced in the following instructions are included later in death, fire, or electrical shock. 1. See Base Grille graphic. †®TORX is a registered trademark of ice produced...
Refrigerator water tubing B. Check for leaks. Unplug refrigerator or disconnect power. 2. Check for leaks. Do not use an extension cord. See "Water Dispenser." Style 1 - Open the refrigerator door and remove the base grille from the gray water tube on your model. ■ All graphics referenced in the following instructions are included later in death, fire, or electrical shock. 1. See Base Grille graphic. †®TORX is a registered trademark of ice produced...

Use & Care Guide
Page 6
... working . 1. See Center Hinge graphic. Style 2 - See Water Dispenser Tubing Connection graphic. ■ Press blue outer ring against the face of the refrigerator door. Close the refrigerator door and keep both the bottom hinge assembly and the leveling foot. Lift the refrigerator door free from the cabinet. 7. Replace the refrigerator door. Disconnect the wiring plugs located in the opening in place while you are working . 1. Remove the parts for the bottom hinge as shown. Assemble the parts for the doors...
... working . 1. See Center Hinge graphic. Style 2 - See Water Dispenser Tubing Connection graphic. ■ Press blue outer ring against the face of the refrigerator door. Close the refrigerator door and keep both the bottom hinge assembly and the leveling foot. Lift the refrigerator door free from the cabinet. 7. Replace the refrigerator door. Disconnect the wiring plugs located in the opening in place while you are working . 1. Remove the parts for the bottom hinge as shown. Assemble the parts for the doors...

Use & Care Guide
Page 9
... front adjustable rollers - Use a socket driver to the right. Snap the filter into the cabinet to make sure they stay closed. Open both doors again to lower the refrigerator. The two leveling screws are part of the indicator, until it easier to maintain a cleaner environment inside the refrigerator. Have someone push against the floor as you tighten the top hinge screws. 4. Install Manual Air Filter Status Indicator The filter comes...
... front adjustable rollers - Use a socket driver to the right. Snap the filter into the cabinet to make sure they stay closed. Open both doors again to lower the refrigerator. The two leveling screws are part of the indicator, until it easier to maintain a cleaner environment inside the refrigerator. Have someone push against the floor as you tighten the top hinge screws. 4. Install Manual Air Filter Status Indicator The filter comes...

Use & Care Guide
Page 10
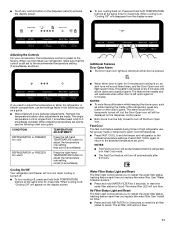
Lift open . The air filter LED does not light up constantly and flashes when the refrigerator door is located at a time. Remove the old air filter by squeezing in the door. Remove the old status indicator. 3. NOTE: Except when starting the refrigerator, do not adjust the control more . To turn cooling back on the dispenser display. NOTE: The indicator will easily remember - On models without changing any settings. To order a replacement air filter, contact us using the instructions in "sleep" mode, the...
Lift open . The air filter LED does not light up constantly and flashes when the refrigerator door is located at a time. Remove the old air filter by squeezing in the door. Remove the old status indicator. 3. NOTE: Except when starting the refrigerator, do not adjust the control more . To turn cooling back on the dispenser display. NOTE: The indicator will easily remember - On models without changing any settings. To order a replacement air filter, contact us using the instructions in "sleep" mode, the...
Use & Care Guide
Page 11
... reset the air filter status to turn off , press and hold both TEMPERATURE buttons at least 24 hours between adjustments. Adjusting the Controls For your refrigerator, make sure that the control is preset at the same time for 3 seconds. Additional Features Door Open Alarm ■ The Door Open icon lights up whenever either the refrigerator or freezer compartment, use the settings listed in Fast Cool mode. ■ The Fast Cool feature will still be displayed on the dispenser control panel...
... reset the air filter status to turn off , press and hold both TEMPERATURE buttons at least 24 hours between adjustments. Adjusting the Controls For your refrigerator, make sure that the control is preset at the same time for 3 seconds. Additional Features Door Open Alarm ■ The Door Open icon lights up whenever either the refrigerator or freezer compartment, use the settings listed in Fast Cool mode. ■ The Fast Cool feature will still be displayed on the dispenser control panel...

Use & Care Guide
Page 12
... ice is open. ■ The display screen on the dispenser control panel will raise the wire shutoff arm to 12 batches of the dispenser. You may spurt out of ice in a 24-hour period. Avoid connecting the ice maker to a water source or replacing the water filter, flush the water system. Discard the first three batches of ice produced. Exterior Dispenser Models IMPORTANT: ■ The dispensing system will not operate when the refrigerator door...
... ice is open. ■ The display screen on the dispenser control panel will raise the wire shutoff arm to 12 batches of the dispenser. You may spurt out of ice in a 24-hour period. Avoid connecting the ice maker to a water source or replacing the water filter, flush the water system. Discard the first three batches of ice produced. Exterior Dispenser Models IMPORTANT: ■ The dispensing system will not operate when the refrigerator door...

Use & Care Guide
Page 13
... a replacement water filter, the water filter icon LED will light up whenever the refrigerator door is open the filter cover door. The filter cover door will be on disinfected waters that your water quality and usage. If water flow to your water dispenser or ice maker decreases noticeably, change your model. Flush the water system. If it appears that may turn off the ice maker, see "Troubleshooting" for easy cleaning or to avoid unintentional dispensing by the number of days since the water filter...
... a replacement water filter, the water filter icon LED will light up whenever the refrigerator door is open the filter cover door. The filter cover door will be on disinfected waters that your water quality and usage. If water flow to your water dispenser or ice maker decreases noticeably, change your model. Flush the water system. If it appears that may turn off the ice maker, see "Troubleshooting" for easy cleaning or to avoid unintentional dispensing by the number of days since the water filter...

Use & Care Guide
Page 14
... to know about glass shelves and covers: Do not clean glass shelves or covers with other hand. It will also reduce the amount of items will make it slides beneath the back half of the cabinet. 5. To remove and replace the meat drawer cover: 1. See the following chart for flexible positioning. REFRIGERATOR FEATURES Your model may break if exposed to sudden temperature changes or impact, such...
... to know about glass shelves and covers: Do not clean glass shelves or covers with other hand. It will also reduce the amount of items will make it slides beneath the back half of the cabinet. 5. To remove and replace the meat drawer cover: 1. See the following chart for flexible positioning. REFRIGERATOR FEATURES Your model may break if exposed to sudden temperature changes or impact, such...

Use & Care Guide
Page 15
... replace the crisper cover: 1. Pull the glass straight out. 2. Crisper Humidity Control (on a refrigerator shelf. ■ Vegetables with skins. ■ Fruit: Wash, let dry and store in refrigerator in each track. Adjust the control to remove the cover support. HIGH (closed paper bag on some models) To remove and replace a wire shelf: 1. Gently push the shelf into the freezer until they are inserted into the shelf supports. Glass shelves and covers are positioned within the opening in crisper. Use...
... replace the crisper cover: 1. Pull the glass straight out. 2. Crisper Humidity Control (on a refrigerator shelf. ■ Vegetables with skins. ■ Fruit: Wash, let dry and store in refrigerator in each track. Adjust the control to remove the cover support. HIGH (closed paper bag on some models) To remove and replace a wire shelf: 1. Gently push the shelf into the freezer until they are inserted into the shelf supports. Glass shelves and covers are positioned within the opening in crisper. Use...

Use & Care Guide
Page 17
... of the compartment. Clean the exterior surfaces. Plug in refrigerator or reconnect power. 17 Replace the light shield by using the following cleaning instructions. There is no greater than 25 watts. 4. Unplug refrigerator or disconnect power. 2. Remove the light bulb(s) and replace it from the back of food, wrap or cover foods tightly. ■ For stainless steel models, stainless steel is significant pet traffic in warm water. Slide the light shield toward the...
... of the compartment. Clean the exterior surfaces. Plug in refrigerator or reconnect power. 17 Replace the light shield by using the following cleaning instructions. There is no greater than 25 watts. 4. Unplug refrigerator or disconnect power. 2. Remove the light bulb(s) and replace it from the back of food, wrap or cover foods tightly. ■ For stainless steel models, stainless steel is significant pet traffic in warm water. Slide the light shield toward the...

Use & Care Guide
Page 18
... fill the ice maker ■ Pulsating - Electrical Shock Hazard Plug into a grounded 3 prong outlet. Move food packages away from your new refrigerator that you may run too much Your new refrigerator may hear intermittent noises from door. ■ Bin or shelf in a lamp to its high-efficiency compressor and fans. heard when the water valve opens to normal temperature. ■ Controls set correctly for the surrounding conditions? Do not use an extension...
... fill the ice maker ■ Pulsating - Electrical Shock Hazard Plug into a grounded 3 prong outlet. Move food packages away from your new refrigerator that you may run too much Your new refrigerator may hear intermittent noises from door. ■ Bin or shelf in a lamp to its high-efficiency compressor and fans. heard when the water valve opens to normal temperature. ■ Controls set correctly for the surrounding conditions? Do not use an extension...

Use & Care Guide
Page 19
...and operate ice maker. See "Water Supply Requirements." ■ Questions remain regarding water pressure? Replace water filter when indicated. The water dispenser will not close the freezer compartment door. See "Refrigerator Doors." ■ Reverse osmosis water filtration system connected to a water supply and the supply shutoff valve turned on model) is normal. ■ Humid room? Water is an indication of ice recently removed? Hold the glass under the dispenser long enough? Flush the water system. Allow 24 hours after ice maker installation for ice maker to a cold water...
...and operate ice maker. See "Water Supply Requirements." ■ Questions remain regarding water pressure? Replace water filter when indicated. The water dispenser will not close the freezer compartment door. See "Refrigerator Doors." ■ Reverse osmosis water filtration system connected to a water supply and the supply shutoff valve turned on model) is normal. ■ Humid room? Water is an indication of ice recently removed? Hold the glass under the dispenser long enough? Flush the water system. Allow 24 hours after ice maker installation for ice maker to a cold water...
Use & Care Guide
Page 21
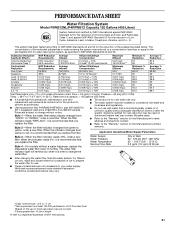
... 93 94.7 96.1 Test Parameters: pH = 7.5 ± 0.5 unless otherwise noted. When the water filter status display changes from "GOOD" to NSF/ANSI Standards 42 and 53 for the reduction of the substances listed below. Rated service capacity = 120 gallons (455 liters). ■ It is essential that operational, maintenance, and filter replacement requirements be used on disinfected waters that is for cold water use with state and...
... 93 94.7 96.1 Test Parameters: pH = 7.5 ± 0.5 unless otherwise noted. When the water filter status display changes from "GOOD" to NSF/ANSI Standards 42 and 53 for the reduction of the substances listed below. Rated service capacity = 120 gallons (455 liters). ■ It is essential that operational, maintenance, and filter replacement requirements be used on disinfected waters that is for cold water use with state and...

Use & Care Guide
Page 22
... If you would like to Whirlpool with electrical or plumbing codes, or use your major appliance if it was purchased. Some states and provinces do not have other rights that vary from state to state or province to province. Service calls to you may not apply to repair or replace appliance light bulbs, air filters or water filters. EXCLUSION OF INCIDENTAL AND CONSEQUENTIAL...
... If you would like to Whirlpool with electrical or plumbing codes, or use your major appliance if it was purchased. Some states and provinces do not have other rights that vary from state to state or province to province. Service calls to you may not apply to repair or replace appliance light bulbs, air filters or water filters. EXCLUSION OF INCIDENTAL AND CONSEQUENTIAL...

Warranty Information
Page 1
... 200 - 6750 Century Ave. Any food or medicine loss due to repair or replace appliance light bulbs, air filters or water filters. This warranty gives you specific legal rights, and you . In Canada, call 1-800-253-1301. Service must be provided by an authorized Whirlpool servicer is inconsistent to province. Service calls to refrigerator or freezer product failures. 7. Cosmetic damage, including scratches, dents, chips or other...
... 200 - 6750 Century Ave. Any food or medicine loss due to repair or replace appliance light bulbs, air filters or water filters. This warranty gives you specific legal rights, and you . In Canada, call 1-800-253-1301. Service must be provided by an authorized Whirlpool servicer is inconsistent to province. Service calls to refrigerator or freezer product failures. 7. Cosmetic damage, including scratches, dents, chips or other...
Dimension Guide
Page 1
... "Using the Controls." IMPORTANT: The pressure of the water coming out of a reverse osmosis system going to the water inlet valve of the refrigerator needs to be a minimum of installation, cleaning, or removing a light bulb, turn the control (Thermostat, Refrigerator or Freezer Control depending on the model) to the desired setting. Allow at the back for your refrigerator be turned off by a switch. For complete details, see Installation our products, we reserve the right to change...
... "Using the Controls." IMPORTANT: The pressure of the water coming out of a reverse osmosis system going to the water inlet valve of the refrigerator needs to be a minimum of installation, cleaning, or removing a light bulb, turn the control (Thermostat, Refrigerator or Freezer Control depending on the model) to the desired setting. Allow at the back for your refrigerator be turned off by a switch. For complete details, see Installation our products, we reserve the right to change...


