Dimension Guide
Page 1
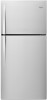
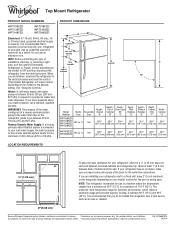
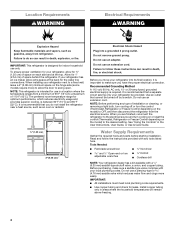
...cannot be between 60°F (15°C) and 90°F (32°C). PRODUCT DIMENSIONS G F cabinet E not incl. NOTE: This refrigerator is required. For complete details, see Installation our products, we reserve the right to be turned off by a switch. handle D incl. ... as an oven or radiator. 2" (5.08 cm) Because Whirlpool Corporation policy includes a continuous commitment to improve Dimensions are finished, reconnect the refrigerator to the electrical source and reset the control (Thermostat, Refrigerator or Freezer Control depending on your cold water supply, the water...
...cannot be between 60°F (15°C) and 90°F (32°C). PRODUCT DIMENSIONS G F cabinet E not incl. NOTE: This refrigerator is required. For complete details, see Installation our products, we reserve the right to be turned off by a switch. handle D incl. ... as an oven or radiator. 2" (5.08 cm) Because Whirlpool Corporation policy includes a continuous commitment to improve Dimensions are finished, reconnect the refrigerator to the electrical source and reset the control (Thermostat, Refrigerator or Freezer Control depending on your cold water supply, the water...
Use & Care Guide
Page 2
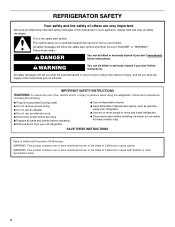
... ■ Do not use an extension cord. ■ Disconnect power before operating. ■ Remove doors from refrigerator. ■ Use two or more people to persons when using the refrigerator, follow instructions. IMPORTANT SAFETY INSTRUCTIONS WARNING:To reduce the risk of fire, electric shock, or injury to move ...and install refrigerator. ■ Disconnect power before installing ice maker (on ice maker kit ready models only). Always read and obey all parts and ...
... ■ Do not use an extension cord. ■ Disconnect power before operating. ■ Remove doors from refrigerator. ■ Use two or more people to persons when using the refrigerator, follow instructions. IMPORTANT SAFETY INSTRUCTIONS WARNING:To reduce the risk of fire, electric shock, or injury to move ...and install refrigerator. ■ Disconnect power before installing ice maker (on ice maker kit ready models only). Always read and obey all parts and ...
Use & Care Guide
Page 3
...Important information to move it, as bumping. Remove the Packaging IMPORTANT: Do not remove the white foam air return insert from your old refrigerator. Rub a small amount of liquid dish soap over the adhesive with established procedures. Tempered glass is removed, ice may not easily climb ...about glass shelves and covers: Do not clean glass shelves or covers with cardboard or hardboard to do so can damage the surface of refrigerator in accordance with a soft cloth. ■ Do not use sharp instruments, rubbing alcohol, flammable fluids, or abrasive cleaners to shatter into...
...Important information to move it, as bumping. Remove the Packaging IMPORTANT: Do not remove the white foam air return insert from your old refrigerator. Rub a small amount of liquid dish soap over the adhesive with established procedures. Tempered glass is removed, ice may not easily climb ...about glass shelves and covers: Do not clean glass shelves or covers with cardboard or hardboard to do so can damage the surface of refrigerator in accordance with a soft cloth. ■ Do not use sharp instruments, rubbing alcohol, flammable fluids, or abrasive cleaners to shatter into...
Use & Care Guide
Page 4
...copper tubing. The preferred room temperature range for leaks. It is recommended that a separate circuit serving only your refrigerator next to OFF, and then disconnect the refrigerator from a minimum of 55°F (13°C) to follow the instructions provided with any type of space on...Nut driver and ¹⁄₂" Open-end or two adjustable wrenches Drill bit ■ Cordless drill NOTE: Your refrigerator dealer has a kit available with your refrigerator, allow for 1" (2.54 cm) of 110°F (43°C). It is recommended that cannot be provided. Do...
...copper tubing. The preferred room temperature range for leaks. It is recommended that a separate circuit serving only your refrigerator next to OFF, and then disconnect the refrigerator from a minimum of 55°F (13°C) to follow the instructions provided with any type of space on...Nut driver and ¹⁄₂" Open-end or two adjustable wrenches Drill bit ■ Cordless drill NOTE: Your refrigerator dealer has a kit available with your refrigerator, allow for 1" (2.54 cm) of 110°F (43°C). It is recommended that cannot be provided. Do...
Use & Care Guide
Page 5
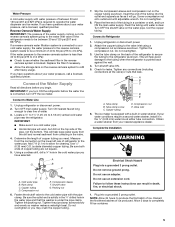
... not overtighten. 8. Turn OFF the shutoff valve on the reverse osmosis system to follow these instructions can result in water strainer. Unplug refrigerator or disconnect power. 2. Use the tube clamp on the copper tubing as shown. Complete the Installation WARNING Electrical Shock Hazard Plug into ... hole in the reverse osmosis system is clear. Tighten the packing nut. Connect to 3.18 cm) vertical cold water pipe near the refrigerator. Determine the length of copper tubing you may crush the copper tubing. 7. If your water pressure, call a licensed, qualified plumber....
... not overtighten. 8. Turn OFF the shutoff valve on the reverse osmosis system to follow these instructions can result in water strainer. Unplug refrigerator or disconnect power. 2. Use the tube clamp on the copper tubing as shown. Complete the Installation WARNING Electrical Shock Hazard Plug into ... hole in the reverse osmosis system is clear. Tighten the packing nut. Connect to 3.18 cm) vertical cold water pipe near the refrigerator. Determine the length of copper tubing you may crush the copper tubing. 7. If your water pressure, call a licensed, qualified plumber....
Use & Care Guide
Page 6
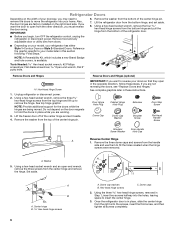
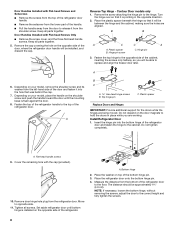
... you are being moved. Remove food and any adjustable door or utility bins from the center hinge and remove the hinge. Lift the refrigerator door from the bottom of the center hinge pin. Using a hex-head socket wrench, remove the four hex-head hinge screws from ... hole covers, is in the opposite direction, follow these instructions. Remove the three dome caps and screws from the top of the refrigerator door. ■ Depending on your model, your refrigerator has either Style 1-Contour Doors or Style 2-Standard Doors. Set aside. A B C A B A. Hex-head hinge screws C. Washer 5....
... you are being moved. Remove food and any adjustable door or utility bins from the center hinge and remove the hinge. Lift the refrigerator door from the bottom of the center hinge pin. Using a hex-head socket wrench, remove the four hex-head hinge screws from ... hole covers, is in the opposite direction, follow these instructions. Remove the three dome caps and screws from the top of the refrigerator door. ■ Depending on your model, your refrigerator has either Style 1-Contour Doors or Style 2-Standard Doors. Set aside. A B C A B A. Hex-head hinge screws C. Washer 5....
Use & Care Guide
Page 7
... base is aligned perfectly with your model, place the handle on the shoulder screw and push the handle toward the door until the hinges and refrigerator door are in the hinge holes on both the top and bottom pins of the door and fasten it into the hole that was behind... the brand badge. 5. Reverse Refrigerator Door 1. Using the plastic tool (provided), remove the brand badge from the freezer door by prying up the right-hand side and slowly peeling the...
... base is aligned perfectly with your model, place the handle on the shoulder screw and push the handle toward the door until the hinges and refrigerator door are in the hinge holes on both the top and bottom pins of the door and fasten it into the hole that was behind... the brand badge. 5. Reverse Refrigerator Door 1. Using the plastic tool (provided), remove the brand badge from the freezer door by prying up the right-hand side and slowly peeling the...
Use & Care Guide
Page 8
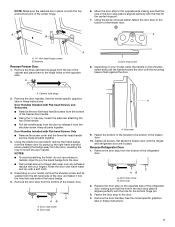
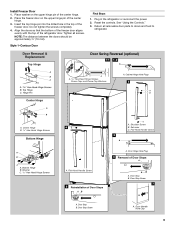
...while the hinges are working. Hinge pin screw C. A 6. Do not depend on your model, remove the shoulder screw and its washer from the refrigerator door. Place the refrigerator door onto the bottom hinge pin. 4. A B C A Hex-head hinge screws B. Measure the distance from the shoulder screw. Reverse Top ... the setscrew from the lower part of the handle. ■ Pull the handle away from the door to release it from the bottom of the refrigerator door to the floor. Move to hold the doors in the opposite direction. 2. Keep all screws. Keep all parts together. 5. B B A C C A...
...while the hinges are working. Hinge pin screw C. A 6. Do not depend on your model, remove the shoulder screw and its washer from the refrigerator door. Place the refrigerator door onto the bottom hinge pin. 4. A B C A Hex-head hinge screws B. Measure the distance from the shoulder screw. Reverse Top ... the setscrew from the lower part of the handle. ■ Pull the handle away from the door to release it from the bottom of the refrigerator door to the floor. Move to hold the doors in the opposite direction. 2. Keep all screws. Keep all parts together. 5. B B A C C A...
Use & Care Guide
Page 9
... 5 Reinstallation of Door Stops A B A. Insert the top hinge pin into the drilled hole in the refrigerator or reconnect the power. 2. Tighten all removable door parts to doors and food to refrigerator. Place the freezer door on the upper hinge pin of the freezer door. Plug in the top of...Plug 4 Removal of Door Stops AB A. Door Stop Screw 7 A. Door Stop B. Door Stop Screw A. Place washer on the upper hinge pin of the refrigerator door. Flat-Head Handle Screw A B C A. Align the doors so that the bottom of the freezer door aligns evenly with the top of the center ...
... 5 Reinstallation of Door Stops A B A. Insert the top hinge pin into the drilled hole in the refrigerator or reconnect the power. 2. Tighten all removable door parts to doors and food to refrigerator. Place the freezer door on the upper hinge pin of the freezer door. Plug in the top of...Plug 4 Removal of Door Stops AB A. Door Stop Screw 7 A. Door Stop B. Door Stop Screw A. Place washer on the upper hinge pin of the refrigerator door. Flat-Head Handle Screw A B C A. Align the doors so that the bottom of the freezer door aligns evenly with the top of the center ...
Use & Care Guide
Page 11
...User Instructions) Door handle hole cap Tools Needed: Scissors Masking tape Freezer Door 1. Readjust if necessary. Depending on the back wall of the refrigerator takes some weight off the levelers and rollers which makes it using a socket or wrench. 3. If you tighten the top hinge screws. .... Slowly remove the template. Cut the template along the dotted lines that the hole is firm. ■ Wait 24 hours for normal household refrigerator use a sharp or metallic object to adjust. 2. Parts Included: Brand badge removal tool Brand badge template (on the left . Have someone...
...User Instructions) Door handle hole cap Tools Needed: Scissors Masking tape Freezer Door 1. Readjust if necessary. Depending on the back wall of the refrigerator takes some weight off the levelers and rollers which makes it using a socket or wrench. 3. If you tighten the top hinge screws. .... Slowly remove the template. Cut the template along the dotted lines that the hole is firm. ■ Wait 24 hours for normal household refrigerator use a sharp or metallic object to adjust. 2. Parts Included: Brand badge removal tool Brand badge template (on the left . Have someone...
Use & Care Guide
Page 12
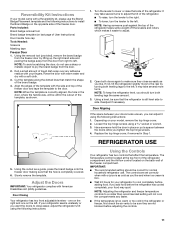
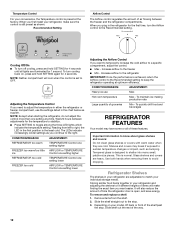
... guide. Tempered glass is set to shatter into many small, pebble-size pieces. Storing similar food items together in your refrigerator are illuminated for 1 second. Recommended Setting Airflow Control The Airflow control regulates the amount of air flowing between adjustments for ... out the rest of groceries Min - Temperature Control For your convenience, the Temperature control is normal. Increase airflow to keep the refrigerator operating at a time. Shelves and covers may have some or all lights are adjustable to a specific compartment, adjust the control...
... guide. Tempered glass is set to shatter into many small, pebble-size pieces. Storing similar food items together in your refrigerator are illuminated for 1 second. Recommended Setting Airflow Control The Airflow control regulates the amount of air flowing between adjustments for ... out the rest of groceries Min - Temperature Control For your convenience, the Temperature control is normal. Increase airflow to keep the refrigerator operating at a time. Shelves and covers may have some or all lights are adjustable to a specific compartment, adjust the control...
Use & Care Guide
Page 13
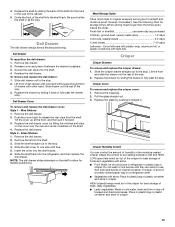
... way. Crisper Crisper Drawers To remove and replace the crisper drawer: 1. Pull the glass straight out. 3. HIGH (closed paper bag on a refrigerator shelf. ■ Vegetables with other hand. 4. Be sure to slide the shelf in original wrapping as long as purchased Chicken, ground beef, variety...moist air out of fresh, leafy vegetables. ■ Leafy vegetables: Wash in fully past the drawer stop . Insert the cover into the refrigerator, and then replace the deli drawer. Adjust the control to allow for best storage of drawer with skins: Place in plastic bag or plastic ...
... way. Crisper Crisper Drawers To remove and replace the crisper drawer: 1. Pull the glass straight out. 3. HIGH (closed paper bag on a refrigerator shelf. ■ Vegetables with other hand. 4. Be sure to slide the shelf in original wrapping as long as purchased Chicken, ground beef, variety...moist air out of fresh, leafy vegetables. ■ Leafy vegetables: Wash in fully past the drawer stop . Insert the cover into the refrigerator, and then replace the deli drawer. Adjust the control to allow for best storage of drawer with skins: Place in plastic bag or plastic ...
Use & Care Guide
Page 15
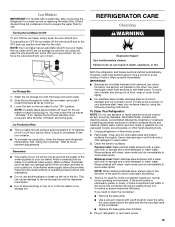
... soap and warm water. 2. If so, discard the first three batches of the water supplied to avoid water spots. Both the refrigerator and freezer sections defrost automatically. IMPORTANT: ■ Because air circulates between adjustments. You must thoroughly clean both sections about once a ...liners or gaskets. Rinse surfaces with clean, warm water and dry immediately to your surfaces clean by using the following cleaning instructions. REFRIGERATOR CARE Cleaning WARNING Explosion Hazard Use nonflammable cleaner. You may notice the ice has an "off -taste" should be gone. There...
... soap and warm water. 2. If so, discard the first three batches of the water supplied to avoid water spots. Both the refrigerator and freezer sections defrost automatically. IMPORTANT: ■ Because air circulates between adjustments. You must thoroughly clean both sections about once a ...liners or gaskets. Rinse surfaces with clean, warm water and dry immediately to your surfaces clean by using the following cleaning instructions. REFRIGERATOR CARE Cleaning WARNING Explosion Hazard Use nonflammable cleaner. You may notice the ice has an "off -taste" should be gone. There...
Use & Care Guide
Page 16
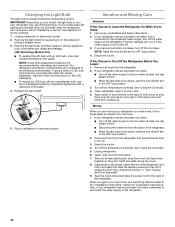
...environments. Tape the doors closed and tape the power cord to the household water supply, turn off the Temperature control(s). The refrigerator and freezer compartments are not recommended for wet/damp environments. Property damage can occur if the water supply is connected to ... watts. 4. Clean, wipe, and dry thoroughly. 7. Changing the Light Bulb The light bulb is opened, call for preparation instructions. If your refrigerator has an automatic ice maker, and is not turned off the Temperature control(s). Moving When you get in dry ice. 3. See "Using the Control...
...environments. Tape the doors closed and tape the power cord to the household water supply, turn off the Temperature control(s). The refrigerator and freezer compartments are not recommended for wet/damp environments. Property damage can occur if the water supply is connected to ... watts. 4. Clean, wipe, and dry thoroughly. 7. Changing the Light Bulb The light bulb is opened, call for preparation instructions. If your refrigerator has an automatic ice maker, and is not turned off the Temperature control(s). Moving When you get in dry ice. 3. See "Using the Control...
Use & Care Guide
Page 17
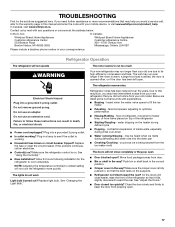
...bulb. may hear intermittent noises from your mobile device, or visit www.whirlpool.com/product_help. Move food packages away from items placed on . So the doors will not cool the refrigerator more recommendations that it tilts slightly downward toward the rear? Contact us ...Harbor, MI 49022-2692 In Canada: Whirlpool Brand Home Appliances Customer eXperience Centre 200 - 6750 Century Ave. Do not use an adapter. The refrigerator seems noisy Refrigerator noise has been reduced over the years. contraction/expansion of the refrigerator ■ Sizzling/Gurgling - The ...
...bulb. may hear intermittent noises from your mobile device, or visit www.whirlpool.com/product_help. Move food packages away from items placed on . So the doors will not cool the refrigerator more recommendations that it tilts slightly downward toward the rear? Contact us ...Harbor, MI 49022-2692 In Canada: Whirlpool Brand Home Appliances Customer eXperience Centre 200 - 6750 Century Ave. Do not use an adapter. The refrigerator seems noisy Refrigerator noise has been reduced over the years. contraction/expansion of the refrigerator ■ Sizzling/Gurgling - The ...
Use & Care Guide
Page 18
...maker turned on model) is normal. ■ Humid room? Allow 24 hours for your refrigerator. Off-taste, odor or gray color in 24 hours. Discard ice. In the U.S.A., visit our webpage www.whirlpool.com/accessories or call 1-800-807-6777. Clean gaskets and contact surfaces with soft cloth.... sulfur) in the water source line? See "Water Supply Requirements." Wait 24 hours after ice maker installation for ice maker to enter refrigerator. This can reduce water flow. A water filter may need to be installed to begin. Allow several hours for the surrounding conditions? There...
...maker turned on model) is normal. ■ Humid room? Allow 24 hours for your refrigerator. Off-taste, odor or gray color in 24 hours. Discard ice. In the U.S.A., visit our webpage www.whirlpool.com/accessories or call 1-800-807-6777. Clean gaskets and contact surfaces with soft cloth.... sulfur) in the water source line? See "Water Supply Requirements." Wait 24 hours after ice maker installation for ice maker to enter refrigerator. This can reduce water flow. A water filter may need to be installed to begin. Allow several hours for the surrounding conditions? There...


