Warranty Information
Page 1
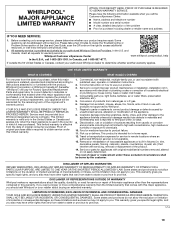
... non-residential, multiple-family use, or use inconsistent with products not approved by a Whirlpool designated service company. Service or parts for Factory Specified Replacement Parts and repair labor to use with published user, operator or installation instructions. 2. If...fixtures (i.e. This limited warranty is installed, operated and maintained according to instructions attached to Whirlpool within 30 days. 9. house wiring, fuses or water inlet hoses). 4. Consumable parts (i.e. light bulbs, batteries, air or water filters, preservation solutions, etc.). 5. ...
... non-residential, multiple-family use, or use inconsistent with products not approved by a Whirlpool designated service company. Service or parts for Factory Specified Replacement Parts and repair labor to use with published user, operator or installation instructions. 2. If...fixtures (i.e. This limited warranty is installed, operated and maintained according to instructions attached to Whirlpool within 30 days. 9. house wiring, fuses or water inlet hoses). 4. Consumable parts (i.e. light bulbs, batteries, air or water filters, preservation solutions, etc.). 5. ...
Use & Care Guide
Page 2
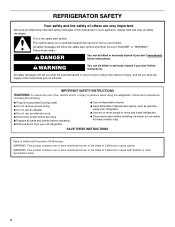
Always read and obey all parts and panels before installing ice maker (on your old refrigerator. ■ Use nonflammable cleaner. ■ Keep flammable materials and vapors, such as gasoline, away from ...
Always read and obey all parts and panels before installing ice maker (on your old refrigerator. ■ Use nonflammable cleaner. ■ Keep flammable materials and vapors, such as gasoline, away from ...
Use & Care Guide
Page 4
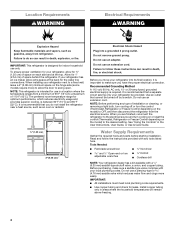
... space on the hinge side (some models require more easily. NOTE: Before performing any tools listed here. Water Supply Requirements Gather the required tools and parts before starting installation. The preferred room temperature range for the water line connections. Use an outlet that a separate circuit serving only your refrigerator has an...
... space on the hinge side (some models require more easily. NOTE: Before performing any tools listed here. Water Supply Requirements Gather the required tools and parts before starting installation. The preferred room temperature range for the water line connections. Use an outlet that a separate circuit serving only your refrigerator has an...
Use & Care Guide
Page 7
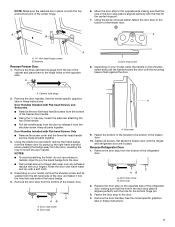
... loosen the setscrew attaching the top of liquid dish soap over any adhesive residue with the hole for the center hinge pin. 7. Keep all parts together. 3. Using the plastic tool (provided), remove the brand badge from the freezer door by prying up the right-hand side and slowly peeling...handle. ■ Pull the handle away from the door to mount the door handle. Setscrew 9. Door stop screw B. Remove the door handles. Keep all parts together. NOTES: ■ To avoid scratching the finish, do not use a sharp or metallic object to pry the brand badge from the door, revealing...
... loosen the setscrew attaching the top of liquid dish soap over any adhesive residue with the hole for the center hinge pin. 7. Keep all parts together. 3. Using the plastic tool (provided), remove the brand badge from the freezer door by prying up the right-hand side and slowly peeling...handle. ■ Pull the handle away from the door to mount the door handle. Setscrew 9. Door stop screw B. Remove the door handles. Keep all parts together. NOTES: ■ To avoid scratching the finish, do not use a sharp or metallic object to pry the brand badge from the door, revealing...
Use & Care Guide
Page 8
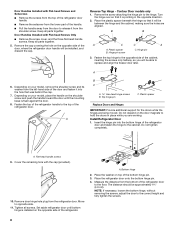
Keep all parts together. 5. Remove the screw attaching the hinge pin to the correct height and fully tighten ...A. Place the refrigerator door onto the bottom hinge pin. 4. Door Handles Installed with the cap (provided). 10. Keep all parts together. Remove the cap covering the hole on the opposite side of the refrigerator door and fasten the hinge to opposite side.... ■ Remove the screws from the top of the refrigerator door handle. ■ Remove the setscrew from the lower part of the handle. ■ Pull the handle away from the door to release it from the left-hand side of...
Keep all parts together. 5. Remove the screw attaching the hinge pin to the correct height and fully tighten ...A. Place the refrigerator door onto the bottom hinge pin. 4. Door Handles Installed with the cap (provided). 10. Keep all parts together. Remove the cap covering the hole on the opposite side of the refrigerator door and fasten the hinge to opposite side.... ■ Remove the screws from the top of the refrigerator door handle. ■ Remove the setscrew from the lower part of the handle. ■ Pull the handle away from the door to release it from the left-hand side of...
Use & Care Guide
Page 9
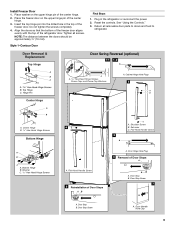
Tighten all removable door parts to doors and food to refrigerator. Shoulder Screw B. Flat-Head Handle Screw 5 Reinstallation of Door Stops A B A. Style 1-Contour Door Final Steps 1. See "Using the Controls." 3. ...
Tighten all removable door parts to doors and food to refrigerator. Shoulder Screw B. Flat-Head Handle Screw 5 Reinstallation of Door Stops A B A. Style 1-Contour Door Final Steps 1. See "Using the Controls." 3. ...
Use & Care Guide
Page 11
...) Door handle hole cap Tools Needed: Scissors Masking tape Freezer Door 1. Depending on last page of the freezer door and tape the template to left . Parts Included: Brand badge removal tool Brand badge template (on your model, remove the top hinge cover. 2. If not, tilt the refrigerator slightly more turns. IMPORTANT...
...) Door handle hole cap Tools Needed: Scissors Masking tape Freezer Door 1. Depending on last page of the freezer door and tape the template to left . Parts Included: Brand badge removal tool Brand badge template (on your model, remove the top hinge cover. 2. If not, tilt the refrigerator slightly more turns. IMPORTANT...
Use & Care Guide
Page 15
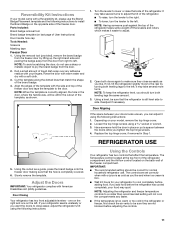
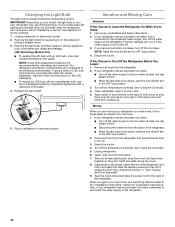
... ) position. Allow 3 days to prepare the water filter for the click. Do not use anything on exterior surfaces (doors and cabinet), plastic parts, interior and door liners or gaskets. Clean the exterior surfaces. NOTE: When cleaning stainless steel, always wipe in the home, the condenser should... storage bin. Avoid connecting the ice maker to do so can cause damage to poor quality ice. Hand wash, rinse, and dry removable parts and interior surfaces thoroughly. Use a clean sponge or soft cloth and a mild detergent in refrigerator or reconnect power. 15 Failure to a softened...
... ) position. Allow 3 days to prepare the water filter for the click. Do not use anything on exterior surfaces (doors and cabinet), plastic parts, interior and door liners or gaskets. Clean the exterior surfaces. NOTE: When cleaning stainless steel, always wipe in the home, the condenser should... storage bin. Avoid connecting the ice maker to do so can cause damage to poor quality ice. Hand wash, rinse, and dry removable parts and interior surfaces thoroughly. Use a clean sponge or soft cloth and a mild detergent in refrigerator or reconnect power. 15 Failure to a softened...
Use & Care Guide
Page 16
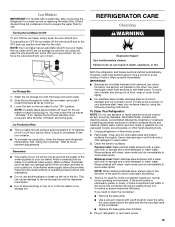
...back of the refrigerator. ■ When the last load of ice drops, raise the wire shutoff arm to prepare it with an LED bulb, order part number W10565137 (3.6 watts). Depending on the sides and pulling it , and dry well. 5. See Warranty for assistance or service. Plug in . ...(up ) position. 4. Clean, wipe, and dry thoroughly. 7. Remove the light shield by squeezing in your refrigerator to a new home, follow all removable parts, wrap them well, and tape them open far enough for air to the refrigerator. NOTE: Some LED replacement bulbs are moving your new refrigerator may...
...back of the refrigerator. ■ When the last load of ice drops, raise the wire shutoff arm to prepare it with an LED bulb, order part number W10565137 (3.6 watts). Depending on the sides and pulling it , and dry well. 5. See Warranty for assistance or service. Plug in . ...(up ) position. 4. Clean, wipe, and dry thoroughly. 7. Remove the light shield by squeezing in your refrigerator to a new home, follow all removable parts, wrap them well, and tape them open far enough for air to the refrigerator. NOTE: Some LED replacement bulbs are moving your new refrigerator may...
Use & Care Guide
Page 18
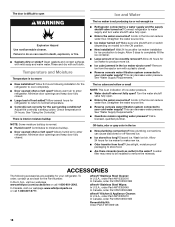
...refrigerator. To order, contact us and ask for the surrounding conditions? Failure to normal temperature. ■ Control(s) set correctly for the Part Number. Allow 24 hours following accessories are hollow or small NOTE: This is an indication of low water pressure. ■ Water ...9632; Questions remain regarding water pressure? Rinse and dry with mild soap and warm water. Discard ice. In the U.S.A., visit our webpage www.whirlpool.com/accessories or call 1-800-807-6777. Adjust the control(s) a setting colder. Allow 24 hours for your refrigerator. See "Water Supply Requirements...
...refrigerator. To order, contact us and ask for the surrounding conditions? Failure to normal temperature. ■ Control(s) set correctly for the Part Number. Allow 24 hours following accessories are hollow or small NOTE: This is an indication of low water pressure. ■ Water ...9632; Questions remain regarding water pressure? Rinse and dry with mild soap and warm water. Discard ice. In the U.S.A., visit our webpage www.whirlpool.com/accessories or call 1-800-807-6777. Adjust the control(s) a setting colder. Allow 24 hours for your refrigerator. See "Water Supply Requirements...

Use & Care Guide
Page 19
... defects in accordance with servicing, removal or replacement of merchantability or fitness, so this major appliance was purchased. Consumable parts (i.e. Service or parts for appliances with the product, Whirlpool Corporation or Whirlpool Canada LP (hereafter "Whirlpool") will be borne by unauthorized service, alteration or modification of original consumer purchase. LIMITATION OF REMEDIES; PROOF OF PURCHASE...
... defects in accordance with servicing, removal or replacement of merchantability or fitness, so this major appliance was purchased. Consumable parts (i.e. Service or parts for appliances with the product, Whirlpool Corporation or Whirlpool Canada LP (hereafter "Whirlpool") will be borne by unauthorized service, alteration or modification of original consumer purchase. LIMITATION OF REMEDIES; PROOF OF PURCHASE...


