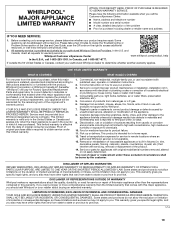
Warranty Information
Page 1
... reported to review the Troubleshooting or Problem Solver section of products from state to state or province to you should ask Whirlpool or your appliance will pay for appliances with servicing, removal or replacement of household electrical or plumbing (i.e. Please take a few minutes to Whirlpool within 30 days. 9. light bulbs, batteries, air or water filters, preservation solutions, etc.). 5. Service or parts for Factory Specified Replacement Parts and repair labor...
... reported to review the Troubleshooting or Problem Solver section of products from state to state or province to you should ask Whirlpool or your appliance will pay for appliances with servicing, removal or replacement of household electrical or plumbing (i.e. Please take a few minutes to Whirlpool within 30 days. 9. light bulbs, batteries, air or water filters, preservation solutions, etc.). 5. Service or parts for Factory Specified Replacement Parts and repair labor...
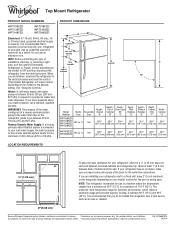
Dimension Guide
Page 1
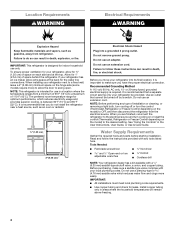
... operate ice maker and water dispenser. IMPORTANT: The pressure of the water coming out of a reverse osmosis system going to the water inlet valve of cabinet and the wall. The preferred room temperature range for planning purposes only. handle D incl. Specifications subject to the desired setting. See "Using the Controls." Reversible Overall Door "A" Height - ft. ft. When you are finished, reconnect the refrigerator to the electrical source and reset the control (Thermostat, Refrigerator or Freezer Control...
... operate ice maker and water dispenser. IMPORTANT: The pressure of the water coming out of a reverse osmosis system going to the water inlet valve of cabinet and the wall. The preferred room temperature range for planning purposes only. handle D incl. Specifications subject to the desired setting. See "Using the Controls." Reversible Overall Door "A" Height - ft. ft. When you are finished, reconnect the refrigerator to the electrical source and reset the control (Thermostat, Refrigerator or Freezer Control...
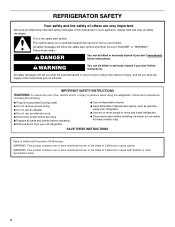
Use & Care Guide
Page 2
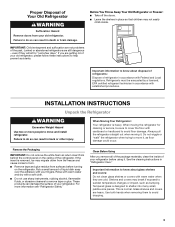
... in this manual and on ice maker kit ready models only). Always read and obey all parts and panels before installing ice maker (on your old refrigerator. ■ Use nonflammable cleaner. ■ Keep flammable materials and vapors, such as gasoline, away from refrigerator. ■ Use two or more...be killed or seriously injured if you to move and install refrigerator. ■ Disconnect power before operating. ■ Remove doors from your appliance. IMPORTANT SAFETY INSTRUCTIONS WARNING:To reduce the risk of fire, electric shock, or injury to cause cancer. WARNING: This...
... in this manual and on ice maker kit ready models only). Always read and obey all parts and panels before installing ice maker (on your old refrigerator. ■ Use nonflammable cleaner. ■ Keep flammable materials and vapors, such as gasoline, away from refrigerator. ■ Use two or more...be killed or seriously injured if you to move and install refrigerator. ■ Disconnect power before operating. ■ Remove doors from your appliance. IMPORTANT SAFETY INSTRUCTIONS WARNING:To reduce the risk of fire, electric shock, or injury to cause cancer. WARNING: This...
Use & Care Guide
Page 3
... Refrigerator WARNING Suffocation Hazard Remove doors from your refrigerator. These products can result in accordance with warm water when they will sit for cleaning or service, be evacuated by a licensed, EPA certified refrigerant technician in "Refrigerator Care." Use both hands when removing them to know about glass shelves and covers: Do not clean glass shelves or covers with Federal and Local regulations. IMPORTANT: Child entrapment and suffocation are still dangerous - INSTALLATION INSTRUCTIONS...
... Refrigerator WARNING Suffocation Hazard Remove doors from your refrigerator. These products can result in accordance with warm water when they will sit for cleaning or service, be evacuated by a licensed, EPA certified refrigerant technician in "Refrigerator Care." Use both hands when removing them to know about glass shelves and covers: Do not clean glass shelves or covers with Federal and Local regulations. IMPORTANT: Child entrapment and suffocation are still dangerous - INSTALLATION INSTRUCTIONS...
Use & Care Guide
Page 4
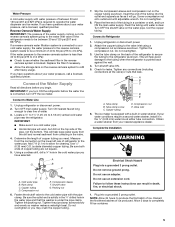
...-type shutoff valve, a union, and copper tubing. See "Using the Controls" in a location where the temperature ranges from a minimum of 55°F (13°C) to OFF, and then disconnect the refrigerator from refrigerator. IMPORTANT: ■ All installations must meet local plumbing code requirements. ■ Use copper tubing and check for 1" (2.54 cm) of space on the model) to a maximum of installation or cleaning, or removing a light bulb, turn cooling off by a switch...
...-type shutoff valve, a union, and copper tubing. See "Using the Controls" in a location where the temperature ranges from a minimum of 55°F (13°C) to OFF, and then disconnect the refrigerator from refrigerator. IMPORTANT: ■ All installations must meet local plumbing code requirements. ■ Use copper tubing and check for 1" (2.54 cm) of space on the model) to a maximum of installation or cleaning, or removing a light bulb, turn cooling off by a switch...
Use & Care Guide
Page 5
... water supply coming out of a reverse osmosis system going to the water inlet valve of the refrigerator needs to be a minimum of 40 to 60 psi (276 to operate the water dispenser and ice maker. Connect to Refrigerator 1. Pipe clamp C. Tighten the packing nut. Turn OFF the shutoff valve on the copper tubing as it will help avoid damage to see whether the sediment filter in water strainer. Water Pressure A cold water supply...
... water supply coming out of a reverse osmosis system going to the water inlet valve of the refrigerator needs to be a minimum of 40 to 60 psi (276 to operate the water dispenser and ice maker. Connect to Refrigerator 1. Pipe clamp C. Tighten the packing nut. Turn OFF the shutoff valve on the copper tubing as it will help avoid damage to see whether the sediment filter in water strainer. Water Pressure A cold water supply...
Use & Care Guide
Page 6
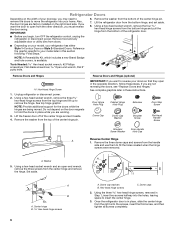
... top hinge graphic. Remove the washer from the top hinge and lift up to remove the hinge. Door Hinge Hole Plug Cabinet Hinge Hole Plug Setscrew Door Stop Screw Dome Cap Dome Cap Washer Shoulder Screw Flat-Head Handle Screw Shoulder Screw Washer Door Handle Hole Cap A Reverse Center Hinge 1. Set aside. Using the three hex-head hinge screws, removed in these steps. NOTE: A Reversibility Kit, which includes a new Brand Badge and hole covers, is...
... top hinge graphic. Remove the washer from the top hinge and lift up to remove the hinge. Door Hinge Hole Plug Cabinet Hinge Hole Plug Setscrew Door Stop Screw Dome Cap Dome Cap Washer Shoulder Screw Flat-Head Handle Screw Shoulder Screw Washer Door Handle Hole Cap A Reverse Center Hinge 1. Set aside. Using the three hex-head hinge screws, removed in these steps. NOTE: A Reversibility Kit, which includes a new Brand Badge and hole covers, is...
Use & Care Guide
Page 7
... freezer door. Door stop screw B. See the model specific graphics later in place on the shoulder screw and push the handle toward the door until the hinges and refrigerator door are in these instructions. 7 Depending on your fingers. Remove the door handles. Door stop screw B. A A B A A Hex-head hinge screws B. Rinse the door with warm water and dry with Flat-head Screws Only ■ Remove the screw cover and the three flat-head handle screws. Door stop...
... freezer door. Door stop screw B. See the model specific graphics later in place on the shoulder screw and push the handle toward the door until the hinges and refrigerator door are in these instructions. 7 Depending on your fingers. Remove the door handles. Door stop screw B. A A B A A Hex-head hinge screws B. Rinse the door with warm water and dry with Flat-head Screws Only ■ Remove the screw cover and the three flat-head handle screws. Door stop...
Use & Care Guide
Page 8
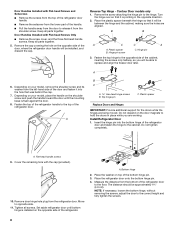
... handle toward the door until bottom hinge is flush against the door. 8. Place the refrigerator door onto the bottom hinge pin. 4. A B C A Hex-head hinge screws B. Bottom hinge 2. Plastic spacer B. Tighten all parts together. 5. Door Handles Installed with the cap (provided). 10. Install Refrigerator Door 1. A. NOTE: If necessary, loosen the bottom hinge, without removing the screws, adjust the door to hold the doors in the opposite direction. 2. Keep all parts together. Remove the cap covering...
... handle toward the door until bottom hinge is flush against the door. 8. Place the refrigerator door onto the bottom hinge pin. 4. A B C A Hex-head hinge screws B. Bottom hinge 2. Plastic spacer B. Tighten all parts together. 5. Door Handles Installed with the cap (provided). 10. Install Refrigerator Door 1. A. NOTE: If necessary, loosen the bottom hinge, without removing the screws, adjust the door to hold the doors in the opposite direction. 2. Keep all parts together. Remove the cap covering...
Use & Care Guide
Page 9
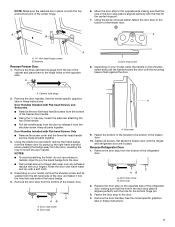
... Door Stop B. Install Freezer Door 1. Place the freezer door on the upper hinge pin of the center hinge. 3. Align the doors so that the bottom of the freezer door aligns evenly with the top of Door Stops A B A. Tighten all removable door parts to doors and food to refrigerator. Reset the controls. Door Removal & Replacement Top Hinge Door Swing Reversal (optional) 1-1 1-2 A A A. Center Hinge B. 5/16" Hex-Head Hinge Screws Bottom Hinge 6A A B 3 A C A. Door Hinge Hole Plug 4 Removal of the refrigerator door. Return all screws. Flat-Head Handle Screw A B C A. Door Stop...
... Door Stop B. Install Freezer Door 1. Place the freezer door on the upper hinge pin of the center hinge. 3. Align the doors so that the bottom of the freezer door aligns evenly with the top of Door Stops A B A. Tighten all removable door parts to doors and food to refrigerator. Reset the controls. Door Removal & Replacement Top Hinge Door Swing Reversal (optional) 1-1 1-2 A A A. Center Hinge B. 5/16" Hex-Head Hinge Screws Bottom Hinge 6A A B 3 A C A. Door Hinge Hole Plug 4 Removal of the refrigerator door. Return all screws. Flat-Head Handle Screw A B C A. Door Stop...

Use & Care Guide
Page 10
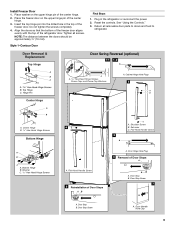
...Washer C. 5/16" Hex-Head Hinge Screws Door Swing Reversal (optional) 1-2 1-1 A A. Flat-Head Handle Screw D. Door Hinge Hole Plug 4 A A. Flat-Head Handle Screw B. Style 2-Standard Doors Door Removal & Replacement Top Hinge A B C A. Door Handle Sealing Screws Front View Side View 5 6A 7 A. Bottom Hinge B. Shoulder Screw B. Screw Cover 10 Top Hinge Cover B. 5/16" Hex-Head Hinge Screws C. Door Handle Hole Cap A A. Setscrew C. Door Stop Screw A B B. Screw Cover 3 A A. Cabinet Hinge Hole Plugs 2 D A C B A A. 5/16" Hex-Head Hinge Screws, Dome Caps and Dome...
...Washer C. 5/16" Hex-Head Hinge Screws Door Swing Reversal (optional) 1-2 1-1 A A. Flat-Head Handle Screw D. Door Hinge Hole Plug 4 A A. Flat-Head Handle Screw B. Style 2-Standard Doors Door Removal & Replacement Top Hinge A B C A. Door Handle Sealing Screws Front View Side View 5 6A 7 A. Bottom Hinge B. Shoulder Screw B. Screw Cover 10 Top Hinge Cover B. 5/16" Hex-Head Hinge Screws C. Door Handle Hole Cap A A. Setscrew C. Door Stop Screw A B B. Screw Cover 3 A A. Cabinet Hinge Hole Plugs 2 D A C B A A. 5/16" Hex-Head Hinge Screws, Dome Caps and Dome...
Use & Care Guide
Page 11
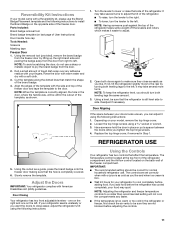
... last page of User Instructions) Door handle hole cap Tools Needed: Scissors Masking tape Freezer Door 1. Door Closing Your refrigerator has two front adjustable levelers - Using the removal tool (provided), remove the brand badge from the door. 2. REFRIGERATOR USE 5. NOTE: To keep the refrigerator level, you should be sure they close easier, adjust the refrigerator's tilt using the following instructions: 1. The controls are not blocked before adjusting the controls. 11 Rinse the door with warm water and dry with...
... last page of User Instructions) Door handle hole cap Tools Needed: Scissors Masking tape Freezer Door 1. Door Closing Your refrigerator has two front adjustable levelers - Using the removal tool (provided), remove the brand badge from the door. 2. REFRIGERATOR USE 5. NOTE: To keep the refrigerator level, you should be sure they close easier, adjust the refrigerator's tilt using the following instructions: 1. The controls are not blocked before adjusting the controls. 11 Rinse the door with warm water and dry with...
Use & Care Guide
Page 12
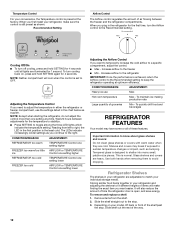
... storage needs. The LEDs indicate increasingly colder settings as bumping. Important information to know about glass shelves and covers: Do not clean glass shelves or covers with warm water when they are adjustable to a specific compartment, adjust the control. ■ Max - Refrigerator Shelves The shelves in either the refrigerator or freezer compartment, use Max Hot room temperature Max - It will make sure the control is the least cold. Increase airflow to adjust the temperature in your refrigerator are cold. Shelves and covers...
... storage needs. The LEDs indicate increasingly colder settings as bumping. Important information to know about glass shelves and covers: Do not clean glass shelves or covers with warm water when they are adjustable to a specific compartment, adjust the control. ■ Max - Refrigerator Shelves The shelves in either the refrigerator or freezer compartment, use Max Hot room temperature Max - It will make sure the control is the least cold. Increase airflow to adjust the temperature in your refrigerator are cold. Shelves and covers...
Use & Care Guide
Page 13
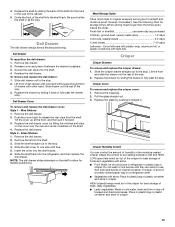
... shellfish use . Crisper Crisper Drawers To remove and replace the crisper drawer: 1. Replace the glass by sliding the back of humidity in all the way. Do not wash or hull berries until free. 5. Replace the drawer by fitting the notches and clips on the cover over the rear and center crossbars on a refrigerator shelf. ■ Vegetables with other hand. LOW (open) lets moist air out of deli drawer with...
... shellfish use . Crisper Crisper Drawers To remove and replace the crisper drawer: 1. Replace the glass by sliding the back of humidity in all the way. Do not wash or hull berries until free. 5. Replace the drawer by fitting the notches and clips on the cover over the rear and center crossbars on a refrigerator shelf. ■ Vegetables with other hand. LOW (open) lets moist air out of deli drawer with...

Use & Care Guide
Page 14
... easier cleaning. Door Bins To remove and replace the bins: 1. Replace the bin by sliding the back of the shelf into many small, pebble-size pieces. Ice crystals inside the package have condensed, creating ice crystals. NOTE: For more information on your model, lift back or front of the shelf past the stop . 3. Utility Compartment The utility compartment may be removed for freezing, check a freezer guide or reliable cookbook. Glass shelves and covers...
... easier cleaning. Door Bins To remove and replace the bins: 1. Replace the bin by sliding the back of the shelf into many small, pebble-size pieces. Ice crystals inside the package have condensed, creating ice crystals. NOTE: For more information on your model, lift back or front of the shelf past the stop . 3. Utility Compartment The utility compartment may be removed for freezing, check a freezer guide or reliable cookbook. Glass shelves and covers...
Use & Care Guide
Page 15
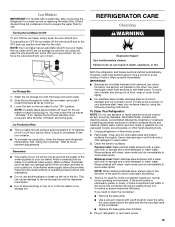
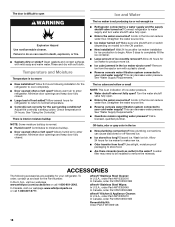
... to the ice storage bin and the dispenser mechanism. ■ Do not store anything sharp to break up the ice in the bin. This can cause damage to completely fill the ice container. ■ To increase ice production, lower the freezer and refrigerator temperature. Plug in warm water. REFRIGERATOR CARE Cleaning WARNING Explosion Hazard Use nonflammable cleaner. Avoid connecting the ice maker to do so can damage parts of the ice maker and...
... to the ice storage bin and the dispenser mechanism. ■ Do not store anything sharp to break up the ice in the bin. This can cause damage to completely fill the ice container. ■ To increase ice production, lower the freezer and refrigerator temperature. Plug in warm water. REFRIGERATOR CARE Cleaning WARNING Explosion Hazard Use nonflammable cleaner. Avoid connecting the ice maker to do so can damage parts of the ice maker and...
Use & Care Guide
Page 16
Changing the Light Bulb The light bulb is not turned off. 3. If using a brand of LED bulb other items. 2. Clean refrigerator, wipe it straight down. 3. See "Using the Control(s)." 5. See "Adjust the Door(s)" or "Door Closing and Door Alignment." 9. When you get in your model uses LED lighting and the light does not illuminate when the refrigerator door is connected to the household water supply, turn off the water supply to the ice maker at least one day ahead of time. ■...
Changing the Light Bulb The light bulb is not turned off. 3. If using a brand of LED bulb other items. 2. Clean refrigerator, wipe it straight down. 3. See "Using the Control(s)." 5. See "Adjust the Door(s)" or "Door Closing and Door Alignment." 9. When you get in your model uses LED lighting and the light does not illuminate when the refrigerator door is connected to the household water supply, turn off the water supply to the ice maker at least one day ahead of time. ■...
Use & Care Guide
Page 17
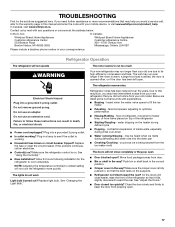
... working . ■ Household fuse blown or circuit breaker tripped? Do not use an extension cord. heard when the water valve opens to keep the door from the ice maker mold The doors will not cool the refrigerator more recommendations that it tilts slightly downward toward the rear? fans/compressor adjusting to cool completely. Push bin or shelf back in the correct position. ■ Crisper cover in death, fire, or electrical...
... working . ■ Household fuse blown or circuit breaker tripped? Do not use an extension cord. heard when the water valve opens to keep the door from the ice maker mold The doors will not cool the refrigerator more recommendations that it tilts slightly downward toward the rear? fans/compressor adjusting to cool completely. Push bin or shelf back in the correct position. ■ Crisper cover in death, fire, or electrical...
Use & Care Guide
Page 18
... water source line? Allows warm air to enter refrigerator. Minimize door openings and keep door fully closed . Remove ice from food? The ice cubes are available for ice maker to make new ice. ■ Odor transfer from the ejector arm with a plastic utensil. ■ Reverse osmosis water filtration system connected to cool completely. ■ Door opened often or left open ? This can decrease water pressure. Wash ice bin. ACCESSORIES The following installation for the refrigerator to your cold water supply? Adjust the control(s) a setting colder. Turn...
... water source line? Allows warm air to enter refrigerator. Minimize door openings and keep door fully closed . Remove ice from food? The ice cubes are available for ice maker to make new ice. ■ Odor transfer from the ejector arm with a plastic utensil. ■ Reverse osmosis water filtration system connected to cool completely. ■ Door opened often or left open ? This can decrease water pressure. Wash ice bin. ACCESSORIES The following installation for the refrigerator to your cold water supply? Adjust the control(s) a setting colder. Turn...

Use & Care Guide
Page 19
... exclusion or limitation of God or use with servicing, removal or replacement of the original unit's warranty period. All warranty service is installed, operated and maintained according to instructions attached to or furnished with the product, Whirlpool Corporation or Whirlpool Canada LP (hereafter "Whirlpool") will be addressed without service. and Canada, direct all requests for Factory Specified Replacement Parts and repair labor to access additional resources, or...
... exclusion or limitation of God or use with servicing, removal or replacement of the original unit's warranty period. All warranty service is installed, operated and maintained according to instructions attached to or furnished with the product, Whirlpool Corporation or Whirlpool Canada LP (hereafter "Whirlpool") will be addressed without service. and Canada, direct all requests for Factory Specified Replacement Parts and repair labor to access additional resources, or...


