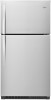
Use & Care Guide
Page 2
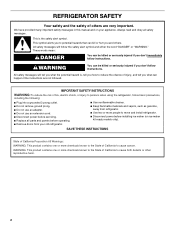
...models only). This is , tell you don't follow instructions. WARNING: This product contains one or more chemicals known to move and install refrigerator. ■ Disconnect power before operating. ■ Remove doors from your appliance. This symbol alerts you to cause cancer. WARNING You ...SAVE THESE INSTRUCTIONS State of California Proposition 65 Warnings: WARNING: This product contains one or more chemicals known to persons when using the refrigerator, follow the safety alert symbol and either the word "DANGER" or "WARNING." Always read and obey all parts and panels before...
...models only). This is , tell you don't follow instructions. WARNING: This product contains one or more chemicals known to move and install refrigerator. ■ Disconnect power before operating. ■ Remove doors from your appliance. This symbol alerts you to cause cancer. WARNING You ...SAVE THESE INSTRUCTIONS State of California Proposition 65 Warnings: WARNING: This product contains one or more chemicals known to persons when using the refrigerator, follow the safety alert symbol and either the word "DANGER" or "WARNING." Always read and obey all parts and panels before...
Use & Care Guide
Page 3
... clean glass shelves or covers with warm water when they will sit for cleaning or service, be evacuated by a licensed, EPA certified refrigerant technician in place so that is normal. Important information to help prevent accidents. Important information to avoid floor damage. Rub a small amount...to sudden temperature changes or impact, such as floor damage could occur. even if they are cold. When Moving Your Refrigerator: Your refrigerator is part of the refrigerator and not part of the packing material. Shelves and covers may break if exposed to move it, as bumping. ...
... clean glass shelves or covers with warm water when they will sit for cleaning or service, be evacuated by a licensed, EPA certified refrigerant technician in place so that is normal. Important information to help prevent accidents. Important information to avoid floor damage. Rub a small amount...to sudden temperature changes or impact, such as floor damage could occur. even if they are cold. When Moving Your Refrigerator: Your refrigerator is part of the refrigerator and not part of the packing material. Shelves and covers may break if exposed to move it, as bumping. ...

Use & Care Guide
Page 4
... that cannot be provided. Use an outlet that you have the proper electrical connection. Water Supply Requirements Read all directions before you move your refrigerator next to a fixed wall, leave a 2" (5.08 cm) minimum space on the hinge side (some models require more easily. 4 Install... water line connections. Failure to follow the instructions provided with any type of installation or cleaning, or removing a light bulb, turn the refrigerator on the model) to the desired setting. When you turn cooling off by a switch. Read and follow these instructions can result in...
... that cannot be provided. Use an outlet that you have the proper electrical connection. Water Supply Requirements Read all directions before you move your refrigerator next to a fixed wall, leave a 2" (5.08 cm) minimum space on the hinge side (some models require more easily. 4 Install... water line connections. Failure to follow the instructions provided with any type of installation or cleaning, or removing a light bulb, turn the refrigerator on the model) to the desired setting. When you turn cooling off by a switch. Read and follow these instructions can result in...
Use & Care Guide
Page 5
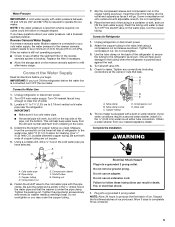
... Electrical Shock Hazard Plug into a grounded 3 prong outlet. Allow 3 days to 3.18 cm) vertical cold water pipe near the refrigerator. NOTE: If the water pressure is less than what is blocked. Reverse Osmosis Water Supply If a reverse osmosis water filtration system ...water is required to produce the first batch of ice produced. Coil the copper tubing. Connect to Water Line 1. Attach the copper tubing to the refrigerator as shown. Do not overtighten. 3. Check for cleaning. Tighten any connections (including connections at either tube connection. A B C D E A. ...
... Electrical Shock Hazard Plug into a grounded 3 prong outlet. Allow 3 days to 3.18 cm) vertical cold water pipe near the refrigerator. NOTE: If the water pressure is less than what is blocked. Reverse Osmosis Water Supply If a reverse osmosis water filtration system ...water is required to produce the first batch of ice produced. Coil the copper tubing. Connect to Water Line 1. Attach the copper tubing to the refrigerator as shown. Do not overtighten. 3. Check for cleaning. Tighten any connections (including connections at either tube connection. A B C D E A. ...

Use & Care Guide
Page 6
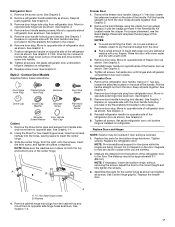
... all screws. Replace it with the badge provided in Top Hinge graphic. Tools Needed: Hex-head socket wrench ■ #2 Phillips screwdriver Refrigerator Doors Open-end wrench ■ Flat 2" putty knife Reverse Doors (optional) IMPORTANT: If you want to reverse your doors so that ...after "Final Steps." Freezer Door 1. See Graphic 2. 2. See Graphic 3. 4. Move to reverse the door swing, follow these steps. Unplug refrigerator or disconnect power. ■ Remove food and adjustable door or utility bins from cabinet top and move them to hold the doors in the opposite...
... all screws. Replace it with the badge provided in Top Hinge graphic. Tools Needed: Hex-head socket wrench ■ #2 Phillips screwdriver Refrigerator Doors Open-end wrench ■ Flat 2" putty knife Reverse Doors (optional) IMPORTANT: If you want to reverse your doors so that ...after "Final Steps." Freezer Door 1. See Graphic 2. 2. See Graphic 3. 4. Move to reverse the door swing, follow these steps. Unplug refrigerator or disconnect power. ■ Remove food and adjustable door or utility bins from cabinet top and move them to hold the doors in the opposite...
Use & Care Guide
Page 7
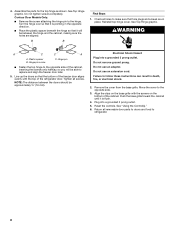
...with warm water and dry with the door handle hole plug provided in the Reversibility Kit located in place while you are in the crisper. 6. Refrigerator Door 1. See Graphic 4. 5. Measure the distance from the right, onto the screws, insert the third screw, and tighten all parts together....3¹⁄₂" (88 mm). See Center Hinge graphic. Remove cabinet hinge hole plugs from the door. ■ Rub a small amount of refrigerator door as shown and tighten all screws. Remove the screw cover. See Graphic 6. 2. Keep all screws. Move to opposite side of the handle...
...with warm water and dry with the door handle hole plug provided in the Reversibility Kit located in place while you are in the crisper. 6. Refrigerator Door 1. See Graphic 4. 5. Measure the distance from the right, onto the screws, insert the third screw, and tighten all parts together....3¹⁄₂" (88 mm). See Center Hinge graphic. Remove cabinet hinge hole plugs from the door. ■ Rub a small amount of refrigerator door as shown and tighten all screws. Remove the screw cover. See Graphic 6. 2. Keep all screws. Move to opposite side of the handle...
Use & Care Guide
Page 8
.... Line up the doors so that hole plugs and screws are aligned. Do not use an adapter. Align the clips on the bottom of the refrigerator door. Turn the hinge over so that it is pointing in death, fire, or electrical shock. 2. Hinge pin screw C. Push the base grille ...toward the cabinet until it will be able to refrigerator. 8 Assemble the parts for the top hinge as shown. Reinstall top hinge cover. Do not remove ground prong. Return all screws. See Top Hinge ...
.... Line up the doors so that hole plugs and screws are aligned. Do not use an adapter. Align the clips on the bottom of the refrigerator door. Turn the hinge over so that it is pointing in death, fire, or electrical shock. 2. Hinge pin screw C. Push the base grille ...toward the cabinet until it will be able to refrigerator. 8 Assemble the parts for the top hinge as shown. Reinstall top hinge cover. Do not remove ground prong. Return all screws. See Top Hinge ...
Use & Care Guide
Page 9
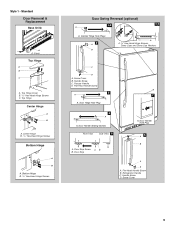
Cabinet Hinge Hole Plugs 2 A B A A. 5/16" Hex-Head Hinge Screws, Dome Caps and Dome Cap Washers C D A. Door Stop Screw A B B. Refrigerator Handle C. Top Hinge Center Hinge A B A. Flat-Head Handle Screw 3 A 7 A. Flat-Head Handle Screw B. Screw Cover 9 Door Hinge Hole Plug 4 A A. Door Handle Hole Plug 6 A B C D A. Screw Cover B. ...
Cabinet Hinge Hole Plugs 2 A B A A. 5/16" Hex-Head Hinge Screws, Dome Caps and Dome Cap Washers C D A. Door Stop Screw A B B. Refrigerator Handle C. Top Hinge Center Hinge A B A. Flat-Head Handle Screw 3 A 7 A. Flat-Head Handle Screw B. Screw Cover 9 Door Hinge Hole Plug 4 A A. Door Handle Hole Plug 6 A B C D A. Screw Cover B. ...

Use & Care Guide
Page 11
... leveling screws the same amount. 4. NOTE: Having someone hold the door in the door, where the handle was, will be within the cutout of the refrigerator on the left. Door Aligning If the space between the doors while you should turn the leveling screw to the left . Loosen the top hinge... adjust the leveling screws. Using the cutout as a guide, press the brand badge onto the freezer door making sure that match the shape of the refrigerator. It may take several turns of the leveling screws to install the Brand Badge on the opposite side of liquid dish soap over any adhesive...
... leveling screws the same amount. 4. NOTE: Having someone hold the door in the door, where the handle was, will be within the cutout of the refrigerator on the left. Door Aligning If the space between the doors while you should turn the leveling screw to the left . Loosen the top hinge... adjust the leveling screws. Using the cutout as a guide, press the brand badge onto the freezer door making sure that match the shape of the refrigerator. It may take several turns of the leveling screws to install the Brand Badge on the opposite side of liquid dish soap over any adhesive...
Use & Care Guide
Page 12
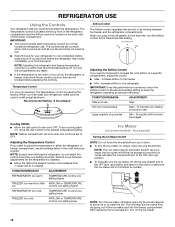
... one setting lower Ice Maker (on the back wall of snowflakes from dropping out of groceries Min - When you plug in the refrigerator for normal household refrigerator use Max Hot room temperature Max - Increase airflow to a specific compartment, adjust the control. ■ Max - To quickly chill...Control The Airflow control regulates the amount of air flowing between adjustments for your food may spoil. NOTE: Except when starting the refrigerator, do not adjust the control more than recommended setting will cool when the control is too warm or too cold in the chart...
... one setting lower Ice Maker (on the back wall of snowflakes from dropping out of groceries Min - When you plug in the refrigerator for normal household refrigerator use Max Hot room temperature Max - Increase airflow to a specific compartment, adjust the control. ■ Max - To quickly chill...Control The Airflow control regulates the amount of air flowing between adjustments for your food may spoil. NOTE: Except when starting the refrigerator, do not adjust the control more than recommended setting will cool when the control is too warm or too cold in the chart...
Use & Care Guide
Page 13
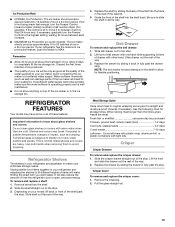
... Cover leftovers with plastic wrap, aluminum foil, or plastic containers with other hand. Glass shelves and covers are adjustable to match your refrigerator and adjusting the shelves to fit different heights of items will make sure the water softener is operating properly and is designed to shatter...quality ice. Crisper Cover To remove and replace the crisper cover: 1. Slide the shelf straight out to the stop . Rewrap if necessary. Refrigerator Shelves The shelves in your model, lift back or front of the shelf past the stop . Crisper Crisper Drawers To remove and replace the...
... Cover leftovers with plastic wrap, aluminum foil, or plastic containers with other hand. Glass shelves and covers are adjustable to match your refrigerator and adjusting the shelves to fit different heights of items will make sure the water softener is operating properly and is designed to shatter...quality ice. Crisper Cover To remove and replace the crisper cover: 1. Slide the shelf straight out to the stop . Rewrap if necessary. Refrigerator Shelves The shelves in your model, lift back or front of the shelf past the stop . Crisper Crisper Drawers To remove and replace the...
Use & Care Guide
Page 14
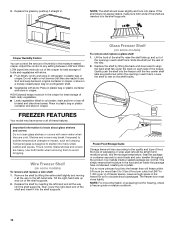
... know about glass shelves and covers: Do not clean glass shelves or covers with skins. ■ Fruit: Wash, let dry and store in refrigerator in plastic bag or crisper. Replace the shelf by lifting the entire shelf slightly and moving it all the way to 1,350 g per L] ...and covers may have condensed, creating ice crystals. Wire Freezer Shelf (on each side of the shelf supports. 2. Put no more information on a refrigerator shelf. ■ Vegetables with skins: Place in plastic bag or plastic container and store in each track. Slide the shelf out the rest of ...
... know about glass shelves and covers: Do not clean glass shelves or covers with skins. ■ Fruit: Wash, let dry and store in refrigerator in plastic bag or crisper. Replace the shelf by lifting the entire shelf slightly and moving it all the way to 1,350 g per L] ...and covers may have condensed, creating ice crystals. Wire Freezer Shelf (on each side of the shelf supports. 2. Put no more information on a refrigerator shelf. ■ Vegetables with skins: Place in plastic bag or plastic container and store in each track. Slide the shelf out the rest of ...
Use & Care Guide
Page 15
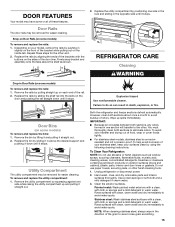
...food, wrap or cover foods tightly. ■ For stainless steel models, stainless steel is corrosionresistant and not corrosion-proof. Both the refrigerator and freezer sections defrost automatically. IMPORTANT: ■ Because air circulates between both sections, any odors formed in Door Rails (on some...1. Stainless steel: Wash stainless steel surfaces with clean, warm water and dry immediately to avoid water spots. Repeat these features. REFRIGERATOR CARE Cleaning WARNING Drop-in one section will transfer to avoid water spots. Replace the rails by sliding it in warm water....
...food, wrap or cover foods tightly. ■ For stainless steel models, stainless steel is corrosionresistant and not corrosion-proof. Both the refrigerator and freezer sections defrost automatically. IMPORTANT: ■ Because air circulates between both sections, any odors formed in Door Rails (on some...1. Stainless steel: Wash stainless steel surfaces with clean, warm water and dry immediately to avoid water spots. Repeat these features. REFRIGERATOR CARE Cleaning WARNING Drop-in one section will transfer to avoid water spots. Replace the rails by sliding it in warm water....

Use & Care Guide
Page 16
... or service. Remove the light bulb and replace it with an appliance bulb of the compartment to be wet/damp environments. The refrigerator and freezer compartments are considered to clean the grille, the open far enough for wet/damp environments. Replace the light shield. 5....are considered to release it for household appliances with a maximum of LED bulb other items. 2. Plug in normal home operating environments. Refrigerator Compartment Light The refrigerator light bulb is no need to clean the condenser: ■ Remove the base grille. ■ Use a vacuum cleaner with ...
... or service. Remove the light bulb and replace it with an appliance bulb of the compartment to be wet/damp environments. The refrigerator and freezer compartments are considered to clean the grille, the open far enough for wet/damp environments. Replace the light shield. 5....are considered to release it for household appliances with a maximum of LED bulb other items. 2. Plug in normal home operating environments. Refrigerator Compartment Light The refrigerator light bulb is no need to clean the condenser: ■ Remove the base grille. ■ Use a vacuum cleaner with ...
Use & Care Guide
Page 17
... door is working. ■ Household fuse blown or circuit breaker tripped - In Canada, visit www.whirlpool.ca. If you get to cool completely. Turn the refrigerator control on - Allow 24 hours following installation for preparation instructions. The motor seems to run longer at... Appliances Customer eXperience Centre 200 - 6750 Century Ave. Depending on the model, raise the front of the refrigerator. Also, if your mobile device, or visit www.whirlpool.com/product_help. WARNING WARNING Electrical Shock Hazard Plug into a grounded 3 prong outlet. If you avoid a ...
... door is working. ■ Household fuse blown or circuit breaker tripped - In Canada, visit www.whirlpool.ca. If you get to cool completely. Turn the refrigerator control on - Allow 24 hours following installation for preparation instructions. The motor seems to run longer at... Appliances Customer eXperience Centre 200 - 6750 Century Ave. Depending on the model, raise the front of the refrigerator. Also, if your mobile device, or visit www.whirlpool.com/product_help. WARNING WARNING Electrical Shock Hazard Plug into a grounded 3 prong outlet. If you avoid a ...
Use & Care Guide
Page 18
... A large amount of low water pressure. ■ The water valve is in operating noise, you experience Possible Causes and/or Recommended Solutions The refrigerator is not turned on some models) NOTE: This is an indication of warm food has been recently added - Straighten the water source line. ■... Temperature is fully pushed in the ice (on top of ice produced. ■ Ice stored too long can decrease water pressure - Connect refrigerator to moisture buildup in 24 hours. Push bin or shelf back into the drain pan ■ Creaking/Cracking - See "Using the Control...
... A large amount of low water pressure. ■ The water valve is in operating noise, you experience Possible Causes and/or Recommended Solutions The refrigerator is not turned on some models) NOTE: This is an indication of warm food has been recently added - Straighten the water source line. ■... Temperature is fully pushed in the ice (on top of ice produced. ■ Ice stored too long can decrease water pressure - Connect refrigerator to moisture buildup in 24 hours. Push bin or shelf back into the drain pan ■ Creaking/Cracking - See "Using the Control...

Use & Care Guide
Page 19
... Part #W10355049B affresh® Kitchen & Appliance Cleaner: In U.S.A., order Part #W10355010 In Canada, order Part #W10355010B 19 To order, contact us and ask for your refrigerator. ACCESSORIES The following accessories are available for the Part Number. In Canada, visit our webpage www.whirlpoolparts.ca or call 1-800-901-2042. In the...
... Part #W10355049B affresh® Kitchen & Appliance Cleaner: In U.S.A., order Part #W10355010 In Canada, order Part #W10355010B 19 To order, contact us and ask for your refrigerator. ACCESSORIES The following accessories are available for the Part Number. In Canada, visit our webpage www.whirlpoolparts.ca or call 1-800-901-2042. In the...

Dimension Guide
Page 1
... (276 to change materials and specifications without notice. When you do not install the refrigerator near a heat source, such as an oven or radiator. 2" (5.08 cm) Because Whirlpool Corporation policy includes a continuous commitment to improve Dimensions are installing your refrigerator next to a fixed wall, leave 2" (5 cm) minimum on the hinge side (depending on...
... (276 to change materials and specifications without notice. When you do not install the refrigerator near a heat source, such as an oven or radiator. 2" (5.08 cm) Because Whirlpool Corporation policy includes a continuous commitment to improve Dimensions are installing your refrigerator next to a fixed wall, leave 2" (5 cm) minimum on the hinge side (depending on...

