Use & Care Guide
Page 2
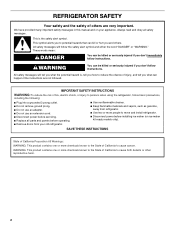
... be killed or seriously injured if you don't follow instructions. All safety messages will follow instructions. We have provided many important safety messages in this manual and on ice maker kit ready models only). Always read and obey all parts and panels before operating. ■ Remove doors from your old refrigerator...
... be killed or seriously injured if you don't follow instructions. All safety messages will follow instructions. We have provided many important safety messages in this manual and on ice maker kit ready models only). Always read and obey all parts and panels before operating. ■ Remove doors from your old refrigerator...

Use & Care Guide
Page 6
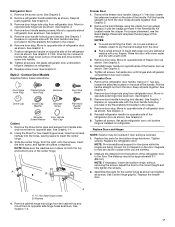
... shown. Keep all screws. Move to opposite side hinge hole as shown. Position freezer handle on the door magnets to hold the doors in this manual). Close the refrigerator door and keep both doors closed until hinges and refrigerator compartment door are working. 3. Remove the three dome caps and the screws...
... shown. Keep all screws. Move to opposite side hinge hole as shown. Position freezer handle on the door magnets to hold the doors in this manual). Close the refrigerator door and keep both doors closed until hinges and refrigerator compartment door are working. 3. Remove the three dome caps and the screws...
Use & Care Guide
Page 7
.... 1. Slide the center hinge, from handle side and move them to opposite side hinge hole as shown. Washers 4. Refrigerator Door 1. Align lower portion of this manual). See Graphic 1-1. 2. Remove the brand badge using the plastic tool (provided). Replace Doors and Hinges NOTE: Graphic may be approximately 3¹⁄₂" (88 mm...
.... 1. Slide the center hinge, from handle side and move them to opposite side hinge hole as shown. Washers 4. Refrigerator Door 1. Align lower portion of this manual). See Graphic 1-1. 2. Remove the brand badge using the plastic tool (provided). Replace Doors and Hinges NOTE: Graphic may be approximately 3¹⁄₂" (88 mm...
Use & Care Guide
Page 12
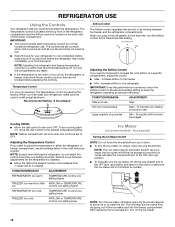
... shutoff arm. Increase airflow to clean the bin. NOTE: Neither compartment will raise the wire shutoff arm to the OFF (arm up) position. ■ To manually turn on the back wall of groceries Min - Wait 24 hours between the freezer and the refrigerator compartments. Recommended Setting "3 Snowflakes" Airflow Control The Airflow...
... shutoff arm. Increase airflow to clean the bin. NOTE: Neither compartment will raise the wire shutoff arm to the OFF (arm up) position. ■ To manually turn on the back wall of groceries Min - Wait 24 hours between the freezer and the refrigerator compartments. Recommended Setting "3 Snowflakes" Airflow Control The Airflow...
Use & Care Guide
Page 17
...old one. If you need further assistance or more energy efficient speeds. Mississauga, Ontario L5N 0B7 Please include a daytime phone number in this manual and scan the code with any questions or concerns at lower, more recommendations that may help you avoid a service call, refer to an...refrigerator more easily OR raise the leveling screws so they don't scrape the floor. In Canada, visit www.whirlpool.ca. If you get to your mobile device, or visit www.whirlpool.com/product_help. Also, if your correspondence. Your refrigerator may run longer at the address below: In the ...
...old one. If you need further assistance or more energy efficient speeds. Mississauga, Ontario L5N 0B7 Please include a daytime phone number in this manual and scan the code with any questions or concerns at lower, more recommendations that may help you avoid a service call, refer to an...refrigerator more easily OR raise the leveling screws so they don't scrape the floor. In Canada, visit www.whirlpool.ca. If you get to your mobile device, or visit www.whirlpool.com/product_help. Also, if your correspondence. Your refrigerator may run longer at the address below: In the ...

