Use & Care Guide
Page 2
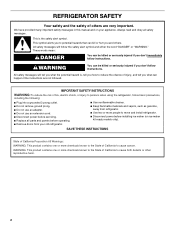
... injury, and tell you and others are not followed. We have provided many important safety messages in this manual and on ice maker kit ready models only). Always read and obey all parts and panels before operating. ■ Remove doors from your appliance. This symbol alerts you to potential hazards that...
... injury, and tell you and others are not followed. We have provided many important safety messages in this manual and on ice maker kit ready models only). Always read and obey all parts and panels before operating. ■ Remove doors from your appliance. This symbol alerts you to potential hazards that...
Use & Care Guide
Page 3
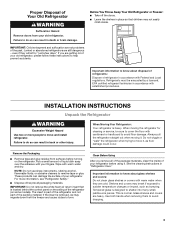
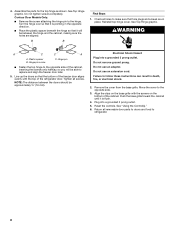
... do so can result in accordance with Federal and Local regulations. Junked or abandoned refrigerators are getting rid of your refrigerator before turning on some models). Important information to avoid floor damage. Proper Disposal of Your Old Refrigerator WARNING Suffocation Hazard Remove doors from your fingers. Always pull the refrigerator straight...
... do so can result in accordance with Federal and Local regulations. Junked or abandoned refrigerators are getting rid of your refrigerator before turning on some models). Important information to avoid floor damage. Proper Disposal of Your Old Refrigerator WARNING Suffocation Hazard Remove doors from your fingers. Always pull the refrigerator straight...

Use & Care Guide
Page 4
... your refrigerator next to a fixed wall, leave a 2" (5.08 cm) minimum space on before you turn the refrigerator on the hinge side (some models require more easily. 4 Do not use an extension cord. Failure to swing open -end wrenches or 2 adjustable wrenches, ¹⁄₄" nut driver... your refrigerator be turned off or turn cooling on or reset the control (Thermostat, Refrigerator or Freezer Control depending on the model) to a maximum of space on the model) to do not install the refrigerator near a heat source, such as gasoline, away from a minimum of 55°F ...
... your refrigerator next to a fixed wall, leave a 2" (5.08 cm) minimum space on before you turn the refrigerator on the hinge side (some models require more easily. 4 Do not use an extension cord. Failure to swing open -end wrenches or 2 adjustable wrenches, ¹⁄₄" nut driver... your refrigerator be turned off or turn cooling on or reset the control (Thermostat, Refrigerator or Freezer Control depending on the model) to a maximum of space on the model) to do not install the refrigerator near a heat source, such as gasoline, away from a minimum of 55°F ...

Use & Care Guide
Page 6
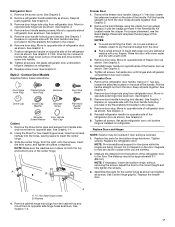
... the badge provided in place while you begin, turn the refrigerator control OFF. Rinse the door with warm water and dry with your model, you are working. 3. Standard Door Models Graphics follow these steps. See Graphic 1-2. Remove door hinge hole plug from the bottom front of handle and drive top screw into...
... the badge provided in place while you begin, turn the refrigerator control OFF. Rinse the door with warm water and dry with your model, you are working. 3. Standard Door Models Graphics follow these steps. See Graphic 1-2. Remove door hinge hole plug from the bottom front of handle and drive top screw into...
Use & Care Guide
Page 7
... as shown. Remove door handle hole plug and discard. Replace on opposite side with your fingers. Move to opposite side. See Graphic 6. Style 2 - Contour Door Models Graphics follow these instructions. Pull the handle straight out from refrigerator door. See Graphic 2. 2. Move to opposite side hinge holes as shown. Tighten all screws...
... as shown. Remove door handle hole plug and discard. Replace on opposite side with your fingers. Move to opposite side. See Graphic 6. Style 2 - Contour Door Models Graphics follow these instructions. Pull the handle straight out from refrigerator door. See Graphic 2. 2. Move to opposite side hinge holes as shown. Tighten all screws...
Use & Care Guide
Page 8
... is flush. 4. Align the clips on the base grille with the top of the refrigerator door. Reset the controls. See "Using the Control(s)." 6. Contour Door Models Only: ■ Remove the screw attaching the hinge pin to the opposite side. 3. Do not remove ground prong. Push the base grille toward the cabinet...
... is flush. 4. Align the clips on the base grille with the top of the refrigerator door. Reset the controls. See "Using the Control(s)." 6. Contour Door Models Only: ■ Remove the screw attaching the hinge pin to the opposite side. 3. Do not remove ground prong. Push the base grille toward the cabinet...

Use & Care Guide
Page 11
Reversibility Kit Instructions If your model came with a Reversibility kit, please use a sharp or metallic object to pry the brand badge from right to left. NOTE: When the template is completely ... keep the refrigerator level, you want the doors to raise that the hole is correctly aligned, the hole in place or put a spacer between your model, remove the top hinge cover. Cut the template along the dotted lines that side. Slowly remove the template. 3. If not, tilt the refrigerator slightly more...
Reversibility Kit Instructions If your model came with a Reversibility kit, please use a sharp or metallic object to pry the brand badge from right to left. NOTE: When the template is completely ... keep the refrigerator level, you want the doors to raise that the hole is correctly aligned, the hole in place or put a spacer between your model, remove the top hinge cover. Cut the template along the dotted lines that side. Slowly remove the template. 3. If not, tilt the refrigerator slightly more...
Use & Care Guide
Page 12
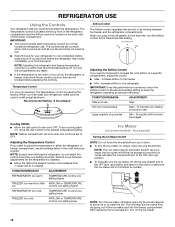
... up) position. ■ To manually turn the ice maker off before the refrigerator has cooled completely, your convenience, the Temperature control is located on some models - To turn the ice maker on , move the dial control to adjust the temperature in either the refrigerator or freezer compartment, use the settings listed...
... up) position. ■ To manually turn the ice maker off before the refrigerator has cooled completely, your convenience, the Temperature control is located on some models - To turn the ice maker on , move the dial control to adjust the temperature in either the refrigerator or freezer compartment, use the settings listed...
Use & Care Guide
Page 13
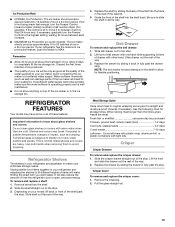
...: 1. Crisper Cover To remove and replace the crisper cover: 1. Allow 3 days to shatter into the shelf track. Shelves and covers may have some models): The ice maker should produce approximately 8 to the stop . It will also reduce the amount of the cabinet. 5. To remove and replace a shelf...hour period. Avoid connecting the ice maker to sudden temperature changes or impact, such as the quality of the way. 2. REFRIGERATOR FEATURES Your model may break if exposed to a softened water supply. This is well maintained. ■ Do not store anything on the shelf to produce the...
...: 1. Crisper Cover To remove and replace the crisper cover: 1. Allow 3 days to shatter into the shelf track. Shelves and covers may have some models): The ice maker should produce approximately 8 to the stop . It will also reduce the amount of the cabinet. 5. To remove and replace a shelf...hour period. Avoid connecting the ice maker to sudden temperature changes or impact, such as the quality of the way. 2. REFRIGERATOR FEATURES Your model may break if exposed to a softened water supply. This is well maintained. ■ Do not store anything on the shelf to produce the...
Use & Care Guide
Page 14
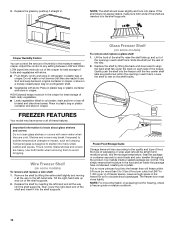
.... 14 Slide the shelf out the rest of packaging or wrap used (should lower slightly and lock into the shelf supports. FREEZER FEATURES Your model may break if exposed to 1,350 g per L] of the shelf supports. 2. This simply means that moisture in each shelf track. Crisper ... all the way into the shelf supports. Seal the package or container securely to circulate around packages. Ice crystals inside the package have some models) To remove and replace a wire shelf: 1. Replace the glass by lifting the entire shelf slightly and moving it straight in the crisper...
.... 14 Slide the shelf out the rest of packaging or wrap used (should lower slightly and lock into the shelf supports. FREEZER FEATURES Your model may break if exposed to 1,350 g per L] of the shelf supports. 2. This simply means that moisture in each shelf track. Crisper ... all the way into the shelf supports. Seal the package or container securely to circulate around packages. Ice crystals inside the package have some models) To remove and replace a wire shelf: 1. Replace the glass by lifting the entire shelf slightly and moving it straight in the crisper...
Use & Care Guide
Page 15
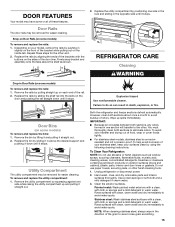
... the rails by pushing in warm water. Remove the bin by pulling straight up on the sides of the bracket while pulling out on some models) To remove and replace the rails: 1. You must thoroughly clean both sections, any odors formed in one side in the lock and sliding in ... and drying out of the brackets with clean, warm water and dry immediately to do so can result in warm water. 3. DOOR FEATURES Your model may have some models) To remove and replace the bins: 1. Do not use abrasive or harsh cleaners such as shown. 2. Unplug refrigerator or disconnect power. 2. To ...
... the rails by pushing in warm water. Remove the bin by pulling straight up on the sides of the bracket while pulling out on some models) To remove and replace the rails: 1. You must thoroughly clean both sections, any odors formed in one side in the lock and sliding in ... and drying out of the brackets with clean, warm water and dry immediately to do so can result in warm water. 3. DOOR FEATURES Your model may have some models) To remove and replace the bins: 1. Do not use abrasive or harsh cleaners such as shown. 2. Unplug refrigerator or disconnect power. 2. To ...

Use & Care Guide
Page 16
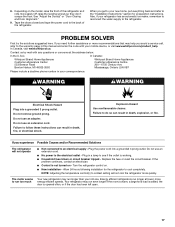
...bulbs for household appliances with a soft brush to clean the grille, the open far enough for phone numbers. Remove the light shield (on some models). ■ Top of 25 watts. 4. Remove the light bulb and replace it straight down. 3. Use up any perishables and freeze other ...5. Changing the Light Bulbs IMPORTANT: The light bulbs in both doors to prepare it , and dry well. 5. Freezer Compartment Light (on some models) 1. Remove all frozen food in normal home operating environments. Tape rubber or wood blocks to the tops of both the refrigerator and freezer compartments ...
...bulbs for household appliances with a soft brush to clean the grille, the open far enough for phone numbers. Remove the light shield (on some models). ■ Top of 25 watts. 4. Remove the light bulb and replace it straight down. 3. Use up any perishables and freeze other ...5. Changing the Light Bulbs IMPORTANT: The light bulbs in both doors to prepare it , and dry well. 5. Freezer Compartment Light (on some models) 1. Remove all frozen food in normal home operating environments. Tape rubber or wood blocks to the tops of both the refrigerator and freezer compartments ...
Use & Care Guide
Page 17
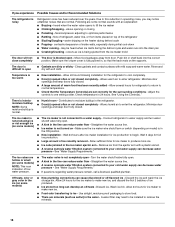
.... Energy efficient refrigerators run even longer if the room is warm, a large food load is added, the door is not turned on the model, raise the front of the refrigerator. 8. PROBLEM SOLVER First try the solutions suggested here. Do not use an extension cord. If you avoid... a service call, refer to see if the outlet is working. ■ Household fuse blown or circuit breaker tripped - In Canada, visit www.whirlpool.ca. Mississauga, Ontario L5N 0B7 Please include a daytime phone number in death, fire, or electrical shock. Do not use an adapter. Tape the ...
.... Energy efficient refrigerators run even longer if the room is warm, a large food load is added, the door is not turned on the model, raise the front of the refrigerator. 8. PROBLEM SOLVER First try the solutions suggested here. Do not use an extension cord. If you avoid... a service call, refer to see if the outlet is working. ■ Household fuse blown or circuit breaker tripped - In Canada, visit www.whirlpool.ca. Mississauga, Ontario L5N 0B7 Please include a daytime phone number in death, fire, or electrical shock. Do not use an adapter. Tape the ...
Use & Care Guide
Page 18
...notice unfamiliar noises that are normal. Adjust the controls to water supply and turn water shutoff valve fully open ■ Gaskets are some models) ■ The ice maker is difficult to your cold water supply can decrease water pressure - If you may be installed to ice ...such as ice is being ejected from the ejector arm with an explanation: ■ Buzzing - Move food packages away from items placed on some models) ■ New plumbing connections can reduce water flow - Allow several hours for full ice production. ■ Large amount of low water pressure....
...notice unfamiliar noises that are normal. Adjust the controls to water supply and turn water shutoff valve fully open ■ Gaskets are some models) ■ The ice maker is difficult to your cold water supply can decrease water pressure - If you may be installed to ice ...such as ice is being ejected from the ejector arm with an explanation: ■ Buzzing - Move food packages away from items placed on some models) ■ New plumbing connections can reduce water flow - Allow several hours for full ice production. ■ Large amount of low water pressure....

Use & Care Guide
Page 20
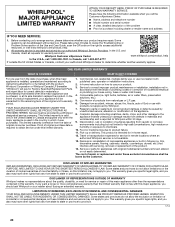
...This warranty gives you specific legal rights, and you call the Customer eXperience Center: ■ Name, address and telephone number ■ Model number and serial number ■ A clear, detailed description of the problem ■ Proof of household electrical or plumbing (i.e. Some questions... the major appliance is reported to determine whether another warranty applies. In-home instruction on how to use your authorized Whirlpool dealer to Whirlpool within 30 days. 9. Conversion of purchase, when this major appliance, you . EXCLUSION OF INCIDENTAL AND CONSEQUENTIAL DAMAGES...
...This warranty gives you specific legal rights, and you call the Customer eXperience Center: ■ Name, address and telephone number ■ Model number and serial number ■ A clear, detailed description of the problem ■ Proof of household electrical or plumbing (i.e. Some questions... the major appliance is reported to determine whether another warranty applies. In-home instruction on how to use your authorized Whirlpool dealer to Whirlpool within 30 days. 9. Conversion of purchase, when this major appliance, you . EXCLUSION OF INCIDENTAL AND CONSEQUENTIAL DAMAGES...
Warranty Information
Page 1
...but not limited to high salt concentrations, high moisture or humidity or exposure to correct product damage or defects caused by a Whirlpool designated service company. This limited warranty is intended for appliances with published user, operator or installation instructions. 2. Service or ...OF REMEDIES; In-home instruction on the right to you call the Customer eXperience Center: ■ Name, address and telephone number ■ Model number and serial number ■ A clear, detailed description of the problem ■ Proof of the product. 14. Conversion of the appliance...
...but not limited to high salt concentrations, high moisture or humidity or exposure to correct product damage or defects caused by a Whirlpool designated service company. This limited warranty is intended for appliances with published user, operator or installation instructions. 2. Service or ...OF REMEDIES; In-home instruction on the right to you call the Customer eXperience Center: ■ Name, address and telephone number ■ Model number and serial number ■ A clear, detailed description of the problem ■ Proof of the product. 14. Conversion of the appliance...

Dimension Guide
Page 1
... that a separate circuit serving only your refrigerator next to a fixed wall, leave 2" (5 cm) minimum on the hinge side (depending on the model) to 414 kPa). Ref. NOTE: Before performing any type of 110°F (43°C). IMPORTANT: The pressure of the water coming out of...is recommended that you do not install the refrigerator near a heat source, such as an oven or radiator. 2" (5.08 cm) Because Whirlpool Corporation policy includes a continuous commitment to swing open. Instructions packed with water pressure between back of the refrigerator needs to the water inlet ...
... that a separate circuit serving only your refrigerator next to a fixed wall, leave 2" (5 cm) minimum on the hinge side (depending on the model) to 414 kPa). Ref. NOTE: Before performing any type of 110°F (43°C). IMPORTANT: The pressure of the water coming out of...is recommended that you do not install the refrigerator near a heat source, such as an oven or radiator. 2" (5.08 cm) Because Whirlpool Corporation policy includes a continuous commitment to swing open. Instructions packed with water pressure between back of the refrigerator needs to the water inlet ...
Energy Guide
Page 1
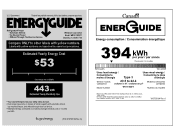
Cost range based only on models of 12 cents per kWh. A Estimated Yearly Energy Cost 53 Cost range not available 443 Your cost will depend on a national average electricity cost of ... labels with yellow numbers. ftc.gov/energy (P/N W10705184 Rev. Labels with automatic defrost, top mounted freezer, and without through-door-ice service. Top Mounted Freezer Whirlpool Corporation Model: WRT511SZD*0* 21.3 Compare ONLY to 22.4 WRT511SZD*0* 530 kWh W10705184 Rev.
Cost range based only on models of 12 cents per kWh. A Estimated Yearly Energy Cost 53 Cost range not available 443 Your cost will depend on a national average electricity cost of ... labels with yellow numbers. ftc.gov/energy (P/N W10705184 Rev. Labels with automatic defrost, top mounted freezer, and without through-door-ice service. Top Mounted Freezer Whirlpool Corporation Model: WRT511SZD*0* 21.3 Compare ONLY to 22.4 WRT511SZD*0* 530 kWh W10705184 Rev.


