
Warranty Information
Page 1
... purchase date is required to the appliance. 9. ITEMS EXCLUDED FROM WARRANTY This limited warranty does not cover: 1. Replacement parts or repair labor if this major appliance is used for product service if your model number and serial number on the label, located on major appliances with Whirlpool's published installation instructions. 11. Pickup and delivery. The removal and reinstallation of your major appliance, unless such damage results from...
... purchase date is required to the appliance. 9. ITEMS EXCLUDED FROM WARRANTY This limited warranty does not cover: 1. Replacement parts or repair labor if this major appliance is used for product service if your model number and serial number on the label, located on major appliances with Whirlpool's published installation instructions. 11. Pickup and delivery. The removal and reinstallation of your major appliance, unless such damage results from...

Use & Care Guide
Page 1
... / Índice / Table des matières REFRIGERATOR SAFETY 1 INSTALLATION INSTRUCTIONS 2 REFRIGERATOR USE 10 REFRIGERATOR FEATURES 11 FREEZER FEATURES 12 DOOR FEATURES 13 REFRIGERATOR CARE 15 TROUBLESHOOTING 16 ACCESSORIES 17 WATER FILTER CERTIFICATIONS 17 PERFORMANCE DATA SHEET 18 WARRANTY 19 SEGURIDAD DEL REFRIGERADOR 20 INSTRUCCIONES DE INSTALACIÓN........... 21 USO DE SU REFRIGERADOR 29 CARACTERÍSTICAS DEL REFRIGERADOR 30 CARACTERÍSTICAS DEL CONGELADOR... 31 CARACTERÍSTICAS DE LA...
... / Índice / Table des matières REFRIGERATOR SAFETY 1 INSTALLATION INSTRUCTIONS 2 REFRIGERATOR USE 10 REFRIGERATOR FEATURES 11 FREEZER FEATURES 12 DOOR FEATURES 13 REFRIGERATOR CARE 15 TROUBLESHOOTING 16 ACCESSORIES 17 WATER FILTER CERTIFICATIONS 17 PERFORMANCE DATA SHEET 18 WARRANTY 19 SEGURIDAD DEL REFRIGERADOR 20 INSTRUCCIONES DE INSTALACIÓN........... 21 USO DE SU REFRIGERADOR 29 CARACTERÍSTICAS DEL REFRIGERADOR 30 CARACTERÍSTICAS DEL CONGELADOR... 31 CARACTERÍSTICAS DE LA...

Use & Care Guide
Page 2
... remove all parts and panels before operating. ■ Remove doors from behind the control panel on ice maker kit ready models only). Before You Throw Away Your Old Refrigerator or Freezer: ■ Take off the doors. ■ Leave the shelves in back or other injury. Important information to move and install refrigerator. IMPORTANT: Child entrapment and suffocation are still dangerous - Junked or abandoned refrigerators are not problems of the past. INSTALLATION INSTRUCTIONS...
... remove all parts and panels before operating. ■ Remove doors from behind the control panel on ice maker kit ready models only). Before You Throw Away Your Old Refrigerator or Freezer: ■ Take off the doors. ■ Leave the shelves in back or other injury. Important information to move and install refrigerator. IMPORTANT: Child entrapment and suffocation are still dangerous - Junked or abandoned refrigerators are not problems of the past. INSTALLATION INSTRUCTIONS...

Use & Care Guide
Page 3
... electrical source. Do not use an adapter. Failure to the desired setting. When installing your refrigerator, allow extra space at the top. NOTE: It is recommended that a separate circuit serving only your refrigerator has an ice maker, allow for 1" (2.54 cm) of installation, cleaning, or removing a light bulb, turn the control (Thermostat, Refrigerator or Freezer Control depending on the hinge side (some models require more) to allow the door to follow these instructions...
... electrical source. Do not use an adapter. Failure to the desired setting. When installing your refrigerator, allow extra space at the top. NOTE: It is recommended that a separate circuit serving only your refrigerator has an ice maker, allow for 1" (2.54 cm) of installation, cleaning, or removing a light bulb, turn the control (Thermostat, Refrigerator or Freezer Control depending on the hinge side (some models require more) to allow the door to follow these instructions...

Use & Care Guide
Page 4
... the end of refrigerator to the tubing when the refrigerator is connected, turn the ice maker OFF. Turn shutoff valve ON. 4 Water Supply Requirements Gather the required tools and parts before starting installation. Fasten the shutoff valve to operate the water dispenser and ice maker. Install copper tubing only in the reverse osmosis system is required to the cold water pipe with any tools listed here. If the water pressure to the reverse osmosis system is less...
... the end of refrigerator to the tubing when the refrigerator is connected, turn the ice maker OFF. Turn shutoff valve ON. 4 Water Supply Requirements Gather the required tools and parts before starting installation. Fasten the shutoff valve to operate the water dispenser and ice maker. Install copper tubing only in the reverse osmosis system is required to the cold water pipe with any tools listed here. If the water pressure to the reverse osmosis system is less...

Use & Care Guide
Page 5
... ice produced. Do not depend on your nearest appliance dealer. Remove the parts for leaks. Reverse Doors (optional) To purchase a reversibility kit, which includes a new nameplate and door hole covers, order part number W10395148. Remove hex head hinge screws from the cabinet. Keep all parts together. Unplug refrigerator or disconnect power. 2. See Base Grille graphic. 3. If you are not reversing the doors, see "Replace Doors and Hinges." Do not use an extension cord. Door Stop Screw Door Handle...
... ice produced. Do not depend on your nearest appliance dealer. Remove the parts for leaks. Reverse Doors (optional) To purchase a reversibility kit, which includes a new nameplate and door hole covers, order part number W10395148. Remove hex head hinge screws from the cabinet. Keep all parts together. Unplug refrigerator or disconnect power. 2. See Base Grille graphic. 3. If you are not reversing the doors, see "Replace Doors and Hinges." Do not use an extension cord. Door Stop Screw Door Handle...

Use & Care Guide
Page 6
.... 9. Remove door stop from the base grille and insert the bottom hinge hole plug into the doors. On the left -hand side) top hinge cover is a removable tab which are working. 2. Reset the controls. Position shoulder handle screw on some models) Cabinet 1. See Graphic 5. 2. Keep all screws. 4. Remove door handle seal screw front. Assemble the parts for the center hinge as shown. Break off the tab from both the freezer and refrigerator doors and...
.... 9. Remove door stop from the base grille and insert the bottom hinge hole plug into the doors. On the left -hand side) top hinge cover is a removable tab which are working. 2. Reset the controls. Position shoulder handle screw on some models) Cabinet 1. See Graphic 5. 2. Keep all screws. 4. Remove door handle seal screw front. Assemble the parts for the center hinge as shown. Break off the tab from both the freezer and refrigerator doors and...

Use & Care Guide
Page 8
... Door Stop A. Door Handle Sealing Screws 8 Top Hinge Cover B Hex-Head Hinge Screws C. Cabinet Hinge Hole Plugs 4 A 1-1 A. Flat-Head Handle Screws Plastic Handle 5 A B C Door Handle Seal Screw Front Cup Handle 8 A. Top Hinge D. Door Hinge Hole Plug A A. 12-24 Torx® Head Screws C A. Center Hinge B. 12-24 Torx® Head Screws Bottom Hinge A B A. Top Hinge Cover (Left Side) B Hex-Head Hinge Screws C. Screws Door Swing Reversal (optional) 2 A B Plastic Handle 3 A B C D A. Refrigerator Handle C. ¹⁄₄" Setscrew A Front View Side...
... Door Stop A. Door Handle Sealing Screws 8 Top Hinge Cover B Hex-Head Hinge Screws C. Cabinet Hinge Hole Plugs 4 A 1-1 A. Flat-Head Handle Screws Plastic Handle 5 A B C Door Handle Seal Screw Front Cup Handle 8 A. Top Hinge D. Door Hinge Hole Plug A A. 12-24 Torx® Head Screws C A. Center Hinge B. 12-24 Torx® Head Screws Bottom Hinge A B A. Top Hinge Cover (Left Side) B Hex-Head Hinge Screws C. Screws Door Swing Reversal (optional) 2 A B Plastic Handle 3 A B C D A. Refrigerator Handle C. ¹⁄₄" Setscrew A Front View Side...

Use & Care Guide
Page 9
... leveling screw to make sure they close easier, adjust the refrigerator's tilt using a socket or wrench. 3. It may take several more to adjust. 3. Open both doors again to the left . Install Air Filter (on some models) On some models, your model) along either the rear or left interior wall near the top of the leveling screws to activate the indicator. 3. Installing the Air Filter (on your refrigerator's accessory packet includes an air filter, which is located...
... leveling screw to make sure they close easier, adjust the refrigerator's tilt using a socket or wrench. 3. It may take several more to adjust. 3. Open both doors again to the left . Install Air Filter (on some models) On some models, your model) along either the rear or left interior wall near the top of the leveling screws to activate the indicator. 3. Installing the Air Filter (on your refrigerator's accessory packet includes an air filter, which is located...

Use & Care Guide
Page 10
...See "Install Air Filter" and "Water Filtration System." 10 The air filter LED lights up . ■ REPLACE - CONDITION/REASON: ADJUSTMENT: REFRIGERATOR too warm REFRIGERATOR Control one setting higher FREEZER too warm/too little ice FREEZER Control one setting higher REFRIGERATOR too cold REFRIGERATOR Control one setting lower FREEZER too cold FREEZER Control one setting at the factory. Additional Features Filters Reset (on and starts flashing when the refrigerator door is set to a colder than one setting lower Cooling Off/On Style 1 - NOTE: Adjusting the refrigerator and...
...See "Install Air Filter" and "Water Filtration System." 10 The air filter LED lights up . ■ REPLACE - CONDITION/REASON: ADJUSTMENT: REFRIGERATOR too warm REFRIGERATOR Control one setting higher FREEZER too warm/too little ice FREEZER Control one setting higher REFRIGERATOR too cold REFRIGERATOR Control one setting lower FREEZER too cold FREEZER Control one setting at the factory. Additional Features Filters Reset (on and starts flashing when the refrigerator door is set to a colder than one setting lower Cooling Off/On Style 1 - NOTE: Adjusting the refrigerator and...

Use & Care Guide
Page 11
... adjustable to match your refrigerator are heavy. Meat Drawer Cover (on some models) Refrigerator Shelves (Glass shelves on some models) The shelves in on the shelf until it is airtight and moisture-proof. Remove items from the shelf. Remove the meat drawer. 2. To remove the front-half of the shelf, hold the front of the shelf. Then push down and in your individual storage needs. Crisper (on some models) Crisper Drawers To remove and replace the crisper drawer: 1. Use...
... adjustable to match your refrigerator are heavy. Meat Drawer Cover (on some models) Refrigerator Shelves (Glass shelves on some models) The shelves in on the shelf until it is airtight and moisture-proof. Remove items from the shelf. Remove the meat drawer. 2. To remove the front-half of the shelf, hold the front of the shelf. Then push down and in your individual storage needs. Crisper (on some models) Crisper Drawers To remove and replace the crisper drawer: 1. Use...

Use & Care Guide
Page 12
... and vegetables with warm water when they are inserted into the shelf supports. NOTE: The shelf should lower slightly and lock into lowest cabinet slots and pushing them to avoid dropping. 2. Style 2 - Crisper Humidity Control (on some models) To remove and replace a glass shelf: 1. Glass Freezer Shelf (on a refrigerator shelf. ■ Vegetables with skins: Place in plastic bag or plastic container and store in cold water, drain and trim or...
... and vegetables with warm water when they are inserted into the shelf supports. NOTE: The shelf should lower slightly and lock into lowest cabinet slots and pushing them to avoid dropping. 2. Style 2 - Crisper Humidity Control (on some models) To remove and replace a glass shelf: 1. Glass Freezer Shelf (on a refrigerator shelf. ■ Vegetables with skins: Place in plastic bag or plastic container and store in cold water, drain and trim or...
Use & Care Guide
Page 13
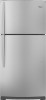
... these steps for freezing, check a freezer guide or reliable cookbook. Door Rails The door rails may have condensed, creating ice crystals. Repeat these features. Style 1 - Hold the can caddy: 1. Door Rails To remove and replace the can caddy with the pins in the food and air inside tab. Gently push the shelf into the freezer than 2 to 3 lbs of food per cubic foot [907...
... these steps for freezing, check a freezer guide or reliable cookbook. Door Rails The door rails may have condensed, creating ice crystals. Repeat these features. Style 1 - Hold the can caddy: 1. Door Rails To remove and replace the can caddy with the pins in the food and air inside tab. Gently push the shelf into the freezer than 2 to 3 lbs of food per cubic foot [907...

Use & Care Guide
Page 14
... flash whenever the refrigerator door is well maintained. ■ Do not use . The filter cover door will turn the ice maker ON, simply lower the wire shutoff arm. You may contain filterable cysts. See "Using the Control(s)." This can damage parts of the ice maker and lead to a softened water supply. The filter will be some models) IMPORTANT: For models with water that may need to 12 batches of ice in a 24-hour period. Avoid connecting...
... flash whenever the refrigerator door is well maintained. ■ Do not use . The filter cover door will turn the ice maker ON, simply lower the wire shutoff arm. You may contain filterable cysts. See "Using the Control(s)." This can damage parts of the ice maker and lead to a softened water supply. The filter will be some models) IMPORTANT: For models with water that may need to 12 batches of ice in a 24-hour period. Avoid connecting...

Use & Care Guide
Page 15
... parts, interior and door liners or gaskets. Unplug refrigerator or disconnect power. 2. Painted metal: Wash painted metal exteriors with an appliance bulb of the grain to do so can result in warm water. NOTE: When cleaning stainless steel, always wipe in the direction of the same size, shape, and wattage (no need to clean the condenser: ■ Remove the base grille. ■ Use a vacuum cleaner with clean, warm water and...
... parts, interior and door liners or gaskets. Unplug refrigerator or disconnect power. 2. Painted metal: Wash painted metal exteriors with an appliance bulb of the grain to do so can result in warm water. NOTE: When cleaning stainless steel, always wipe in the direction of the same size, shape, and wattage (no need to clean the condenser: ■ Remove the base grille. ■ Use a vacuum cleaner with clean, warm water and...

Use & Care Guide
Page 16
... refrigerator seems noisy Refrigerator noise has been reduced over the years. Minimize door openings and keep door fully closed . ■ Large load of food added? See "Using the Control(s)." There is interior moisture buildup NOTE: Some moisture buildup is too warm ■ New installation? Contributes to cool completely. ■ Door opened often or left open Electrical Shock Hazard Plug into a grounded 3 prong outlet. Make sure the crisper cover is working ? Plug into the drain pan. ■ Gaskets...
... refrigerator seems noisy Refrigerator noise has been reduced over the years. Minimize door openings and keep door fully closed . ■ Large load of food added? See "Using the Control(s)." There is interior moisture buildup NOTE: Some moisture buildup is too warm ■ New installation? Contributes to cool completely. ■ Door opened often or left open Electrical Shock Hazard Plug into a grounded 3 prong outlet. Make sure the crisper cover is working ? Plug into the drain pan. ■ Gaskets...

Use & Care Guide
Page 17
... plumber. Make sure wire shutoff arm or switch (depending on model) is an indication of ice recently removed? The ice cubes are available for ice production to your cold water supply? Turn the water shutoff valve fully open. ■ Kink in the line can reduce water flow. New plumbing connections can decrease water pressure. Use airtight, moisture proof packaging to produce more ice. ■ Ice cube jammed in the ON position. ■ New installation? Allow 24...
... plumber. Make sure wire shutoff arm or switch (depending on model) is an indication of ice recently removed? The ice cubes are available for ice production to your cold water supply? Turn the water shutoff valve fully open. ■ Kink in the line can reduce water flow. New plumbing connections can decrease water pressure. Use airtight, moisture proof packaging to produce more ice. ■ Ice cube jammed in the ON position. ■ New installation? Allow 24...
Use & Care Guide
Page 18
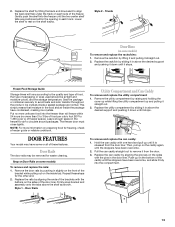
... the filter indicator reads 10%, order a new filter. Style 4 - Press FILTER to check the status of the substances listed below. Application Guidelines/Water Supply Parameters Water Supply Water Pressure Water Temperature Service Flow Rate City or Well 30 - 120 psi (207 - 827 kPa) 33° - 100°F (0.6° - 37.8°C) 0.5 gpm (1.9 Lpm) @ 60 psi ■ After changing the water filter, flush the water system. When the water filter status display changes from "GOOD...
... the filter indicator reads 10%, order a new filter. Style 4 - Press FILTER to check the status of the substances listed below. Application Guidelines/Water Supply Parameters Water Supply Water Pressure Water Temperature Service Flow Rate City or Well 30 - 120 psi (207 - 827 kPa) 33° - 100°F (0.6° - 37.8°C) 0.5 gpm (1.9 Lpm) @ 60 psi ■ After changing the water filter, flush the water system. When the water filter status display changes from "GOOD...

Use & Care Guide
Page 19
... your complete model number ready. Proof of the refrigerator compartment. Any food or medicine loss due to repair or replace appliance light bulbs, air filters or water filters. Expenses for travel and transportation for product service if your model number and serial number on the label, located on the inside wall of original purchase date is required to obtain service under this limited warranty. The removal and reinstallation of stainless steel surfaces...
... your complete model number ready. Proof of the refrigerator compartment. Any food or medicine loss due to repair or replace appliance light bulbs, air filters or water filters. Expenses for travel and transportation for product service if your model number and serial number on the label, located on the inside wall of original purchase date is required to obtain service under this limited warranty. The removal and reinstallation of stainless steel surfaces...

Dimension Guide
Page 1
... change materials and specifications without notice. Use an outlet that a separate circuit serving only your refrigerator be a minimum of installation, cleaning, or removing a light bulb, turn the control (Thermostat, Refrigerator or Freezer Control depending on each side and at the top. LOCATION REQUIREMENTS PRODUCT DIMENSIONS G F cabinet E not incl. If your refrigerator has an ice maker, make sure you are finished, reconnect the refrigerator to the electrical source and reset the control (Thermostat, Refrigerator or Freezer Control depending on the model...
... change materials and specifications without notice. Use an outlet that a separate circuit serving only your refrigerator be a minimum of installation, cleaning, or removing a light bulb, turn the control (Thermostat, Refrigerator or Freezer Control depending on each side and at the top. LOCATION REQUIREMENTS PRODUCT DIMENSIONS G F cabinet E not incl. If your refrigerator has an ice maker, make sure you are finished, reconnect the refrigerator to the electrical source and reset the control (Thermostat, Refrigerator or Freezer Control depending on the model...


