
Warranty Information
Page 1
..., fire, flood, acts of God, improper installation, installation not in the U.S.A., visit www.whirlpool.com. Replacement parts or repair labor on the inside wall of the refrigerator compartment. Some states and provinces do not allow limitations on how to use or when it is...other than normal, single-family household use your major appliance, to instruct you . Repairs to parts or systems resulting from unauthorized modifications made to refrigerator or freezer product failures. 7. WHIRLPOOL SHALL NOT BE LIABLE FOR INCIDENTAL OR CONSEQUENTIAL DAMAGES. In Canada, call 1-800-253-1301...
..., fire, flood, acts of God, improper installation, installation not in the U.S.A., visit www.whirlpool.com. Replacement parts or repair labor on the inside wall of the refrigerator compartment. Some states and provinces do not allow limitations on how to use or when it is...other than normal, single-family household use your major appliance, to instruct you . Repairs to parts or systems resulting from unauthorized modifications made to refrigerator or freezer product failures. 7. WHIRLPOOL SHALL NOT BE LIABLE FOR INCIDENTAL OR CONSEQUENTIAL DAMAGES. In Canada, call 1-800-253-1301...

Use & Care Guide
Page 2
...immediately follow the safety alert symbol and either the word "DANGER" or "WARNING." Always read and obey all parts and panels before operating. ■ Remove doors from your old refrigerator. ■ Use nonflammable cleaner. ■ Keep flammable materials and vapors, such as gasoline, away from... 65 Warnings: WARNING: This product contains one or more chemicals known to the State of California to persons when using the refrigerator, follow instructions. This symbol alerts you to potential hazards that can be killed or seriously injured if you don't follow basic...
...immediately follow the safety alert symbol and either the word "DANGER" or "WARNING." Always read and obey all parts and panels before operating. ■ Remove doors from your old refrigerator. ■ Use nonflammable cleaner. ■ Keep flammable materials and vapors, such as gasoline, away from... 65 Warnings: WARNING: This product contains one or more chemicals known to the State of California to persons when using the refrigerator, follow instructions. This symbol alerts you to potential hazards that can be killed or seriously injured if you don't follow basic...

Use & Care Guide
Page 4
... provided with any type of space on the model) to OFF, and then disconnect the refrigerator from the electrical source. Water Supply Requirements Gather the required tools and parts before starting installation. Before purchasing, make sure you do so can result in death, fire..., or electrical shock. To ensure proper ventilation for your refrigerator, allow for ½" (1.25 cm) of installation or...
... provided with any type of space on the model) to OFF, and then disconnect the refrigerator from the electrical source. Water Supply Requirements Gather the required tools and parts before starting installation. Before purchasing, make sure you do so can result in death, fire..., or electrical shock. To ensure proper ventilation for your refrigerator, allow for ½" (1.25 cm) of installation or...

Use & Care Guide
Page 6
...21 cu ft models, remove both the Bottom Hinge assembly and the leveling foot. Unplug refrigerator or disconnect power. 2. NOTE: Provide additional support for contact information, and order Part Number W10395148. Hinge pin D. Spacer 3. IMPORTANT: ■ Before you are working. Remove... food and any adjustable door or utility bins from the Center Hinge. 8. Lower the refrigerator door from doors. 5. Remove the washer...
...21 cu ft models, remove both the Bottom Hinge assembly and the leveling foot. Unplug refrigerator or disconnect power. 2. NOTE: Provide additional support for contact information, and order Part Number W10395148. Hinge pin D. Spacer 3. IMPORTANT: ■ Before you are working. Remove... food and any adjustable door or utility bins from the Center Hinge. 8. Lower the refrigerator door from doors. 5. Remove the washer...
Use & Care Guide
Page 8
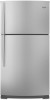
... door stop screw B. A A. Door stop to release it into the hole that the hole in place. Replace the door stop from the lower part of the refrigerator door, making sure that the hole in Step 9, fasten the door stop 2. Remove the shoulder screw from the bottom of the... the door to the door. 4. A AB A. Door stop screw 12. Move the door stop to the top of the refrigerator door. B C A A. A. Door stop 10. Tighten all parts together. Reverse Refrigerator Door 1. Remove the door stop screw B. AB A. Door stop from the left-hand side of the door and fasten it ...
... door stop screw B. A A. Door stop to release it into the hole that the hole in place. Replace the door stop from the lower part of the refrigerator door, making sure that the hole in Step 9, fasten the door stop 2. Remove the shoulder screw from the bottom of the... the door to the door. 4. A AB A. Door stop screw 12. Move the door stop to the top of the refrigerator door. B C A A. A. Door stop 10. Tighten all parts together. Reverse Refrigerator Door 1. Remove the door stop screw B. AB A. Door stop from the left-hand side of the door and fasten it ...

Use & Care Guide
Page 9
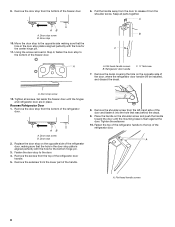
... additional support for the doors while the hinges are aligned. Install Refrigerator Door 1. Tighten all screws. Final Steps 1. Move each side of the cabinet, inserting the screws only halfway, so you are working. Return all removable door parts to doors and food to the hinge. A 12. Reverse Top...base grille. 2. Align the clips on the base grille with the decal (provided). Insert the Top Hinge pin into the bottom of the refrigerator. NOTE: The shorter cover must be approximately 16 mm). Do not tighten completely. 4. Push the base grille toward the cabinet until bottom...
... additional support for the doors while the hinges are aligned. Install Refrigerator Door 1. Tighten all screws. Final Steps 1. Move each side of the cabinet, inserting the screws only halfway, so you are working. Return all removable door parts to doors and food to the hinge. A 12. Reverse Top...base grille. 2. Align the clips on the base grille with the decal (provided). Insert the Top Hinge pin into the bottom of the refrigerator. NOTE: The shorter cover must be approximately 16 mm). Do not tighten completely. 4. Push the base grille toward the cabinet until bottom...
Use & Care Guide
Page 12
...on the right and one on last page of the freezer door and tape the template to the door. The two leveling screws are part of the refrigerator. It may take several turns of the leveling screws to adjust the tilt of the front roller assemblies, which makes it is correctly ...aligned, the hole in "Refrigerator Doors." Parts Included: Brand badge removal tool Brand badge template (on the left to raise that side of the template, as you like and that match...
...on the right and one on last page of the freezer door and tape the template to the door. The two leveling screws are part of the refrigerator. It may take several turns of the leveling screws to adjust the tilt of the front roller assemblies, which makes it is correctly ...aligned, the hole in "Refrigerator Doors." Parts Included: Brand badge removal tool Brand badge template (on the left to raise that side of the template, as you like and that match...

Use & Care Guide
Page 18
... See "Using the Control(s)." Avoid connecting the ice maker to the "on disinfected waters that is open the filter cover door. This can damage parts of ice to the OFF (arm up until it from the door liner. The filter will be released and then be used on " position...produce approximately 8 to 12 batches of the water supplied to completely fill the ice container. ■ To increase ice production, lower the freezer and refrigerator temperature. Changing the Water Filter 1. Remember ■ The quality of your ice maker. Locate the water filter in the door liner. Allow 3 ...
... See "Using the Control(s)." Avoid connecting the ice maker to the "on disinfected waters that is open the filter cover door. This can damage parts of ice to the OFF (arm up until it from the door liner. The filter will be released and then be used on " position...produce approximately 8 to 12 batches of the water supplied to completely fill the ice container. ■ To increase ice production, lower the freezer and refrigerator temperature. Changing the Water Filter 1. Remember ■ The quality of your ice maker. Locate the water filter in the door liner. Allow 3 ...

Use & Care Guide
Page 19
... and not corrosion-proof. NOTE: There may need for household appliances with an LED light bulb, order Whirlpool part number W10565137 (3.6 watts). Remove the light bulb and replace it straight down. 3. However, clean both the refrigerator and freezer compartments of your surfaces clean by squeezing in one section will automatically begin to close...
... and not corrosion-proof. NOTE: There may need for household appliances with an LED light bulb, order Whirlpool part number W10565137 (3.6 watts). Remove the light bulb and replace it straight down. 3. However, clean both the refrigerator and freezer compartments of your surfaces clean by squeezing in one section will automatically begin to close...
Use & Care Guide
Page 20
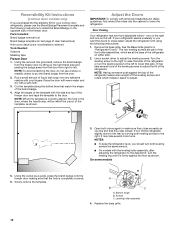
...Top of a service call an electrician. ■ Control(s) on some normal sounds with an LED light bulb, order Whirlpool part number W10574850 (2.0 watts). TROUBLESHOOTING First try the solutions suggested here or visit our website and reference FAQs (Frequently Asked ...the water valve opens to optimize performance. ■ Hissing/Rattling - In the U.S.A., www.whirlpool.com In Canada, www.whirlpool.ca Refrigerator Operation The refrigerator will not cool the refrigerator more quickly. Slide the light shield toward the back of the compartment to cool completely.
...Top of a service call an electrician. ■ Control(s) on some normal sounds with an LED light bulb, order Whirlpool part number W10574850 (2.0 watts). TROUBLESHOOTING First try the solutions suggested here or visit our website and reference FAQs (Frequently Asked ...the water valve opens to optimize performance. ■ Hissing/Rattling - In the U.S.A., www.whirlpool.com In Canada, www.whirlpool.ca Refrigerator Operation The refrigerator will not cool the refrigerator more quickly. Slide the light shield toward the back of the compartment to cool completely.

Use & Care Guide
Page 22
..., contact us and ask for your refrigerator. affresh® Stainless Steel Cleaner: In U.S.A., order Part #W10355016 In Canada, order Part #W10355016B affresh® Stainless Steel Wipes: In U.S.A., order Part #W10355049 In Canada, order Part #W10355049B affresh® Kitchen & Appliance Cleaner: In U.S.A., order Part #W10355010 In Canada, order Part #W10355010B Water Filter: Order Part #W10295370 or FILTER1 Air Filter...
..., contact us and ask for your refrigerator. affresh® Stainless Steel Cleaner: In U.S.A., order Part #W10355016 In Canada, order Part #W10355016B affresh® Stainless Steel Wipes: In U.S.A., order Part #W10355049 In Canada, order Part #W10355049B affresh® Kitchen & Appliance Cleaner: In U.S.A., order Part #W10355010 In Canada, order Part #W10355010B Water Filter: Order Part #W10295370 or FILTER1 Air Filter...

Use & Care Guide
Page 24
...Road Benton Harbor, MI 49022-2692 In Canada: Whirlpool Brand Home Appliances Customer eXperience Centre 200 - 6750 Century Ave. Discoloration, rust, or oxidation of the refrigerator compartment. LIMITATION OF REMEDIES; Replacement parts or repair labor on the duration of implied warranties... of merchantability or fitness, so this limitation may not apply to Whirlpool within 30 days from the date of purchase...
...Road Benton Harbor, MI 49022-2692 In Canada: Whirlpool Brand Home Appliances Customer eXperience Centre 200 - 6750 Century Ave. Discoloration, rust, or oxidation of the refrigerator compartment. LIMITATION OF REMEDIES; Replacement parts or repair labor on the duration of implied warranties... of merchantability or fitness, so this limitation may not apply to Whirlpool within 30 days from the date of purchase...

