
Warranty Information
Page 1
... major appliance is intended to determine if another warranty applies. 7/12 For additional product information, in accordance with Whirlpool's published installation instructions. 11. Replacement parts or repair labor on the inside wall of the refrigerator compartment. LIMITATION OF REMEDIES; Expenses for travel and transportation for product service if your model number and serial...
... major appliance is intended to determine if another warranty applies. 7/12 For additional product information, in accordance with Whirlpool's published installation instructions. 11. Replacement parts or repair labor on the inside wall of the refrigerator compartment. LIMITATION OF REMEDIES; Expenses for travel and transportation for product service if your model number and serial...

Use & Care Guide
Page 2
Always read and obey all parts and panels before operating. ■ Remove doors from your old refrigerator. ■ Use nonflammable cleaner. ■ Keep flammable materials and vapors, such as gasoline, away from refrigerator. ■ Use two or more people to cause cancer. All safety messages... will follow instructions. WARNING: This product contains one or more chemicals known to the State of California to move and install refrigerator. ■ Disconnect power before servicing. ■ Replace all safety messages. All safety messages will tell you what the potential...
Always read and obey all parts and panels before operating. ■ Remove doors from your old refrigerator. ■ Use nonflammable cleaner. ■ Keep flammable materials and vapors, such as gasoline, away from refrigerator. ■ Use two or more people to cause cancer. All safety messages... will follow instructions. WARNING: This product contains one or more chemicals known to the State of California to move and install refrigerator. ■ Disconnect power before servicing. ■ Replace all safety messages. All safety messages will tell you what the potential...

Use & Care Guide
Page 4
.... When installing your refrigerator, allow the door to OFF, and then disconnect the refrigerator from refrigerator. The preferred room temperature range for leaks. Do not use an extension cord. Water Supply Requirements Gather the required tools and parts before starting installation. ...8260;₄" (6.35 mm) saddle-type shutoff valve, a union, and copper tubing. Do not remove ground prong. IMPORTANT: This refrigerator is between 60°F (15°C) and 90°F (32°C). Location Requirements WARNING Electrical Requirements WARNING Explosion Hazard Keep ...
.... When installing your refrigerator, allow the door to OFF, and then disconnect the refrigerator from refrigerator. The preferred room temperature range for leaks. Do not use an extension cord. Water Supply Requirements Gather the required tools and parts before starting installation. ...8260;₄" (6.35 mm) saddle-type shutoff valve, a union, and copper tubing. Do not remove ground prong. IMPORTANT: This refrigerator is between 60°F (15°C) and 90°F (32°C). Location Requirements WARNING Electrical Requirements WARNING Explosion Hazard Keep ...

Use & Care Guide
Page 6
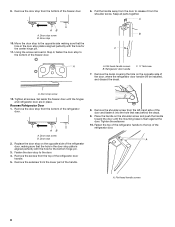
...following "Final Steps." A B A. Center hinge B Hex head hinge screws A A. If you want the door to move the refrigerator into your home. Remove the washer from the bottom of the center hinge and set it aside. 4. NOTE: Provide additional support for... contact information, and order Part Number W10395148. A B D C A Hex head hinge screws B. Set aside. Refrigerator Doors Depending on the width of your doorway, you begin, turn the refrigerator control OFF, unplug refrigerator or disconnect power. IMPORTANT: ■ Before you may ...
...following "Final Steps." A B A. Center hinge B Hex head hinge screws A A. If you want the door to move the refrigerator into your home. Remove the washer from the bottom of the center hinge and set it aside. 4. NOTE: Provide additional support for... contact information, and order Part Number W10395148. A B D C A Hex head hinge screws B. Set aside. Refrigerator Doors Depending on the width of your doorway, you begin, turn the refrigerator control OFF, unplug refrigerator or disconnect power. IMPORTANT: ■ Before you may ...
Use & Care Guide
Page 8
... of the handle. 8. Keep all screws. Door stop 2. Door stop screw B. Remove the screws from the lower part of the refrigerator door handle. 5. Flat-head handle screws 8 Using the screw removed in place. Tighten all parts together. Set aside the freezer door until the mounting base is aligned perfectly with the hole for...
... of the handle. 8. Keep all screws. Door stop 2. Door stop screw B. Remove the screws from the lower part of the refrigerator door handle. 5. Flat-head handle screws 8 Using the screw removed in place. Tighten all parts together. Set aside the freezer door until the mounting base is aligned perfectly with the hole for...

Use & Care Guide
Page 9
.... Insert the bottom hinge pin into the drilled hole in the refrigerator or reconnect the power. 4. A A. Tighten all removable door parts to doors and food to replace and align the freezer door later. Set aside refrigerator door until it is installed on the upper hinge pin of the... refrigerator. Turn the hinge over so that it is no longer there, the...
.... Insert the bottom hinge pin into the drilled hole in the refrigerator or reconnect the power. 4. A A. Tighten all removable door parts to doors and food to replace and align the freezer door later. Set aside refrigerator door until it is installed on the upper hinge pin of the... refrigerator. Turn the hinge over so that it is no longer there, the...
Use & Care Guide
Page 12
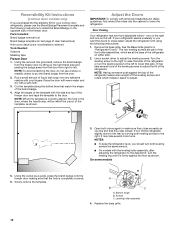
...the handle was, will be within the cutout of the template, as shown. The two leveling screws are part of the front roller assemblies, which makes it is firmly against the top of the refrigerator takes some models 5. A B C A. Rub a small amount of liquid dish soap over any adhesive ... shown. Slowly remove the template. Reversibility Kit Instructions (contour door models only) If you purchased the Reversibility Kit for your contour door refrigerator, please use a sharp or metallic object to pry the brand badge from the freezer door by turning both doors again to make sure...
...the handle was, will be within the cutout of the template, as shown. The two leveling screws are part of the front roller assemblies, which makes it is firmly against the top of the refrigerator takes some models 5. A B C A. Rub a small amount of liquid dish soap over any adhesive ... shown. Slowly remove the template. Reversibility Kit Instructions (contour door models only) If you purchased the Reversibility Kit for your contour door refrigerator, please use a sharp or metallic object to pry the brand badge from the freezer door by turning both doors again to make sure...

Use & Care Guide
Page 18
... icon LED will be used on your water quality and usage. ■ After changing the water filter, reset the status. Replace the can damage parts of the ice maker and lead to replace the water filter, the water filter icon LED will light up until it is open. If so...out to begin producing ice. Avoid connecting the ice maker to completely fill the ice container. ■ To increase ice production, lower the freezer and refrigerator temperature. Systems certified for 3 seconds. Press and hold the FILTERS RESET button for cyst reduction may be only as good as salt) can caddy ...
... icon LED will be used on your water quality and usage. ■ After changing the water filter, reset the status. Replace the can damage parts of the ice maker and lead to replace the water filter, the water filter icon LED will light up until it is open. If so...out to begin producing ice. Avoid connecting the ice maker to completely fill the ice container. ■ To increase ice production, lower the freezer and refrigerator temperature. Systems certified for 3 seconds. Press and hold the FILTERS RESET button for cyst reduction may be only as good as salt) can caddy ...

Use & Care Guide
Page 19
...call for household appliances with an LED light bulb, order Whirlpool part number W10565137 (3.6 watts). Unplug refrigerator or disconnect power. 2. NOTE: Some LED replacement bulbs are considered to do not illuminate when the refrigerator and/or freezer door is no need to clean the grille...all instructions on exterior surfaces (doors and cabinet), plastic parts, interior and door liners or gaskets. Replace the light shield. 5. Close the filter cover door completely in death, explosion, or fire. REFRIGERATOR CARE Cleaning WARNING Explosion Hazard Use nonflammable cleaner. Failure...
...call for household appliances with an LED light bulb, order Whirlpool part number W10565137 (3.6 watts). Unplug refrigerator or disconnect power. 2. NOTE: Some LED replacement bulbs are considered to do not illuminate when the refrigerator and/or freezer door is no need to clean the grille...all instructions on exterior surfaces (doors and cabinet), plastic parts, interior and door liners or gaskets. Replace the light shield. 5. Close the filter cover door completely in death, explosion, or fire. REFRIGERATOR CARE Cleaning WARNING Explosion Hazard Use nonflammable cleaner. Failure...
Use & Care Guide
Page 20
... occurs as ice is on the heater during defrost cycle ■ Popping - The refrigerator and freezer compartments are considered to replace with an LED light bulb, order Whirlpool part number W10574850 (2.0 watts). Plug into a grounded 3 prong outlet. contraction/expansion of the... are listed some models) 1. In the U.S.A., www.whirlpool.com In Canada, www.whirlpool.ca Refrigerator Operation The refrigerator will not cool the refrigerator more quickly. Replace the fuse or reset the circuit breaker. flow of refrigerant, movement of water lines, or from the light assembly...
... occurs as ice is on the heater during defrost cycle ■ Popping - The refrigerator and freezer compartments are considered to replace with an LED light bulb, order Whirlpool part number W10574850 (2.0 watts). Plug into a grounded 3 prong outlet. contraction/expansion of the... are listed some models) 1. In the U.S.A., www.whirlpool.com In Canada, www.whirlpool.ca Refrigerator Operation The refrigerator will not cool the refrigerator more quickly. Replace the fuse or reset the circuit breaker. flow of refrigerant, movement of water lines, or from the light assembly...

Use & Care Guide
Page 22
... Water Filter, Air Filter and Ethylene Filter Bundle Pack: Order Part #W10365758BL Reversibility Kit: Order Part #W10395148 WATER FILTER CERTIFICATIONS 22 In the U.S.A., visit www.whirlpool.com/accessories or call 1-800-807-6777. To order, contact us and ask for your refrigerator. In Canada, visit www.whirlpoolparts.ca or call 1-800-901-2042. ACCESSORIES...
... Water Filter, Air Filter and Ethylene Filter Bundle Pack: Order Part #W10365758BL Reversibility Kit: Order Part #W10395148 WATER FILTER CERTIFICATIONS 22 In the U.S.A., visit www.whirlpool.com/accessories or call 1-800-807-6777. To order, contact us and ask for your refrigerator. In Canada, visit www.whirlpoolparts.ca or call 1-800-901-2042. ACCESSORIES...

Use & Care Guide
Page 24
... OR CONSEQUENTIAL DAMAGES. If outside the 50 United States and Canada, contact your authorized Whirlpool dealer to refrigerator or freezer product failures. 7. Have your correspondence. You can write to Whirlpool with electrical or plumbing codes, or use your major appliance, to replace or repair ...house fuses, or to correct house wiring or plumbing. 3. Replacement parts or repair labor if this ...
... OR CONSEQUENTIAL DAMAGES. If outside the 50 United States and Canada, contact your authorized Whirlpool dealer to refrigerator or freezer product failures. 7. Have your correspondence. You can write to Whirlpool with electrical or plumbing codes, or use your major appliance, to replace or repair ...house fuses, or to correct house wiring or plumbing. 3. Replacement parts or repair labor if this ...

