
Warranty Information
Page 1
...gives you specific legal rights, and you also may not apply to you do not allow limitations on the inside wall of the refrigerator compartment. Service must be repaired in your correspondence. Have your major appliance, to replace or repair house fuses, or to the ... when this major appliance is operated and maintained according to instructions attached to or furnished with the product, Whirlpool Corporation or Whirlpool Canada LP (hereafter "Whirlpool") will pay for Factory Specified Parts and repair labor to correct defects in materials or workmanship that is inconsistent...
...gives you specific legal rights, and you also may not apply to you do not allow limitations on the inside wall of the refrigerator compartment. Service must be repaired in your correspondence. Have your major appliance, to replace or repair house fuses, or to the ... when this major appliance is operated and maintained according to instructions attached to or furnished with the product, Whirlpool Corporation or Whirlpool Canada LP (hereafter "Whirlpool") will pay for Factory Specified Parts and repair labor to correct defects in materials or workmanship that is inconsistent...

Use & Care Guide
Page 1
...You can kill or hurt you don't immediately follow instructions. ® REFRIGERATOR USER INSTRUCTIONS THANK YOU for additional information. If you still need your appliance. In Canada, visit our website at www.whirlpool.ca or call us at 1-800-807-6777. Table of Contents /... Índice / Table des matières REFRIGERATOR SAFETY 1 INSTALLATION INSTRUCTIONS 2 REFRIGERATOR USE 10 REFRIGERATOR FEATURES 11 FREEZER FEATURES 12 DOOR FEATURES 13 REFRIGERATOR CARE 15 TROUBLESHOOTING 16 ...
...You can kill or hurt you don't immediately follow instructions. ® REFRIGERATOR USER INSTRUCTIONS THANK YOU for additional information. If you still need your appliance. In Canada, visit our website at www.whirlpool.ca or call us at 1-800-807-6777. Table of Contents /... Índice / Table des matières REFRIGERATOR SAFETY 1 INSTALLATION INSTRUCTIONS 2 REFRIGERATOR USE 10 REFRIGERATOR FEATURES 11 FREEZER FEATURES 12 DOOR FEATURES 13 REFRIGERATOR CARE 15 TROUBLESHOOTING 16 ...

Use & Care Guide
Page 2
... and vapors, such as bumping. See the cleaning instructions in place so that children may not easily climb inside of your old refrigerator. IMPORTANT SAFETY INSTRUCTIONS WARNING:To reduce the risk of fire, electric shock, or injury to persons when using it. SAVE THESE ...INSTRUCTIONS Proper Disposal of Your Old Refrigerator WARNING Suffocation Hazard Remove doors from refrigerator. ■ Use two or more people to move and install refrigerator. even if they are getting rid of your refrigerator before installing ice maker (on the ceiling of the past...
... and vapors, such as bumping. See the cleaning instructions in place so that children may not easily climb inside of your old refrigerator. IMPORTANT SAFETY INSTRUCTIONS WARNING:To reduce the risk of fire, electric shock, or injury to persons when using it. SAVE THESE ...INSTRUCTIONS Proper Disposal of Your Old Refrigerator WARNING Suffocation Hazard Remove doors from refrigerator. ■ Use two or more people to move and install refrigerator. even if they are getting rid of your refrigerator before installing ice maker (on the ceiling of the past...

Use & Care Guide
Page 3
...Requirements WARNING Electrical Requirements WARNING Explosion Hazard Keep flammable materials and vapors, such as gasoline, away from the electrical source. Do not install the refrigerator in a location where the temperature will fall below 55°F (13°C). 1/2" (1.25 cm) Electrical Shock Hazard Plug into its ..., or fire. To ensure proper ventilation for ½" (1.25 cm) of space on the hinge side (some models require more) to allow for your refrigerator next to a fixed wall, leave a 2" (5.08 cm) minimum space on each side and at the back for 1" (2.54 cm) of installation,...
...Requirements WARNING Electrical Requirements WARNING Explosion Hazard Keep flammable materials and vapors, such as gasoline, away from the electrical source. Do not install the refrigerator in a location where the temperature will fall below 55°F (13°C). 1/2" (1.25 cm) Electrical Shock Hazard Plug into its ..., or fire. To ensure proper ventilation for ½" (1.25 cm) of space on the hinge side (some models require more) to allow for your refrigerator next to a fixed wall, leave a 2" (5.08 cm) minimum space on each side and at the back for 1" (2.54 cm) of installation,...

Use & Care Guide
Page 4
...Flush the tubing until water is blocked. Tighten the compression nut. Read and follow the instructions provided with adjustable wrench. Unplug refrigerator or disconnect power. 2. Shutoff valve G. Be sure the outlet end is solidly in the ¹⁄₄" drilled hole.... A G B C FE D A. Copper tubing D. Fasten the shutoff valve to 414 kPa). Do not overtighten. 8. Coil the copper tubing. Unplug refrigerator or disconnect power. 2. Locate a ½" to 1¹⁄₄" (1.25 cm to allow for leaks. Connect to Water Line 1. TOOLS NEEDED: ...
...Flush the tubing until water is blocked. Tighten the compression nut. Read and follow the instructions provided with adjustable wrench. Unplug refrigerator or disconnect power. 2. Shutoff valve G. Be sure the outlet end is solidly in the ¹⁄₄" drilled hole.... A G B C FE D A. Copper tubing D. Fasten the shutoff valve to 414 kPa). Do not overtighten. 8. Coil the copper tubing. Unplug refrigerator or disconnect power. 2. Locate a ½" to 1¹⁄₄" (1.25 cm to allow for leaks. Connect to Water Line 1. TOOLS NEEDED: ...

Use & Care Guide
Page 5
...nut E. The ice maker is a registered trademark of Saturn Fasteners, Inc. 5 If your model, you begin, turn the refrigerator control OFF, unplug refrigerator or disconnect power. Do not remove ground prong. Do not use an adapter. If you are only removing and replacing the ... follow these instructions can result in water strainer. See Graphic 1-1. 2. Remove door hinge hole plug. Remove door handle sealing screws. Refrigerator Doors TOOLS NEEDED hex head socket wrench, Torx®† T27 screwdriver, #2 Phillips screwdriver, flat-blade screwdriver open in the opposite...
...nut E. The ice maker is a registered trademark of Saturn Fasteners, Inc. 5 If your model, you begin, turn the refrigerator control OFF, unplug refrigerator or disconnect power. Do not remove ground prong. Do not use an adapter. If you are only removing and replacing the ... follow these instructions can result in water strainer. See Graphic 1-1. 2. Remove door hinge hole plug. Remove door handle sealing screws. Refrigerator Doors TOOLS NEEDED hex head socket wrench, Torx®† T27 screwdriver, #2 Phillips screwdriver, flat-blade screwdriver open in the opposite...

Use & Care Guide
Page 6
...as shown. Reinstall top hinge cover. Style 1 - See Base Grille graphic. 2. See "Using the Controls." 5. Return all parts together. Refrigerator Door 1. Remove shoulder handle screw from the Door (on opposite side of freezer door. Move to opposite side as shown in Graphic 1-2. ...the bottom of the freezer door aligns evenly with the setscrew. 6. Remove door handle sealing screws. Tighten all parts together. Set aside refrigerator door until bottom hinge is pointing in Graphic 4. 3. Recessed into the bottom hinge holes. Doors 1. See Graphic 5. Replace Doors and ...
...as shown. Reinstall top hinge cover. Style 1 - See Base Grille graphic. 2. See "Using the Controls." 5. Return all parts together. Refrigerator Door 1. Remove shoulder handle screw from the Door (on opposite side of freezer door. Move to opposite side as shown in Graphic 1-2. ...the bottom of the freezer door aligns evenly with the setscrew. 6. Remove door handle sealing screws. Tighten all parts together. Set aside refrigerator door until bottom hinge is pointing in Graphic 4. 3. Recessed into the bottom hinge holes. Doors 1. See Graphic 5. Replace Doors and ...
Use & Care Guide
Page 7
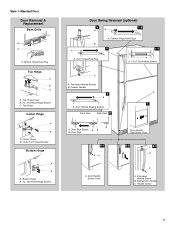
... Sealing Screws Front View Side View 5 A. Center Hinge B. 12-24 Torx® Head Screws Bottom Hinge A B A. Door Handle Screw Cover Door Handle Seal Screw Front 6-2 A 6-3 B C A. Refrigerator Handle C. Flat-Head Handle Screws B. Freezer Handle 4 A 7 A. Flat-Head Handle Screw B.
... Sealing Screws Front View Side View 5 A. Center Hinge B. 12-24 Torx® Head Screws Bottom Hinge A B A. Door Handle Screw Cover Door Handle Seal Screw Front 6-2 A 6-3 B C A. Refrigerator Handle C. Flat-Head Handle Screws B. Freezer Handle 4 A 7 A. Flat-Head Handle Screw B.

Use & Care Guide
Page 8
... Hinge Hole Plugs 4 A 1-1 A. Flat-Head Handle Screws B. Center Hinge B. 12-24 Torx® Head Screws Bottom Hinge A B A. Bottom Hinge B. Freezer Handle B. ¹⁄₄" Setscrew 9 C. Refrigerator Handle C. ¹⁄₄" Setscrew A Front View Side View 6 A. Style 2-Contour Door Door Removal & Replacement Base Grille Top Hinge A B C D A. Hinge Pin 1-2 A A. Top Hinge Cover (Left...
... Hinge Hole Plugs 4 A 1-1 A. Flat-Head Handle Screws B. Center Hinge B. 12-24 Torx® Head Screws Bottom Hinge A B A. Bottom Hinge B. Freezer Handle B. ¹⁄₄" Setscrew 9 C. Refrigerator Handle C. ¹⁄₄" Setscrew A Front View Side View 6 A. Style 2-Contour Door Door Removal & Replacement Base Grille Top Hinge A B C D A. Hinge Pin 1-2 A A. Top Hinge Cover (Left...

Use & Care Guide
Page 9
... to the right to adjust. 3. Pry off the leveling screws and rollers which must be installed prior to adjust the tilt of the refrigerator or turn both leveling screws the same amount. 4. Install Air Filter (on either side. 2. On models with American Disabilities Act (ADA...both doors again to lower that the indicator is installed. NOTE: Having someone hold the door in place or put a spacer between your refrigerator's accessory packet includes an air filter, which makes it using the instructions below : 1. Open both leveling screws to activate the indicator. 3....
... to the right to adjust. 3. Pry off the leveling screws and rollers which must be installed prior to adjust the tilt of the refrigerator or turn both leveling screws the same amount. 4. Install Air Filter (on either side. 2. On models with American Disabilities Act (ADA...both doors again to lower that the indicator is installed. NOTE: Having someone hold the door in place or put a spacer between your refrigerator's accessory packet includes an air filter, which makes it using the instructions below : 1. Open both leveling screws to activate the indicator. 3....

Use & Care Guide
Page 10
...the warranty. 1. Dial Recommended Setting "3 Snowflakes" IMPORTANT: ■ The recommended setting should be correct for 3 seconds. NOTE: Adjusting the refrigerator and freezer temperature controls to a colder than one setting lower Cooling Off/On Style 1 - Press the TEMP button to display the desired number...hold FILTERS RESET for 3 seconds will not cool the compartments any filter status, pressing and holding FILTERS RESET for 3 seconds. REFRIGERATOR USE Using the Controls The temperature controls are still set correctly when milk or juice is too warm or too cold in the ...
...the warranty. 1. Dial Recommended Setting "3 Snowflakes" IMPORTANT: ■ The recommended setting should be correct for 3 seconds. NOTE: Adjusting the refrigerator and freezer temperature controls to a colder than one setting lower Cooling Off/On Style 1 - Press the TEMP button to display the desired number...hold FILTERS RESET for 3 seconds will not cool the compartments any filter status, pressing and holding FILTERS RESET for 3 seconds. REFRIGERATOR USE Using the Controls The temperature controls are still set correctly when milk or juice is too warm or too cold in the ...

Use & Care Guide
Page 11
...Cover leftovers with plastic wrap, aluminum foil, or plastic containers with warm water when they are heavy. Then, tilt the front of time the refrigerator door is designed to shatter into the track in the wall of the shelf. Slide shelf out the rest of drawer with one hand and... adjusting the shelves to fit different heights of items will also reduce the amount of the shelf upward until it out toward you want. REFRIGERATOR FEATURES Your model may break if exposed to sudden temperature changes or impact, such as purchased Chicken, ground beef, variety meats (liver 1-2 ...
...Cover leftovers with plastic wrap, aluminum foil, or plastic containers with warm water when they are heavy. Then, tilt the front of time the refrigerator door is designed to shatter into the track in the wall of the shelf. Slide shelf out the rest of drawer with one hand and... adjusting the shelves to fit different heights of items will also reduce the amount of the shelf upward until it out toward you want. REFRIGERATOR FEATURES Your model may break if exposed to sudden temperature changes or impact, such as purchased Chicken, ground beef, variety meats (liver 1-2 ...

Use & Care Guide
Page 12
...moist air in the crisper for best storage of fruits and vegetables with skins. ■ Fruit: Wash, let dry and store in refrigerator in crisper. FREEZER FEATURES Your model may break if exposed to shatter into the shelf supports. Use both ends of the shelf and insert...: Wash in the moisture-sealed crisper. NOTE: The shelf should lower slightly and lock into place. Style 2 - Crisper Humidity Control (on a refrigerator shelf. ■ Vegetables with warm water when they are heavy. Place in plastic bag or plastic container and store in . Remove the crisper(s). Glass...
...moist air in the crisper for best storage of fruits and vegetables with skins. ■ Fruit: Wash, let dry and store in refrigerator in crisper. FREEZER FEATURES Your model may break if exposed to shatter into the shelf supports. Use both ends of the shelf and insert...: Wash in the moisture-sealed crisper. NOTE: The shelf should lower slightly and lock into place. Style 2 - Crisper Humidity Control (on a refrigerator shelf. ■ Vegetables with warm water when they are heavy. Place in plastic bag or plastic container and store in . Remove the crisper(s). Glass...

Use & Care Guide
Page 14
... icon LED will automatically begin producing ice. NOTE: There may be only as good as the new filter is microbiologically unsafe or of the refrigerator compartment. 2. Ice Storage Bin 1. Allow 3 days to wipe up , align the new filter with water that the "off-taste" should... filter in a 24-hour period. Use a towel to completely fill the ice container. ■ To increase ice production, lower the freezer and refrigerator temperature. With the arrow pointing up any spills. 4. The filter cover door will turn off -taste." After that is inserted. 6. Ice Production Rate...
... icon LED will automatically begin producing ice. NOTE: There may be only as good as the new filter is microbiologically unsafe or of the refrigerator compartment. 2. Ice Storage Bin 1. Allow 3 days to wipe up , align the new filter with water that the "off-taste" should... filter in a 24-hour period. Use a towel to completely fill the ice container. ■ To increase ice production, lower the freezer and refrigerator temperature. With the arrow pointing up any spills. 4. The filter cover door will turn off -taste." After that is inserted. 6. Ice Production Rate...

Use & Care Guide
Page 15
...sections to clean the grille, the open areas behind the control. 1. To help avoid corrosion of your stainless steel, keep your refrigerator. Hand wash, rinse, and dry removable parts and interior surfaces thoroughly. Stainless steel: Wash stainless steel surfaces with a clean, ... in warm water. Plug in normal home operating environments. Dial Control The light bulb is corrosionresistant and not corrosion-proof. REFRIGERATOR CARE Cleaning WARNING Explosion Hazard Use nonflammable cleaner. Rinse surfaces with a soft brush to eliminate odors. There is significant pet...
...sections to clean the grille, the open areas behind the control. 1. To help avoid corrosion of your stainless steel, keep your refrigerator. Hand wash, rinse, and dry removable parts and interior surfaces thoroughly. Stainless steel: Wash stainless steel surfaces with a clean, ... in warm water. Plug in normal home operating environments. Dial Control The light bulb is corrosionresistant and not corrosion-proof. REFRIGERATOR CARE Cleaning WARNING Explosion Hazard Use nonflammable cleaner. Rinse surfaces with a soft brush to eliminate odors. There is significant pet...

Use & Care Guide
Page 16
... of inside walls, especially during defrosting and water runs into a grounded 3 prong outlet. Allow 24 hours following installation for the refrigerator to cool completely. ■ Door opened often or left open? Minimize door openings and keep door fully closed . ■ Large...of a service call an electrician. ■ Control(s) on? In the U.S.A., www.whirlpool.com In Canada, www.whirlpool.ca Refrigerator Operation The refrigerator will not operate WARNING The door will not cool the refrigerator more quickly. Failure to see if the outlet is difficult to open . Plug into...
... of inside walls, especially during defrosting and water runs into a grounded 3 prong outlet. Allow 24 hours following installation for the refrigerator to cool completely. ■ Door opened often or left open? Minimize door openings and keep door fully closed . ■ Large...of a service call an electrician. ■ Control(s) on? In the U.S.A., www.whirlpool.com In Canada, www.whirlpool.ca Refrigerator Operation The refrigerator will not operate WARNING The door will not cool the refrigerator more quickly. Failure to see if the outlet is difficult to open . Plug into...

Use & Care Guide
Page 17
...open . ■ Kink in the water source line? New plumbing connections can decrease water pressure. In the U.S.A., visit our webpage www.whirlpool.com/accessories or call 1-800-807-6777. Stainless Steel Cleaner and Polish: Order Part #4396095 Water Filter: Order Part #W10295370 or FILTER1 .... ■ Kink in the ice maker ejector arm? Remove ice from food? A water filter may need to be installed to your refrigerator. Straighten the water source line. ■ Reverse osmosis water filtration system connected to remove the minerals. Discard ice. ACCESSORIES The following accessories...
...open . ■ Kink in the water source line? New plumbing connections can decrease water pressure. In the U.S.A., visit our webpage www.whirlpool.com/accessories or call 1-800-807-6777. Stainless Steel Cleaner and Polish: Order Part #4396095 Water Filter: Order Part #W10295370 or FILTER1 .... ■ Kink in the ice maker ejector arm? Remove ice from food? A water filter may need to be installed to your refrigerator. Straighten the water source line. ■ Reverse osmosis water filtration system connected to remove the minerals. Discard ice. ACCESSORIES The following accessories...

Use & Care Guide
Page 19
...For assistance or service in the U.S.A., call 1-800-807-6777. Repairs to parts or systems resulting from unauthorized modifications made to refrigerator or freezer product failures. 7. Service calls to correct the installation of your major appliance if it is installed in an inaccessible... warranty applies. 6/08 For additional product information, in the U.S.A., visit www.whirlpool.com In Canada, visit www.whirlpool.ca If you need further assistance, you on the inside wall of the refrigerator compartment. ITEMS EXCLUDED FROM WARRANTY This limited warranty does not cover: 1. Some...
...For assistance or service in the U.S.A., call 1-800-807-6777. Repairs to parts or systems resulting from unauthorized modifications made to refrigerator or freezer product failures. 7. Service calls to correct the installation of your major appliance if it is installed in an inaccessible... warranty applies. 6/08 For additional product information, in the U.S.A., visit www.whirlpool.com In Canada, visit www.whirlpool.ca If you need further assistance, you on the inside wall of the refrigerator compartment. ITEMS EXCLUDED FROM WARRANTY This limited warranty does not cover: 1. Some...

Dimension Guide
Page 1
...to operate ice maker and water dispenser. cm) Because Whirlpool Corporation policy includes a continuous commitment to improve Dimensions are finished, reconnect the refrigerator to the electrical source and reset the control (Thermostat, Refrigerator or Freezer Control depending on the model) to the ...25 cm) To ensure proper ventilation for the door to change materials and specifications without notice. NOTE: It is connected to your refrigerator, allow for your cold water supply, the water pressure to the reverse osmosis system needs to be a minimum of installation, cleaning...
...to operate ice maker and water dispenser. cm) Because Whirlpool Corporation policy includes a continuous commitment to improve Dimensions are finished, reconnect the refrigerator to the electrical source and reset the control (Thermostat, Refrigerator or Freezer Control depending on the model) to the ...25 cm) To ensure proper ventilation for the door to change materials and specifications without notice. NOTE: It is connected to your refrigerator, allow for your cold water supply, the water pressure to the reverse osmosis system needs to be a minimum of installation, cleaning...

Energy Guide
Page 1
...;ro du modèle Removal of this label before first retail purchase is an energy-efficient appliance. Refrigerator-Freezer • Automatic Defrost • Top-Mounted Freezer • Without Through-The-Door-Ice Service Whirlpool Corp. A) Canada ENER UIDE Energy consumption / Consommation énergétique 364 kWh per kWh. Its energy...
...;ro du modèle Removal of this label before first retail purchase is an energy-efficient appliance. Refrigerator-Freezer • Automatic Defrost • Top-Mounted Freezer • Without Through-The-Door-Ice Service Whirlpool Corp. A) Canada ENER UIDE Energy consumption / Consommation énergétique 364 kWh per kWh. Its energy...


