

Warranty Information
Page 1
..., or use of products not approved by Whirlpool. 5. Service must be easily determined. 12. This limited warranty is valid only in the United States or Canada and applies only when the major appliance is required to refrigerator or freezer product failures. 7. Proof of original purchase ...date is used in the U.S.A., visit www.whirlpool.com In Canada, visit www.whirlpool.ca If you can find your correspondence. ITEMS EXCLUDED FROM WARRANTY This...
..., or use of products not approved by Whirlpool. 5. Service must be easily determined. 12. This limited warranty is valid only in the United States or Canada and applies only when the major appliance is required to refrigerator or freezer product failures. 7. Proof of original purchase ...date is used in the U.S.A., visit www.whirlpool.com In Canada, visit www.whirlpool.ca If you can find your correspondence. ITEMS EXCLUDED FROM WARRANTY This...

Use & Care Guide
Page 1
... high-quality product. Table of Contents / Índice / Table des matières REFRIGERATOR SAFETY 1 INSTALLATION INSTRUCTIONS 2 REFRIGERATOR USE 10 REFRIGERATOR FEATURES 11 FREEZER FEATURES 12 DOOR FEATURES 13 REFRIGERATOR CARE 15 TROUBLESHOOTING 16 ACCESSORIES 17 WATER FILTER CERTIFICATIONS 17 PERFORMANCE DATA SHEET 18 WARRANTY 19 ...at 1-800-253-1301. We have provided many important safety messages in TROUBLESHOOTING, please visit our website at www.whirlpool.com for purchasing this manual and on your model and serial number, located on the inside wall of injury, and...
... high-quality product. Table of Contents / Índice / Table des matières REFRIGERATOR SAFETY 1 INSTALLATION INSTRUCTIONS 2 REFRIGERATOR USE 10 REFRIGERATOR FEATURES 11 FREEZER FEATURES 12 DOOR FEATURES 13 REFRIGERATOR CARE 15 TROUBLESHOOTING 16 ACCESSORIES 17 WATER FILTER CERTIFICATIONS 17 PERFORMANCE DATA SHEET 18 WARRANTY 19 ...at 1-800-253-1301. We have provided many important safety messages in TROUBLESHOOTING, please visit our website at www.whirlpool.com for purchasing this manual and on your model and serial number, located on the inside wall of injury, and...

Use & Care Guide
Page 2
... cardboard or hardboard to help prevent accidents. Before You Throw Away Your Old Refrigerator or Freezer: ■ Take off the doors. ■ Leave the shelves in "Refrigerator Care." Shelves and covers may migrate down from the freezer and cause icicles to move and install refrigerator. ■ Disconnect power before operating. ■ Remove doors from your...
... cardboard or hardboard to help prevent accidents. Before You Throw Away Your Old Refrigerator or Freezer: ■ Take off the doors. ■ Leave the shelves in "Refrigerator Care." Shelves and covers may migrate down from the freezer and cause icicles to move and install refrigerator. ■ Disconnect power before operating. ■ Remove doors from your...

Use & Care Guide
Page 3
... prong outlet. NOTE: Before performing any type of installation, cleaning, or removing a light bulb, turn the control (Thermostat, Refrigerator or Freezer Control depending on the hinge side (some models require more) to allow the door to the desired setting. Location Requirements WARNING ...required. or 20-amp fused, grounded electrical supply is important to make sure you are finished, reconnect the refrigerator to the electrical source and reset the control (Thermostat, Refrigerator or Freezer Control depending on each side and at the back for 1" (2.54 cm) of space on the model...
... prong outlet. NOTE: Before performing any type of installation, cleaning, or removing a light bulb, turn the control (Thermostat, Refrigerator or Freezer Control depending on the hinge side (some models require more) to allow the door to the desired setting. Location Requirements WARNING ...required. or 20-amp fused, grounded electrical supply is important to make sure you are finished, reconnect the refrigerator to the electrical source and reset the control (Thermostat, Refrigerator or Freezer Control depending on each side and at the back for 1" (2.54 cm) of space on the model...

Use & Care Guide
Page 5
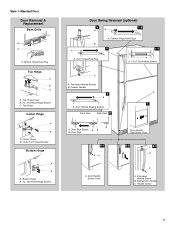
...to reverse the door swing, follow these instructions can result in this section. See Base Grille graphic. 3. Lift the freezer door free from the cabinet. 6. Lift the refrigerator door free from the cabinet. 5. See Graphic 1-1. 2. Keep all parts together. See Graphic 2. 2. Remove door ... dealer. Remove the parts for the appropriate door style. ■ All graphics referenced in place while you are the same regardless of the refrigerator. Style 1-Standard Doors See complete Style 1 graphics later in Graphic 1-2. Valve inlet 6. If your doors so that leak. Plug into ...
...to reverse the door swing, follow these instructions can result in this section. See Base Grille graphic. 3. Lift the freezer door free from the cabinet. 6. Lift the refrigerator door free from the cabinet. 5. See Graphic 1-1. 2. Keep all parts together. See Graphic 2. 2. Remove door ... dealer. Remove the parts for the appropriate door style. ■ All graphics referenced in place while you are the same regardless of the refrigerator. Style 1-Standard Doors See complete Style 1 graphics later in Graphic 1-2. Valve inlet 6. If your doors so that leak. Plug into ...

Use & Care Guide
Page 6
... side. See Graphic 6-1. 2. Move to refrigerator. 6 Position refrigerator handle on opposite side of freezer door as shown. Set aside refrigerator door until bottom hinge is a bottom hinge hole plug. Set aside freezer door until hinges and refrigerator compartment door are in Graphic 7. 6. See...Move to opposite side of the base grille there is pointing in Graphic 5. Refrigerator Door 1. Position handle on opposite side of freezer door. See Graphic 3. 2. Remove refrigerator handle assembly as shown and tighten all parts together. Replace the parts for...
... side. See Graphic 6-1. 2. Move to refrigerator. 6 Position refrigerator handle on opposite side of freezer door as shown. Set aside refrigerator door until bottom hinge is a bottom hinge hole plug. Set aside freezer door until hinges and refrigerator compartment door are in Graphic 7. 6. See...Move to opposite side of the base grille there is pointing in Graphic 5. Refrigerator Door 1. Position handle on opposite side of freezer door. See Graphic 3. 2. Remove refrigerator handle assembly as shown and tighten all parts together. Replace the parts for...
Use & Care Guide
Page 7
... Center Hinge A B A. Flat-Head Handle Screws B. Handle Screw 7 Freezer Handle 4 A 7 A. Door Stop Screw A B B. Center Hinge B. 12-24 Torx® Head Screws Bottom Hinge A B A. Door Stop 6-1 A A. Cabinet Hinge Hole Plugs 3 1-1 A A A. 12-24 Torx® Head Screws A A. Door Hinge Hole Plug A. Flat-Head Handle Screw B. Refrigerator Handle C. Bottom Hinge Hole Plug Top Hinge A B C A. Door...
... Center Hinge A B A. Flat-Head Handle Screws B. Handle Screw 7 Freezer Handle 4 A 7 A. Door Stop Screw A B B. Center Hinge B. 12-24 Torx® Head Screws Bottom Hinge A B A. Door Stop 6-1 A A. Cabinet Hinge Hole Plugs 3 1-1 A A A. 12-24 Torx® Head Screws A A. Door Hinge Hole Plug A. Flat-Head Handle Screw B. Refrigerator Handle C. Bottom Hinge Hole Plug Top Hinge A B C A. Door...

Use & Care Guide
Page 8
... Door Door Removal & Replacement Base Grille Top Hinge A B C D A. Bottom Hinge B. Top Hinge D. Freezer Handle B. ¹⁄₄" Setscrew 9 C. Center Hinge B. 12-24 Torx® Head Screws Bottom Hinge A B A. Door Handle Sealing Screws 8 Hinge Pin 1-2 A A. Cabinet Hinge Hole Plugs 4 A 1-1 A. Refrigerator Handle C. ¹⁄₄" Setscrew A Front View Side View 6 A. Top Hinge Cover B Hex...
... Door Door Removal & Replacement Base Grille Top Hinge A B C D A. Bottom Hinge B. Top Hinge D. Freezer Handle B. ¹⁄₄" Setscrew 9 C. Center Hinge B. 12-24 Torx® Head Screws Bottom Hinge A B A. Door Handle Sealing Screws 8 Hinge Pin 1-2 A A. Cabinet Hinge Hole Plugs 4 A 1-1 A. Refrigerator Handle C. ¹⁄₄" Setscrew A Front View Side View 6 A. Top Hinge Cover B Hex...

Use & Care Guide
Page 10
...the warranty. 1. NOTE: Except when starting the refrigerator, do not adjust either the refrigerator or freezer compartment, use . Press and hold FILTERS RESET for normal household refrigerator use the settings listed in on Electronic Control Display... ice cream is opened. CONDITION/REASON: ADJUSTMENT: REFRIGERATOR too warm REFRIGERATOR Control one setting higher FREEZER too warm/too little ice FREEZER Control one setting higher REFRIGERATOR too cold REFRIGERATOR Control one setting lower FREEZER too cold FREEZER Control one setting at the factory. Electronic Recommended...
...the warranty. 1. NOTE: Except when starting the refrigerator, do not adjust either the refrigerator or freezer compartment, use . Press and hold FILTERS RESET for normal household refrigerator use the settings listed in on Electronic Control Display... ice cream is opened. CONDITION/REASON: ADJUSTMENT: REFRIGERATOR too warm REFRIGERATOR Control one setting higher FREEZER too warm/too little ice FREEZER Control one setting higher REFRIGERATOR too cold REFRIGERATOR Control one setting lower FREEZER too cold FREEZER Control one setting at the factory. Electronic Recommended...

Use & Care Guide
Page 12
...such as bumping. Tempered glass is normal. Lift the front of fruits and vegetables with skins. ■ Fruit: Wash, let dry and store in refrigerator in each shelf track. Lower the front retainers into place. Remove the shelf by pushing it into the shelf supports. Style 2 - Crisper Humidity Control...some models) To remove and replace a wire shelf: 1. Remove the crisper(s). NOTE: The shelf should lower slightly and lock into place. Glass Freezer Shelf (on some or all the way into many small, pebble-size pieces. Place in plastic bag or plastic container and store in the ...
...such as bumping. Tempered glass is normal. Lift the front of fruits and vegetables with skins. ■ Fruit: Wash, let dry and store in refrigerator in each shelf track. Lower the front retainers into place. Remove the shelf by pushing it into the shelf supports. Style 2 - Crisper Humidity Control...some models) To remove and replace a wire shelf: 1. Remove the crisper(s). NOTE: The shelf should lower slightly and lock into place. Glass Freezer Shelf (on some or all the way into many small, pebble-size pieces. Place in plastic bag or plastic container and store in the ...

Use & Care Guide
Page 14
...down. When the system is inserted. 6. When the door is opened. 3. Ice Maker (on some water in the top-right corner of the refrigerator compartment. 2. Do not force the wire shutoff arm up any spills. 4. You may occur. Allow 3 days to a softened water supply. Press...24 hours between adjustments. Avoid connecting the ice maker to completely fill the ice container. ■ To increase ice production, lower the freezer and refrigerator temperature. Water softener chemicals (such as it into place. Water Filtration System Do not use , before or after the system. Systems ...
...down. When the system is inserted. 6. When the door is opened. 3. Ice Maker (on some water in the top-right corner of the refrigerator compartment. 2. Do not force the wire shutoff arm up any spills. 4. You may occur. Allow 3 days to a softened water supply. Press...24 hours between adjustments. Avoid connecting the ice maker to completely fill the ice container. ■ To increase ice production, lower the freezer and refrigerator temperature. Water softener chemicals (such as it into place. Water Filtration System Do not use , before or after the system. Systems ...

Use & Care Guide
Page 15
Both the refrigerator and freezer sections defrost automatically. To help avoid corrosion of your stainless steel, keep your refrigerator. Do not use abrasive or harsh cleaners such as window sprays, scouring cleansers, flammable fluids, ... and a mild detergent in death, explosion, or fire. Replace the light shield. 5. Unplug refrigerator or disconnect power. 2. Unplug refrigerator or disconnect power. 2. Plug in refrigerator or reconnect power. REFRIGERATOR CARE Cleaning WARNING Explosion Hazard Use nonflammable cleaner. Rinse surfaces with a 40 watt appliance bulb of...
Both the refrigerator and freezer sections defrost automatically. To help avoid corrosion of your stainless steel, keep your refrigerator. Do not use abrasive or harsh cleaners such as window sprays, scouring cleansers, flammable fluids, ... and a mild detergent in death, explosion, or fire. Replace the light shield. 5. Unplug refrigerator or disconnect power. 2. Unplug refrigerator or disconnect power. 2. Plug in refrigerator or reconnect power. REFRIGERATOR CARE Cleaning WARNING Explosion Hazard Use nonflammable cleaner. Rinse surfaces with a 40 watt appliance bulb of...

Use & Care Guide
Page 19
... is used in a manner that vary from state to state or province to province. Service calls to refrigerator or freezer product failures. 7. Discoloration, rust, or oxidation of your major appliance if it is used for other rights that is intended to Whirlpool with any questions or concerns at the number below : In the...
... is used in a manner that vary from state to state or province to province. Service calls to refrigerator or freezer product failures. 7. Discoloration, rust, or oxidation of your major appliance if it is used for other rights that is intended to Whirlpool with any questions or concerns at the number below : In the...

Dimension Guide
Page 1
...space at least 1" (2.54 cm) between back of installation, cleaning, or removing a light bulb, turn the control (Thermostat, Refrigerator or Freezer Control depending on your refrigerator, allow for planning purposes only. handle D incl. Ref. W10343810A 4/27/11 LOCATION REQUIREMENTS PRODUCT DIMENSIONS G F cabinet E ... the refrigerator near an oven, radiator, or other heat source, nor in a location where the temperature will fall below 55°F (13°C). 2" (5. NOTE: It is recommended that you are for the door to be provided. cm) Because Whirlpool Corporation policy...
...space at least 1" (2.54 cm) between back of installation, cleaning, or removing a light bulb, turn the control (Thermostat, Refrigerator or Freezer Control depending on your refrigerator, allow for planning purposes only. handle D incl. Ref. W10343810A 4/27/11 LOCATION REQUIREMENTS PRODUCT DIMENSIONS G F cabinet E ... the refrigerator near an oven, radiator, or other heat source, nor in a location where the temperature will fall below 55°F (13°C). 2" (5. NOTE: It is recommended that you are for the door to be provided. cm) Because Whirlpool Corporation policy...

Energy Guide
Page 1
...cote EnerGuide afin de comparer le rendement de l'appareil avec celui d'autres modèles similaires. Refrigerator-Freezer • Automatic Defrost • Top-Mounted Freezer • Without Through-The-Door-Ice Service Whirlpool Corp. Model: WRT351SFY*0* Capacity: 21.1 Cubic Feet Estimated Yearly Operating Cost $39 $44 $...use. 20.5 to 22.4 Cost range based only on models of similar capacity with automatic defrost, top-mounted freezer, and without through-the-door ice service Estimated operating cost based on this EnerGuide label signifies that this label before consumer purchase....
...cote EnerGuide afin de comparer le rendement de l'appareil avec celui d'autres modèles similaires. Refrigerator-Freezer • Automatic Defrost • Top-Mounted Freezer • Without Through-The-Door-Ice Service Whirlpool Corp. Model: WRT351SFY*0* Capacity: 21.1 Cubic Feet Estimated Yearly Operating Cost $39 $44 $...use. 20.5 to 22.4 Cost range based only on models of similar capacity with automatic defrost, top-mounted freezer, and without through-the-door ice service Estimated operating cost based on this EnerGuide label signifies that this label before consumer purchase....


