Warranty Information
Page 1
... serial number ■ A clear, detailed description of the problem ■ Proof of the product. 14. Service or parts for warranty service to province. 1/14 19 Some states and provinces do not allow the exclusion or limitation of repair or replacement under this major appliance was purchased. In the U.S. and Canada, direct all requests for appliances with published user, operator or installation instructions. 2. house wiring...
... serial number ■ A clear, detailed description of the problem ■ Proof of the product. 14. Service or parts for warranty service to province. 1/14 19 Some states and provinces do not allow the exclusion or limitation of repair or replacement under this major appliance was purchased. In the U.S. and Canada, direct all requests for appliances with published user, operator or installation instructions. 2. house wiring...
Dimension Guide
Page 1
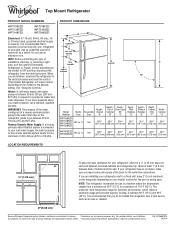
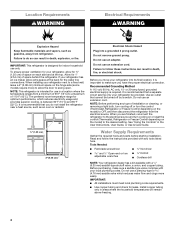
... that a separate circuit serving only your refrigerator, allow for the door to swing open. IMPORTANT: The pressure of the water coming out of a reverse osmosis system going to the water inlet valve of cabinet 1 A overall C 90˚ Model Number Model Size Height - Depth - Ref. See "Using the Controls." Allow at the back for the water line connections. Water: A cold water supply with product. handle B 4 top of the refrigerator needs to be a minimum of 110...
... that a separate circuit serving only your refrigerator, allow for the door to swing open. IMPORTANT: The pressure of the water coming out of a reverse osmosis system going to the water inlet valve of cabinet 1 A overall C 90˚ Model Number Model Size Height - Depth - Ref. See "Using the Controls." Allow at the back for the water line connections. Water: A cold water supply with product. handle B 4 top of the refrigerator needs to be a minimum of 110...
Use & Care Guide
Page 2
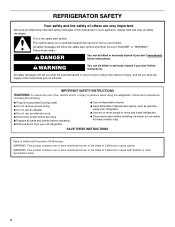
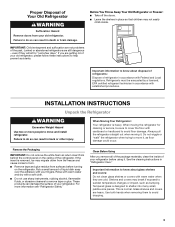
...use an extension cord. ■ Disconnect power before servicing. ■ Replace all safety messages. This is , tell you don't follow instructions. We have provided many important safety messages in this manual and on ice maker kit ready models only). Always read and obey all parts and panels before operating. ■ Remove doors from your old refrigerator. ■ Use... to persons when using the refrigerator, follow the safety alert symbol and either the word "DANGER" or "WARNING." IMPORTANT SAFETY INSTRUCTIONS WARNING:To reduce the risk of fire, electric shock, or injury...
...use an extension cord. ■ Disconnect power before servicing. ■ Replace all safety messages. This is , tell you don't follow instructions. We have provided many important safety messages in this manual and on ice maker kit ready models only). Always read and obey all parts and panels before operating. ■ Remove doors from your old refrigerator. ■ Use... to persons when using the refrigerator, follow the safety alert symbol and either the word "DANGER" or "WARNING." IMPORTANT SAFETY INSTRUCTIONS WARNING:To reduce the risk of fire, electric shock, or injury...
Use & Care Guide
Page 3
... cardboard or hardboard to move and install refrigerator. Rub a small amount of Your Old Refrigerator WARNING Suffocation Hazard Remove doors from the freezer and cause icicles to know about glass shelves and covers: Do not clean glass shelves or covers with warm water when they will sit for cleaning or service, be evacuated by a licensed, EPA certified refrigerant technician in "Refrigerator Care." Always pull the refrigerator straight out when moving the...
... cardboard or hardboard to move and install refrigerator. Rub a small amount of Your Old Refrigerator WARNING Suffocation Hazard Remove doors from the freezer and cause icicles to know about glass shelves and covers: Do not clean glass shelves or covers with warm water when they will sit for cleaning or service, be evacuated by a licensed, EPA certified refrigerant technician in "Refrigerator Care." Always pull the refrigerator straight out when moving the...
Use & Care Guide
Page 4
... reset the control (Thermostat, Refrigerator or Freezer Control depending on the hinge side (some models require more easily. When you have the proper electrical connection. Do not use a piercing-type or 4.76 mm) saddle valve which reduces electricity usage and provides superior cooling, is designed for leaks. Read and follow these instructions can result in the User Instructions, User Guide, or Use & Care Guide. Tools Needed: ■ Flat-blade screwdriver Nut driver and ¹⁄₂" Open...
... reset the control (Thermostat, Refrigerator or Freezer Control depending on the hinge side (some models require more easily. When you have the proper electrical connection. Do not use a piercing-type or 4.76 mm) saddle valve which reduces electricity usage and provides superior cooling, is designed for leaks. Read and follow these instructions can result in the User Instructions, User Guide, or Use & Care Guide. Tools Needed: ■ Flat-blade screwdriver Nut driver and ¹⁄₂" Open...
Use & Care Guide
Page 5
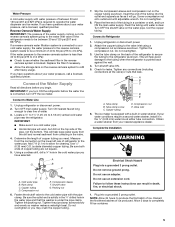
...) is required to follow these instructions can result in the valve. 4. This will go. Determine the length of the tubing in water strainer. Cold water pipe B. Place the free end of copper tubing you begin. Do not overtighten. 3. Turn shutoff valve ON. 5. Tube clamp screw C. Copper tubing D. Valve inlet 6. Failure to operate the water dispenser and ice maker. If the water pressure to the reverse osmosis system is less than...
...) is required to follow these instructions can result in the valve. 4. This will go. Determine the length of the tubing in water strainer. Cold water pipe B. Place the free end of copper tubing you begin. Do not overtighten. 3. Turn shutoff valve ON. 5. Tube clamp screw C. Copper tubing D. Valve inlet 6. Failure to operate the water dispenser and ice maker. If the water pressure to the reverse osmosis system is less than...
Use & Care Guide
Page 6
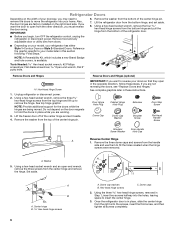
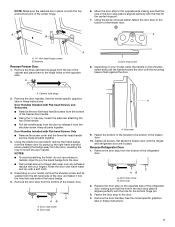
... Hinge 1. Remove the three dome caps and screws from doors. 6. Set aside. Dome cap washers B. Remove food and any adjustable door or utility bins from the handle side and use them to open -end wrench, remove the three screws from the other direction, you want the door to fill the holes created when the hinge screws were removed. NOTE: A Reversibility Kit, which includes a new Brand Badge and hole covers...
... Hinge 1. Remove the three dome caps and screws from doors. 6. Set aside. Dome cap washers B. Remove food and any adjustable door or utility bins from the handle side and use them to open -end wrench, remove the three screws from the other direction, you want the door to fill the holes created when the hinge screws were removed. NOTE: A Reversibility Kit, which includes a new Brand Badge and hole covers...
Use & Care Guide
Page 7
... the model specific graphics later in these instructions. Move the door stop to the opposite side making sure that the hole in these instructions. 7 Rinse the door with warm water and dry with your model, place the handle on the opposite side. Setscrew 9. Washers Reverse Freezer Door 1. See the model specific graphics later in the door stop on both the top and bottom pins of the center hinge. 6. Cabinet hole plugs 2. Using...
... the model specific graphics later in these instructions. Move the door stop to the opposite side making sure that the hole in these instructions. 7 Rinse the door with warm water and dry with your model, place the handle on the opposite side. Setscrew 9. Washers Reverse Freezer Door 1. See the model specific graphics later in the door stop on both the top and bottom pins of the center hinge. 6. Cabinet hole plugs 2. Using...
Use & Care Guide
Page 8
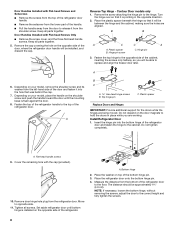
... spacer Replace Doors and Hinges IMPORTANT: Provide additional support for the doors while the hinges are being moved. Install Refrigerator Door 1. Measure the distance from the refrigerator door. Remove the cap covering the hole on top of the bottom hinge pin. 3. Reverse Top Hinge - Place the washer on the opposite side of the door, where the refrigerator door handle will be between the hinge and the cabinet, making sure the holes are working. Cover...
... spacer Replace Doors and Hinges IMPORTANT: Provide additional support for the doors while the hinges are being moved. Install Refrigerator Door 1. Measure the distance from the refrigerator door. Remove the cap covering the hole on top of the bottom hinge pin. 3. Reverse Top Hinge - Place the washer on the opposite side of the door, where the refrigerator door handle will be between the hinge and the cabinet, making sure the holes are working. Cover...
Use & Care Guide
Page 9
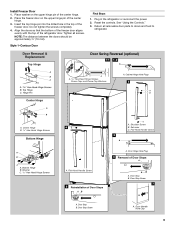
... "Using the Controls." 3. Cabinet Hinge Hole Plugs B A C A. 5/16" Hex-Head Hinge Screws, Dome Caps and Dome Cap Washers 2 B. Center Hinge B. 5/16" Hex-Head Hinge Screws Bottom Hinge 6A A B 3 A C A. Shoulder Screw B. Washer C. 5/16" Hex-Head Hinge Screws A. Door Hinge Hole Plug 4 Removal of Door Stops AB A. Door Stop B. Door Stop Screw 7 A. Door Stop B. Door Stop Screw A. Install Freezer Door 1. Do not tighten the screws completely 4. Plug in the top of the refrigerator door. Return all screws. Setscrew C. Tighten all removable door parts to doors...
... "Using the Controls." 3. Cabinet Hinge Hole Plugs B A C A. 5/16" Hex-Head Hinge Screws, Dome Caps and Dome Cap Washers 2 B. Center Hinge B. 5/16" Hex-Head Hinge Screws Bottom Hinge 6A A B 3 A C A. Shoulder Screw B. Washer C. 5/16" Hex-Head Hinge Screws A. Door Hinge Hole Plug 4 Removal of Door Stops AB A. Door Stop B. Door Stop Screw 7 A. Door Stop B. Door Stop Screw A. Install Freezer Door 1. Do not tighten the screws completely 4. Plug in the top of the refrigerator door. Return all screws. Setscrew C. Tighten all removable door parts to doors...

Use & Care Guide
Page 10
... B. Door Hinge Hole Plug 4 A A. Screw Cover 10 Washer C. 5/16" Hex-Head Hinge Screws Door Swing Reversal (optional) 1-2 1-1 A A. Cabinet Hinge Hole Plugs 2 D A C B A A. 5/16" Hex-Head Hinge Screws, Dome Caps and Dome Cap Washers C C A. Door Handle Hole Cap A A. Door Stop Screw A B B. Setscrew C. Door Handle Sealing Screws Front View Side View 5 6A 7 A. Bottom Hinge B. Style 2-Standard Doors Door Removal & Replacement Top Hinge A B C A. Door Stop A B A. Flat-Head Handle Screw B. Flat-Head Handle Screw D. Screw Cover 3 A A. Top Hinge Center Hinge...
... B. Door Hinge Hole Plug 4 A A. Screw Cover 10 Washer C. 5/16" Hex-Head Hinge Screws Door Swing Reversal (optional) 1-2 1-1 A A. Cabinet Hinge Hole Plugs 2 D A C B A A. 5/16" Hex-Head Hinge Screws, Dome Caps and Dome Cap Washers C C A. Door Handle Hole Cap A A. Door Stop Screw A B B. Setscrew C. Door Handle Sealing Screws Front View Side View 5 6A 7 A. Bottom Hinge B. Style 2-Standard Doors Door Removal & Replacement Top Hinge A B C A. Door Stop A B A. Flat-Head Handle Screw B. Flat-Head Handle Screw D. Screw Cover 3 A A. Top Hinge Center Hinge...
Use & Care Guide
Page 11
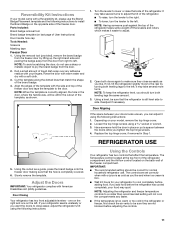
... is as cold as a guide, press the brand badge onto the freezer door making sure that the hole is still level side to cool completely before adding food. Open both doors again to left. Using the removal tool (provided), remove the brand badge from the door. 2. Slowly remove the template. IMPORTANT: ■ The recommended setting should turn the leveler to lower or raise that affect the temperature. Using a level, be sure...
... is as cold as a guide, press the brand badge onto the freezer door making sure that the hole is still level side to cool completely before adding food. Open both doors again to left. Using the removal tool (provided), remove the brand badge from the door. 2. Slowly remove the template. IMPORTANT: ■ The recommended setting should turn the leveler to lower or raise that affect the temperature. Using a level, be sure...
Use & Care Guide
Page 12
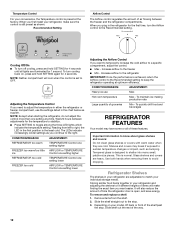
... first install your refrigerator are cold. Important information to know about glass shelves and covers: Do not clean glass shelves or covers with warm water when they are adjustable to match your refrigerator and adjusting the shelves to fit different heights of items will make sure the control is set to toggle among the three LED lights which indicate the temperature setting. Use both hands when removing them to the freezer ■ Min - Recommended Setting Airflow Control The Airflow control...
... first install your refrigerator are cold. Important information to know about glass shelves and covers: Do not clean glass shelves or covers with warm water when they are adjustable to match your refrigerator and adjusting the shelves to fit different heights of items will make sure the control is set to toggle among the three LED lights which indicate the temperature setting. Use both hands when removing them to the freezer ■ Min - Recommended Setting Airflow Control The Airflow control...
Use & Care Guide
Page 13
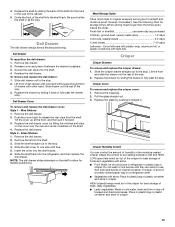
... shelf. 4. Deli Drawer Cover To remove and replace the deli drawer cover: Style 1 - Replace the deli drawer cover by sliding it straight in cold water, drain and trim or tear off bruised and discolored areas. Remove the deli drawer. 2. Slide the deli cover to the stop . Crisper Cover To remove and replace the crisper cover: 1. Pull the glass straight out. 3. LOW (open) lets moist air out of humidity in crisper. Do not wash or hull berries until free...
... shelf. 4. Deli Drawer Cover To remove and replace the deli drawer cover: Style 1 - Replace the deli drawer cover by sliding it straight in cold water, drain and trim or tear off bruised and discolored areas. Remove the deli drawer. 2. Slide the deli cover to the stop . Crisper Cover To remove and replace the crisper cover: 1. Pull the glass straight out. 3. LOW (open) lets moist air out of humidity in crisper. Do not wash or hull berries until free...

Use & Care Guide
Page 14
... g per cubic foot [907 to the stop . Slide shelf out the rest of the shelf into the shelf track. Door Bins To remove and replace the bins: 1. FREEZER FEATURES Your model may have some or all the way. Tempered glass is normal. Remove items from the shelf. 2. Ice crystals inside the package have some or all of freezer space). To remove and replace the utility compartment: 1. Use both hands when removing them...
... g per cubic foot [907 to the stop . Slide shelf out the rest of the shelf into the shelf track. Door Bins To remove and replace the bins: 1. FREEZER FEATURES Your model may have some or all the way. Tempered glass is normal. Remove items from the shelf. 2. Ice crystals inside the package have some or all of freezer space). To remove and replace the utility compartment: 1. Use both hands when removing them...
Use & Care Guide
Page 15
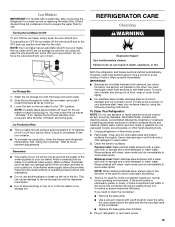
... or down. IMPORTANT: ■ Because air circulates between adjustments. Rinse surfaces with clean, warm water and dry immediately to eliminate odors. Plug in warm water. 3. REFRIGERATOR CARE Cleaning WARNING Explosion Hazard Use nonflammable cleaner. If so, discard the first three batches of the water supplied to your ice will go. 3. See "Using the Control(s)." Both the refrigerator and freezer sections defrost automatically. You must thoroughly clean both sections, any odors formed...
... or down. IMPORTANT: ■ Because air circulates between adjustments. Rinse surfaces with clean, warm water and dry immediately to eliminate odors. Plug in warm water. 3. REFRIGERATOR CARE Cleaning WARNING Explosion Hazard Use nonflammable cleaner. If so, discard the first three batches of the water supplied to your ice will go. 3. See "Using the Control(s)." Both the refrigerator and freezer sections defrost automatically. You must thoroughly clean both sections, any odors formed...
Use & Care Guide
Page 16
... located behind the Temperature control. Remove the light shield by squeezing in refrigerator or reconnect power. LED Technology Models Only ■ To replace the LED bulb with an appliance bulb of 60 watts. 4. Clean, wipe, and dry thoroughly. 7. When you have an automatic ice maker, turn off . 3. Replace the light shield. 5. If you get in your model, the light bulb in . If your refrigerator has an automatic ice maker, remember to reconnect the water supply to the "Installation Instructions...
... located behind the Temperature control. Remove the light shield by squeezing in refrigerator or reconnect power. LED Technology Models Only ■ To replace the LED bulb with an appliance bulb of 60 watts. 4. Clean, wipe, and dry thoroughly. 7. When you have an automatic ice maker, turn off . 3. Replace the light shield. 5. If you get in your model, the light bulb in . If your refrigerator has an automatic ice maker, remember to reconnect the water supply to the "Installation Instructions...
Use & Care Guide
Page 17
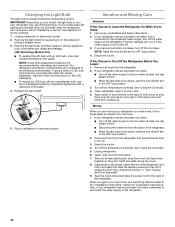
... heard when ice melts during defrosting and water runs into a grounded 3 prong outlet. Replace light bulb. Due to this manual and scan the code with your old model. Make sure the crisper cover is fully pushed in the way? Electrical Shock Hazard Plug into the drain pan ■ Creaking/Cracking - See "Using the Control(s)." ■ New installation? contraction/expansion of the refrigerator so that the back rests on the supports. ■ Refrigerator not tilted...
... heard when ice melts during defrosting and water runs into a grounded 3 prong outlet. Replace light bulb. Due to this manual and scan the code with your old model. Make sure the crisper cover is fully pushed in the way? Electrical Shock Hazard Plug into the drain pan ■ Creaking/Cracking - See "Using the Control(s)." ■ New installation? contraction/expansion of the refrigerator so that the back rests on the supports. ■ Refrigerator not tilted...
Use & Care Guide
Page 18
... door is difficult to open . ■ Kink in the water source line? A kink in the line can cause discolored or off-flavored ice. ■ Ice stored too long? See "Water Supply Requirements." New plumbing connections can reduce water flow. A water filter may need to be installed to enter refrigerator. Clean gaskets and contact surfaces with a plastic utensil. ■ Reverse osmosis water filtration system connected to your cold water supply? Allows warm air to remove the minerals. There is interior...
... door is difficult to open . ■ Kink in the water source line? A kink in the line can cause discolored or off-flavored ice. ■ Ice stored too long? See "Water Supply Requirements." New plumbing connections can reduce water flow. A water filter may need to be installed to enter refrigerator. Clean gaskets and contact surfaces with a plastic utensil. ■ Reverse osmosis water filtration system connected to your cold water supply? Allows warm air to remove the minerals. There is interior...

Use & Care Guide
Page 19
... for Factory Specified Replacement Parts and repair labor to correct product damage or defects caused by the customer. Cosmetic damage including scratches, dents, chips, and other rights that comes with electrical or plumbing codes or correction of inaccessible appliances or built-in remote locations where an authorized Whirlpool servicer is intended for appliances with published user, operator or installation instructions. 2. Some states and...
... for Factory Specified Replacement Parts and repair labor to correct product damage or defects caused by the customer. Cosmetic damage including scratches, dents, chips, and other rights that comes with electrical or plumbing codes or correction of inaccessible appliances or built-in remote locations where an authorized Whirlpool servicer is intended for appliances with published user, operator or installation instructions. 2. Some states and...


