
Warranty Information
Page 1
... - 6750 Century Ave. If outside the 50 United States and Canada, contact your authorized Whirlpool dealer to determine if another warranty applies. 6/08 For additional product information, in the U.S.A., call 1-800-807-6777. Service calls to refrigerator or freezer product failures. 7. ITEMS EXCLUDED FROM WARRANTY This limited warranty does not cover: 1. Any food...
... - 6750 Century Ave. If outside the 50 United States and Canada, contact your authorized Whirlpool dealer to determine if another warranty applies. 6/08 For additional product information, in the U.S.A., call 1-800-807-6777. Service calls to refrigerator or freezer product failures. 7. ITEMS EXCLUDED FROM WARRANTY This limited warranty does not cover: 1. Any food...

Use & Care Guide
Page 1
...not followed. Table of Contents / Índice / Table des matières REFRIGERATOR SAFETY 1 INSTALLATION INSTRUCTIONS 2 REFRIGERATOR USE 10 REFRIGERATOR FEATURES 11 FREEZER FEATURES 12 DOOR FEATURES 13 REFRIGERATOR CARE 15 TROUBLESHOOTING 16 ACCESSORIES 17 WATER FILTER CERTIFICATIONS 17 PERFORMANCE DATA SHEET 18 ...can happen if the instructions are very important. ® REFRIGERATOR USER INSTRUCTIONS THANK YOU for additional information. In Canada, visit our website at www.whirlpool.ca or call us at www.whirlpool.com for purchasing this manual and on your model and ...
...not followed. Table of Contents / Índice / Table des matières REFRIGERATOR SAFETY 1 INSTALLATION INSTRUCTIONS 2 REFRIGERATOR USE 10 REFRIGERATOR FEATURES 11 FREEZER FEATURES 12 DOOR FEATURES 13 REFRIGERATOR CARE 15 TROUBLESHOOTING 16 ACCESSORIES 17 WATER FILTER CERTIFICATIONS 17 PERFORMANCE DATA SHEET 18 ...can happen if the instructions are very important. ® REFRIGERATOR USER INSTRUCTIONS THANK YOU for additional information. In Canada, visit our website at www.whirlpool.ca or call us at www.whirlpool.com for purchasing this manual and on your model and ...

Use & Care Guide
Page 2
..., such as bumping. If you remove all parts and panels before servicing. ■ Replace all of the refrigerator. Before You Throw Away Your Old Refrigerator or Freezer: ■ Take off the doors. ■ Leave the shelves in death or brain damage. For more people...getting rid of Your Old Refrigerator WARNING Suffocation Hazard Remove doors from the freezer and cause icicles to move and install refrigerator. Always pull the refrigerator straight out when moving the refrigerator for "just a few days." Do not wiggle or "walk" the refrigerator when trying to form. ...
..., such as bumping. If you remove all parts and panels before servicing. ■ Replace all of the refrigerator. Before You Throw Away Your Old Refrigerator or Freezer: ■ Take off the doors. ■ Leave the shelves in death or brain damage. For more people...getting rid of Your Old Refrigerator WARNING Suffocation Hazard Remove doors from the freezer and cause icicles to move and install refrigerator. Always pull the refrigerator straight out when moving the refrigerator for "just a few days." Do not wiggle or "walk" the refrigerator when trying to form. ...

Use & Care Guide
Page 3
...Do not remove ground prong. It is important to make sure you are finished, reconnect the refrigerator to the electrical source and reset the control (Thermostat, Refrigerator or Freezer Control depending on each side and at the top. Use an outlet that a separate circuit ...shock. To ensure proper ventilation for 1" (2.54 cm) of installation, cleaning, or removing a light bulb, turn the control (Thermostat, Refrigerator or Freezer Control depending on the hinge side (some models require more) to follow these instructions can result in death, explosion, or fire. Recommended...
...Do not remove ground prong. It is important to make sure you are finished, reconnect the refrigerator to the electrical source and reset the control (Thermostat, Refrigerator or Freezer Control depending on each side and at the top. Use an outlet that a separate circuit ...shock. To ensure proper ventilation for 1" (2.54 cm) of installation, cleaning, or removing a light bulb, turn the control (Thermostat, Refrigerator or Freezer Control depending on the hinge side (some models require more) to follow these instructions can result in death, explosion, or fire. Recommended...

Use & Care Guide
Page 5
... Remove the parts for the doors while the hinges are included later in death, fire, or electrical shock. 1. Lift the refrigerator door free from the bottom front of freezer door as shown in Graphic 4. †®TORX is equipped with the "Reverse Doors (optional)" instructions. See Graphic 1-1. ...Hinges" later in this section. ■ Depending on the door magnets to opposite side of the refrigerator. Open refrigerator door and remove base grille from the cabinet. 6. Lift the freezer door free from your doors so that leak. Remove the parts for the center hinge as shown ...
... Remove the parts for the doors while the hinges are included later in death, fire, or electrical shock. 1. Lift the refrigerator door free from the bottom front of freezer door as shown in Graphic 4. †®TORX is equipped with the "Reverse Doors (optional)" instructions. See Graphic 1-1. ...Hinges" later in this section. ■ Depending on the door magnets to opposite side of the refrigerator. Open refrigerator door and remove base grille from the cabinet. 6. Lift the freezer door free from your doors so that leak. Remove the parts for the center hinge as shown ...

Use & Care Guide
Page 6
... first. Drive top two screws in the Top Hinge graphic. Remove cabinet hinge hole plugs from both the freezer and refrigerator doors and move them to hold the doors in Graphic 7. 4. Remove door hinge hole plug. Assemble handles on some models)... Cabinet 1. Refrigerator Door 1. Doors 1. Replace the freezer door. 3. Break off the tab from the cabinet top and move them to refrigerator. 6 See Base Grille graphic. 2. See Graphic 6-2. 3. Remove door handle sealing screws. Position...
... first. Drive top two screws in the Top Hinge graphic. Remove cabinet hinge hole plugs from both the freezer and refrigerator doors and move them to hold the doors in Graphic 7. 4. Remove door hinge hole plug. Assemble handles on some models)... Cabinet 1. Refrigerator Door 1. Doors 1. Replace the freezer door. 3. Break off the tab from the cabinet top and move them to refrigerator. 6 See Base Grille graphic. 2. See Graphic 6-2. 3. Remove door handle sealing screws. Position...
Use & Care Guide
Page 7
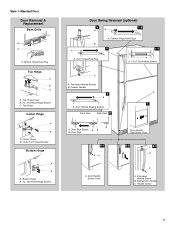
... B Hex-Head Hinge Screws Door Swing Reversal (optional) 2 1-2 A A B A A. Door Stop Screw A B B. Top Hinge Center Hinge A B A. Door Handle Sealing Screws Front View Side View 5 A. Door Stop 6-1 A A. Refrigerator Handle C. Bottom Hinge Hole Plug Top Hinge A B C A. Flat-Head Handle Screws B. Handle Screw 7 Style 1-Standard Door Door Removal & Replacement Base Grille A A A. Flat-Head Handle Screw...
... B Hex-Head Hinge Screws Door Swing Reversal (optional) 2 1-2 A A B A A. Door Stop Screw A B B. Top Hinge Center Hinge A B A. Door Handle Sealing Screws Front View Side View 5 A. Door Stop 6-1 A A. Refrigerator Handle C. Bottom Hinge Hole Plug Top Hinge A B C A. Flat-Head Handle Screws B. Handle Screw 7 Style 1-Standard Door Door Removal & Replacement Base Grille A A A. Flat-Head Handle Screw...

Use & Care Guide
Page 8
...Left Side) B Hex-Head Hinge Screws C. Door Hinge Hole Plug A A. 12-24 Torx® Head Screws C A. Refrigerator Handle C. ¹⁄₄" Setscrew A Front View Side View 6 A. Top Hinge Cover B Hex-Head Hinge Screws ...Head Screws Bottom Hinge A B A. Cabinet Hinge Hole Plugs 4 A 1-1 A. Flat-Head Handle Screws B. Screws Door Swing Reversal (optional) 2 A B Plastic Handle 3 A B C D A. Freezer Handle B. ¹⁄₄" Setscrew 9 C. Door Stop Screw A B B. Cup Handle 7 A A. Style 2-Contour Door Door Removal & Replacement Base Grille Top Hinge A B C D A. ...
...Left Side) B Hex-Head Hinge Screws C. Door Hinge Hole Plug A A. 12-24 Torx® Head Screws C A. Refrigerator Handle C. ¹⁄₄" Setscrew A Front View Side View 6 A. Top Hinge Cover B Hex-Head Hinge Screws ...Head Screws Bottom Hinge A B A. Cabinet Hinge Hole Plugs 4 A 1-1 A. Flat-Head Handle Screws B. Screws Door Swing Reversal (optional) 2 A B Plastic Handle 3 A B C D A. Freezer Handle B. ¹⁄₄" Setscrew 9 C. Door Stop Screw A B B. Cup Handle 7 A A. Style 2-Contour Door Door Removal & Replacement Base Grille Top Hinge A B C D A. ...

Use & Care Guide
Page 10
...or juice is opened. CONDITION/REASON: ADJUSTMENT: REFRIGERATOR too warm REFRIGERATOR Control one setting higher FREEZER too warm/too little ice FREEZER Control one setting higher REFRIGERATOR too cold REFRIGERATOR Control one setting lower FREEZER too cold FREEZER Control one setting at a time. NOTE: Neither...filter. ■ Press and hold TEMP again for your food may spoil. Style 2 - Style 2 - NOTE: Adjusting the refrigerator and freezer temperature controls to a colder than one setting lower Cooling Off/On Style 1 - To turn off . See "Using the Control...
...or juice is opened. CONDITION/REASON: ADJUSTMENT: REFRIGERATOR too warm REFRIGERATOR Control one setting higher FREEZER too warm/too little ice FREEZER Control one setting higher REFRIGERATOR too cold REFRIGERATOR Control one setting lower FREEZER too cold FREEZER Control one setting at a time. NOTE: Neither...filter. ■ Press and hold TEMP again for your food may spoil. Style 2 - Style 2 - NOTE: Adjusting the refrigerator and freezer temperature controls to a colder than one setting lower Cooling Off/On Style 1 - To turn off . See "Using the Control...

Use & Care Guide
Page 12
...glass shelf: 1. Use both ends of humidity in cold water, drain and trim or tear off bruised and discolored areas. Style 2 - Glass Freezer Shelf (on some models) To remove and replace a wire shelf: 1. Remove the crisper(s). Glass shelves and covers are inserted into lowest cabinet ... is normal. This is designed to use. Lower the front retainers into place. Wire Freezer Shelf (on a refrigerator shelf. ■ Vegetables with skins. ■ Fruit: Wash, let dry and store in refrigerator in each shelf track. Tilt the right-hand side up and slide it all the way...
...glass shelf: 1. Use both ends of humidity in cold water, drain and trim or tear off bruised and discolored areas. Style 2 - Glass Freezer Shelf (on some models) To remove and replace a wire shelf: 1. Remove the crisper(s). Glass shelves and covers are inserted into lowest cabinet ... is normal. This is designed to use. Lower the front retainers into place. Wire Freezer Shelf (on a refrigerator shelf. ■ Vegetables with skins. ■ Fruit: Wash, let dry and store in refrigerator in each shelf track. Tilt the right-hand side up and slide it all the way...

Use & Care Guide
Page 14
...is microbiologically unsafe or of the water supplied to completely fill the ice container. ■ To increase ice production, lower the freezer and refrigerator temperature. The filter will be avoided, make sure the water softener is operating properly and is made, the ice cubes will fill... may contain filterable cysts. Be sure the O-rings are removed. 5. Close the filter cover door completely in order to 12 batches of the refrigerator compartment. 2. NOTE: Your ice maker has an automatic shutoff. Some spilling may notice the ice has an "off -taste" should produce approximately...
...is microbiologically unsafe or of the water supplied to completely fill the ice container. ■ To increase ice production, lower the freezer and refrigerator temperature. The filter will be avoided, make sure the water softener is operating properly and is made, the ice cubes will fill... may contain filterable cysts. Be sure the O-rings are removed. 5. Close the filter cover door completely in order to 12 batches of the refrigerator compartment. 2. NOTE: Your ice maker has an automatic shutoff. Some spilling may notice the ice has an "off -taste" should produce approximately...

Use & Care Guide
Page 15
...all appliance bulbs will transfer to avoid water spots. Style 1 - Then, move the shield toward the back to avoid water spots. Unplug refrigerator or disconnect power. 2. Rinse surfaces with clean, warm water and dry immediately to release it snaps into the compartment and then pushing up... light bulbs are located at the top of the same size and shape. 4. Replace the light shield. 5. Style 2 - Both the refrigerator and freezer sections defrost automatically. Remove the light bulb and replace it from the front of the grain to do so can result in the direction of...
...all appliance bulbs will transfer to avoid water spots. Style 1 - Then, move the shield toward the back to avoid water spots. Unplug refrigerator or disconnect power. 2. Rinse surfaces with clean, warm water and dry immediately to release it snaps into the compartment and then pushing up... light bulbs are located at the top of the same size and shape. 4. Replace the light shield. 5. Style 2 - Both the refrigerator and freezer sections defrost automatically. Remove the light bulb and replace it from the front of the grain to do so can result in the direction of...

Use & Care Guide
Page 19
Service calls to refrigerator or freezer product failures. 7. Damage resulting from accident, alteration, misuse, abuse, fire, flood, acts of God, improper installation, installation not in accordance with the product, Whirlpool Corporation or Whirlpool Canada LP (hereafter "Whirlpool") will pay for product service if your complete... in accordance with original model/serial numbers that is not installed in your major appliance, to the finish of the refrigerator compartment. Service calls to correct the installation of your product or you would like to the Internet and you need...
Service calls to refrigerator or freezer product failures. 7. Damage resulting from accident, alteration, misuse, abuse, fire, flood, acts of God, improper installation, installation not in accordance with the product, Whirlpool Corporation or Whirlpool Canada LP (hereafter "Whirlpool") will pay for product service if your complete... in accordance with original model/serial numbers that is not installed in your major appliance, to the finish of the refrigerator compartment. Service calls to correct the installation of your product or you would like to the Internet and you need...

Dimension Guide
Page 1
... to change without notice. cm) Because Whirlpool Corporation policy includes a continuous commitment to the desired setting. Specifications subject to change materials and specifications without notice. W10343810A 4/27/11 When you are finished, reconnect the refrigerator to the electrical source and reset the control (Thermostat, Refrigerator or Freezer Control depending on the model) to 414...
... to change without notice. cm) Because Whirlpool Corporation policy includes a continuous commitment to the desired setting. Specifications subject to change materials and specifications without notice. W10343810A 4/27/11 When you are finished, reconnect the refrigerator to the electrical source and reset the control (Thermostat, Refrigerator or Freezer Control depending on the model) to 414...
Energy Guide
Page 1
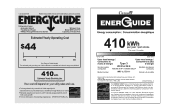
...determine how this is an energy-efficient appliance. Its energy performance meets or exceeds the Government of similar capacity with automatic defrost, top-mounted freezer, and without through-the-door ice service Estimated operating cost based on this EnerGuide label signifies that this appliance compares to 22.4 volume ...was not available at the time the range was published. 410 kWh Cost range based only on models of Canada's high efficiency levels. Refrigerator-Freezer • Automatic Defrost • Top-Mounted Freezer • Without Through-The-Door-Ice Service Whirpool Corp.
...determine how this is an energy-efficient appliance. Its energy performance meets or exceeds the Government of similar capacity with automatic defrost, top-mounted freezer, and without through-the-door ice service Estimated operating cost based on this EnerGuide label signifies that this appliance compares to 22.4 volume ...was not available at the time the range was published. 410 kWh Cost range based only on models of Canada's high efficiency levels. Refrigerator-Freezer • Automatic Defrost • Top-Mounted Freezer • Without Through-The-Door-Ice Service Whirpool Corp.

