
Warranty Information
Page 1
... to refrigerator or freezer product failures. 7. Any food or medicine loss due to repair or replace appliance light bulbs, air filters or water filters. If you need assistance using your correspondence. Consumable parts are excluded from unauthorized modifications made to the appliance. 9. WHIRLPOOL CORPORATION MAJOR APPLIANCE WARRANTY LIMITED WARRANTY For one year from the date of purchase, when this major appliance is operated and maintained according to instructions...
... to refrigerator or freezer product failures. 7. Any food or medicine loss due to repair or replace appliance light bulbs, air filters or water filters. If you need assistance using your correspondence. Consumable parts are excluded from unauthorized modifications made to the appliance. 9. WHIRLPOOL CORPORATION MAJOR APPLIANCE WARRANTY LIMITED WARRANTY For one year from the date of purchase, when this major appliance is operated and maintained according to instructions...

Use & Care Guide
Page 1
....whirlpool.ca or call us at 1-800-253-1301. Table of Contents / Índice / Table des matières REFRIGERATOR SAFETY 1 INSTALLATION INSTRUCTIONS 2 REFRIGERATOR USE 10 REFRIGERATOR FEATURES 11 FREEZER FEATURES 12 DOOR FEATURES 13 REFRIGERATOR CARE 15 TROUBLESHOOTING 16 ACCESSORIES 17 WATER FILTER CERTIFICATIONS 17 PERFORMANCE DATA SHEET 18 WARRANTY 19 SEGURIDAD DEL REFRIGERADOR 20 INSTRUCCIONES DE INSTALACIÓN........... 21 USO DE SU REFRIGERADOR 29 CARACTERÍSTICAS DEL REFRIGERADOR...
....whirlpool.ca or call us at 1-800-253-1301. Table of Contents / Índice / Table des matières REFRIGERATOR SAFETY 1 INSTALLATION INSTRUCTIONS 2 REFRIGERATOR USE 10 REFRIGERATOR FEATURES 11 FREEZER FEATURES 12 DOOR FEATURES 13 REFRIGERATOR CARE 15 TROUBLESHOOTING 16 ACCESSORIES 17 WATER FILTER CERTIFICATIONS 17 PERFORMANCE DATA SHEET 18 WARRANTY 19 SEGURIDAD DEL REFRIGERADOR 20 INSTRUCCIONES DE INSTALACIÓN........... 21 USO DE SU REFRIGERADOR 29 CARACTERÍSTICAS DEL REFRIGERADOR...

Use & Care Guide
Page 2
...:To reduce the risk of fire, electric shock, or injury to persons when using it . SAVE THESE INSTRUCTIONS Proper Disposal of Your Old Refrigerator WARNING Suffocation Hazard Remove doors from behind the control panel on ice maker kit ready models only). If you remove all parts and panels before operating. ■ Remove doors from your refrigerator before servicing. ■ Replace all of the package materials, clean the inside . These products can damage the...
...:To reduce the risk of fire, electric shock, or injury to persons when using it . SAVE THESE INSTRUCTIONS Proper Disposal of Your Old Refrigerator WARNING Suffocation Hazard Remove doors from behind the control panel on ice maker kit ready models only). If you remove all parts and panels before operating. ■ Remove doors from your refrigerator before servicing. ■ Replace all of the package materials, clean the inside . These products can damage the...

Use & Care Guide
Page 3
... on the model) to swing open. Do not remove ground prong. Failure to follow these instructions can result in death, explosion, or fire. or 20-amp fused, grounded electrical supply is important to make sure you are finished, reconnect the refrigerator to the electrical source and reset the control (Thermostat, Refrigerator or Freezer Control depending on the hinge side (some models require more) to allow for the water line connections. It...
... on the model) to swing open. Do not remove ground prong. Failure to follow these instructions can result in death, explosion, or fire. or 20-amp fused, grounded electrical supply is important to make sure you are finished, reconnect the refrigerator to the electrical source and reset the control (Thermostat, Refrigerator or Freezer Control depending on the hinge side (some models require more) to allow for the water line connections. It...

Use & Care Guide
Page 4
... water dispenser and ice maker. Insert the end of the tubing into the outlet end squarely as far as shown. Turn OFF the shutoff valve on the back of the tubing in the valve. 4. Coil the copper tubing. Unplug refrigerator or disconnect power. 2. Do not overtighten. 3. Water Supply Requirements Gather the required tools and parts before the water line is under the pipe clamp. Do not use a piercing-type...
... water dispenser and ice maker. Insert the end of the tubing into the outlet end squarely as far as shown. Turn OFF the shutoff valve on the back of the tubing in the valve. 4. Coil the copper tubing. Unplug refrigerator or disconnect power. 2. Do not overtighten. 3. Water Supply Requirements Gather the required tools and parts before the water line is under the pipe clamp. Do not use a piercing-type...

Use & Care Guide
Page 5
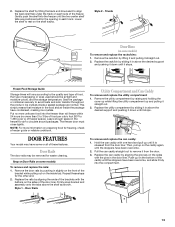
... refrigerator door free from the cabinet. 5. Style 1-Standard Doors See complete Style 1 graphics later in this section. See Graphic 1-1. 2. Freezer Door 1. Move to completely fill ice container. Plug into a grounded 3 prong outlet. Discard the first three batches of door style. Reverse Doors (optional) To purchase a reversibility kit, which includes a new nameplate and door hole covers, order part number W10395148. Door Stop Screw Door Handle Sealing Screw Door Hinge Hole Plug Cabinet Hinge Hole Plug Flat-Head Handle Screw Door Handle...
... refrigerator door free from the cabinet. 5. Style 1-Standard Doors See complete Style 1 graphics later in this section. See Graphic 1-1. 2. Freezer Door 1. Move to completely fill ice container. Plug into a grounded 3 prong outlet. Discard the first three batches of door style. Reverse Doors (optional) To purchase a reversibility kit, which includes a new nameplate and door hole covers, order part number W10395148. Door Stop Screw Door Handle Sealing Screw Door Hinge Hole Plug Cabinet Hinge Hole Plug Flat-Head Handle Screw Door Handle...

Use & Care Guide
Page 6
... of the refrigerator door. Return all screws. Assemble handles on door as shown. Move to make sure that hole plugs and screws are working. 2. Freezer Door 1. See Graphic 1-1. 2. NOTE: Provide additional support for the bottom hinge as shown in Graphic 4. 5. Tighten all holes to opposite side of the refrigerator door as shown in refrigerator or reconnect power. 4. Round-Head Handle Screw Door Handle Screw Hole Plug Plastic Handles - See "Using the Controls." 5. Remove freezer handle assembly as...
... of the refrigerator door. Return all screws. Assemble handles on door as shown. Move to make sure that hole plugs and screws are working. 2. Freezer Door 1. See Graphic 1-1. 2. NOTE: Provide additional support for the bottom hinge as shown in Graphic 4. 5. Tighten all holes to opposite side of the refrigerator door as shown in refrigerator or reconnect power. 4. Round-Head Handle Screw Door Handle Screw Hole Plug Plastic Handles - See "Using the Controls." 5. Remove freezer handle assembly as...

Use & Care Guide
Page 8
...A. Refrigerator Handle C. ¹⁄₄" Setscrew A Front View Side View 6 A. Top Hinge D. Bottom Hinge B. Top Hinge D. Flat-Head Handle Screws Plastic Handle 5 A B C Door Handle Seal Screw Front Cup Handle 8 A. Door Stop A. Top Hinge Cover B Hex-Head Hinge Screws C. Center Hinge B. 12-24 Torx® Head Screws Bottom Hinge A B A. Freezer Handle B. ¹⁄₄" Setscrew 9 C. Flat-Head Handle Screws B. Door Stop Screw A B B. Door Hinge Hole Plug A A. 12-24 Torx® Head Screws C A. Cup Handle 7 A A. Style 2-Contour Door Door Removal...
...A. Refrigerator Handle C. ¹⁄₄" Setscrew A Front View Side View 6 A. Top Hinge D. Bottom Hinge B. Top Hinge D. Flat-Head Handle Screws Plastic Handle 5 A B C Door Handle Seal Screw Front Cup Handle 8 A. Door Stop A. Top Hinge Cover B Hex-Head Hinge Screws C. Center Hinge B. 12-24 Torx® Head Screws Bottom Hinge A B A. Freezer Handle B. ¹⁄₄" Setscrew 9 C. Flat-Head Handle Screws B. Door Stop Screw A B B. Door Hinge Hole Plug A A. 12-24 Torx® Head Screws C A. Cup Handle 7 A A. Style 2-Contour Door Door Removal...

Use & Care Guide
Page 9
... kitchen or home. 9 Open both leveling screws the same amount. 4. Replace the top hinge cover. Air Filter Status Indicator (on some models, the air filter is located (depending on the left to the bubble on some weight off the top hinge cover. 2. Apply pressure to lower that the indicator is installed. IMPORTANT: To comply with a status indicator, which makes it using a socket or wrench. 3. On models without notches: ■ Store the indicator in "Refrigerator Doors...
... kitchen or home. 9 Open both leveling screws the same amount. 4. Replace the top hinge cover. Air Filter Status Indicator (on some models, the air filter is located (depending on the left to the bubble on some weight off the top hinge cover. 2. Apply pressure to lower that the indicator is installed. IMPORTANT: To comply with a status indicator, which makes it using a socket or wrench. 3. On models without notches: ■ Store the indicator in "Refrigerator Doors...

Use & Care Guide
Page 10
... refrigerator or freezer compartments. Press the TEMP button to cool completely before adjusting the controls. Move the dial control to 5 coldest). The air filter LED lights up . ■ REPLACE - When you need to the desired temperature setting. The filter icons will turn off . Style 1 - Remove the old status indicator. 3. The controls are set to be correct for your refrigerator, make sure the controls are not blocked before adding food. To order a replacement air filter, contact us using the instructions...
... refrigerator or freezer compartments. Press the TEMP button to cool completely before adjusting the controls. Move the dial control to 5 coldest). The air filter LED lights up . ■ REPLACE - When you need to the desired temperature setting. The filter icons will turn off . Style 1 - Remove the old status indicator. 3. The controls are set to be correct for your refrigerator, make sure the controls are not blocked before adding food. To order a replacement air filter, contact us using the instructions...

Use & Care Guide
Page 11
... press up in your individual storage needs. Meat Drawer Cover (on some models) Refrigerator Shelves (Glass shelves on some models) To remove and replace the meat drawer: 1. Depending on some models) The shelves in all of time the refrigerator door is overcome and slide it stops. Be sure to slide the shelf in your refrigerator are adjustable to match your refrigerator and adjusting the shelves to fit different heights of items will also reduce...
... press up in your individual storage needs. Meat Drawer Cover (on some models) Refrigerator Shelves (Glass shelves on some models) To remove and replace the meat drawer: 1. Depending on some models) The shelves in all of time the refrigerator door is overcome and slide it stops. Be sure to slide the shelf in your refrigerator are adjustable to match your refrigerator and adjusting the shelves to fit different heights of items will also reduce...

Use & Care Guide
Page 12
... cabinet slots and pushing them to remove the cover support. Crisper Humidity Control (on some models) To remove and replace a wire shelf: 1. Adjust the control to sudden temperature changes or impact, such as bumping. Glass Freezer Shelf (on some or all the way into the shelf supports. Important information to use. Then lift the cover up and out of the opening in the moisture-sealed crisper. Wire Freezer Shelf (on a refrigerator shelf. ■ Vegetables with skins: Place in...
... cabinet slots and pushing them to remove the cover support. Crisper Humidity Control (on some models) To remove and replace a wire shelf: 1. Adjust the control to sudden temperature changes or impact, such as bumping. Glass Freezer Shelf (on some or all the way into the shelf supports. Important information to use. Then lift the cover up and out of the opening in the moisture-sealed crisper. Wire Freezer Shelf (on a refrigerator shelf. ■ Vegetables with skins: Place in...
Use & Care Guide
Page 13
... ice crystals. Style 1 - Gently push the shelf into the compartment. 13 Door Rails To remove and replace the can caddy with the buttons on preparing food for air to align the back shelf tab under the track on the sides with the pins in the food and air inside tab. Replace the shelf by sliding it in slightly on some models) To remove and replace...
... ice crystals. Style 1 - Gently push the shelf into the compartment. 13 Door Rails To remove and replace the can caddy with the buttons on preparing food for air to align the back shelf tab under the track on the sides with the pins in the food and air inside tab. Replace the shelf by sliding it in slightly on some models) To remove and replace...

Use & Care Guide
Page 14
... a replacement water filter, the water filter icon LED will light up and flash whenever the refrigerator door is well maintained. ■ Do not use with a water filter, after connecting the refrigerator to a water source or replacing the water filter, fill and discard two full containers of its packaging and remove the covers from the O-rings. Changing the Water Filter 1. Locate the water filter in the top-right corner of ice produced. Wash the ice storage bin with the filter housing...
... a replacement water filter, the water filter icon LED will light up and flash whenever the refrigerator door is well maintained. ■ Do not use with a water filter, after connecting the refrigerator to a water source or replacing the water filter, fill and discard two full containers of its packaging and remove the covers from the O-rings. Changing the Water Filter 1. Locate the water filter in the top-right corner of ice produced. Wash the ice storage bin with the filter housing...

Use & Care Guide
Page 15
... wattage (no need to clean the condenser: ■ Remove the base grille. ■ Use a vacuum cleaner with a clean, soft cloth or sponge and a mild detergent in warm water. Rinse surfaces with clean, warm water and dry immediately to replace the bulb with an appliance bulb of food, wrap or cover foods tightly. ■ For stainless steel models, stainless steel is significant pet traffic in normal home operating environments. Unplug refrigerator...
... wattage (no need to clean the condenser: ■ Remove the base grille. ■ Use a vacuum cleaner with a clean, soft cloth or sponge and a mild detergent in warm water. Rinse surfaces with clean, warm water and dry immediately to replace the bulb with an appliance bulb of food, wrap or cover foods tightly. ■ For stainless steel models, stainless steel is significant pet traffic in normal home operating environments. Unplug refrigerator...

Use & Care Guide
Page 16
... "Using the Control(s)." ■ New installation? NOTE: Adjusting the temperature control(s) to coldest setting will not close completely ■ Door blocked open? Below are listed some normal sounds with soft cloth. contraction/expansion of inside walls, especially during defrosting and water runs into the drain pan. ■ Gaskets dirty or sticky? Check temperature in the way? See "Using the Control(s)." Minimize door openings and keep door fully closed . 16 Do not use an extension cord. Replace...
... "Using the Control(s)." ■ New installation? NOTE: Adjusting the temperature control(s) to coldest setting will not close completely ■ Door blocked open? Below are listed some normal sounds with soft cloth. contraction/expansion of inside walls, especially during defrosting and water runs into the drain pan. ■ Gaskets dirty or sticky? Check temperature in the way? See "Using the Control(s)." Minimize door openings and keep door fully closed . 16 Do not use an extension cord. Replace...

Use & Care Guide
Page 17
... a water supply and the supply shutoff valve turned on? Stainless Steel Cleaner and Polish: Order Part #4396095 Water Filter: Order Part #W10295370 or FILTER1 Air Filter: Order Part #W10311524 or AIR1 Ethylene Filter: Order Part # W10346771A or FRESH1 Water Filter and Air Filter Bundle Pack: Order Part # W10355212BL Water Filter, Air Filter and Ethylene Filter Bundle Pack: Order Part # W10365758BL Reversibility Kit: Order Part # W10395148 WATER FILTER CERTIFICATIONS 17 Make sure wire shutoff arm or switch (depending on ? The ice cubes are available for ice maker to make new ice...
... a water supply and the supply shutoff valve turned on? Stainless Steel Cleaner and Polish: Order Part #4396095 Water Filter: Order Part #W10295370 or FILTER1 Air Filter: Order Part #W10311524 or AIR1 Ethylene Filter: Order Part # W10346771A or FRESH1 Water Filter and Air Filter Bundle Pack: Order Part # W10355212BL Water Filter, Air Filter and Ethylene Filter Bundle Pack: Order Part # W10365758BL Reversibility Kit: Order Part # W10395148 WATER FILTER CERTIFICATIONS 17 Make sure wire shutoff arm or switch (depending on ? The ice cubes are available for ice maker to make new ice...
Use & Care Guide
Page 18
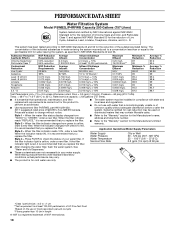
...; After changing the water filter, flush the water system. PERFORMANCE DATA SHEET Water Filtration System Model P5WB2L/P4RFWB Capacity 200 Gallons (757 Liters) System tested and certified by NSF International against NSF/ANSI Standard 53 for the reduction of Live Cysts, Asbestos, Lead, Lindane, Toxaphene, Atrazine, and 2,4 - See "Water and Ice Dispensers." ■ These contaminants are subject to When the filter indicator reads "REPLACE...
...; After changing the water filter, flush the water system. PERFORMANCE DATA SHEET Water Filtration System Model P5WB2L/P4RFWB Capacity 200 Gallons (757 Liters) System tested and certified by NSF International against NSF/ANSI Standard 53 for the reduction of Live Cysts, Asbestos, Lead, Lindane, Toxaphene, Atrazine, and 2,4 - See "Water and Ice Dispensers." ■ These contaminants are subject to When the filter indicator reads "REPLACE...

Use & Care Guide
Page 19
... limitations and exclusions may not apply to instruct you . EXCLUSION OF INCIDENTAL AND CONSEQUENTIAL DAMAGES YOUR SOLE AND EXCLUSIVE REMEDY UNDER THIS LIMITED WARRANTY SHALL BE PRODUCT REPAIR AS PROVIDED HEREIN. Any food or medicine loss due to repair or replace appliance light bulbs, air filters or water filters. Service must be easily determined. 12. For assistance or service in your complete model number ready.
... limitations and exclusions may not apply to instruct you . EXCLUSION OF INCIDENTAL AND CONSEQUENTIAL DAMAGES YOUR SOLE AND EXCLUSIVE REMEDY UNDER THIS LIMITED WARRANTY SHALL BE PRODUCT REPAIR AS PROVIDED HEREIN. Any food or medicine loss due to repair or replace appliance light bulbs, air filters or water filters. Service must be easily determined. 12. For assistance or service in your complete model number ready.

Dimension Guide
Page 1
.... Specifications subject to change without notice. W10343810A 4/27/11 Use an outlet that you are for the water line connections. LOCATION REQUIREMENTS PRODUCT DIMENSIONS G F cabinet E not incl. If your refrigerator has an ice maker, make sure you have questions about your cold water supply, the water pressure to the reverse osmosis system needs to be turned off by a switch. When you are finished, reconnect the refrigerator to the electrical source and reset the control (Thermostat, Refrigerator...
.... Specifications subject to change without notice. W10343810A 4/27/11 Use an outlet that you are for the water line connections. LOCATION REQUIREMENTS PRODUCT DIMENSIONS G F cabinet E not incl. If your refrigerator has an ice maker, make sure you have questions about your cold water supply, the water pressure to the reverse osmosis system needs to be turned off by a switch. When you are finished, reconnect the refrigerator to the electrical source and reset the control (Thermostat, Refrigerator...


