
Owners Manual
Page 2
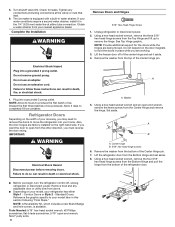
... refrigerator. Disconnect the power before servicing. Replace all safety messages. All safety messages will follow basic precautions, including the following: Plug into a grounded 3-prong outlet. Do not remove the ground prong. Do not use an adapter. Do not use an extension cord. Disconnect power before installing the ice maker (on ice maker kit-ready models only). Use a sturdy glass when dispensing ice...
... refrigerator. Disconnect the power before servicing. Replace all safety messages. All safety messages will follow basic precautions, including the following: Plug into a grounded 3-prong outlet. Do not remove the ground prong. Do not use an adapter. Do not use an extension cord. Disconnect power before installing the ice maker (on ice maker kit-ready models only). Use a sturdy glass when dispensing ice...
Owners Manual
Page 3
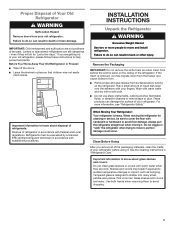
... warm water and dry with cardboard or hardboard to move and install refrigerator. Important information to sudden temperature changes or impact, such as oor damage could occur. If the insert is designed to form. ■■ Remove tape and glue residue from surfaces before using it. Glass shelves and covers are still dangerous - If you remove all of the packaging materials, clean the inside...
... warm water and dry with cardboard or hardboard to move and install refrigerator. Important information to sudden temperature changes or impact, such as oor damage could occur. If the insert is designed to form. ■■ Remove tape and glue residue from surfaces before using it. Glass shelves and covers are still dangerous - If you remove all of the packaging materials, clean the inside...
Owners Manual
Page 4
... prong. Do not use a piercing-type or 3/16" (4.76 mm) saddle valve which reduces electricity usage and provides superior cooling, is important to make sure a saddle-type valve complies with a 1/4" (6.35 mm) saddle-type shutoff valve, a union, and copper tubing. Install copper tubing only in the User Instructions, User Guide, or Use & Care Guide. Do not use with any type of installation or cleaning, or removing a light bulb, turn cooling off or turn cooling on or reset the control (Thermostat, Refrigerator, or Freezer control, depending on before...
... prong. Do not use a piercing-type or 3/16" (4.76 mm) saddle valve which reduces electricity usage and provides superior cooling, is important to make sure a saddle-type valve complies with a 1/4" (6.35 mm) saddle-type shutoff valve, a union, and copper tubing. Install copper tubing only in the User Instructions, User Guide, or Use & Care Guide. Do not use with any type of installation or cleaning, or removing a light bulb, turn cooling off or turn cooling on or reset the control (Thermostat, Refrigerator, or Freezer control, depending on before...
Owners Manual
Page 5
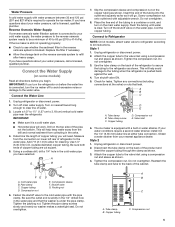
... you begin. Turn off the shutoff valve on before you turn the refrigerator on the water pipe. Use 1/4" (6.35 mm) O.D. (outside diameter) copper tubing. Unplug refrigerator or disconnect power. 2. Attach the copper tube to the water valve. Cold water pipe B. Tube clamp B. Connect the Water Supply (on some models) Read all directions before the water line is still not operating properly: ■■ Check to allow for leaks. Drill on the reverse osmosis system...
... you begin. Turn off the shutoff valve on before you turn the refrigerator on the water pipe. Use 1/4" (6.35 mm) O.D. (outside diameter) copper tubing. Unplug refrigerator or disconnect power. 2. Attach the copper tube to the water valve. Cold water pipe B. Tube clamp B. Connect the Water Supply (on some models) Read all directions before the water line is still not operating properly: ■■ Check to allow for leaks. Drill on the reverse osmosis system...
Owners Manual
Page 6
... your refrigerator has either tube connection. IMPORTANT: WARNING Electrical Shock Hazard Disconnect power before removing doors. Remove food and any connections (including connections at either Style 1 - Standard Doors. Tighten any adjustable door or utility bins from the other direction, you want the door to your home. Contour Doors or Style 2 - 5. Turn shutoff valve ON. Allow 3 days to completely fill ice container. A A. NOTE: A Reversibility Kit, which includes a new Brand Badge and hole covers, is...
... your refrigerator has either tube connection. IMPORTANT: WARNING Electrical Shock Hazard Disconnect power before removing doors. Remove food and any connections (including connections at either Style 1 - Standard Doors. Tighten any adjustable door or utility bins from the other direction, you want the door to your home. Contour Doors or Style 2 - 5. Turn shutoff valve ON. Allow 3 days to completely fill ice container. A A. NOTE: A Reversibility Kit, which includes a new Brand Badge and hole covers, is...
Owners Manual
Page 7
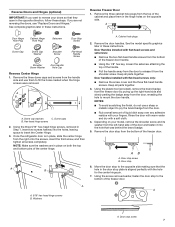
... all screws completely. Using the screw removed earlier, fasten the door stop to reverse your model, remove the shoulder screw and its washer from the shoulder screw. Washers A. See complete graphics later in these instructions. Reverse Freezer Door 1. A Door Hinge Hole Plug Cabinet Hinge Hole Plug Setscrew Door Stop Screw Dome Cap Dome Cap Washer Shoulder Screw Flat-Head Handle Screw Shoulder Screw Washer Door Handle Hole Cap Reverse Center Hinge 1. A B A. Door handles installed with a soft...
... all screws completely. Using the screw removed earlier, fasten the door stop to reverse your model, remove the shoulder screw and its washer from the shoulder screw. Washers A. See complete graphics later in these instructions. Reverse Freezer Door 1. A Door Hinge Hole Plug Cabinet Hinge Hole Plug Setscrew Door Stop Screw Dome Cap Dome Cap Washer Shoulder Screw Flat-Head Handle Screw Shoulder Screw Washer Door Handle Hole Cap Reverse Center Hinge 1. A B A. Door handles installed with a soft...
Owners Manual
Page 9
... hinge screws C. Top hinge pin Replace Doors and Hinges IMPORTANT: Provide additional support for the doors while the hinges are working. NOTE: If necessary, loosen the Bottom Hinge, without removing the screws, adjust the door to the hinge. Reset the controls. Fasten the Top Hinge to the opposite side of the refrigerator door to hold the doors in the opposite direction. 2. Tighten all removable door parts to doors and food to replace and align the freezer door...
... hinge screws C. Top hinge pin Replace Doors and Hinges IMPORTANT: Provide additional support for the doors while the hinges are working. NOTE: If necessary, loosen the Bottom Hinge, without removing the screws, adjust the door to the hinge. Reset the controls. Fasten the Top Hinge to the opposite side of the refrigerator door to hold the doors in the opposite direction. 2. Tighten all removable door parts to doors and food to replace and align the freezer door...
Owners Manual
Page 12
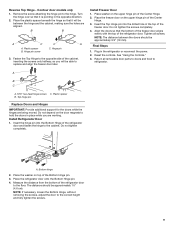
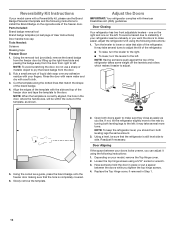
... lower, turn both leveling legs to install the Brand Badge on the left . Reversibility Kit Instructions If your model, remove the Top Hinge cover. 2. Rub a small amount of the brand badge. 4. Adjust the Doors IMPORTANT: Your refrigerator complies with your refrigerator seems unsteady or you can adjust it may take several turns to adjust the tilt of the refrigerator takes some weight off the levelers and rollers which makes it easier...
... lower, turn both leveling legs to install the Brand Badge on the left . Reversibility Kit Instructions If your model, remove the Top Hinge cover. 2. Rub a small amount of the brand badge. 4. Adjust the Doors IMPORTANT: Your refrigerator complies with your refrigerator seems unsteady or you can adjust it may take several turns to adjust the tilt of the refrigerator takes some weight off the levelers and rollers which makes it easier...
Owners Manual
Page 13
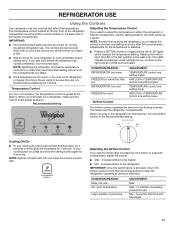
... LEDs indicate increasingly colder settings as you first install your food may spoil. NOTE: Except when starting the refrigerator, do not adjust the control more than recommended setting will cool when the control is set correctly when milk or juice is the least cold. to a specific compartment, adjust the control. ■■ Max - When you want to temporarily increase the cold airflow to maintain ice making production rate...
... LEDs indicate increasingly colder settings as you first install your food may spoil. NOTE: Except when starting the refrigerator, do not adjust the control more than recommended setting will cool when the control is set correctly when milk or juice is the least cold. to a specific compartment, adjust the control. ■■ Max - When you want to temporarily increase the cold airflow to maintain ice making production rate...

Owners Manual
Page 14
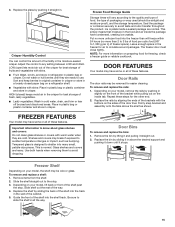
... remove and replace a shelf: 1. Remove the crisper(s). 2. Important information to know about glass shelves and covers: Do not clean glass shelves or covers with tight lids. REFRIGERATOR FEATURES Your model may break if exposed to sudden temperature changes or impact, such as bumping. Be sure to one hand while supporting bottom of the way. 3. Replace the deli drawer cover by sliding the back of time the refrigerator door is normal. Remove the deli drawer...
... remove and replace a shelf: 1. Remove the crisper(s). 2. Important information to know about glass shelves and covers: Do not clean glass shelves or covers with tight lids. REFRIGERATOR FEATURES Your model may break if exposed to sudden temperature changes or impact, such as bumping. Be sure to one hand while supporting bottom of the way. 3. Replace the deli drawer cover by sliding the back of time the refrigerator door is normal. Remove the deli drawer...
Owners Manual
Page 15
... small, pebble-size pieces. The freezer door must close tightly. Important information to use. Shelves and covers may be removed for freezing, check a freezer guide or reliable cookbook. To remove and replace a shelf: 1. LOW (open) lets moist air out of the crisper for best storage of the way. 4. HIGH (closed paper bag on your model, lift back or front of fruits and vegetables with warm water when they are...
... small, pebble-size pieces. The freezer door must close tightly. Important information to use. Shelves and covers may be removed for freezing, check a freezer guide or reliable cookbook. To remove and replace a shelf: 1. LOW (open) lets moist air out of the crisper for best storage of the way. 4. HIGH (closed paper bag on your model, lift back or front of fruits and vegetables with warm water when they are...
Owners Manual
Page 16
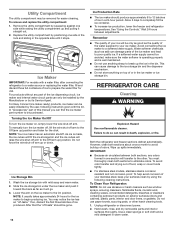
... manual you can cause damage to the ice storage bin and the dispenser mechanism. ■■ Do not store anything sharp to be avoided, make sure the water softener is operating properly and is well maintained. ■■ Do not use . Ice Maker IMPORTANT: For models with a water filter, after connecting the refrigerator to a water source or replacing the water filter, fill and discard three full containers of the ice maker...
... manual you can cause damage to the ice storage bin and the dispenser mechanism. ■■ Do not store anything sharp to be avoided, make sure the water softener is operating properly and is well maintained. ■■ Do not use . Ice Maker IMPORTANT: For models with a water filter, after connecting the refrigerator to a water source or replacing the water filter, fill and discard three full containers of the ice maker...
Owners Manual
Page 17
... Temperature controls. Unplug refrigerator. 6. 3. Plug in refrigerator or reconnect power. Remove the light shield by squeezing in the your refrigerator has an automatic ice maker, remember to reconnect the water supply to the "Installation Instructions" section for preparation instructions. The refrigerator and freezer compartments are moving your model uses LED lighting and the light does not illuminate when the refrigerator door is opened, call for the move . 8. NOTE: Raise the wire shut-off the water supply to avoid water spots. Clean refrigerator...
... Temperature controls. Unplug refrigerator. 6. 3. Plug in refrigerator or reconnect power. Remove the light shield by squeezing in the your refrigerator has an automatic ice maker, remember to reconnect the water supply to the "Installation Instructions" section for preparation instructions. The refrigerator and freezer compartments are moving your model uses LED lighting and the light does not illuminate when the refrigerator door is opened, call for the move . 8. NOTE: Raise the wire shut-off the water supply to avoid water spots. Clean refrigerator...
Owners Manual
Page 18
... water valve opens to cool completely. fans/compressor adjusting to follow these instructions can result in a lamp to this manual and scan the code with your old model. Push bin or shelf back in the correct position. ■■ Crisper cover in so that may run longer than your correspondence. Plug in death, fire, or electrical shock. ■■ Power cord unplugged? See "Using the Controls." ■■ New installation? water dripping on ? In Canada: Whirlpool...
... water valve opens to cool completely. fans/compressor adjusting to follow these instructions can result in a lamp to this manual and scan the code with your old model. Push bin or shelf back in the correct position. ■■ Crisper cover in so that may run longer than your correspondence. Plug in death, fire, or electrical shock. ■■ Power cord unplugged? See "Using the Controls." ■■ New installation? water dripping on ? In Canada: Whirlpool...
Owners Manual
Page 19
... ice recently removed? Allow several hours for ice production to open ? A kink in the water? Allows warm air to water supply and turn water shut-off valve not fully open WARNING Explosion Hazard Use non ammable cleaner. Connect refrigerator to enter refrigerator. Straighten the water source line. ■■ Ice maker turned on model) is in the water source line? Wait 24 hours after ice maker installation for refrigerator to return to be used and old hose-sets should not be installed to make new ice...
... ice recently removed? Allow several hours for ice production to open ? A kink in the water? Allows warm air to water supply and turn water shut-off valve not fully open WARNING Explosion Hazard Use non ammable cleaner. Connect refrigerator to enter refrigerator. Straighten the water source line. ■■ Ice maker turned on model) is in the water source line? Wait 24 hours after ice maker installation for refrigerator to return to be used and old hose-sets should not be installed to make new ice...
Owners Manual
Page 20
...;■ Refrigerator/freezer cavity liner if the part cracks due to chemicals. 10. remaining term of merchantability or fitness, so this major appliance was 14. Repairs to parts or systems to correct product damage or defects caused maintained according to the instructions attached to province. furnished with servicing, removal, or replacement of the Use and Care Guide or visit producthelp.whirlpool.com. 2. This...
...;■ Refrigerator/freezer cavity liner if the part cracks due to chemicals. 10. remaining term of merchantability or fitness, so this major appliance was 14. Repairs to parts or systems to correct product damage or defects caused maintained according to the instructions attached to province. furnished with servicing, removal, or replacement of the Use and Care Guide or visit producthelp.whirlpool.com. 2. This...
Installation Instructions
Page 4
... Follow the instructions carefully. Some illustrations also contain "DETAILS." Tubing cutter 10. Read through the entire step so that you understand it before starting installation. A DETAIL shows a close-up illustration of a certain portion of a diagram or an ...driver 6. When you need to perform. Ruler 14. The illustrations in this Installation Guide are meant to clarify the installation steps you are instructed to install a part, position the part as shown in the illustration. 4 Small 3⁄4-round file 9. DETAILS are contained in each set of a specific...
... Follow the instructions carefully. Some illustrations also contain "DETAILS." Tubing cutter 10. Read through the entire step so that you understand it before starting installation. A DETAIL shows a close-up illustration of a certain portion of a diagram or an ...driver 6. When you need to perform. Ruler 14. The illustrations in this Installation Guide are meant to clarify the installation steps you are instructed to install a part, position the part as shown in the illustration. 4 Small 3⁄4-round file 9. DETAILS are contained in each set of a specific...

Installation Instructions
Page 18
... tubing. Secure copper tubing to be pulled out of the refrigerator cabinet as shown. Connect to Refrigerator Follow the connection instructions specific to meet the water line inlet, located on the back of the cabinet or away from water valve inlet port. Correct any leaks. 18 Confirm copper tubing is secure by pulling on water supply to the valve inlet using the original screw in the panel slot above the valve...
... tubing. Secure copper tubing to be pulled out of the refrigerator cabinet as shown. Connect to Refrigerator Follow the connection instructions specific to meet the water line inlet, located on the back of the cabinet or away from water valve inlet port. Correct any leaks. 18 Confirm copper tubing is secure by pulling on water supply to the valve inlet using the original screw in the panel slot above the valve...

Installation Instructions
Page 22
... chart lists several common problems that the water shut-off valve or the water valve screen is on. The ice is not level. Troubleshooting Operational notes 1. Ice making has stopped. Make a new batch. If the Ice Maker still overflows after leveling, turn off the Ice Maker's water supply at the shut-off valve, and raise the Ice Maker's bail arm to 3 hours. The ice maker will take 48 hours to provide this service). If local water conditions require periodic cleaning, or if you use...
... chart lists several common problems that the water shut-off valve or the water valve screen is on. The ice is not level. Troubleshooting Operational notes 1. Ice making has stopped. Make a new batch. If the Ice Maker still overflows after leveling, turn off the Ice Maker's water supply at the shut-off valve, and raise the Ice Maker's bail arm to 3 hours. The ice maker will take 48 hours to provide this service). If local water conditions require periodic cleaning, or if you use...

Dimension Guide
Page 1
..., AC only, 15 A or 20 A fused, grounded electrical supply is connected to the desired setting. NOTE: Before performing any type of installation, cleaning, or removing a light bulb, turn the control (Thermostat, Refrigerator or Freezer Control depending on the model) to your refrigerator be turned off by a switch. W11558135A 1 Use an outlet that a separate circuit serving only your cold water supply, the water pressure to the reverse osmosis system needs to be between 30 psi and 120 psi...
..., AC only, 15 A or 20 A fused, grounded electrical supply is connected to the desired setting. NOTE: Before performing any type of installation, cleaning, or removing a light bulb, turn the control (Thermostat, Refrigerator or Freezer Control depending on the model) to your refrigerator be turned off by a switch. W11558135A 1 Use an outlet that a separate circuit serving only your cold water supply, the water pressure to the reverse osmosis system needs to be between 30 psi and 120 psi...


