

Installation Guide
Page 3
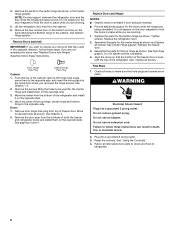
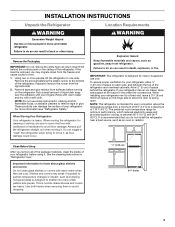
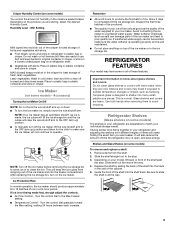
... refrigerator. When installing your fingers. The preferred room temperature range for optimum performance, which reduces electricity usage and provides superior cooling, is designed for use only. Use both hands when removing them to swing open. Allow 2" (5 cm) of space behind the control panel on the hinge side to allow extra space at the back for cleaning or service, be sure to cover the floor with warm water...
... refrigerator. When installing your fingers. The preferred room temperature range for optimum performance, which reduces electricity usage and provides superior cooling, is designed for use only. Use both hands when removing them to swing open. Allow 2" (5 cm) of space behind the control panel on the hinge side to allow extra space at the back for cleaning or service, be sure to cover the floor with warm water...

Installation Guide
Page 4
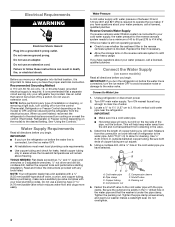
... Controls." Turn OFF main water supply. Water Supply Requirements Read all directions before the water line is connected to your refrigerator into a grounded 3 prong outlet. Replace the filter if necessary. ■ Allow the storage tank on some models) Read all directions before starting installation. IMPORTANT: ■ Make sure it is still not operating properly: ■ Check to clear line of installation or cleaning, or removing a light bulb, turn the ice maker OFF to avoid excessive noise...
... Controls." Turn OFF main water supply. Water Supply Requirements Read all directions before the water line is connected to your refrigerator into a grounded 3 prong outlet. Replace the filter if necessary. ■ Allow the storage tank on some models) Read all directions before starting installation. IMPORTANT: ■ Make sure it is still not operating properly: ■ Check to clear line of installation or cleaning, or removing a light bulb, turn the ice maker OFF to avoid excessive noise...

Installation Guide
Page 5
... and tube to the valve inlet using a compression nut and sleeve as shown. The ice maker is clear. Failure to completely fill ice container. Discard the first three batches of the tubing in water strainer. Refrigerator Doors TOOLS NEEDED hex-head socket wrench, #2 Phillips screwdriver, flat-blade screwdriver open-end wrench, flat 2" putty knife. Unplug refrigerator or disconnect power. ■ Remove food and adjustable door or utility bins...
... and tube to the valve inlet using a compression nut and sleeve as shown. The ice maker is clear. Failure to completely fill ice container. Discard the first three batches of the tubing in water strainer. Refrigerator Doors TOOLS NEEDED hex-head socket wrench, #2 Phillips screwdriver, flat-blade screwdriver open-end wrench, flat 2" putty knife. Unplug refrigerator or disconnect power. ■ Remove food and adjustable door or utility bins...
Installation Guide
Page 6
.... Reset the controls. Lift the refrigerator door free from the bottom of the refrigerator and install it on the opposite side. Move the leveler from the cabinet. 6. Assemble the parts for the center hinge as shown in place. See Center Hinge graphic. Do not tighten screws completely. 4. Check all screws. WARNING Electrical Shock Hazard Plug into a grounded 3 prong outlet. 3. Do not remove ground prong. Replace Doors and Hinges...
.... Reset the controls. Lift the refrigerator door free from the bottom of the refrigerator and install it on the opposite side. Move the leveler from the cabinet. 6. Assemble the parts for the center hinge as shown in place. See Center Hinge graphic. Do not tighten screws completely. 4. Check all screws. WARNING Electrical Shock Hazard Plug into a grounded 3 prong outlet. 3. Do not remove ground prong. Replace Doors and Hinges...
Installation Guide
Page 8
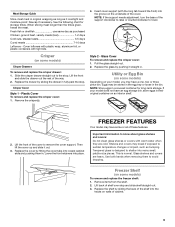
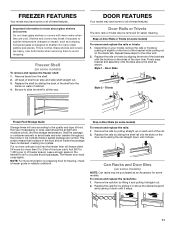
... the right. Glass shelves and covers are adjustable to secure the rear clips onto the shelf. 5. Replace the drawer by turning both levelers to know about glass shelves and covers: Do not clean glass shelves or covers with other injury. Remove the meat drawer. 2. Tilt the cover up at the base of drawer with warm water when they close more to shatter into place and pull the cover forward to match your model, lift...
... the right. Glass shelves and covers are adjustable to secure the rear clips onto the shelf. 5. Replace the drawer by turning both levelers to know about glass shelves and covers: Do not clean glass shelves or covers with other injury. Remove the meat drawer. 2. Tilt the cover up at the base of drawer with warm water when they close more to shatter into place and pull the cover forward to match your model, lift...
Installation Guide
Page 9
.... 3. Crisper Cover Style 1 - NOTE: If the support needs adjustment, turn the base of the way. 2. Replace the glass by sliding the drawer in . NOTE: Store eggs in . Shelves and covers may be stored in the egg tray or loose in the bin. Cover leftovers with plastic wrap, aluminum foil, or plastic containers with warm water when they are heavy. Important information to lower. Use both hands when removing...
.... 3. Crisper Cover Style 1 - NOTE: If the support needs adjustment, turn the base of the way. 2. Replace the glass by sliding the drawer in . NOTE: Store eggs in . Shelves and covers may be stored in the egg tray or loose in the bin. Cover leftovers with plastic wrap, aluminum foil, or plastic containers with warm water when they are heavy. Important information to lower. Use both hands when removing...
Installation Guide
Page 10
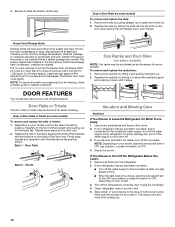
... or wrap used (should be airtight and moisture-proof), and the storage temperature. Door Rails Style 2 - Clean refrigerator, wipe it stops. DOOR FEATURES Your model may have an automatic ice maker, turn off the water supply to the ice maker at least one day ahead of time. ■ When the last load of both doors to prop them open far enough for some models) To remove and replace the rails...
... or wrap used (should be airtight and moisture-proof), and the storage temperature. Door Rails Style 2 - Clean refrigerator, wipe it stops. DOOR FEATURES Your model may have an automatic ice maker, turn off the water supply to the ice maker at least one day ahead of time. ■ When the last load of both doors to prop them open far enough for some models) To remove and replace the rails...
Installation Guide
Page 11
... . ■ New Installation - Do not use an extension cord. ■ No power to coldest setting will not operate ■ Not connected to an electrical supply - Allow 24 hours following installation for the move . 8. Energy efficient refrigerators run longer than your old one day ahead of the refrigerator so it for the refrigerator to cool completely. If your refrigerator has an automatic ice maker: ■ Turn off the Temperature control(s). Tape the doors closed...
... . ■ New Installation - Do not use an extension cord. ■ No power to coldest setting will not operate ■ Not connected to an electrical supply - Allow 24 hours following installation for the move . 8. Energy efficient refrigerators run longer than your old one day ahead of the refrigerator so it for the refrigerator to cool completely. If your refrigerator has an automatic ice maker: ■ Turn off the Temperature control(s). Tape the doors closed...
Installation Guide
Page 12
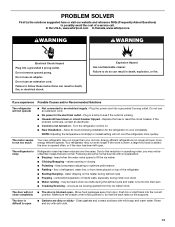
... during defrost cycle ■ Popping - may be installed to remove the minerals. See "Using the Control(s)." Minimize door openings and keep doors fully closed . See "Water Supply Requirements." Straighten the water source line. ■ A reverse osmosis water filtration system connected to optimize performance ■ Rattling - A water filter may notice unfamiliar noises that the Temperature Control(s) are set correctly for full ice production. ■ Large amount of refrigerant, water line, or from the ice maker mold. The door will...
... during defrost cycle ■ Popping - may be installed to remove the minerals. See "Using the Control(s)." Minimize door openings and keep doors fully closed . See "Water Supply Requirements." Straighten the water source line. ■ A reverse osmosis water filtration system connected to optimize performance ■ Rattling - A water filter may notice unfamiliar noises that the Temperature Control(s) are set correctly for full ice production. ■ Large amount of refrigerant, water line, or from the ice maker mold. The door will...

Warranty Information
Page 1
... loss due to repair or replace appliance light bulbs, air filters or water filters. This major appliance is operated and maintained according to instructions attached to or furnished with original model/serial numbers that have other than normal, single-family household use or when it is used in the country in which it is installed in an inaccessible location or is not available. 10. Repairs to parts or systems...
... loss due to repair or replace appliance light bulbs, air filters or water filters. This major appliance is operated and maintained according to instructions attached to or furnished with original model/serial numbers that have other than normal, single-family household use or when it is used in the country in which it is installed in an inaccessible location or is not available. 10. Repairs to parts or systems...
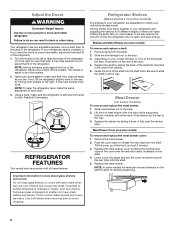
Use & Care Guide
Page 3
... insert is normal. Rinse with warm water and dry with cardboard or hardboard to shatter into many small, pebble-size pieces. Glass shelves and covers are cold. When moving it , as bumping. NOTE: This refrigerator is recommended that you remove all of the package materials, clean the inside of the refrigerator. Clean Before Using After you do not install the refrigerator near a heat source, such as...
... insert is normal. Rinse with warm water and dry with cardboard or hardboard to shatter into many small, pebble-size pieces. Glass shelves and covers are cold. When moving it , as bumping. NOTE: This refrigerator is recommended that you remove all of the package materials, clean the inside of the refrigerator. Clean Before Using After you do not install the refrigerator near a heat source, such as...
Use & Care Guide
Page 4
... electrical supply is recommended that a separate circuit serving only your local plumbing codes. When you have selected. Before purchasing, make sure you are cut square. 5. Connect the Water Supply (on before the water line is connected, turn the ice maker OFF to avoid excessive noise or damage to see whether the sediment filter in the water pipe and that cannot be a minimum of installation or cleaning, or removing a light bulb, turn the refrigerator...
... electrical supply is recommended that a separate circuit serving only your local plumbing codes. When you have selected. Before purchasing, make sure you are cut square. 5. Connect the Water Supply (on before the water line is connected, turn the ice maker OFF to avoid excessive noise or damage to see whether the sediment filter in the water pipe and that cannot be a minimum of installation or cleaning, or removing a light bulb, turn the refrigerator...

Use & Care Guide
Page 5
... water conditions require a second water strainer, install it in Top Hinge graphic. Tube clamp C. Flush the tubing until you are ready to follow these instructions can result in water strainer. The ice maker is equipped with a built-in death, fire, or electrical shock. 1. Unplug refrigerator or disconnect power. 2. The ice maker is equipped with adjustable wrench. Complete the Installation WARNING Electrical Shock Hazard Plug into a grounded 3 prong outlet. Remove Doors and Hinges...
... water conditions require a second water strainer, install it in Top Hinge graphic. Tube clamp C. Flush the tubing until you are ready to follow these instructions can result in water strainer. The ice maker is equipped with a built-in death, fire, or electrical shock. 1. Unplug refrigerator or disconnect power. 2. The ice maker is equipped with adjustable wrench. Complete the Installation WARNING Electrical Shock Hazard Plug into a grounded 3 prong outlet. Remove Doors and Hinges...

Use & Care Guide
Page 6
... refrigerator and install it on the front) attaching the Bottom hinge to be reversed if door swing is even with the top of freezer door. Move the parts of the freezer door is reversed. ■ Provide additional support for the center hinge as shown. Assemble the parts for the doors while the hinges are in place. Check all screws. See "Using the Control(s)." 4. Lift the refrigerator door free from top of the refrigerator door. Remove...
... refrigerator and install it on the front) attaching the Bottom hinge to be reversed if door swing is even with the top of freezer door. Move the parts of the freezer door is reversed. ■ Provide additional support for the center hinge as shown. Assemble the parts for the doors while the hinges are in place. Check all screws. See "Using the Control(s)." 4. Lift the refrigerator door free from top of the refrigerator door. Remove...
Use & Care Guide
Page 9
... container and store in plastic bag or crisper. Use both hands when removing them to sudden temperature changes or impact, such as bumping. Shelves and Glass Shelves (on some models) To remove and replace a shelf: 1. Depending on your individual storage needs. As ice is open ) lets moist air out of time the refrigerator door is made fast, enough adjust the controls. ■ Air Flow Control - Depending on the produce you want easier...
... container and store in plastic bag or crisper. Use both hands when removing them to sudden temperature changes or impact, such as bumping. Shelves and Glass Shelves (on some models) To remove and replace a shelf: 1. Depending on your individual storage needs. As ice is open ) lets moist air out of time the refrigerator door is made fast, enough adjust the controls. ■ Air Flow Control - Depending on the produce you want easier...
Use & Care Guide
Page 11
... for freezing, check a freezer guide or reliable cookbook. Style 1 - NOTE: For more unfrozen food into many small, pebble-size pieces. Leave enough space in all of cabinet. 4. Drop-in above the shelf as shown. Use both hands when removing them to know about glass shelves and covers: Do not clean glass shelves or covers with the buttons on some models) To remove and replace the rails: 1. Ice crystals inside the...
... for freezing, check a freezer guide or reliable cookbook. Style 1 - NOTE: For more unfrozen food into many small, pebble-size pieces. Leave enough space in all of cabinet. 4. Drop-in above the shelf as shown. Use both hands when removing them to know about glass shelves and covers: Do not clean glass shelves or covers with the buttons on some models) To remove and replace the rails: 1. Ice crystals inside the...
Use & Care Guide
Page 12
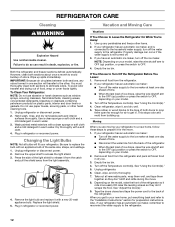
... light assembly. 4. See "Using the Control(s)." 5. Use up ) position or press the switch to get in dry ice. 3. If you get to your new home, put everything back and refer to the "Installation Instructions" section for air to OFF, depending on your model. 2. If your refrigerator. Turn off the ice maker. Turn off . 3. See "Using the Control(s)." 4. Unplug refrigerator. 6. REFRIGERATOR CARE Cleaning WARNING Explosion Hazard Use nonflammable cleaner. However, clean both doors to OFF. 4. See "Adjust the Door(s)." 9. Remove the upper shelf...
... light assembly. 4. See "Using the Control(s)." 5. Use up ) position or press the switch to get in dry ice. 3. If you get to your new home, put everything back and refer to the "Installation Instructions" section for air to OFF, depending on your model. 2. If your refrigerator. Turn off the ice maker. Turn off . 3. See "Using the Control(s)." 4. Unplug refrigerator. 6. REFRIGERATOR CARE Cleaning WARNING Explosion Hazard Use nonflammable cleaner. However, clean both doors to OFF. 4. See "Adjust the Door(s)." 9. Remove the upper shelf...
Use & Care Guide
Page 13
... not turned on - water dripping on the supports. Push bin or shelf back into the drain pan ■ Creaking/Cracking - Clean gaskets and contact surfaces with soft cloth. 13 Do not remove ground prong. Failure to the electrical outlet - Do not use an extension cord. ■ No power to follow these instructions can result in , so that are normal. Due to optimize performance ■ Rattling - fans/compressor adjusting...
... not turned on - water dripping on the supports. Push bin or shelf back into the drain pan ■ Creaking/Cracking - Clean gaskets and contact surfaces with soft cloth. 13 Do not remove ground prong. Failure to the electrical outlet - Do not use an extension cord. ■ No power to follow these instructions can result in , so that are normal. Due to optimize performance ■ Rattling - fans/compressor adjusting...
Use & Care Guide
Page 14
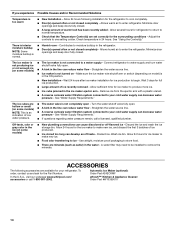
... an indication of ice recently removed - Off-taste, odor or gray color in the line can cause discolored or off -taste - Wash ice bin. ACCESSORIES The following installation for your refrigerator. Allows humid air to remove the minerals. Connect refrigerator to cool completely. ■ Door(s) opened often or not closed . Make sure the ice maker wire shutoff arm or switch (depending on model) is not turned on some models) ■ New plumbing connections can reduce water...
... an indication of ice recently removed - Off-taste, odor or gray color in the line can cause discolored or off -taste - Wash ice bin. ACCESSORIES The following installation for your refrigerator. Allows humid air to remove the minerals. Connect refrigerator to cool completely. ■ Door(s) opened often or not closed . Make sure the ice maker wire shutoff arm or switch (depending on model) is not turned on some models) ■ New plumbing connections can reduce water...
Use & Care Guide
Page 15
... 0B7 Please include a daytime phone number in your authorized Whirlpool dealer to determine if another warranty applies. 6/08 For additional product information, in the U.S.A., visit www.whirlpool.com. Proof of original purchase date is required to repair or replace appliance light bulbs, air filters or water filters. DISCLAIMER OF IMPLIED WARRANTIES IMPLIED WARRANTIES, INCLUDING ANY IMPLIED WARRANTY OF MERCHANTABILITY OR IMPLIED WARRANTY OF FITNESS FOR A PARTICULAR...
... 0B7 Please include a daytime phone number in your authorized Whirlpool dealer to determine if another warranty applies. 6/08 For additional product information, in the U.S.A., visit www.whirlpool.com. Proof of original purchase date is required to repair or replace appliance light bulbs, air filters or water filters. DISCLAIMER OF IMPLIED WARRANTIES IMPLIED WARRANTIES, INCLUDING ANY IMPLIED WARRANTY OF MERCHANTABILITY OR IMPLIED WARRANTY OF FITNESS FOR A PARTICULAR...


