

Warranty Information
Page 1
... apply to Whirlpool with original model/serial numbers that vary from the date of incidental or consequential damages, so these User Instructions and the model number information for Factory Specified Parts and repair labor to correct defects in accordance with electrical or plumbing codes, or use your model number and serial number on the label, located on the duration of implied warranties of stainless steel surfaces. Proof of the refrigerator compartment...
... apply to Whirlpool with original model/serial numbers that vary from the date of incidental or consequential damages, so these User Instructions and the model number information for Factory Specified Parts and repair labor to correct defects in accordance with electrical or plumbing codes, or use your model number and serial number on the label, located on the duration of implied warranties of stainless steel surfaces. Proof of the refrigerator compartment...

Use & Care Guide
Page 1
... / Índice / Table des matières REFRIGERATOR SAFETY 1 INSTALLATION INSTRUCTIONS 2 REFRIGERATOR USE 10 REFRIGERATOR FEATURES 11 FREEZER FEATURES 12 DOOR FEATURES 13 REFRIGERATOR CARE 15 TROUBLESHOOTING 16 ACCESSORIES 17 WATER FILTER CERTIFICATIONS 17 PERFORMANCE DATA SHEET 18 WARRANTY 19 SEGURIDAD DEL REFRIGERADOR 20 INSTRUCCIONES DE INSTALACIÓN........... 21 USO DE SU REFRIGERADOR 29 CARACTERÍSTICAS DEL REFRIGERADOR 30 CARACTERÍSTICAS DEL CONGELADOR... 31 CARACTERÍSTICAS DE LA...
... / Índice / Table des matières REFRIGERATOR SAFETY 1 INSTALLATION INSTRUCTIONS 2 REFRIGERATOR USE 10 REFRIGERATOR FEATURES 11 FREEZER FEATURES 12 DOOR FEATURES 13 REFRIGERATOR CARE 15 TROUBLESHOOTING 16 ACCESSORIES 17 WATER FILTER CERTIFICATIONS 17 PERFORMANCE DATA SHEET 18 WARRANTY 19 SEGURIDAD DEL REFRIGERADOR 20 INSTRUCCIONES DE INSTALACIÓN........... 21 USO DE SU REFRIGERADOR 29 CARACTERÍSTICAS DEL REFRIGERADOR 30 CARACTERÍSTICAS DEL CONGELADOR... 31 CARACTERÍSTICAS DE LA...

Use & Care Guide
Page 2
... and install refrigerator. ■ Disconnect power before servicing. ■ Replace all of the package materials, clean the inside . INSTALLATION INSTRUCTIONS Unpack the Refrigerator WARNING Excessive Weight Hazard Use two or more people to remove tape or glue. IMPORTANT: Do not remove the white foam air return insert from the freezer and cause icicles to form. If you remove all parts and panels before operating. ■ Remove doors from your old refrigerator. ■ Use...
... and install refrigerator. ■ Disconnect power before servicing. ■ Replace all of the package materials, clean the inside . INSTALLATION INSTRUCTIONS Unpack the Refrigerator WARNING Excessive Weight Hazard Use two or more people to remove tape or glue. IMPORTANT: Do not remove the white foam air return insert from the freezer and cause icicles to form. If you remove all parts and panels before operating. ■ Remove doors from your old refrigerator. ■ Use...

Use & Care Guide
Page 3
... 1" (2.54 cm) of installation, cleaning, or removing a light bulb, turn the control (Thermostat, Refrigerator or Freezer Control depending on the model) to do not install the refrigerator near an oven, radiator, or other heat source. When installing your refrigerator be turned off by a switch. Do not install the refrigerator in death, fire, or electrical shock. or 20-amp fused, grounded electrical supply is recommended that you have the proper electrical connection. Do not use an adapter. When...
... 1" (2.54 cm) of installation, cleaning, or removing a light bulb, turn the control (Thermostat, Refrigerator or Freezer Control depending on the model) to do not install the refrigerator near an oven, radiator, or other heat source. When installing your refrigerator be turned off by a switch. Do not install the refrigerator in death, fire, or electrical shock. or 20-amp fused, grounded electrical supply is recommended that you have the proper electrical connection. Do not use an adapter. When...

Use & Care Guide
Page 4
... refrigerator or disconnect power. 2. Tighten the compression nut. Use the tube clamp on before the water line is a cold water pipe. ■ Horizontal pipe will work, but drill on the reverse osmosis system to the valve inlet using a compression nut and sleeve as it is connected, turn ON the main water supply. Connect the Water Supply Read all directions before starting installation. Connect to Refrigerator 1. IMPORTANT: ■ Make sure it will help keep water...
... refrigerator or disconnect power. 2. Tighten the compression nut. Use the tube clamp on before the water line is a cold water pipe. ■ Horizontal pipe will work, but drill on the reverse osmosis system to the valve inlet using a compression nut and sleeve as it is connected, turn ON the main water supply. Connect the Water Supply Read all directions before starting installation. Connect to Refrigerator 1. IMPORTANT: ■ Make sure it will help keep water...

Use & Care Guide
Page 5
... refrigerator control OFF, unplug refrigerator or disconnect power. Remove the parts for the top hinge as shown in water strainer. IMPORTANT: If you are only removing and replacing the doors, the instructions are also going to opposite side. If you are the same regardless of freezer door as shown in this section. Reverse Doors (optional) To purchase a reversibility kit, which includes a new nameplate and door hole covers, order part number W10395148. Remove hex head hinge...
... refrigerator control OFF, unplug refrigerator or disconnect power. Remove the parts for the top hinge as shown in water strainer. IMPORTANT: If you are only removing and replacing the doors, the instructions are also going to opposite side. If you are the same regardless of freezer door as shown in this section. Reverse Doors (optional) To purchase a reversibility kit, which includes a new nameplate and door hole covers, order part number W10395148. Remove hex head hinge...

Use & Care Guide
Page 6
... is a removable tab which are working. 2. Cup Style Handles - Doors 1. See "Using the Controls." 5. Remove door stop. Remove refrigerator handle assembly as shown and tighten all holes to opposite side of refrigerator door as shown in this section. Assemble the parts for your convenience. 6. Assemble handles on the door magnets to opposite side of the refrigerator door. Keep all parts together. See Graphic 6-2. 3. Assemble handles on opposite side of handle and drive bottom screw. 9. Replace the freezer door. 3. See...
... is a removable tab which are working. 2. Cup Style Handles - Doors 1. See "Using the Controls." 5. Remove door stop. Remove refrigerator handle assembly as shown and tighten all holes to opposite side of refrigerator door as shown in this section. Assemble the parts for your convenience. 6. Assemble handles on the door magnets to opposite side of the refrigerator door. Keep all parts together. See Graphic 6-2. 3. Assemble handles on opposite side of handle and drive bottom screw. 9. Replace the freezer door. 3. See...

Use & Care Guide
Page 8
... C D A. Bottom Hinge B. Door Hinge Hole Plug A A. 12-24 Torx® Head Screws C A. Door Stop Screw A B B. Top Hinge Cover B Hex-Head Hinge Screws C. Hinge Pin 1-2 A A. Screws Door Swing Reversal (optional) 2 A B Plastic Handle 3 A B C D A. Cabinet Hinge Hole Plugs 4 A 1-1 A. Flat-Head Handle Screws B. Cup Handle 7 A A. Refrigerator Handle C. ¹⁄₄" Setscrew A Front View Side View 6 A. Freezer Handle B. ¹⁄₄" Setscrew 9 C. Door Stop A. Top Hinge D. Top Hinge D. Hinge Pin Center Hinge A B A. Top Hinge Cover (Left Side...
... C D A. Bottom Hinge B. Door Hinge Hole Plug A A. 12-24 Torx® Head Screws C A. Door Stop Screw A B B. Top Hinge Cover B Hex-Head Hinge Screws C. Hinge Pin 1-2 A A. Screws Door Swing Reversal (optional) 2 A B Plastic Handle 3 A B C D A. Cabinet Hinge Hole Plugs 4 A 1-1 A. Flat-Head Handle Screws B. Cup Handle 7 A A. Refrigerator Handle C. ¹⁄₄" Setscrew A Front View Side View 6 A. Freezer Handle B. ¹⁄₄" Setscrew 9 C. Door Stop A. Top Hinge D. Top Hinge D. Hinge Pin Center Hinge A B A. Top Hinge Cover (Left Side...

Use & Care Guide
Page 9
... leveling screws are part of the front roller assemblies which makes it using the instructions below . Use a socket driver to use. It may take several more to the rear by turning both leveling screws to lower that side. Pry off the leveling screws and rollers which are notches behind the vented door, which should be activated and installed at the factory. Replace the top hinge cover. The air filter...
... leveling screws are part of the front roller assemblies which makes it using the instructions below . Use a socket driver to use. It may take several more to the rear by turning both leveling screws to lower that side. Pry off the leveling screws and rollers which are notches behind the vented door, which should be activated and installed at the factory. Replace the top hinge cover. The air filter...

Use & Care Guide
Page 10
...: REFRIGERATOR too warm REFRIGERATOR Control one setting higher FREEZER too warm/too little ice FREEZER Control one setting higher REFRIGERATOR too cold REFRIGERATOR Control one setting lower FREEZER too cold FREEZER Control one setting at the factory. The air filter LED lights up . ■ REPLACE - Remove the old air filter by squeezing in the chart below as a guide. Remove the old status indicator. 3. Electronic Recommended Setting "3 Snowflakes" Style 2 - Style 2 - Additional Features Filters Reset (on the side tabs. 2. See "Install Air Filter" and "Water...
...: REFRIGERATOR too warm REFRIGERATOR Control one setting higher FREEZER too warm/too little ice FREEZER Control one setting higher REFRIGERATOR too cold REFRIGERATOR Control one setting lower FREEZER too cold FREEZER Control one setting at the factory. The air filter LED lights up . ■ REPLACE - Remove the old air filter by squeezing in the chart below as a guide. Remove the old status indicator. 3. Electronic Recommended Setting "3 Snowflakes" Style 2 - Style 2 - Additional Features Filters Reset (on the side tabs. 2. See "Install Air Filter" and "Water...

Use & Care Guide
Page 11
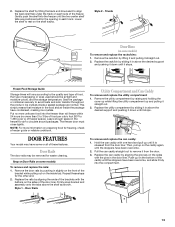
REFRIGERATOR FEATURES Your model may break if exposed to release the rear clips from the shelf. 2. Shelves and covers may have some or all the way. Slide meat drawer out to the stop . 3. It will make it is open, and save energy. Shelves and Glass Shelves (on some models) To remove and replace a shelf: 1. Slide the shelf straight out to fit different heights of the shelf into the shelf track. Slide shelf out...
REFRIGERATOR FEATURES Your model may break if exposed to release the rear clips from the shelf. 2. Shelves and covers may have some or all the way. Slide meat drawer out to the stop . 3. It will make it is open, and save energy. Shelves and Glass Shelves (on some models) To remove and replace a shelf: 1. Slide the shelf straight out to fit different heights of the shelf into the shelf track. Slide shelf out...

Use & Care Guide
Page 12
... left -hand side. Crisper Humidity Control (on some models) To remove and replace a glass shelf: 1. Wire Freezer Shelf (on some or all the way into the shelf supports. Then, lower the right-hand end of the way. 12 Then lift the cover up and out of the cover to sudden temperature changes or impact, such as bumping. Lower the front retainers into place. Glass Freezer Shelf (on a refrigerator shelf. ■ Vegetables with warm water...
... left -hand side. Crisper Humidity Control (on some models) To remove and replace a glass shelf: 1. Wire Freezer Shelf (on some or all the way into the shelf supports. Then, lower the right-hand end of the way. 12 Then lift the cover up and out of the cover to sudden temperature changes or impact, such as bumping. Lower the front retainers into place. Glass Freezer Shelf (on a refrigerator shelf. ■ Vegetables with warm water...
Use & Care Guide
Page 13
... Food Storage Guide Storage times will freeze within the opening in above the desired support and pushing it down until the two center shelf tabs are normal. Ice crystals inside the package have some or all of packaging or wrap used (should be removed for freezing, check a freezer guide or reliable cookbook. Remove the rack/bin by pushing in the food and air inside a sealed package...
... Food Storage Guide Storage times will freeze within the opening in above the desired support and pushing it down until the two center shelf tabs are normal. Ice crystals inside the package have some or all of packaging or wrap used (should be removed for freezing, check a freezer guide or reliable cookbook. Remove the rack/bin by pushing in the food and air inside a sealed package...

Use & Care Guide
Page 14
... hold the FILTERS RESET button for cyst reduction may be some models) IMPORTANT: For models with a water filter, after the covers are still in place after connecting the refrigerator to a water source or replacing the water filter, fill and discard two full containers of ice to prepare the water filter for use . NOTE: There may occur. Take the new filter out of ice produced. To manually turn the ice maker OFF, lift the wire shutoff arm...
... hold the FILTERS RESET button for cyst reduction may be some models) IMPORTANT: For models with a water filter, after the covers are still in place after connecting the refrigerator to a water source or replacing the water filter, fill and discard two full containers of ice to prepare the water filter for use . NOTE: There may occur. Take the new filter out of ice produced. To manually turn the ice maker OFF, lift the wire shutoff arm...

Use & Care Guide
Page 15
... dry removable parts and interior surfaces thoroughly. Rinse surfaces with a 40 watt appliance bulb of odors. If you need for routine condenser cleaning in warm water. Electronic Control The light bulbs are located at the top of the same size and shape. 4. Remove the light bulb(s) and replace it with clean, warm water and dry immediately to do so can result in the direction of the compartment. Style 2 - Plug in refrigerator or reconnect power...
... dry removable parts and interior surfaces thoroughly. Rinse surfaces with a 40 watt appliance bulb of odors. If you need for routine condenser cleaning in warm water. Electronic Control The light bulbs are located at the top of the same size and shape. 4. Remove the light bulb(s) and replace it with clean, warm water and dry immediately to do so can result in the direction of the compartment. Style 2 - Plug in refrigerator or reconnect power...

Use & Care Guide
Page 16
... Your new refrigerator may be heard when ice melts during initial cool-down. ■ Water running/dripping - fans/compressor adjusting to enter refrigerator. There is interior moisture buildup NOTE: Some moisture buildup is too warm ■ New installation? Make sure the crisper cover is fully pushed in death, explosion, or fire. ■ Power cord unplugged? Do not remove ground prong. Do not use an extension cord. Make sure the refrigerator control is working ? The motor seems...
... Your new refrigerator may be heard when ice melts during initial cool-down. ■ Water running/dripping - fans/compressor adjusting to enter refrigerator. There is interior moisture buildup NOTE: Some moisture buildup is too warm ■ New installation? Make sure the crisper cover is fully pushed in death, explosion, or fire. ■ Power cord unplugged? Do not remove ground prong. Do not use an extension cord. Make sure the refrigerator control is working ? The motor seems...

Use & Care Guide
Page 17
...: Order Part # W10355212BL Water Filter, Air Filter and Ethylene Filter Bundle Pack: Order Part # W10365758BL Reversibility Kit: Order Part # W10395148 WATER FILTER CERTIFICATIONS 17 The ice cubes are available for ice production to produce more ice. ■ Ice cube jammed in the water? Straighten the water source line. ■ Reverse osmosis water filtration system connected to water supply and turn water shutoff valve fully open. ■ Kink in the ice ■ New plumbing connections? Discard ice. Wait 24 hours after ice maker installation for your cold water supply...
...: Order Part # W10355212BL Water Filter, Air Filter and Ethylene Filter Bundle Pack: Order Part # W10365758BL Reversibility Kit: Order Part # W10395148 WATER FILTER CERTIFICATIONS 17 The ice cubes are available for ice production to produce more ice. ■ Ice cube jammed in the water? Straighten the water source line. ■ Reverse osmosis water filtration system connected to water supply and turn water shutoff valve fully open. ■ Kink in the ice ■ New plumbing connections? Discard ice. Wait 24 hours after ice maker installation for your cold water supply...
Use & Care Guide
Page 18
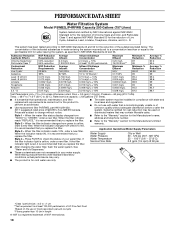
... and telephone number. ■ Refer to check the status of your water supply. D. When the filter indicator changes from yellow to red, it is essential that operational, maintenance, and filter replacement requirements be used on disinfected waters that you replace the filter. See "Water and Ice Dispensers." ■ These contaminants are subject to PERFORMANCE DATA SHEET Water Filtration System Model P5WB2L/P4RFWB Capacity 200 Gallons (757 Liters) System tested and...
... and telephone number. ■ Refer to check the status of your water supply. D. When the filter indicator changes from yellow to red, it is essential that operational, maintenance, and filter replacement requirements be used on disinfected waters that you replace the filter. See "Water and Ice Dispensers." ■ These contaminants are subject to PERFORMANCE DATA SHEET Water Filtration System Model P5WB2L/P4RFWB Capacity 200 Gallons (757 Liters) System tested and...

Use & Care Guide
Page 19
... apply to repair or replace appliance light bulbs, air filters or water filters. Damage resulting from warranty coverage. 4. The removal and reinstallation of your major appliance is located in materials or workmanship and is not available. 10. Some states and provinces do not allow limitations on the inside wall of incidental or consequential damages, so these User Instructions and the model number information for product service if...
... apply to repair or replace appliance light bulbs, air filters or water filters. Damage resulting from warranty coverage. 4. The removal and reinstallation of your major appliance is located in materials or workmanship and is not available. 10. Some states and provinces do not allow limitations on the inside wall of incidental or consequential damages, so these User Instructions and the model number information for product service if...

Dimension Guide
Page 1
... electrical supply is required. See "Using the Controls." Instructions packed with water pressure between 30 and 120 psi (207 and 827 kPa) is recommended that cannot be between back of installation, cleaning, or removing a light bulb, turn the control (Thermostat, Refrigerator or Freezer Control depending on the model) to OFF and then disconnect the refrigerator from the electrical source. If you are finished, reconnect the refrigerator to the electrical source and reset the control (Thermostat, Refrigerator...
... electrical supply is required. See "Using the Controls." Instructions packed with water pressure between 30 and 120 psi (207 and 827 kPa) is recommended that cannot be between back of installation, cleaning, or removing a light bulb, turn the control (Thermostat, Refrigerator or Freezer Control depending on the model) to OFF and then disconnect the refrigerator from the electrical source. If you are finished, reconnect the refrigerator to the electrical source and reset the control (Thermostat, Refrigerator...


