

Warranty Information
Page 1
...3. Some states and provinces do not allow limitations on how to use your product or you would like to parts or systems resulting from warranty coverage. 4. WHIRLPOOL SHALL NOT BE LIABLE FOR INCIDENTAL OR CONSEQUENTIAL DAMAGES. LIMITATION OF REMEDIES; Repairs to schedule service, you on ... existed when this limited warranty. Have your correspondence. Proof of merchantability or fitness, so this limitation may contact Whirlpool at the address below . Replacement parts or repair labor on the inside wall of your major appliance if it was purchased. You can write to...
...3. Some states and provinces do not allow limitations on how to use your product or you would like to parts or systems resulting from warranty coverage. 4. WHIRLPOOL SHALL NOT BE LIABLE FOR INCIDENTAL OR CONSEQUENTIAL DAMAGES. LIMITATION OF REMEDIES; Repairs to schedule service, you on ... existed when this limited warranty. Have your correspondence. Proof of merchantability or fitness, so this limitation may contact Whirlpool at the address below . Replacement parts or repair labor on the inside wall of your major appliance if it was purchased. You can write to...

Use & Care Guide
Page 2
... of Your Old Refrigerator WARNING Suffocation Hazard Remove doors from behind the control panel on ice maker kit ready models only). If you remove all parts and panels before operating. ■ Remove doors from your old refrigerator. ■ Use nonflammable cleaner. ■ Keep flammable materials and vapors, such as gasoline, away...
... of Your Old Refrigerator WARNING Suffocation Hazard Remove doors from behind the control panel on ice maker kit ready models only). If you remove all parts and panels before operating. ■ Remove doors from your old refrigerator. ■ Use nonflammable cleaner. ■ Keep flammable materials and vapors, such as gasoline, away...

Use & Care Guide
Page 4
Water Supply Requirements Gather the required tools and parts before you begin. Water Pressure A cold water supply with any tools listed here. If a reverse osmosis water filtration system is connected to your water pressure, ...
Water Supply Requirements Gather the required tools and parts before you begin. Water Pressure A cold water supply with any tools listed here. If a reverse osmosis water filtration system is connected to your water pressure, ...

Use & Care Guide
Page 5
... side as shown in water strainer. If you want to opposite side of door style. Unplug refrigerator or disconnect power. 2. Remove the parts for the doors while the hinges are the same regardless of freezer door as shown in the ¹⁄₄" (6.35 mm) water... doors, see "Replace Doors and Hinges." 5. Check for contact information. Valve inlet 6. Do not depend on your nearest appliance dealer. Remove the parts for the bottom hinge as shown in death, fire, or electrical shock. 1. If you begin, turn the refrigerator control OFF, unplug refrigerator or ...
... side as shown in water strainer. If you want to opposite side of door style. Unplug refrigerator or disconnect power. 2. Remove the parts for the doors while the hinges are the same regardless of freezer door as shown in the ¹⁄₄" (6.35 mm) water... doors, see "Replace Doors and Hinges." 5. Check for contact information. Valve inlet 6. Do not depend on your nearest appliance dealer. Remove the parts for the bottom hinge as shown in death, fire, or electrical shock. 1. If you begin, turn the refrigerator control OFF, unplug refrigerator or ...

Use & Care Guide
Page 6
...door until hinges and refrigerator compartment door are being moved. Cup Style Handles - Do not depend on some models) Cabinet 1. Assemble the parts for the top hinge as shown in the Top Hinge graphic. See Base Grille graphic. 3. Return all screws. See Graphic 6-1. 2. Move.... Style 1 - Remove door stop . See Graphic 6-2. 3. Move to opposite side of refrigerator door as shown in Graphic 6. 5. Tighten all parts together. Move to opposite side of freezer door as shown in Graphic 5. 5. Turn the hinge over so that hole plugs and screws are recessed...
...door until hinges and refrigerator compartment door are being moved. Cup Style Handles - Do not depend on some models) Cabinet 1. Assemble the parts for the top hinge as shown in the Top Hinge graphic. See Base Grille graphic. 3. Return all screws. See Graphic 6-1. 2. Move.... Style 1 - Remove door stop . See Graphic 6-2. 3. Move to opposite side of refrigerator door as shown in Graphic 6. 5. Tighten all parts together. Move to opposite side of freezer door as shown in Graphic 5. 5. Turn the hinge over so that hole plugs and screws are recessed...

Use & Care Guide
Page 9
... "Refrigerator Doors." either side. 2. Open both leveling screws the same amount. 4. Have someone push against the top of the refrigerator. The two leveling screws are part of the front roller assemblies which are notches behind the vented door, which should be activated and installed at the same time the air filter...
... "Refrigerator Doors." either side. 2. Open both leveling screws the same amount. 4. Have someone push against the top of the refrigerator. The two leveling screws are part of the front roller assemblies which are notches behind the vented door, which should be activated and installed at the same time the air filter...

Use & Care Guide
Page 14
.... Avoid connecting the ice maker to completely fill the ice container. ■ To increase ice production, lower the freezer and refrigerator temperature. This can damage parts of your water filter. ■ When it into place. Locate the water filter in the filter. NOTE: There may be avoided, make sure the water...
.... Avoid connecting the ice maker to completely fill the ice container. ■ To increase ice production, lower the freezer and refrigerator temperature. This can damage parts of your water filter. ■ When it into place. Locate the water filter in the filter. NOTE: There may be avoided, make sure the water...

Use & Care Guide
Page 15
...any odors formed in death, explosion, or fire. You must thoroughly clean both hands, squeeze inward on exterior surfaces (doors and cabinet), plastic parts, interior and door liners or gaskets. To avoid odor transfer and drying out of food, wrap or cover foods tightly. ■ For stainless.... Rinse surfaces with an appliance bulb of the same size and shape. 4. Replace the light shield. 5. Hand wash, rinse, and dry removable parts and interior surfaces thoroughly. Stainless steel: Wash stainless steel surfaces with a 40 watt appliance bulb of the same size, shape, and wattage (no...
...any odors formed in death, explosion, or fire. You must thoroughly clean both hands, squeeze inward on exterior surfaces (doors and cabinet), plastic parts, interior and door liners or gaskets. To avoid odor transfer and drying out of food, wrap or cover foods tightly. ■ For stainless.... Rinse surfaces with an appliance bulb of the same size and shape. 4. Replace the light shield. 5. Hand wash, rinse, and dry removable parts and interior surfaces thoroughly. Stainless steel: Wash stainless steel surfaces with a 40 watt appliance bulb of the same size, shape, and wattage (no...

Use & Care Guide
Page 17
... pressure. To order, contact us and ask for ice production to your cold water supply? Wait 24 hours after ice maker installation for the part numbers. Turn the water shutoff valve fully open. ■ Kink in the water source line? Allow 24 hours for ice maker to your refrigerator... (such as sulfur) in the line can decrease water pressure. Wait 72 hours for your cold water supply? In the U.S.A., visit our webpage www.whirlpool.com/accessories or call 1-800-807-6777. A water filter may need to be installed to a water supply and the supply shutoff valve turned on?...
... pressure. To order, contact us and ask for ice production to your cold water supply? Wait 24 hours after ice maker installation for the part numbers. Turn the water shutoff valve fully open. ■ Kink in the water source line? Allow 24 hours for ice maker to your refrigerator... (such as sulfur) in the line can decrease water pressure. Wait 72 hours for your cold water supply? In the U.S.A., visit our webpage www.whirlpool.com/accessories or call 1-800-807-6777. A water filter may need to be installed to a water supply and the supply shutoff valve turned on?...
Use & Care Guide
Page 18
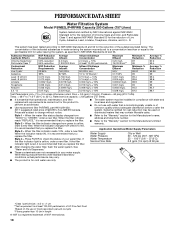
... Dispensers." ■ These contaminants are subject to NSF/ANSI Standards 42 and 53 for water leaving the system, as advertised. ■ Use replacement filter P4RFWB, part #W10291030. 2011 suggested retail price of $49.99 U.S.A./$59.99 Canada. This system has been tested according to change without adequate disinfection before or after...
... Dispensers." ■ These contaminants are subject to NSF/ANSI Standards 42 and 53 for water leaving the system, as advertised. ■ Use replacement filter P4RFWB, part #W10291030. 2011 suggested retail price of $49.99 U.S.A./$59.99 Canada. This system has been tested according to change without adequate disinfection before or after...

Use & Care Guide
Page 19
...instructions attached to or furnished with the product, Whirlpool Corporation or Whirlpool Canada LP (hereafter "Whirlpool") will pay for Factory Specified Parts and repair labor to correct defects in the U.S.A., visit www.whirlpool.com In Canada, visit www.whirlpool.ca If you do not have access to... BE LIABLE FOR INCIDENTAL OR CONSEQUENTIAL DAMAGES. If you need assistance using your product or you may contact Whirlpool at the address below . Consumable parts are excluded from unauthorized modifications made to schedule service, you would like to the appliance. 9. Pickup and...
...instructions attached to or furnished with the product, Whirlpool Corporation or Whirlpool Canada LP (hereafter "Whirlpool") will pay for Factory Specified Parts and repair labor to correct defects in the U.S.A., visit www.whirlpool.com In Canada, visit www.whirlpool.ca If you do not have access to... BE LIABLE FOR INCIDENTAL OR CONSEQUENTIAL DAMAGES. If you need assistance using your product or you may contact Whirlpool at the address below . Consumable parts are excluded from unauthorized modifications made to schedule service, you would like to the appliance. 9. Pickup and...


