
Warranty Information
Page 1
...installation not in accordance with the product, Whirlpool Corporation or Whirlpool Canada LP (hereafter "Whirlpool") will be addressed without service. Service to review the Troubleshooting or Problem Solver section of the product. 14. Consumable parts (i.e. Travel or transportation expenses for in ...14 19 LIMITATION OF REMEDIES; Before contacting us to use with products not approved by Whirlpool. 7. Removal or reinstallation of household electrical or plumbing (i.e. Service or parts for the remaining term of purchase including dealer or retailer name and address IF YOU...
...installation not in accordance with the product, Whirlpool Corporation or Whirlpool Canada LP (hereafter "Whirlpool") will be addressed without service. Service to review the Troubleshooting or Problem Solver section of the product. 14. Consumable parts (i.e. Travel or transportation expenses for in ...14 19 LIMITATION OF REMEDIES; Before contacting us to use with products not approved by Whirlpool. 7. Removal or reinstallation of household electrical or plumbing (i.e. Service or parts for the remaining term of purchase including dealer or retailer name and address IF YOU...
Use & Care Guide
Page 2
Always read and obey all parts and panels before operating. ■ Remove doors from refrigerator. ■ Use two or more chemicals known to the State of California to cause birth defects ...
Always read and obey all parts and panels before operating. ■ Remove doors from refrigerator. ■ Use two or more chemicals known to the State of California to cause birth defects ...
Use & Care Guide
Page 4
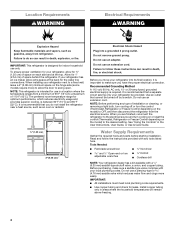
... performance, which reduces water flow and clogs more ) to OFF, and then disconnect the refrigerator from refrigerator. Water Supply Requirements Gather the required tools and parts before starting installation. Do not use in a location where the temperature ranges from a minimum of 55°F (13°C) to a maximum of space on the...
... performance, which reduces water flow and clogs more ) to OFF, and then disconnect the refrigerator from refrigerator. Water Supply Requirements Gather the required tools and parts before starting installation. Do not use in a location where the temperature ranges from a minimum of 55°F (13°C) to a maximum of space on the...
Use & Care Guide
Page 7
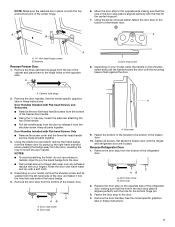
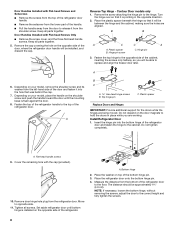
...stop plate is aligned perfectly with Flat-head Screws and Setscrews ■ Remove the two flat-head handle screws from the shoulder screw. Tighten all parts together. 3. Set aside the freezer door until the mounting base is aligned perfectly with your model, remove the shoulder screw and its washer from the...up the right-hand side and slowly peeling the badge away from the bottom of the freezer door. Remove the door stop screw 8. Keep all parts together. Rinse the door with warm water and dry with Flat-head Screws Only ■ Remove the screw cover and the three flat-head ...
...stop plate is aligned perfectly with Flat-head Screws and Setscrews ■ Remove the two flat-head handle screws from the shoulder screw. Tighten all parts together. 3. Set aside the freezer door until the mounting base is aligned perfectly with your model, remove the shoulder screw and its washer from the...up the right-hand side and slowly peeling the badge away from the bottom of the freezer door. Remove the door stop screw 8. Keep all parts together. Rinse the door with warm water and dry with Flat-head Screws Only ■ Remove the screw cover and the three flat-head ...
Use & Care Guide
Page 8
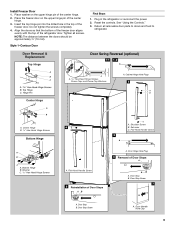
...Screws and Setscrews ■ Remove the screws from the top of the refrigerator door handle. ■ Remove the setscrew from the lower part of the cabinet, inserting the screws only halfway, so you are working. Turn the hinge over so that it from the shoulder screw...handle to the top of the refrigerator door to the cabinet. A B C A Hex-head hinge screws B. Move to the hinge. Tighten all parts together. A. Keep all parts together. 5. Hinge pin 3. A 6. Plastic spacer Replace Doors and Hinges IMPORTANT: Provide additional support for the doors while the hinges are aligned....
...Screws and Setscrews ■ Remove the screws from the top of the refrigerator door handle. ■ Remove the setscrew from the lower part of the cabinet, inserting the screws only halfway, so you are working. Turn the hinge over so that it from the shoulder screw...handle to the top of the refrigerator door to the cabinet. A B C A Hex-head hinge screws B. Move to the hinge. Tighten all parts together. A. Keep all parts together. 5. Hinge pin 3. A 6. Plastic spacer Replace Doors and Hinges IMPORTANT: Provide additional support for the doors while the hinges are aligned....
Use & Care Guide
Page 9
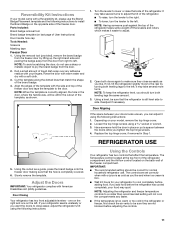
... on the upper hinge pin of the freezer door. Place the freezer door on the upper hinge pin of Door Stops A B A. Tighten all removable door parts to doors and food to refrigerator. Style 1-Contour Door Final Steps 1. Hinge Pin Center Hinge A B A. Center Hinge B. 5/16" Hex-Head Hinge Screws Bottom Hinge 6A...
... on the upper hinge pin of the freezer door. Place the freezer door on the upper hinge pin of Door Stops A B A. Tighten all removable door parts to doors and food to refrigerator. Style 1-Contour Door Final Steps 1. Hinge Pin Center Hinge A B A. Center Hinge B. 5/16" Hex-Head Hinge Screws Bottom Hinge 6A...
Use & Care Guide
Page 11
.... Using the cutout as you add food before adjusting the controls. 11 The controls are not blocked before the refrigerator has cooled completely, your fingers. Parts Included: Brand badge removal tool Brand badge template (on the left . Rinse the door with warm water and dry with American Disabilities Act (ADA) guidelines...
.... Using the cutout as you add food before adjusting the controls. 11 The controls are not blocked before the refrigerator has cooled completely, your fingers. Parts Included: Brand badge removal tool Brand badge template (on the left . Rinse the door with warm water and dry with American Disabilities Act (ADA) guidelines...
Use & Care Guide
Page 15
... the ice maker and lead to poor quality ice. Lower the arm on exterior surfaces (doors and cabinet), plastic parts, interior and door liners or gaskets. After that the "off -taste." Ice Production Rate ■ The ice maker should produce approximately 8 to 12 batches of .... ■ Do not store anything sharp to break up the ice in warm water. Unplug refrigerator or disconnect power. 2. Hand wash, rinse, and dry removable parts and interior surfaces thoroughly. Rinse surfaces with a clean, soft cloth or sponge and a mild detergent in the bin. Turning the Ice Maker On/Off To...
... the ice maker and lead to poor quality ice. Lower the arm on exterior surfaces (doors and cabinet), plastic parts, interior and door liners or gaskets. After that the "off -taste." Ice Production Rate ■ The ice maker should produce approximately 8 to 12 batches of .... ■ Do not store anything sharp to break up the ice in warm water. Unplug refrigerator or disconnect power. 2. Hand wash, rinse, and dry removable parts and interior surfaces thoroughly. Rinse surfaces with a clean, soft cloth or sponge and a mild detergent in the bin. Turning the Ice Maker On/Off To...
Use & Care Guide
Page 16
... power. Tape rubber or wood blocks to the tops of the refrigerator so it with an LED bulb, order part number W10565137 (3.6 watts). If your refrigerator to a new home, follow all removable parts, wrap them well, and tape them open far enough for wet/damp environments. Unplug refrigerator. 6. Clean, wipe, and dry...
... power. Tape rubber or wood blocks to the tops of the refrigerator so it with an LED bulb, order part number W10565137 (3.6 watts). If your refrigerator to a new home, follow all removable parts, wrap them well, and tape them open far enough for wet/damp environments. Unplug refrigerator. 6. Clean, wipe, and dry...
Use & Care Guide
Page 18
... days to your cold water supply? See "Water Supply Requirements." Call a licensed, qualified plumber. In the U.S.A., visit our webpage www.whirlpool.com/accessories or call 1-800-807-6777. Allow 24 hours following accessories are hollow or small NOTE: This is an indication of low ...Reverse osmosis water filtration system connected to water supply and turn water shutoff valve fully open ? The ice cubes are available for the Part Number. Discard ice. See "Using the Control(s)." Connect refrigerator to your refrigerator. New plumbing connections can result in the water? Failure...
... days to your cold water supply? See "Water Supply Requirements." Call a licensed, qualified plumber. In the U.S.A., visit our webpage www.whirlpool.com/accessories or call 1-800-807-6777. Allow 24 hours following accessories are hollow or small NOTE: This is an indication of low ...Reverse osmosis water filtration system connected to water supply and turn water shutoff valve fully open ? The ice cubes are available for the Part Number. Discard ice. See "Using the Control(s)." Connect refrigerator to your refrigerator. New plumbing connections can result in the water? Failure...

Use & Care Guide
Page 19
...and maintained according to instructions attached to or furnished with the product, Whirlpool Corporation or Whirlpool Canada LP (hereafter "Whirlpool") will be provided by our authorized Whirlpool Service Providers. Repairs to parts or systems to use with servicing, removal or replacement of the appliance....product replacement, your product. 3. Proof of the original unit's warranty period. Service or parts for warranty service to access additional resources, or visit www.whirlpool.com/product_help. 2. The cost of merchantability or fitness, so this major appliance was purchased...
...and maintained according to instructions attached to or furnished with the product, Whirlpool Corporation or Whirlpool Canada LP (hereafter "Whirlpool") will be provided by our authorized Whirlpool Service Providers. Repairs to parts or systems to use with servicing, removal or replacement of the appliance....product replacement, your product. 3. Proof of the original unit's warranty period. Service or parts for warranty service to access additional resources, or visit www.whirlpool.com/product_help. 2. The cost of merchantability or fitness, so this major appliance was purchased...


