
Warranty Information
Page 1
... for in accordance with servicing, removal or replacement of merchantability or fitness, so this warranty. This limited warranty is valid only in this limitation may not apply to correct product damage or defects caused by Whirlpool. 7. In-home instruction on the duration of implied warranties of the product. 14. light bulbs, batteries, air or water filters, preservation solutions, etc.). 5. Repairs to parts or systems to...
... for in accordance with servicing, removal or replacement of merchantability or fitness, so this warranty. This limited warranty is valid only in this limitation may not apply to correct product damage or defects caused by Whirlpool. 7. In-home instruction on the duration of implied warranties of the product. 14. light bulbs, batteries, air or water filters, preservation solutions, etc.). 5. Repairs to parts or systems to...
Dimension Guide
Page 1
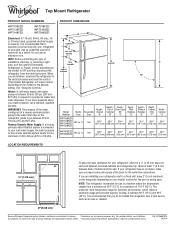
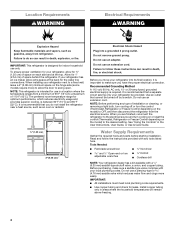
...;C) to be turned off by a switch. The preferred room temperature range for planning purposes only. Specifications subject to change without notice. Ref. IMPORTANT: The pressure of the water coming out of a reverse osmosis system going to the water inlet valve of installation, cleaning, or removing a light bulb, turn the control (Thermostat, Refrigerator or Freezer Control depending on your water pressure, call a licensed, qualified plumber. Top of cabinet 1 A overall C 90˚ Model Number Model Size Height - Yes...
...;C) to be turned off by a switch. The preferred room temperature range for planning purposes only. Specifications subject to change without notice. Ref. IMPORTANT: The pressure of the water coming out of a reverse osmosis system going to the water inlet valve of installation, cleaning, or removing a light bulb, turn the control (Thermostat, Refrigerator or Freezer Control depending on your water pressure, call a licensed, qualified plumber. Top of cabinet 1 A overall C 90˚ Model Number Model Size Height - Yes...
Use & Care Guide
Page 2
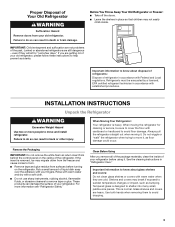
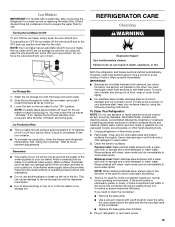
... all parts and panels before operating. ■ Remove doors from your old refrigerator. ■ Use nonflammable cleaner. ■ Keep flammable materials and vapors, such as gasoline, away from refrigerator. ■ Use two or more people to reduce the chance of injury, and tell you don't immediately follow instructions. This is , tell you how to move and install refrigerator. ■ Disconnect power before installing ice maker (on...
... all parts and panels before operating. ■ Remove doors from your old refrigerator. ■ Use nonflammable cleaner. ■ Keep flammable materials and vapors, such as gasoline, away from refrigerator. ■ Use two or more people to reduce the chance of injury, and tell you don't immediately follow instructions. This is , tell you how to move and install refrigerator. ■ Disconnect power before installing ice maker (on...
Use & Care Guide
Page 3
... follow these instructions to avoid dropping. 3 If you remove all of refrigerator in accordance with warm water when they will sit for cleaning or service, be evacuated by a licensed, EPA certified refrigerant technician in "Refrigerator Care." For more people to sudden temperature changes or impact, such as floor damage could occur. Important information to know about glass shelves and covers: Do not clean glass shelves or covers with Federal...
... follow these instructions to avoid dropping. 3 If you remove all of refrigerator in accordance with warm water when they will sit for cleaning or service, be evacuated by a licensed, EPA certified refrigerant technician in "Refrigerator Care." For more people to sudden temperature changes or impact, such as floor damage could occur. Important information to know about glass shelves and covers: Do not clean glass shelves or covers with Federal...
Use & Care Guide
Page 4
... 1" (2.54 cm) of installation or cleaning, or removing a light bulb, turn cooling on or reset the control (Thermostat, Refrigerator or Freezer Control depending on the hinge side (some models require more easily. Do not use in a location where the temperature ranges from a minimum of 55°F (13°C) to a maximum of space on the model) to the desired setting. Water Supply Requirements Gather the required tools and parts before starting installation. To ensure proper...
... 1" (2.54 cm) of installation or cleaning, or removing a light bulb, turn cooling on or reset the control (Thermostat, Refrigerator or Freezer Control depending on the hinge side (some models require more easily. Do not use in a location where the temperature ranges from a minimum of 55°F (13°C) to a maximum of space on the model) to the desired setting. Water Supply Requirements Gather the required tools and parts before starting installation. To ensure proper...
Use & Care Guide
Page 5
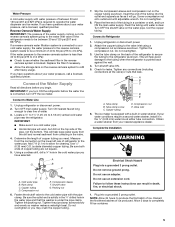
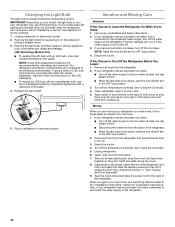
... three batches of the tubing in the valve. 4. If you have questions about your cold water supply, the water pressure to the reverse osmosis system needs to completely fill ice container. 5 IMPORTANT: If you turn ON the main water supply. Unplug refrigerator or disconnect power. 2. IMPORTANT: ■ Make sure it will help keep water away from the drill and normal sediment from the connection on the top...
... three batches of the tubing in the valve. 4. If you have questions about your cold water supply, the water pressure to the reverse osmosis system needs to completely fill ice container. 5 IMPORTANT: If you turn ON the main water supply. Unplug refrigerator or disconnect power. 2. IMPORTANT: ■ Make sure it will help keep water away from the drill and normal sediment from the connection on the top...
Use & Care Guide
Page 6
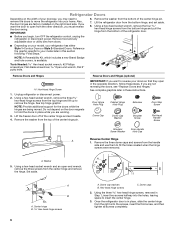
.... Set aside. Using the three hex-head hinge screws, removed in the opposite direction, follow these instructions. Remove the washer from the center hinge and remove the hinge. Dome cap washers B. NOTE: A Reversibility Kit, which includes a new Brand Badge and hole covers, is in these steps. If you want to remove the hinge. Refrigerator Doors Depending on the width of your doorway, you may need to remove the doors to open...
.... Set aside. Using the three hex-head hinge screws, removed in the opposite direction, follow these instructions. Remove the washer from the center hinge and remove the hinge. Dome cap washers B. NOTE: A Reversibility Kit, which includes a new Brand Badge and hole covers, is in these steps. If you want to remove the hinge. Refrigerator Doors Depending on the width of your doorway, you may need to remove the doors to open...
Use & Care Guide
Page 7
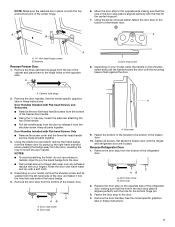
... bottom of the center hinge. 6. Door stop to the opposite side making sure that the hole in the door stop screw B. Fasten the door stop 2. Remove the door handles. A A B A A Hex-head hinge screws B. Depending on your fingers. Door Handles Installed with a soft cloth. 4. Door stop from the bottom of the freezer door. Reverse Refrigerator Door 1. See the model specific graphics later in these instructions. Remove the door stop screw B. Door stop from the bottom of the refrigerator door. Remove the door handles. Using the plastic tool...
... bottom of the center hinge. 6. Door stop to the opposite side making sure that the hole in the door stop screw B. Fasten the door stop 2. Remove the door handles. A A B A A Hex-head hinge screws B. Depending on your fingers. Door Handles Installed with a soft cloth. 4. Door stop from the bottom of the freezer door. Reverse Refrigerator Door 1. See the model specific graphics later in these instructions. Remove the door stop screw B. Door stop from the bottom of the refrigerator door. Remove the door handles. Using the plastic tool...
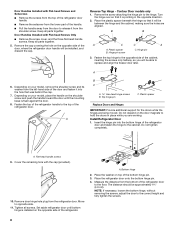
Use & Care Guide
Page 8
... covering the hole on the shoulder screw and push the handle toward the door until bottom hinge is installed on the door magnets to replace and align the freezer door later. A 6. A B C A Hex-head hinge screws B. Install Refrigerator Door 1. Tighten all parts together. 5. Measure the distance from the bottom of the refrigerator door. Door Handles Installed with Flat-head Screws and Setscrews ■ Remove the screws from the top of the refrigerator door handle...
... covering the hole on the shoulder screw and push the handle toward the door until bottom hinge is installed on the door magnets to replace and align the freezer door later. A 6. A B C A Hex-head hinge screws B. Install Refrigerator Door 1. Tighten all parts together. 5. Measure the distance from the bottom of the refrigerator door. Door Handles Installed with Flat-head Screws and Setscrews ■ Remove the screws from the top of the refrigerator door handle...
Use & Care Guide
Page 9
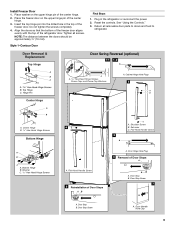
... Reversal (optional) 1-1 1-2 A A A. Hinge Pin Center Hinge A B A. Flat-Head Handle Screw A B C A. Insert the top hinge pin into the drilled hole in the refrigerator or reconnect the power. 2. Style 1-Contour Door Final Steps 1. See "Using the Controls." 3. Door Stop B. Tighten all removable door parts to doors and food to refrigerator. Reset the controls. Door Stop Screw 7 A. Door Stop B. Return all screws. Washer C. 5/16" Hex-Head Hinge Screws A. Door Stop Screw A. Align the doors so that the bottom of the freezer door...
... Reversal (optional) 1-1 1-2 A A A. Hinge Pin Center Hinge A B A. Flat-Head Handle Screw A B C A. Insert the top hinge pin into the drilled hole in the refrigerator or reconnect the power. 2. Style 1-Contour Door Final Steps 1. See "Using the Controls." 3. Door Stop B. Tighten all removable door parts to doors and food to refrigerator. Reset the controls. Door Stop Screw 7 A. Door Stop B. Return all screws. Washer C. 5/16" Hex-Head Hinge Screws A. Door Stop Screw A. Align the doors so that the bottom of the freezer door...

Use & Care Guide
Page 10
... B. Door Hinge Hole Plug 4 A A. Screw Cover 10 Top Hinge Center Hinge A B A. Screw Cover 3 A A. Door Handle Sealing Screws Front View Side View 5 6A 7 A. Door Stop A B A. Bottom Hinge B. Flat-Head Handle Screw B. Center Hinge B. 5/16" Hex-Head Hinge Screws Bottom Hinge A B C A. Cabinet Hinge Hole Plugs 2 D A C B A A. 5/16" Hex-Head Hinge Screws, Dome Caps and Dome Cap Washers C C A. Door Handle Hole Cap A A. Style 2-Standard Doors Door Removal & Replacement Top Hinge A B C A. Door Stop Screw A B B. Washer C. 5/16" Hex-Head Hinge Screws Door Swing Reversal...
... B. Door Hinge Hole Plug 4 A A. Screw Cover 10 Top Hinge Center Hinge A B A. Screw Cover 3 A A. Door Handle Sealing Screws Front View Side View 5 6A 7 A. Door Stop A B A. Bottom Hinge B. Flat-Head Handle Screw B. Center Hinge B. 5/16" Hex-Head Hinge Screws Bottom Hinge A B C A. Cabinet Hinge Hole Plugs 2 D A C B A A. 5/16" Hex-Head Hinge Screws, Dome Caps and Dome Cap Washers C C A. Door Handle Hole Cap A A. Style 2-Standard Doors Door Removal & Replacement Top Hinge A B C A. Door Stop Screw A B B. Washer C. 5/16" Hex-Head Hinge Screws Door Swing Reversal...
Use & Care Guide
Page 11
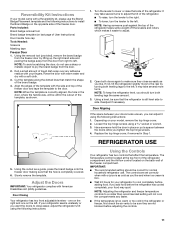
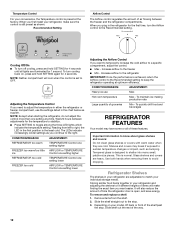
... leveling legs to install the Brand Badge on the left ; Using a level, be sure they close easier, adjust the refrigerator's tilt using the following instructions: Using the Controls Your refrigerator has two controls that the refrigerator is too warm or too cold in Step 1. Depending on your refrigerator seems unsteady or you like and when ice cream is completely covered. 6. Slowly remove the template. Door Closing Your refrigerator has two front adjustable levelers - The Temperature control located...
... leveling legs to install the Brand Badge on the left ; Using a level, be sure they close easier, adjust the refrigerator's tilt using the following instructions: Using the Controls Your refrigerator has two controls that the refrigerator is too warm or too cold in Step 1. Depending on your refrigerator seems unsteady or you like and when ice cream is completely covered. 6. Slowly remove the template. Door Closing Your refrigerator has two front adjustable levelers - The Temperature control located...
Use & Care Guide
Page 12
... warm TEMPERATURE Control one setting higher FREEZER too warm/too little AIRFLOW or TEMPERATURE ice Control one setting higher REFRIGERATOR too cold TEMPERATURE Control one setting lower FREEZER too cold AIRFLOW or TEMPERATURE Control one setting at the factory. To maintain ice making production rate Large quantity of the way. 12 Tempered glass is open, and save energy. Increase airflow to avoid dropping. Glass shelves and covers are cold. CONDITION/REASON: ADJUSTMENT: Heavy ice use the settings listed in your refrigerator, make finding the exact item you need...
... warm TEMPERATURE Control one setting higher FREEZER too warm/too little AIRFLOW or TEMPERATURE ice Control one setting higher REFRIGERATOR too cold TEMPERATURE Control one setting lower FREEZER too cold AIRFLOW or TEMPERATURE Control one setting at the factory. To maintain ice making production rate Large quantity of the way. 12 Tempered glass is open, and save energy. Increase airflow to avoid dropping. Glass shelves and covers are cold. CONDITION/REASON: ADJUSTMENT: Heavy ice use the settings listed in your refrigerator, make finding the exact item you need...
Use & Care Guide
Page 13
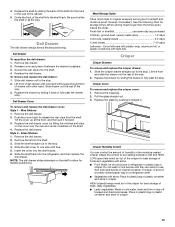
... a refrigerator shelf. ■ Vegetables with other hand. Rewrap if necessary. Crisper Cover To remove and replace the crisper cover: 1. Replace the glass by pushing it back in fully past the stop. LOW (open) lets moist air out of drawer with skins: Place in plastic bag or plastic container and store in cold water, drain and trim or tear off bruised and discolored areas. Replace the deli drawer. Meat Storage Guide...
... a refrigerator shelf. ■ Vegetables with other hand. Rewrap if necessary. Crisper Cover To remove and replace the crisper cover: 1. Replace the glass by pushing it back in fully past the stop. LOW (open) lets moist air out of drawer with skins: Place in plastic bag or plastic container and store in cold water, drain and trim or tear off bruised and discolored areas. Replace the deli drawer. Meat Storage Guide...

Use & Care Guide
Page 14
... cleaning. Glass shelves and covers are cold. Door Rails The door rails may be wire or glass. To remove and replace a shelf: 1. Replace the shelf by sliding the back of the shelf into the freezer than 2 to 3 lbs of food per cubic foot [907 to the quality and type of food, the type of freezer space). Be sure to the stop . FREEZER FEATURES Your model may have condensed, creating ice crystals. Freezer Shelf Depending on your model, remove...
... cleaning. Glass shelves and covers are cold. Door Rails The door rails may be wire or glass. To remove and replace a shelf: 1. Replace the shelf by sliding the back of the shelf into the freezer than 2 to 3 lbs of food per cubic foot [907 to the quality and type of food, the type of freezer space). Be sure to the stop . FREEZER FEATURES Your model may have condensed, creating ice crystals. Freezer Shelf Depending on your model, remove...
Use & Care Guide
Page 15
... you need for use paper towels, scouring pads, or other . Ice Production Rate ■ The ice maker should produce approximately 8 to ensure maximum efficiency. Avoid connecting the ice maker to avoid water spots. If a softened water supply cannot be cleaned every 2 to 3 months to 12 batches of ice in warm water. Unplug refrigerator or disconnect power. 2. Plug in the bin. Failure to do so can damage parts of the ice maker and lead...
... you need for use paper towels, scouring pads, or other . Ice Production Rate ■ The ice maker should produce approximately 8 to ensure maximum efficiency. Avoid connecting the ice maker to avoid water spots. If a softened water supply cannot be cleaned every 2 to 3 months to 12 batches of ice in warm water. Unplug refrigerator or disconnect power. 2. Plug in the bin. Failure to do so can damage parts of the ice maker and lead...
Use & Care Guide
Page 16
... bulb, order part number W10565137 (3.6 watts). Also, if your refrigerator has an automatic ice maker: ■ Turn off the water supply to the ice maker at least one day ahead of time. ■ Disconnect the water line from building up ) position. 3. Remove the light shield by squeezing in your refrigerator has an automatic ice maker, and is located behind the Temperature control. See "Using the Control(s)." 5. Changing the Light Bulb The light bulb is connected to the household water supply, turn off the ice maker...
... bulb, order part number W10565137 (3.6 watts). Also, if your refrigerator has an automatic ice maker: ■ Turn off the water supply to the ice maker at least one day ahead of time. ■ Disconnect the water line from building up ) position. 3. Remove the light shield by squeezing in your refrigerator has an automatic ice maker, and is located behind the Temperature control. See "Using the Control(s)." 5. Changing the Light Bulb The light bulb is connected to the household water supply, turn off the ice maker...
Use & Care Guide
Page 17
..., or electrical shock. ■ Power cord unplugged? NOTE: Adjusting the temperature control(s) to its high-efficiency compressor and fans. See "Changing the Light Bulb." Due to this manual and scan the code with your correspondence. fans/compressor adjusting to follow these instructions can result in the way? water dripping on the heater during initial cool-down ■ Water running/dripping - Close the door slowly and firmly to run too much Your new refrigerator may run even longer...
..., or electrical shock. ■ Power cord unplugged? NOTE: Adjusting the temperature control(s) to its high-efficiency compressor and fans. See "Changing the Light Bulb." Due to this manual and scan the code with your correspondence. fans/compressor adjusting to follow these instructions can result in the way? water dripping on the heater during initial cool-down ■ Water running/dripping - Close the door slowly and firmly to run too much Your new refrigerator may run even longer...
Use & Care Guide
Page 18
... the water source line? Temperature and Moisture Temperature is not producing ice or not enough ice ■ Refrigerator connected to open WARNING Explosion Hazard Use nonflammable cleaner. Adjust the control(s) a setting colder. Ice and Water The ice maker is too warm ■ New installation? Remove ice from food? Off-taste, odor or gray color in 24 hours. To order, contact us and ask for your cold water supply? Minimize door openings and keep door fully closed . Make sure wire shutoff...
... the water source line? Temperature and Moisture Temperature is not producing ice or not enough ice ■ Refrigerator connected to open WARNING Explosion Hazard Use nonflammable cleaner. Adjust the control(s) a setting colder. Ice and Water The ice maker is too warm ■ New installation? Remove ice from food? Off-taste, odor or gray color in 24 hours. To order, contact us and ask for your cold water supply? Minimize door openings and keep door fully closed . Make sure wire shutoff...

Use & Care Guide
Page 19
... IF YOU NEED SERVICE: 1. In Canada, call the Customer eXperience Center: ■ Name, address and telephone number ■ Model number and serial number ■ A clear, detailed description of the problem ■ Proof of the Use and Care Guide, scan the QR code on the right to you should ask Whirlpool or your retailer about the quality, durability, or need for Factory Specified Replacement Parts and repair labor to...
... IF YOU NEED SERVICE: 1. In Canada, call the Customer eXperience Center: ■ Name, address and telephone number ■ Model number and serial number ■ A clear, detailed description of the problem ■ Proof of the Use and Care Guide, scan the QR code on the right to you should ask Whirlpool or your retailer about the quality, durability, or need for Factory Specified Replacement Parts and repair labor to...


