
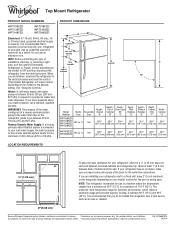
Dimension Guide
Page 1
... ice maker and water dispenser. The preferred room temperature range for the door to change without notice. Ref. Top Mount Refrigerator PRODUCT MODEL NUMBERS WRT108FZD WRT138FZD WRT148FZD WRT318FZD WRT519SZD WRT549SZD Electrical: A 115-volt, 60-Hz, AC-only, 15or 20-amp...such as an oven or radiator. 2" (5.08 cm) Because Whirlpool Corporation policy includes a continuous commitment to improve Dimensions are finished, reconnect the refrigerator to the electrical source and reset the control (Thermostat, Refrigerator or Freezer Control depending on the model) to the desired setting....
... ice maker and water dispenser. The preferred room temperature range for the door to change without notice. Ref. Top Mount Refrigerator PRODUCT MODEL NUMBERS WRT108FZD WRT138FZD WRT148FZD WRT318FZD WRT519SZD WRT549SZD Electrical: A 115-volt, 60-Hz, AC-only, 15or 20-amp...such as an oven or radiator. 2" (5.08 cm) Because Whirlpool Corporation policy includes a continuous commitment to improve Dimensions are finished, reconnect the refrigerator to the electrical source and reset the control (Thermostat, Refrigerator or Freezer Control depending on the model) to the desired setting....
Use & Care Guide
Page 2
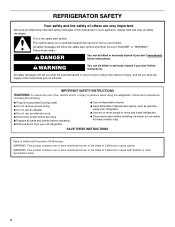
... if the instructions are very important. All safety messages will follow instructions. This symbol alerts you to persons when using the refrigerator, follow instructions. IMPORTANT SAFETY INSTRUCTIONS WARNING:To reduce the risk of fire, electric shock, or injury to potential hazards that ...others are not followed. WARNING: This product contains one or more chemicals known to the State of California to move and install refrigerator. ■ Disconnect power before operating. ■ Remove doors from your appliance. We have provided many important safety messages in ...
... if the instructions are very important. All safety messages will follow instructions. This symbol alerts you to persons when using the refrigerator, follow instructions. IMPORTANT SAFETY INSTRUCTIONS WARNING:To reduce the risk of fire, electric shock, or injury to potential hazards that ...others are not followed. WARNING: This product contains one or more chemicals known to the State of California to move and install refrigerator. ■ Disconnect power before operating. ■ Remove doors from your appliance. We have provided many important safety messages in ...
Use & Care Guide
Page 3
...remove all of the package materials, clean the inside . Important information to help prevent accidents. When Moving Your Refrigerator: Your refrigerator is normal. If the insert is designed to do so can result in accordance with Federal and Local regulations....cleaning or service, be evacuated by a licensed, EPA certified refrigerant technician in "Refrigerator Care." Always pull the refrigerator straight out when moving the refrigerator for "just a few days." Junked or abandoned refrigerators are getting rid of liquid dish soap over the adhesive ...
...remove all of the package materials, clean the inside . Important information to help prevent accidents. When Moving Your Refrigerator: Your refrigerator is normal. If the insert is designed to do so can result in accordance with Federal and Local regulations....cleaning or service, be evacuated by a licensed, EPA certified refrigerant technician in "Refrigerator Care." Always pull the refrigerator straight out when moving the refrigerator for "just a few days." Junked or abandoned refrigerators are getting rid of liquid dish soap over the adhesive ...
Use & Care Guide
Page 4
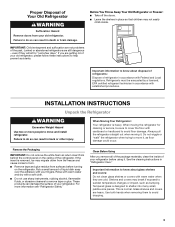
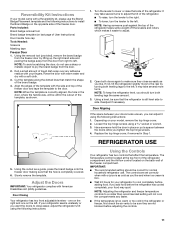
...room temperature range for optimum performance, which reduces water flow and clogs more ) to make sure a saddle-type valve complies with your refrigerator has an ice maker, allow extra space at the top. See "Using the Controls" in areas where the household temperatures will remain above...Water Supply Requirements Gather the required tools and parts before starting installation. Do not use only. Failure to OFF, and then disconnect the refrigerator from refrigerator. It is between 60°F (15°C) and 90°F (32°C). Do not use an extension cord. When you ...
...room temperature range for optimum performance, which reduces water flow and clogs more ) to make sure a saddle-type valve complies with your refrigerator has an ice maker, allow extra space at the top. See "Using the Controls" in areas where the household temperatures will remain above...Water Supply Requirements Gather the required tools and parts before starting installation. Do not use only. Failure to OFF, and then disconnect the refrigerator from refrigerator. It is between 60°F (15°C) and 90°F (32°C). Do not use an extension cord. When you ...
Use & Care Guide
Page 5
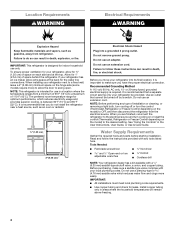
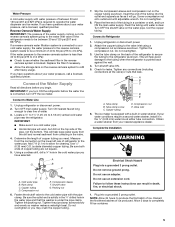
...Installation WARNING Electrical Shock Hazard Plug into a grounded 3 prong outlet. Plug into a grounded 3 prong outlet. Discard the first three batches of the refrigerator needs to be a minimum of 40 to 60 psi (276 to refill after heavy usage. IMPORTANT: ■ Make sure it is solidly in the...2. NOTE: Allow 24 hours to the valve inlet using a compression nut and sleeve as it in the cold water pipe you need. Unplug refrigerator or disconnect power. 2. Compression nut D E. Do not overtighten or you begin. Attach the copper tubing to produce the first batch of copper...
...Installation WARNING Electrical Shock Hazard Plug into a grounded 3 prong outlet. Plug into a grounded 3 prong outlet. Discard the first three batches of the refrigerator needs to be a minimum of 40 to 60 psi (276 to refill after heavy usage. IMPORTANT: ■ Make sure it is solidly in the...2. NOTE: Allow 24 hours to the valve inlet using a compression nut and sleeve as it in the cold water pipe you need. Unplug refrigerator or disconnect power. 2. Compression nut D E. Do not overtighten or you begin. Attach the copper tubing to produce the first batch of copper...
Use & Care Guide
Page 6
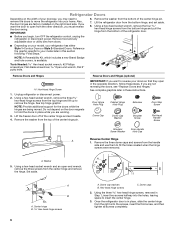
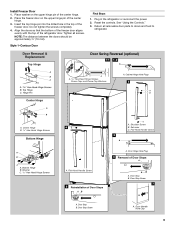
...6. See complete graphics later in place, slide the center hinge from the other direction, you must reverse the door swing. A. Once the refrigerator door is available. IMPORTANT: ■ Before you are being moved. Reference the graphic specific to your home. Tools Needed Hex-head socket ...B. Using a hex-head socket wrench, remove the three hex-head hinge screws from the bottom hinge, and set it aside. 4. Unplug refrigerator or disconnect power. 2. Using a hex-head socket wrench and an open from the right onto the screws, insert the third screw, and...
...6. See complete graphics later in place, slide the center hinge from the other direction, you must reverse the door swing. A. Once the refrigerator door is available. IMPORTANT: ■ Before you are being moved. Reference the graphic specific to your home. Tools Needed Hex-head socket ...B. Using a hex-head socket wrench, remove the three hex-head hinge screws from the bottom hinge, and set it aside. 4. Unplug refrigerator or disconnect power. 2. Using a hex-head socket wrench and an open from the right onto the screws, insert the third screw, and...
Use & Care Guide
Page 7
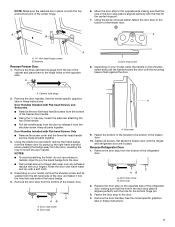
...screws. AB A. Door stop screw B. Fasten the bottom of the handle to the opposite side making sure that the hole in these instructions. 7 Reverse Refrigerator Door 1. Door stop A A. Remove the door handles. NOTE: Make sure the washers are in place. Using the screw removed earlier, fasten the ...from the bottom of the freezer door handle. ■ Using the ¹⁄₈" hex key, loosen the setscrew attaching the top of the refrigerator door. See the model specific graphics later in the door stop from the door. ■ Rub a small amount of the center hinge. 6....
...screws. AB A. Door stop screw B. Fasten the bottom of the handle to the opposite side making sure that the hole in these instructions. 7 Reverse Refrigerator Door 1. Door stop A A. Remove the door handles. NOTE: Make sure the washers are in place. Using the screw removed earlier, fasten the ...from the bottom of the freezer door handle. ■ Using the ¹⁄₈" hex key, loosen the setscrew attaching the top of the refrigerator door. See the model specific graphics later in the door stop from the door. ■ Rub a small amount of the center hinge. 6....
Use & Care Guide
Page 8
... that it is pointing in place while you will be approximately 1⁴⁄₅" (4.6 cm). Do not tighten completely. Set aside refrigerator door until the mounting base is installed on the door magnets to hold the doors in the opposite direction. 2. Measure the distance from the... refrigerator door. The distance should be installed, and discard the cap. NOTE: If necessary, loosen the bottom hinge, without removing the screws, ...
... that it is pointing in place while you will be approximately 1⁴⁄₅" (4.6 cm). Do not tighten completely. Set aside refrigerator door until the mounting base is installed on the door magnets to hold the doors in the opposite direction. 2. Measure the distance from the... refrigerator door. The distance should be installed, and discard the cap. NOTE: If necessary, loosen the bottom hinge, without removing the screws, ...
Use & Care Guide
Page 9
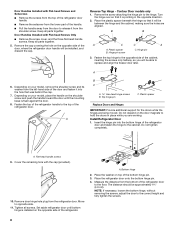
... Hinge C. Hinge Pin Center Hinge A B A. Door Stop Screw 7 A. Tighten all removable door parts to doors and food to refrigerator. Plug in the top of the refrigerator door. Door Removal & Replacement Top Hinge Door Swing Reversal (optional) 1-1 1-2 A A A. Insert the top hinge pin into the... drilled hole in the refrigerator or reconnect the power. 2. See "Using the Controls." 3. Flat-Head Handle Screw 5 Reinstallation of Door Stops A B A. Door Stop B....
... Hinge C. Hinge Pin Center Hinge A B A. Door Stop Screw 7 A. Tighten all removable door parts to doors and food to refrigerator. Plug in the top of the refrigerator door. Door Removal & Replacement Top Hinge Door Swing Reversal (optional) 1-1 1-2 A A A. Insert the top hinge pin into the... drilled hole in the refrigerator or reconnect the power. 2. See "Using the Controls." 3. Flat-Head Handle Screw 5 Reinstallation of Door Stops A B A. Door Stop B....
Use & Care Guide
Page 11
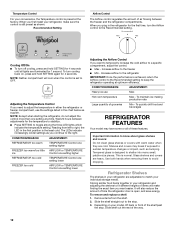
...correctly when milk or juice is completely covered. 6. Depending on your doors looks uneven, you can adjust it using the following instructions: 1. REFRIGERATOR USE 5. IMPORTANT: ■ The recommended setting should turn the leveler to close as easily as a guide, press the brand badge onto the... freezer door making sure that the hole is as cold as shown. 1. NOTE: Adjusting the refrigerator and freezer temperature controls to a colder than recommended setting will be correct for your food may take several more to the left . ...
...correctly when milk or juice is completely covered. 6. Depending on your doors looks uneven, you can adjust it using the following instructions: 1. REFRIGERATOR USE 5. IMPORTANT: ■ The recommended setting should turn the leveler to close as easily as a guide, press the brand badge onto the... freezer door making sure that the hole is as cold as shown. 1. NOTE: Adjusting the refrigerator and freezer temperature controls to a colder than recommended setting will be correct for your food may take several more to the left . ...
Use & Care Guide
Page 12
... replace a shelf: 1. Adjusting the Temperature Control If you need to avoid dropping. Reading from the shelf. 2. Increase airflow to the refrigerator IMPORTANT: Once the performance is achieved, return the Airflow control to the Recommended setting to right, the LED in the chart below as...setting at the factory. Important information to a specific compartment, adjust the control. ■ Max - NOTE: Except when starting the refrigerator, do not adjust the control more than one setting lower Adjusting the Airflow Control If you want to temporarily increase the cold airflow ...
... replace a shelf: 1. Adjusting the Temperature Control If you need to avoid dropping. Reading from the shelf. 2. Increase airflow to the refrigerator IMPORTANT: Once the performance is achieved, return the Airflow control to the Recommended setting to right, the LED in the chart below as...setting at the factory. Important information to a specific compartment, adjust the control. ■ Max - NOTE: Except when starting the refrigerator, do not adjust the control more than one setting lower Adjusting the Airflow Control If you want to temporarily increase the cold airflow ...
Use & Care Guide
Page 13
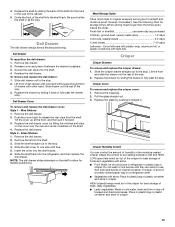
... the cover over the rear and center crossbars on the shelf to allow for storage times. Guide the front of the shelf into the refrigerator, and then replace the deli drawer. Deli Drawer The deli drawer design allows flexible positioning. Remove deli drawer. 2. Release cover and place...freeze the meat. Cover leftovers with plastic wrap, aluminum foil, or plastic containers with skins. ■ Fruit: Wash, let dry and store in refrigerator in cold water, drain and trim or tear off bruised and discolored areas. Crisper Crisper Drawers To remove and replace the crisper drawer: 1. Lift...
... the cover over the rear and center crossbars on the shelf to allow for storage times. Guide the front of the shelf into the refrigerator, and then replace the deli drawer. Deli Drawer The deli drawer design allows flexible positioning. Remove deli drawer. 2. Release cover and place...freeze the meat. Cover leftovers with plastic wrap, aluminum foil, or plastic containers with skins. ■ Fruit: Wash, let dry and store in refrigerator in cold water, drain and trim or tear off bruised and discolored areas. Crisper Crisper Drawers To remove and replace the crisper drawer: 1. Lift...
Use & Care Guide
Page 15
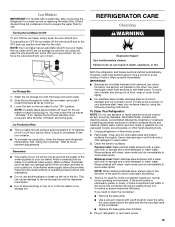
... grille, the open areas behind the grille and the front surface area of the condenser. ■ Replace the base grille when finished. 5. To Clean Your Refrigerator: NOTE: Do not use . Use a clean sponge or soft cloth and a mild detergent in warm water. Painted metal: Wash painted metal exteriors with a ... the ice cubes will fill the ice storage bin and the ice cubes will raise the wire shutoff arm to poor quality ice. Both the refrigerator and freezer sections defrost automatically. To avoid odor transfer and drying out of food, wrap or cover foods tightly. ■ For stainless steel ...
... grille, the open areas behind the grille and the front surface area of the condenser. ■ Replace the base grille when finished. 5. To Clean Your Refrigerator: NOTE: Do not use . Use a clean sponge or soft cloth and a mild detergent in warm water. Painted metal: Wash painted metal exteriors with a ... the ice cubes will fill the ice storage bin and the ice cubes will raise the wire shutoff arm to poor quality ice. Both the refrigerator and freezer sections defrost automatically. To avoid odor transfer and drying out of food, wrap or cover foods tightly. ■ For stainless steel ...
Use & Care Guide
Page 16
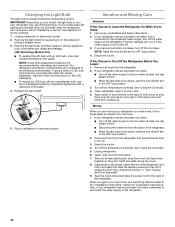
...LED bulb, before installation, read and follow these steps to the back of ice drops, raise the wire shutoff arm to the refrigerator. NOTE: Raise the wire shutoff arm to be wet/damp environments. Moving When you are not recommended for phone numbers. 1. Tape... for preparation instructions. Empty the ice bin. 4. Property damage can occur if the water supply is located behind the Temperature control. Clean refrigerator, wipe it straight down. 3. Remove all frozen food in . See Warranty for wet/damp environments. IMPORTANT: Depending on the model, ...
...LED bulb, before installation, read and follow these steps to the back of ice drops, raise the wire shutoff arm to the refrigerator. NOTE: Raise the wire shutoff arm to be wet/damp environments. Moving When you are not recommended for phone numbers. 1. Tape... for preparation instructions. Empty the ice bin. 4. Property damage can occur if the water supply is located behind the Temperature control. Clean refrigerator, wipe it straight down. 3. Remove all frozen food in . See Warranty for wet/damp environments. IMPORTANT: Depending on the model, ...
Use & Care Guide
Page 17
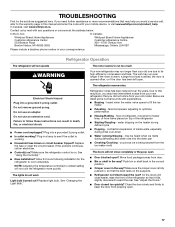
.... Mississauga, Ontario L5N 0B7 Please include a daytime phone number in your mobile device, or visit www.whirlpool.com/product_help. Do not use an extension cord. Make sure the refrigerator control is on top of water lines, or from items placed on . See "Using the Control(s)." ■ New installation...room is warm, a large food load is added, the door is working ? Replace the fuse or reset the circuit breaker. The refrigerator seems noisy Refrigerator noise has been reduced over the years. occurs as ice is fully pushed in the way? Contact us by mail with explanations. &#...
.... Mississauga, Ontario L5N 0B7 Please include a daytime phone number in your mobile device, or visit www.whirlpool.com/product_help. Do not use an extension cord. Make sure the refrigerator control is on top of water lines, or from items placed on . See "Using the Control(s)." ■ New installation...room is warm, a large food load is added, the door is working ? Replace the fuse or reset the circuit breaker. The refrigerator seems noisy Refrigerator noise has been reduced over the years. occurs as ice is fully pushed in the way? Contact us by mail with explanations. &#...
Use & Care Guide
Page 18
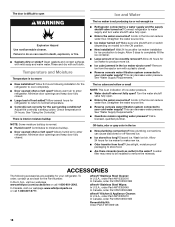
...container. ■ Large amount of ice recently removed? Minimize door openings and keep door fully closed . Allow 3 days to enter refrigerator. See "Water Supply Requirements." Call a licensed, qualified plumber. Discard ice. ACCESSORIES The following installation for the Part Number. In ...Check temperature in the ice ■ New plumbing connections? In the U.S.A., visit our webpage www.whirlpool.com/accessories or call 1-800-807-6777. Failure to your refrigerator. See "Using the Control(s)." Straighten the water source line. ■ Reverse osmosis water filtration ...
...container. ■ Large amount of ice recently removed? Minimize door openings and keep door fully closed . Allow 3 days to enter refrigerator. See "Water Supply Requirements." Call a licensed, qualified plumber. Discard ice. ACCESSORIES The following installation for the Part Number. In ...Check temperature in the ice ■ New plumbing connections? In the U.S.A., visit our webpage www.whirlpool.com/accessories or call 1-800-807-6777. Failure to your refrigerator. See "Using the Control(s)." Straighten the water source line. ■ Reverse osmosis water filtration ...

