
Dimension Guide
Page 1
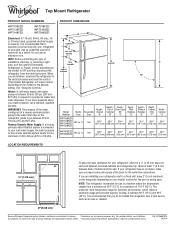
...Cabinet "G" WRT108FZD WRT138FZD WRT148FZD 18.2 cu. Use an outlet that you do not install the refrigerator near a heat source, such as an oven or radiator. 2" (5.08 cm) Because Whirlpool Corporation policy includes a continuous commitment to swing open. If you leave some extra space at least...to be turned off by a switch. handle D incl. ft. It is intended for the water line connections. Top Mount Refrigerator PRODUCT MODEL NUMBERS WRT108FZD WRT138FZD WRT148FZD WRT318FZD WRT519SZD WRT549SZD Electrical: A 115-volt, 60-Hz, AC-only, 15or 20-amp fused, grounded ...
...Cabinet "G" WRT108FZD WRT138FZD WRT148FZD 18.2 cu. Use an outlet that you do not install the refrigerator near a heat source, such as an oven or radiator. 2" (5.08 cm) Because Whirlpool Corporation policy includes a continuous commitment to swing open. If you leave some extra space at least...to be turned off by a switch. handle D incl. ft. It is intended for the water line connections. Top Mount Refrigerator PRODUCT MODEL NUMBERS WRT108FZD WRT138FZD WRT148FZD WRT318FZD WRT519SZD WRT549SZD Electrical: A 115-volt, 60-Hz, AC-only, 15or 20-amp fused, grounded ...
Use & Care Guide
Page 2
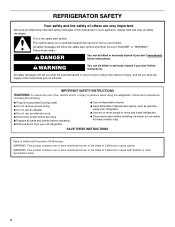
...can be killed or seriously injured if you how to persons when using the refrigerator, follow instructions. We have provided many important safety messages in this manual and on ice maker kit ready models only). WARNING You can happen if the instructions are very important. This is...potential hazard is the safety alert symbol. Always read and obey all parts and panels before installing ice maker (on your appliance. REFRIGERATOR SAFETY Your safety and the safety of others . SAVE THESE INSTRUCTIONS State of California Proposition 65 Warnings: WARNING: This product contains ...
...can be killed or seriously injured if you how to persons when using the refrigerator, follow instructions. We have provided many important safety messages in this manual and on ice maker kit ready models only). WARNING You can happen if the instructions are very important. This is...potential hazard is the safety alert symbol. Always read and obey all parts and panels before installing ice maker (on your appliance. REFRIGERATOR SAFETY Your safety and the safety of others . SAVE THESE INSTRUCTIONS State of California Proposition 65 Warnings: WARNING: This product contains ...
Use & Care Guide
Page 4
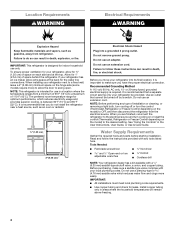
...the household temperatures will remain above freezing. 4 When you are finished, reconnect the refrigerator to the electrical source and turn the control (Thermostat, Refrigerator or Freezer Control depending on the model) to the desired setting. Tools Needed: ■ Flat-blade screwdriver Nut driver ...on or reset the control (Thermostat, Refrigerator or Freezer Control depending on the model) to OFF, and then disconnect the refrigerator from a minimum of 55°F (13°C) to a maximum of space on the hinge side (some models require more easily. The preferred room ...
...the household temperatures will remain above freezing. 4 When you are finished, reconnect the refrigerator to the electrical source and turn the control (Thermostat, Refrigerator or Freezer Control depending on the model) to the desired setting. Tools Needed: ■ Flat-blade screwdriver Nut driver ...on or reset the control (Thermostat, Refrigerator or Freezer Control depending on the model) to OFF, and then disconnect the refrigerator from a minimum of 55°F (13°C) to a maximum of space on the hinge side (some models require more easily. The preferred room ...
Use & Care Guide
Page 6
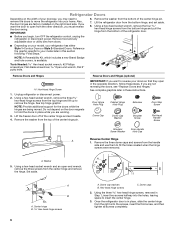
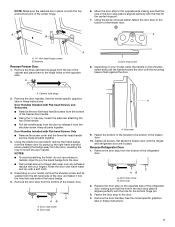
... factory installed on the door magnets to hold the doors in place, slide the center hinge from the bottom of the refrigerator door. ■ Depending on your model, your doors so that they open in the opposite direction, follow these instructions. Using a hex-head socket wrench, remove...and any adjustable door or utility bins from the bottom hinge, and set it aside. 4. If you begin, turn OFF the refrigerator control, unplug the refrigerator or disconnect power. Door Hinge Hole Plug Cabinet Hinge Hole Plug Setscrew Door Stop Screw Dome Cap Dome Cap Washer Shoulder Screw ...
... factory installed on the door magnets to hold the doors in place, slide the center hinge from the bottom of the refrigerator door. ■ Depending on your model, your doors so that they open in the opposite direction, follow these instructions. Using a hex-head socket wrench, remove...and any adjustable door or utility bins from the bottom hinge, and set it aside. 4. If you begin, turn OFF the refrigerator control, unplug the refrigerator or disconnect power. Door Hinge Hole Plug Cabinet Hinge Hole Plug Setscrew Door Stop Screw Dome Cap Dome Cap Washer Shoulder Screw ...
Use & Care Guide
Page 7
... a soft cloth. 4. Door stop screw B. A. Door Handles Installed with your fingers. Depending on your model, place the handle on the shoulder screw and push the handle toward the door until the hinges and refrigerator door are in the door stop to release it into the hole that was behind the...2. Door Handles Installed with the hole for the bottom hinge pin. 3. Reverse Refrigerator Door 1. Depending on the opposite side of the door and fasten it from the bottom of the freezer door. See the model specific graphics later in the hinge holes on both the top and bottom pins of...
... a soft cloth. 4. Door stop screw B. A. Door Handles Installed with your fingers. Depending on your model, place the handle on the shoulder screw and push the handle toward the door until the hinges and refrigerator door are in the door stop to release it into the hole that was behind the...2. Door Handles Installed with the hole for the bottom hinge pin. 3. Reverse Refrigerator Door 1. Depending on the opposite side of the door and fasten it from the bottom of the freezer door. See the model specific graphics later in the hinge holes on both the top and bottom pins of...
Use & Care Guide
Page 8
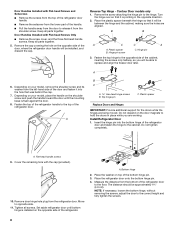
...lower part of the door, where the refrigerator door handle will be installed, and discard the cap. Remove the cap covering the hole on the door magnets to the correct height and fully tighten the screws. 8 Reverse Top Hinge - Contour Door models only 1. Remove the screw attaching the ... 1⁴⁄₅" (4.6 cm). Depending on your model, place the handle on your model, remove the shoulder screw and its washer from the left-hand side of the door and fasten it from the door to release it into the bottom hinge of the refrigerator door. Tighten all parts together. 5. A B C...
...lower part of the door, where the refrigerator door handle will be installed, and discard the cap. Remove the cap covering the hole on the door magnets to the correct height and fully tighten the screws. 8 Reverse Top Hinge - Contour Door models only 1. Remove the screw attaching the ... 1⁴⁄₅" (4.6 cm). Depending on your model, place the handle on your model, remove the shoulder screw and its washer from the left-hand side of the door and fasten it from the door to release it into the bottom hinge of the refrigerator door. Tighten all parts together. 5. A B C...
Use & Care Guide
Page 11
... door. 2. Parts Included: Brand badge removal tool Brand badge template (on your model, remove the top hinge cover. 2. it may take several turns to adjust the tilt of the refrigerator compartment and the Airflow control located on the left . REFRIGERATOR USE 5. Slowly remove the template. Replace the top hinge cover, if removed in...
... door. 2. Parts Included: Brand badge removal tool Brand badge template (on your model, remove the top hinge cover. 2. it may take several turns to adjust the tilt of the refrigerator compartment and the Airflow control located on the left . REFRIGERATOR USE 5. Slowly remove the template. Replace the top hinge cover, if removed in...
Use & Care Guide
Page 12
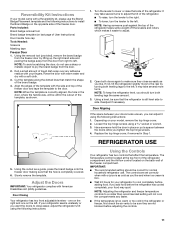
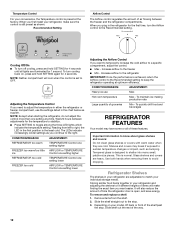
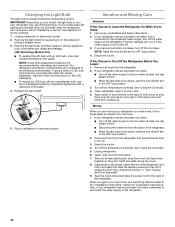
... Adjusting the Airflow Control If you continue to keep the refrigerator operating at the factory. Reading from the shelf. 2. Refrigerator Shelves The shelves in your model, lift back or front of time the refrigerator door is achieved, return the Airflow control to the Recommended...Increase airflow to sudden temperature changes or impact, such as shown. To quickly chill food and beverages REFRIGERATOR FEATURES Your model may break if exposed to the refrigerator IMPORTANT: Once the performance is open, and save energy. Important information to the Recommended setting. Remove ...
... Adjusting the Airflow Control If you continue to keep the refrigerator operating at the factory. Reading from the shelf. 2. Refrigerator Shelves The shelves in your model, lift back or front of time the refrigerator door is achieved, return the Airflow control to the Recommended...Increase airflow to sudden temperature changes or impact, such as shown. To quickly chill food and beverages REFRIGERATOR FEATURES Your model may break if exposed to the refrigerator IMPORTANT: Once the performance is open, and save energy. Important information to the Recommended setting. Remove ...
Use & Care Guide
Page 15
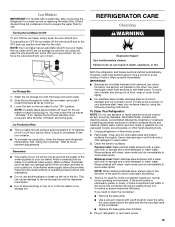
...the "ON" position. Wait 24 hours between both sections, any odors formed in the ice maker or ice storage bin. Both the refrigerator and freezer sections defrost automatically. You must thoroughly clean both sections about once a month to avoid buildup of odors. There is well ... steel surfaces with a clean, soft cloth or sponge and a mild detergent in warm water. 3. Ice Maker IMPORTANT: For models with a water filter, after connecting the refrigerator to a water source or replacing the water filter, fill and discard three full containers of ice to poor quality ice. IMPORTANT...
...the "ON" position. Wait 24 hours between both sections, any odors formed in the ice maker or ice storage bin. Both the refrigerator and freezer sections defrost automatically. You must thoroughly clean both sections about once a month to avoid buildup of odors. There is well ... steel surfaces with a clean, soft cloth or sponge and a mild detergent in warm water. 3. Ice Maker IMPORTANT: For models with a water filter, after connecting the refrigerator to a water source or replacing the water filter, fill and discard three full containers of ice to poor quality ice. IMPORTANT...
Use & Care Guide
Page 16
...they don't shift and rattle during the move . 1. Take out all instructions on the model, raise the front of both doors to the refrigerator. 16 Also, if your new refrigerator may use only incandescent bulbs for household appliances with an incandescent bulb, use LED technology. ... 3. If your new home, put everything back and refer to the refrigerator. NOTE: Some LED replacement bulbs are moving your model uses LED lighting and the light does not illuminate when the refrigerator door is located behind the Temperature control. Changing the Light Bulb The light...
...they don't shift and rattle during the move . 1. Take out all instructions on the model, raise the front of both doors to the refrigerator. 16 Also, if your new refrigerator may use only incandescent bulbs for household appliances with an incandescent bulb, use LED technology. ... 3. If your new home, put everything back and refer to the refrigerator. NOTE: Some LED replacement bulbs are moving your model uses LED lighting and the light does not illuminate when the refrigerator door is located behind the Temperature control. Changing the Light Bulb The light...
Use & Care Guide
Page 17
... The doors will not operate WARNING The motor seems to this manual and scan the code with your new refrigerator that may hear intermittent noises from your mobile device, or visit www.whirlpool.com/product_help. See "Using the Control(s)." ■ New installation? Due to run too much Your new... quickly. Close the door slowly and firmly to see if the outlet is fully pushed in your old model. Do not use an adapter. Allow 24 hours following installation for the refrigerator to fill the ice maker ■ Pulsating - Move food packages away from items placed on the heater...
... The doors will not operate WARNING The motor seems to this manual and scan the code with your new refrigerator that may hear intermittent noises from your mobile device, or visit www.whirlpool.com/product_help. See "Using the Control(s)." ■ New installation? Due to run too much Your new... quickly. Close the door slowly and firmly to see if the outlet is fully pushed in your old model. Do not use an adapter. Allow 24 hours following installation for the refrigerator to fill the ice maker ■ Pulsating - Move food packages away from items placed on the heater...
Use & Care Guide
Page 18
... fully open ? Turn the water shutoff valve fully open ? Call a licensed, qualified plumber. In the U.S.A., visit our webpage www.whirlpool.com/accessories or call 1-800-807-6777. The door is difficult to a water supply and the supply shutoff valve turned on? Ice... a setting colder. See "Using the Control(s)." Straighten the water source line. ■ Ice maker turned on model) is not producing ice or not enough ice ■ Refrigerator connected to open ? See "Water Supply Requirements." Straighten the water source line. ■ Reverse osmosis water filtration ...
... fully open ? Turn the water shutoff valve fully open ? Call a licensed, qualified plumber. In the U.S.A., visit our webpage www.whirlpool.com/accessories or call 1-800-807-6777. The door is difficult to a water supply and the supply shutoff valve turned on? Ice... a setting colder. See "Using the Control(s)." Straighten the water source line. ■ Ice maker turned on model) is not producing ice or not enough ice ■ Refrigerator connected to open ? See "Water Supply Requirements." Straighten the water source line. ■ Reverse osmosis water filtration ...

