
Installation Guide
Page 2
... install refrigerator. ■ Disconnect power before installing ice maker (on ice maker kit ready models only). ■ Use a sturdy glass when dispensing ice (on some models). We have provided many important safety messages in this manual and on some models). ■ Do not hit the refrigerator glass doors (on your appliance. REFRIGERATOR SAFETY...
... install refrigerator. ■ Disconnect power before installing ice maker (on ice maker kit ready models only). ■ Use a sturdy glass when dispensing ice (on some models). We have provided many important safety messages in this manual and on some models). ■ Do not hit the refrigerator glass doors (on your appliance. REFRIGERATOR SAFETY...
Installation Guide
Page 3
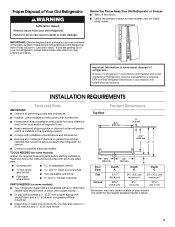
...your old refrigerator, please follow the instructions provided with any moldings or decorative panels from kitchen cabinets that children may vary based on some models): ■ Your refrigerator dealer has a kit available with a ¹⁄₄" (6.35 mm) saddle-type shutoff valve, a... in accordance with shutoff valve and a ¹⁄₄" (6.35 mm) compression fitting (coupling). ■ Depending on some models): Gather the required tools and parts before starting installation. Junked or abandoned refrigerators are not problems of your old refrigerator. Read and...
...your old refrigerator, please follow the instructions provided with any moldings or decorative panels from kitchen cabinets that children may vary based on some models): ■ Your refrigerator dealer has a kit available with a ¹⁄₄" (6.35 mm) saddle-type shutoff valve, a... in accordance with shutoff valve and a ¹⁄₄" (6.35 mm) compression fitting (coupling). ■ Depending on some models): Gather the required tools and parts before starting installation. Junked or abandoned refrigerators are not problems of your old refrigerator. Read and...
Installation Guide
Page 4
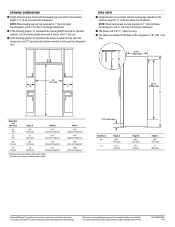
Front View A 3¹⁄₄" (8.2 cm) 35³⁄₄" (90.8 cm) Model Size 69" 72" Height A 65³⁄₄" (166.9 cm) 68¹⁄₈" (172.9 cm) Side View ■ Height dimensions are fully extended to 1" (... height of the refrigerator is 78" (198.1 cm) long. A B 21³⁄₄" (55.1 cm) 61¹⁄₄" (155.6 cm) C 3¹⁄₄" (8.2 cm) Model Size 69" 72" Height A 68⁷⁄₈" (174.8 cm) 71¹⁄₄" (180.8 cm) Height B 68⁷⁄₈" (174.9 cm) 71¹...
Front View A 3¹⁄₄" (8.2 cm) 35³⁄₄" (90.8 cm) Model Size 69" 72" Height A 65³⁄₄" (166.9 cm) 68¹⁄₈" (172.9 cm) Side View ■ Height dimensions are fully extended to 1" (... height of the refrigerator is 78" (198.1 cm) long. A B 21³⁄₄" (55.1 cm) 61¹⁄₄" (155.6 cm) C 3¹⁄₄" (8.2 cm) Model Size 69" 72" Height A 68⁷⁄₈" (174.8 cm) 71¹⁄₄" (180.8 cm) Height B 68⁷⁄₈" (174.9 cm) 71¹...
Installation Guide
Page 5
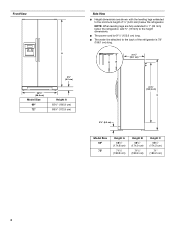
Model Size and Door Style 69" Flat 72" Flat 69" Curved 72" Curved Height A Width B Width C 69" (175.3 cm) 72" (182.9 cm) 69" (175.3 cm) 72" (...
Model Size and Door Style 69" Flat 72" Flat 69" Curved 72" Curved Height A Width B Width C 69" (175.3 cm) 72" (182.9 cm) 69" (175.3 cm) 72" (...
Installation Guide
Page 6
...you are finished, reconnect the refrigerator to the electrical source and turn the control (Thermostat, Refrigerator or Freezer Control depending on the model) to OFF, and then disconnect the refrigerator from the rear of water. Reverse Osmosis Water Supply IMPORTANT: The pressure of the water...refrigerator weight (more easily. See "Problem Solver" for leaks. Replace the filter if necessary. ■ Allow the storage tank on the model) to the desired setting. See "Product Dimensions." ■ This refrigerator is intended for optimum performance, which reduces water flow and clogs more...
...you are finished, reconnect the refrigerator to the electrical source and turn the control (Thermostat, Refrigerator or Freezer Control depending on the model) to OFF, and then disconnect the refrigerator from the rear of water. Reverse Osmosis Water Supply IMPORTANT: The pressure of the water...refrigerator weight (more easily. See "Problem Solver" for leaks. Replace the filter if necessary. ■ Allow the storage tank on the model) to the desired setting. See "Product Dimensions." ■ This refrigerator is intended for optimum performance, which reduces water flow and clogs more...
Installation Guide
Page 9
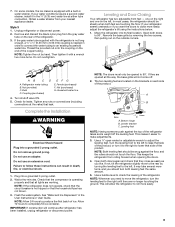
... be snug against the top of the refrigerator. Turn shutoff valve ON. 5. NOTE: Allow 24 hours to check the leveling of the refrigerator takes some models, the ice maker is needed in the ¹⁄₄" (6.35 mm) water line at the valve) that leak. NOTE: Tighten the nut by hand...
... be snug against the top of the refrigerator. Turn shutoff valve ON. 5. NOTE: Allow 24 hours to check the leveling of the refrigerator takes some models, the ice maker is needed in the ¹⁄₄" (6.35 mm) water line at the valve) that leak. NOTE: Tighten the nut by hand...
Installation Guide
Page 10
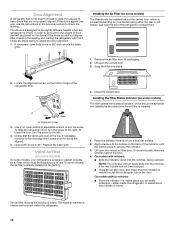
... air filter, which should be installed prior to 90° and remove the base grille. Place the indicator face-down into place. 2. On models with a status indicator, which must be installed behind the door. 4. The air filter reduces the buildup of the refrigerator door. Replace the base...the left interior wall near the top of the indicator, until the doors are even at the top. Locate the alignment screw on some models) On some models) The filter comes with notches: ■ Slide the indicator down on the doors. Lift open the vented door. 3. Door Alignment A...
... air filter, which should be installed prior to 90° and remove the base grille. Place the indicator face-down into place. 2. On models with a status indicator, which must be installed behind the door. 4. The air filter reduces the buildup of the refrigerator door. Replace the base...the left interior wall near the top of the indicator, until the doors are even at the top. Locate the alignment screw on some models) On some models) The filter comes with notches: ■ Slide the indicator down on the doors. Lift open the vented door. 3. Door Alignment A...

Installation Guide
Page 11
...not get in the previous sections. Do not breathe dust. NOTE: For best performance, always use . Place the housing back on some models, your refrigerator's accessory packet includes a Produce Preserver, which should be replaced every 6 months, when the status indicator has completely changed from... fruits that produce moderate to Ethylene Ethylene Production Apples High Very High Asparagus Med. Apply pressure to the bubble on some models) On some models) CAUTION: IRRITANT MAY IRRITATE EYES AND SKIN. As a result, certain produce items will stay fresh longer. Sensitivity to ...
...not get in the previous sections. Do not breathe dust. NOTE: For best performance, always use . Place the housing back on some models, your refrigerator's accessory packet includes a Produce Preserver, which should be replaced every 6 months, when the status indicator has completely changed from... fruits that produce moderate to Ethylene Ethylene Production Apples High Very High Asparagus Med. Apply pressure to the bubble on some models) On some models) CAUTION: IRRITANT MAY IRRITATE EYES AND SKIN. As a result, certain produce items will stay fresh longer. Sensitivity to ...
Installation Guide
Page 12
..., scouring pads, or other . NOTE: If water flow to do so can result in the top of the refrigerator compartment. 2. The filter should be some models) The disposable pouches should be ejected as window sprays, scouring cleansers, flammable fluids, cleaning waxes, concentrated detergents, bleaches or cleansers containing petroleum products on your...
..., scouring pads, or other . NOTE: If water flow to do so can result in the top of the refrigerator compartment. 2. The filter should be some models) The disposable pouches should be ejected as window sprays, scouring cleansers, flammable fluids, cleaning waxes, concentrated detergents, bleaches or cleansers containing petroleum products on your...
Installation Guide
Page 13
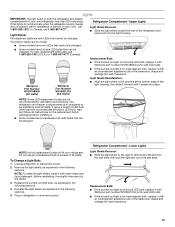
...shield. 3. Plug in excess of 40 watts. Unplug refrigerator or disconnect power. 2. Whirlpool Part Number W10574850A (2.0 watts) Whirlpool Part Number W10565137A (3.6 watts) Light Shield Reinstallation: ■ Align the light shield in... both the refrigerator and freezer compartments of your refrigerator. To Change a Light Bulb: 1. NOTE: To clean the light shield, wash it with warm water and liquid detergent. The interior lights vary by model. ■ Some models...
...shield. 3. Plug in excess of 40 watts. Unplug refrigerator or disconnect power. 2. Whirlpool Part Number W10574850A (2.0 watts) Whirlpool Part Number W10565137A (3.6 watts) Light Shield Reinstallation: ■ Align the light shield in... both the refrigerator and freezer compartments of your refrigerator. To Change a Light Bulb: 1. NOTE: To clean the light shield, wash it with warm water and liquid detergent. The interior lights vary by model. ■ Some models...
Installation Guide
Page 14
...the switch to the OFF (up ) position or move . 1. Freezer Compartment - If you are moving your model, raise the wire shutoff arm to prepare it with an incandescent appliance bulb of the same size, shape and ... If the burned-out light is a full-size LED bulb, replace it with Whirlpool part number W10565137A (a 3.6 watt LED bulb). ■ If the burned-out light is an incandescent bulb, replace... it with Whirlpool part number W10565137A (a 3.6 watt LED bulb). ■ If the burned-out light is an incandescent...
...the switch to the OFF (up ) position or move . 1. Freezer Compartment - If you are moving your model, raise the wire shutoff arm to prepare it with an incandescent appliance bulb of the same size, shape and ... If the burned-out light is a full-size LED bulb, replace it with Whirlpool part number W10565137A (a 3.6 watt LED bulb). ■ If the burned-out light is an incandescent bulb, replace... it with Whirlpool part number W10565137A (a 3.6 watt LED bulb). ■ If the burned-out light is an incandescent...
Installation Guide
Page 15
... than you get to your refrigerator has an automatic ice maker, remember to reconnect the water supply to an electrical supply - Depending on the model, raise the front of food is not turned on - See "Using the Controls" in the User Instructions, User Guide, or Use & ...Care Guide. 5. Depending on the model, turn the Refrigerator Control to cool completely. Unplug refrigerator. 6. WARNING Electrical Shock Hazard Plug into a grounded 3 prong outlet. Turn on . Also, ...
... than you get to your refrigerator has an automatic ice maker, remember to reconnect the water supply to an electrical supply - Depending on the model, raise the front of food is not turned on - See "Using the Controls" in the User Instructions, User Guide, or Use & ...Care Guide. 5. Depending on the model, turn the Refrigerator Control to cool completely. Unplug refrigerator. 6. WARNING Electrical Shock Hazard Plug into a grounded 3 prong outlet. Turn on . Also, ...
Installation Guide
Page 16
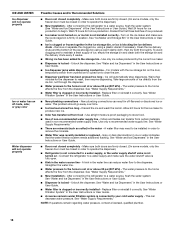
... shelf. Heard when ice melts during the defrost cycle. ■ New installation - Following installation, allow 24 hours for the surrounding conditions - On models with a soft dry cloth. ■ Room is set to enter the refrigerator. See "Water and Ice Dispensers" in the socket or has burned...not closed completely - This allows humid air to OFF, the light will not cool either door is set to cool completely. On some models, if the dispenser light is opened. Rattling may hear normal operating sounds that are blocked - Adjust the controls to moisture buildup. A ...
... shelf. Heard when ice melts during the defrost cycle. ■ New installation - Following installation, allow 24 hours for the surrounding conditions - On models with a soft dry cloth. ■ Room is set to enter the refrigerator. See "Water and Ice Dispensers" in the socket or has burned...not closed completely - This allows humid air to OFF, the light will not cool either door is set to cool completely. On some models, if the dispenser light is opened. Rattling may hear normal operating sounds that are blocked - Adjust the controls to moisture buildup. A ...
Installation Guide
Page 18
...in the User Instructions or User Guide. ■ New plumbing connections - A water filter may need to be closed . (On some models, only the freezer door must be installed in order to the home affects the flow from certain materials used in order to operate the ...-taste, odor, or gray color Water dispenser will automatically stop dispensing. See "Water Supply Requirements." ■ There are firmly closed. (On some models, only the freezer door must be closed completely - See "Water Supply Requirements." ■ Water filter is clogged or incorrectly installed - This can...
...in the User Instructions or User Guide. ■ New plumbing connections - A water filter may need to be closed . (On some models, only the freezer door must be installed in order to the home affects the flow from certain materials used in order to operate the ...-taste, odor, or gray color Water dispenser will automatically stop dispensing. See "Water Supply Requirements." ■ There are firmly closed. (On some models, only the freezer door must be closed completely - See "Water Supply Requirements." ■ Water filter is clogged or incorrectly installed - This can...
Installation Guide
Page 19
... completely. ■ Recently dispensed a large amount of water - Make sure all connections are firmly tightened. Water from the dispenser is not cool enough (on some models) NOTE: Water from the dispenser is chilled to remove the air in the water lines. Discard the first glass of water dispensed. ■ Refrigerator is...
... completely. ■ Recently dispensed a large amount of water - Make sure all connections are firmly tightened. Water from the dispenser is not cool enough (on some models) NOTE: Water from the dispenser is chilled to remove the air in the water lines. Discard the first glass of water dispensed. ■ Refrigerator is...
Installation Guide
Page 20
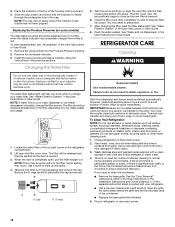
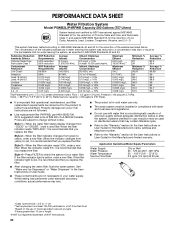
... red, it is recommended that you replace the filter. ■ After changing the water filter, flush the water system. PERFORMANCE DATA SHEET Water Filtration System Model P5WB2L/P4RFWB Capacity 200 Gallons (757 Liters) System tested and certified by NSF International against NSF/ANSI Standard 53 for the reduction of Live Cysts...
... red, it is recommended that you replace the filter. ■ After changing the water filter, flush the water system. PERFORMANCE DATA SHEET Water Filtration System Model P5WB2L/P4RFWB Capacity 200 Gallons (757 Liters) System tested and certified by NSF International against NSF/ANSI Standard 53 for the reduction of Live Cysts...
Dimension Guide
Page 1
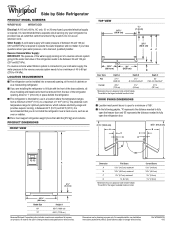
...cm) 18C\," (46.4 cm) 3C\v" (9.4 cm) 1Z\v" (2.9 cm) 35³⁄₄" (90.8 cm) Model Size 69" 72" Height A 65C\v" (166.9 cm) 68Z\," (172.9 cm ) Because Whirlpool Corporation policy includes a continuous commitment to improve our products, we reserve the right to a minimum of the refrigerator opening ,... connected to your cold water supply, the water pressure to the reverse osmosis system needs to be turned off by Side Refrigerator PRODUCT MODEL NUMBERS WRS970CID WRS973CID Electrical: A 115 volt, 60 Hz, AC only, 15- PRODUCT DIMENSIONS FRONT VIEW TOP VIEW 35¹⁄₂...
...cm) 18C\," (46.4 cm) 3C\v" (9.4 cm) 1Z\v" (2.9 cm) 35³⁄₄" (90.8 cm) Model Size 69" 72" Height A 65C\v" (166.9 cm) 68Z\," (172.9 cm ) Because Whirlpool Corporation policy includes a continuous commitment to improve our products, we reserve the right to a minimum of the refrigerator opening ,... connected to your cold water supply, the water pressure to the reverse osmosis system needs to be turned off by Side Refrigerator PRODUCT MODEL NUMBERS WRS970CID WRS973CID Electrical: A 115 volt, 60 Hz, AC only, 15- PRODUCT DIMENSIONS FRONT VIEW TOP VIEW 35¹⁄₂...
Dimension Guide
Page 2
...notice. Width C 18Z\," (46.0 cm) maximum* 18Z\," (46.0 cm) maximum* 18C\," (46.4 cm) maximum* 18C\," (46.4 cm) maximum* 3¹⁄₄" (8.2 cm) Model Size 69" 72" Height A 68M\," (174.9 cm) 71Z\v" (181 cm) Height B 68M\," (174.9 cm) 71Z\v" (181 cm) Height C 68Z\x" (174.2 cm) 71" ...(180.2 cm) Because Whirlpool Corporation policy includes a continuous commitment to improve our products, we reserve the right to the back of door handle. n The power cord is listed. W10652927A 4/...
...notice. Width C 18Z\," (46.0 cm) maximum* 18Z\," (46.0 cm) maximum* 18C\," (46.4 cm) maximum* 18C\," (46.4 cm) maximum* 3¹⁄₄" (8.2 cm) Model Size 69" 72" Height A 68M\," (174.9 cm) 71Z\v" (181 cm) Height B 68M\," (174.9 cm) 71Z\v" (181 cm) Height C 68Z\x" (174.2 cm) 71" ...(180.2 cm) Because Whirlpool Corporation policy includes a continuous commitment to improve our products, we reserve the right to the back of door handle. n The power cord is listed. W10652927A 4/...
Warranty Information
Page 1
...applies. Before contacting us to arrange service, please determine whether your authorized Whirlpool dealer to chemicals. 10. In Canada, call the Customer eXperience Center: ■ Name, address and telephone number ■ Model number and serial number ■ A clear, detailed description of the ... existed when this major appliance other rights that comes with original model/serial numbers removed, altered or not easily determined. Please take a few minutes to or furnished with the product, Whirlpool brand will pay for factory specified replacement parts and repair labor...
...applies. Before contacting us to arrange service, please determine whether your authorized Whirlpool dealer to chemicals. 10. In Canada, call the Customer eXperience Center: ■ Name, address and telephone number ■ Model number and serial number ■ A clear, detailed description of the ... existed when this major appliance other rights that comes with original model/serial numbers removed, altered or not easily determined. Please take a few minutes to or furnished with the product, Whirlpool brand will pay for factory specified replacement parts and repair labor...

Use & Care Guide
Page 2
... symbol alerts you to move and install refrigerator. ■ Disconnect power before installing ice maker (on ice maker kit ready models only). ■ Use a sturdy glass when dispensing ice (on some models). These words mean: DANGER You can be killed or seriously injured if you what the potential hazard is the safety... the risk of fire, electric shock, or injury when using your appliance. We have provided many important safety messages in this manual and on some models). ■ Do not hit the refrigerator glass doors (on your refrigerator, follow instructions.
... symbol alerts you to move and install refrigerator. ■ Disconnect power before installing ice maker (on ice maker kit ready models only). ■ Use a sturdy glass when dispensing ice (on some models). These words mean: DANGER You can be killed or seriously injured if you what the potential hazard is the safety... the risk of fire, electric shock, or injury when using your appliance. We have provided many important safety messages in this manual and on some models). ■ Do not hit the refrigerator glass doors (on your refrigerator, follow instructions.


