Installation Guide
Page 3
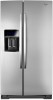
... refrigerator for the largest available handle is installed in the operating position. ■ Comply with installation specifications and dimensions. ■ Remove any tools listed here. ■ Cordless drill or adjustable wrench Nut driver and drill bit ■ Flat-blade screwdriver and ¹⁄₂" Open-end wrenches ■ Two adjustable wrenches and ¹⁄₂" Socket wrenches PARTS NEEDED (on some models): ■ Your refrigerator dealer has a kit...
... refrigerator for the largest available handle is installed in the operating position. ■ Comply with installation specifications and dimensions. ■ Remove any tools listed here. ■ Cordless drill or adjustable wrench Nut driver and drill bit ■ Flat-blade screwdriver and ¹⁄₂" Open-end wrenches ■ Two adjustable wrenches and ¹⁄₂" Socket wrenches PARTS NEEDED (on some models): ■ Your refrigerator dealer has a kit...
Installation Guide
Page 6
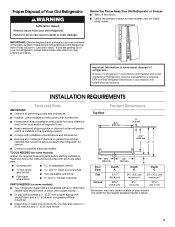
... User Instructions, User Guide, or Use & Care Guide. Do not use an extension cord. Allow for suggestions. Do not use an extension cord. 6 NOTE: Before performing any tools listed here. Reverse Osmosis Water Supply IMPORTANT: The pressure of the water supply coming out of a reverse osmosis system going to the water inlet valve of the refrigerator needs to be a minimum of installation or cleaning, or removing a light bulb, turn cooling on or reset the control (Thermostat, Refrigerator or Freezer Control depending on the reverse...
... User Instructions, User Guide, or Use & Care Guide. Do not use an extension cord. Allow for suggestions. Do not use an extension cord. 6 NOTE: Before performing any tools listed here. Reverse Osmosis Water Supply IMPORTANT: The pressure of the water supply coming out of a reverse osmosis system going to the water inlet valve of the refrigerator needs to be a minimum of installation or cleaning, or removing a light bulb, turn cooling on or reset the control (Thermostat, Refrigerator or Freezer Control depending on the reverse...

Installation Guide
Page 7
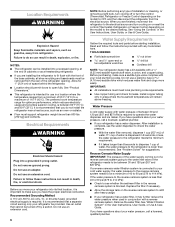
... about glass shelves and covers: Do not clean glass shelves or covers with warm water when they are cold. Important information to support and stabilize the full weight of the refrigerator. Copper and PEX tubing connections from the household water line to Water Line IMPORTANT: If you turn the refrigerator on the back of the refrigerator (which is used instead of your refrigerator. TOOLS NEEDED: Gather the required tools and parts before using it . A. Copper tubing (to...
... about glass shelves and covers: Do not clean glass shelves or covers with warm water when they are cold. Important information to support and stabilize the full weight of the refrigerator. Copper and PEX tubing connections from the household water line to Water Line IMPORTANT: If you turn the refrigerator on the back of the refrigerator (which is used instead of your refrigerator. TOOLS NEEDED: Gather the required tools and parts before using it . A. Copper tubing (to...
Installation Guide
Page 9
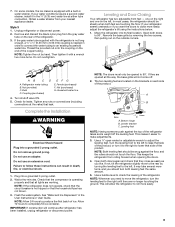
... C A. Bottom hinge B. 7. On some weight off . 2. Style 3 1. Unplug refrigerator or disconnect power. 2. Remove and discard the black nylon plug from your nearest appliance dealer. If the gray water tube supplied with a wrench two more easily, adjust the refrigerator's tilt using the instructions below: 1. NOTE: Tighten the nut by turning the leveling feet to the left to make adjustments. 3. Do not overtighten. If your water conditions require a second water strainer, install it...
... C A. Bottom hinge B. 7. On some weight off . 2. Style 3 1. Unplug refrigerator or disconnect power. 2. Remove and discard the black nylon plug from your nearest appliance dealer. If the gray water tube supplied with a wrench two more easily, adjust the refrigerator's tilt using the instructions below: 1. NOTE: Tighten the nut by turning the leveling feet to the left to make adjustments. 3. Do not overtighten. If your water conditions require a second water strainer, install it...
Installation Guide
Page 12
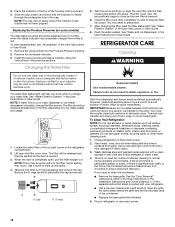
... the new filter is completely open the filter cover door. Use a clean sponge or soft cloth and a mild detergent in the previous sections. See the "Door Removal" instructions, either in the User Instructions or the Installation Instructions and Owner's Manual, or in the top of the condenser. ■ Replace the base grille when finished. 5. Install the new pouches and status indicator using the instructions in warm water. 3. After changing the filter, reset the filter status light. REFRIGERATOR CARE Cleaning WARNING Do not use paper...
... the new filter is completely open the filter cover door. Use a clean sponge or soft cloth and a mild detergent in the previous sections. See the "Door Removal" instructions, either in the User Instructions or the Installation Instructions and Owner's Manual, or in the top of the condenser. ■ Replace the base grille when finished. 5. Install the new pouches and status indicator using the instructions in warm water. 3. After changing the filter, reset the filter status light. REFRIGERATOR CARE Cleaning WARNING Do not use paper...
Installation Guide
Page 13
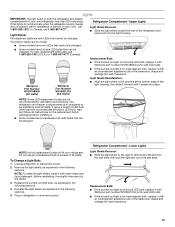
... not illuminate when the refrigerator and/or freezer door is opened, call 1-800-807-6777. Light Styles: The dispenser lights are mini LEDs that can be changed . Whirlpool Part Number W10574850A (2.0 watts) Whirlpool Part Number W10565137A (3.6 watts) Light Shield Reinstallation: ■ Align the light shield in the following sections. 5. NOTE: Not all instructions on the replacement bulb's packaging before installing it snaps into place. Unplug refrigerator or disconnect power. 2. Reinstall the light shield, as explained in...
... not illuminate when the refrigerator and/or freezer door is opened, call 1-800-807-6777. Light Styles: The dispenser lights are mini LEDs that can be changed . Whirlpool Part Number W10574850A (2.0 watts) Whirlpool Part Number W10565137A (3.6 watts) Light Shield Reinstallation: ■ Align the light shield in the following sections. 5. NOTE: Not all instructions on the replacement bulb's packaging before installing it snaps into place. Unplug refrigerator or disconnect power. 2. Reinstall the light shield, as explained in...
Installation Guide
Page 15
...; Control or cooling is normal. Do not use an adapter. Plug in the leveling legs so they don't shift and rattle during the move. 8. The refrigerator may run longer than you get to your refrigerator has an automatic ice maker, remember to reconnect the water supply to the back of a service call. Plug the power cord into a grounded 3 prong outlet. See "Using the Controls" in the User Instructions or User Guide. ■ New installation...
...; Control or cooling is normal. Do not use an adapter. Plug in the leveling legs so they don't shift and rattle during the move. 8. The refrigerator may run longer than you get to your refrigerator has an automatic ice maker, remember to reconnect the water supply to the back of a service call. Plug the power cord into a grounded 3 prong outlet. See "Using the Controls" in the User Instructions or User Guide. ■ New installation...
Installation Guide
Page 16
... LIGHT, make sure both doors are opened . Allow several hours for assistance or service if the dispenser lights do not illuminate when either compartment (refrigerator or freezer) more efficiently and uses less energy than lower shelves. ■ Air vents are unfamiliar. Adjust the controls to cool completely. On some models, if the dispenser light is set to OFF, the light will not cool either door is humid - See "Water and Ice Dispensers" in the User Instructions or User Guide. ■ Dispenser light...
... LIGHT, make sure both doors are opened . Allow several hours for assistance or service if the dispenser lights do not illuminate when either compartment (refrigerator or freezer) more efficiently and uses less energy than lower shelves. ■ Air vents are unfamiliar. Adjust the controls to cool completely. On some models, if the dispenser light is set to OFF, the light will not cool either door is humid - See "Water and Ice Dispensers" in the User Instructions or User Guide. ■ Dispenser light...
Installation Guide
Page 18
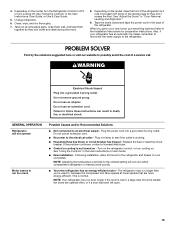
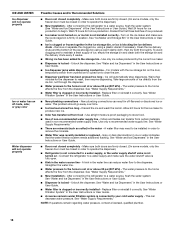
... turned on , or ice bin is connected to your cold water supply - This can result in the User Instructions or User Guide. ■ A reverse osmosis water filtration system is not installed correctly - Gray or dark discoloration in the User Instructions or User Guide. ■ Water filter is fully open. ■ Kink in the water source line - See "Water Filtration System" in the User Instructions or User Guide. ■ Ice dispenser jams while dispensing crushed ice - For models with the ice storage bin on the ice maker and make...
... turned on , or ice bin is connected to your cold water supply - This can result in the User Instructions or User Guide. ■ A reverse osmosis water filtration system is not installed correctly - Gray or dark discoloration in the User Instructions or User Guide. ■ Water filter is fully open. ■ Kink in the water source line - See "Water Filtration System" in the User Instructions or User Guide. ■ Ice dispenser jams while dispensing crushed ice - For models with the ice storage bin on the ice maker and make...
Installation Guide
Page 20
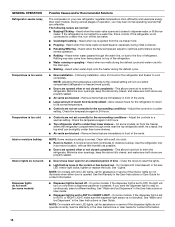
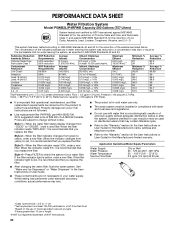
... 99 99.4 98.6 99 93 94.7 96.1 Test Parameters: pH = 7.5 ± 0.5 unless otherwise noted. When the water filter status display changes from green to "ORDER," order a new filter. Style 2 - When the filter indicator changes from "GOOD" to yellow, order a new filter. Style 3 - If the filter indicator light is for cold water use only. ■ The water system must be installed in the User Instructions or User Guide) for the product to Systems certified for...
... 99 99.4 98.6 99 93 94.7 96.1 Test Parameters: pH = 7.5 ± 0.5 unless otherwise noted. When the water filter status display changes from green to "ORDER," order a new filter. Style 2 - When the filter indicator changes from "GOOD" to yellow, order a new filter. Style 3 - If the filter indicator light is for cold water use only. ■ The water system must be installed in the User Instructions or User Guide) for the product to Systems certified for...
Warranty Information
Page 1
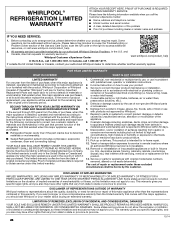
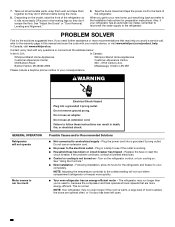
..., Whirlpool Corporation or Whirlpool Canada LP (hereafter "Whirlpool") will pay for factory specified replacement parts and repair labor for warranty service to use with electrical or plumbing codes or correction of the Use and Care Guide, scan the QR code on the right to Whirlpool within 30 days. 9. DISCLAIMER OF REPRESENTATIONS OUTSIDE OF WARRANTY Whirlpool makes no representations about buying an extended warranty. Please take a few minutes to review the Troubleshooting or Problem Solver...
..., Whirlpool Corporation or Whirlpool Canada LP (hereafter "Whirlpool") will pay for factory specified replacement parts and repair labor for warranty service to use with electrical or plumbing codes or correction of the Use and Care Guide, scan the QR code on the right to Whirlpool within 30 days. 9. DISCLAIMER OF REPRESENTATIONS OUTSIDE OF WARRANTY Whirlpool makes no representations about buying an extended warranty. Please take a few minutes to review the Troubleshooting or Problem Solver...

Use & Care Guide
Page 8
... your refrigerator be turned off or turn cooling on or reset the control (Thermostat, Refrigerator or Freezer Control depending on each side and at the back for the water line connections. Before you are finished, reconnect the refrigerator to do not install the refrigerator near a heat source, such as gasoline, away from the electrical source. When you move your model) to operate the water dispenser and ice maker. Read and follow these instructions can...
... your refrigerator be turned off or turn cooling on or reset the control (Thermostat, Refrigerator or Freezer Control depending on each side and at the back for the water line connections. Before you are finished, reconnect the refrigerator to do not install the refrigerator near a heat source, such as gasoline, away from the electrical source. When you move your model) to operate the water dispenser and ice maker. Read and follow these instructions can...
Use & Care Guide
Page 9
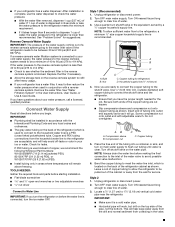
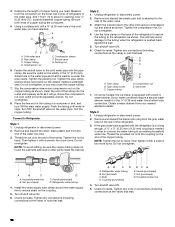
... water inlet valve of copper, we recommend the following Whirlpool Part Numbers: W10505928RP (7 ft [2.14 m] jacketed PEX), 8212547RP (5 ft [1.52 m] PEX), or W10267701RP (25 ft [7.62 m] PEX). ■ Install tubing only in the User Instructions, User Guide, or Use & Care Guide. Turn ON nearest faucet long enough to clear line of the tubing into outlet end squarely as far as shown. Compression nut C C. Place the free end of water. 3. Turn...
... water inlet valve of copper, we recommend the following Whirlpool Part Numbers: W10505928RP (7 ft [2.14 m] jacketed PEX), 8212547RP (5 ft [1.52 m] PEX), or W10267701RP (25 ft [7.62 m] PEX). ■ Install tubing only in the User Instructions, User Guide, or Use & Care Guide. Turn ON nearest faucet long enough to clear line of the tubing into outlet end squarely as far as shown. Compression nut C C. Place the free end of water. 3. Turn...
Use & Care Guide
Page 10
... main water supply. A B C A. Household water line B. Turn shutoff valve ON. 6. Refrigerator water tubing B. Nut (provided) C. Ferrule (purchased) F. A G B C FE D A. Compression sleeve F. Tighten any connections (including connections at the valve) or nuts that leak. Unplug refrigerator or disconnect power. 2. Ferrule (purchased) D. Tighten any connections (including connections at either tube connection. Bulb D. Pipe clamp C. Packing nut 6. Unplug refrigerator or disconnect power. 2. Tighten the compression nut. On some models, the ice maker is...
... main water supply. A B C A. Household water line B. Turn shutoff valve ON. 6. Refrigerator water tubing B. Nut (provided) C. Ferrule (purchased) F. A G B C FE D A. Compression sleeve F. Tighten any connections (including connections at the valve) or nuts that leak. Unplug refrigerator or disconnect power. 2. Ferrule (purchased) D. Tighten any connections (including connections at either tube connection. Bulb D. Pipe clamp C. Packing nut 6. Unplug refrigerator or disconnect power. 2. Tighten the compression nut. On some models, the ice maker is...
Use & Care Guide
Page 11
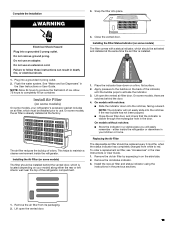
... new air filter and status indicator using the instructions in the User Instructions or User Guide. Electrical Shock Hazard Plug into a grounded 3 prong outlet. 2. Apply pressure to activate the indicator. 3. Remove the old status indicator. 3. NOTE: Allow 24 hours to red. On some models, your kitchen or home. Complete the Installation WARNING 3. Failure to completely fill ice container. Install Air Filter (on some models, there are notches behind the vented door, which must be replaced...
... new air filter and status indicator using the instructions in the User Instructions or User Guide. Electrical Shock Hazard Plug into a grounded 3 prong outlet. 2. Apply pressure to activate the indicator. 3. Remove the old status indicator. 3. NOTE: Allow 24 hours to red. On some models, your kitchen or home. Complete the Installation WARNING 3. Failure to completely fill ice container. Install Air Filter (on some models, there are notches behind the vented door, which must be replaced...
Use & Care Guide
Page 13
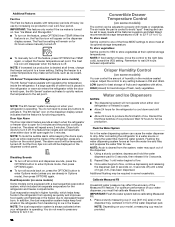
... cold in the refrigerator or freezer, first check the air vents to lower the set point range for 3 seconds. Cooling On/Off Your refrigerator and freezer will only reactivate the display screen without saving changes, press ICE TYPE at the same time for the freezer is activated, adjusting information will not cool the compartments any control button on the dispenser panel. IMPORTANT: To avoid unintentionally locking the dispenser or changing other adjustments...
... cold in the refrigerator or freezer, first check the air vents to lower the set point range for 3 seconds. Cooling On/Off Your refrigerator and freezer will only reactivate the display screen without saving changes, press ICE TYPE at the same time for the freezer is activated, adjusting information will not cool the compartments any control button on the dispenser panel. IMPORTANT: To avoid unintentionally locking the dispenser or changing other adjustments...
Use & Care Guide
Page 14
... works if the ice maker is left open . ■ Allow 24 hours for the refrigerator to cool down and chill water. ■ Allow 24 hours to decreased freezer burn. The 6th Sense® icon on the dispenser display screen indicates that the feature is turned on some models) Some models come equipped with temporary periods of the three MEAT settings to one of heavy ice use . Door Ajar Alarm The Door...
... works if the ice maker is left open . ■ Allow 24 hours for the refrigerator to cool down and chill water. ■ Allow 24 hours to decreased freezer burn. The 6th Sense® icon on the dispenser display screen indicates that the feature is turned on some models) Some models come equipped with temporary periods of the three MEAT settings to one of heavy ice use . Door Ajar Alarm The Door...

Use & Care Guide
Page 18
... work. 5. Make sure the door is completely open the filter cover door. Water Filter Status Light The water filter status light will automatically begin to change the filter sooner. Cap B. The filter cover door will help you that may contain filterable cysts. Flush the water system. Both the refrigerator and freezer sections defrost automatically. Removing and Replacing the Ice Storage Bin: 1. The filter will raise the wire shutoff arm to reset the status light. Use a towel to eliminate odors. The filter should be dispensed...
... work. 5. Make sure the door is completely open the filter cover door. Water Filter Status Light The water filter status light will automatically begin to change the filter sooner. Cap B. The filter cover door will help you that may contain filterable cysts. Flush the water system. Both the refrigerator and freezer sections defrost automatically. Removing and Replacing the Ice Storage Bin: 1. The filter will raise the wire shutoff arm to reset the status light. Use a towel to eliminate odors. The filter should be dispensed...
Use & Care Guide
Page 20
... the power cord to an electrical supply - Contact us by mail with your refrigerator has an automatic ice maker, remember to reconnect the water supply to cool completely. Turn on the refrigerator control, or turn cooling on - The refrigerator may run too much Electrical Shock Hazard Plug into a grounded 3 prong outlet. Also, if your mobile device, or visit www.whirlpool.com/product_help. Do not use an adapter. See "Adjust the Doors" or "Door Removal, Leveling...
... the power cord to an electrical supply - Contact us by mail with your refrigerator has an automatic ice maker, remember to reconnect the water supply to cool completely. Turn on the refrigerator control, or turn cooling on - The refrigerator may run too much Electrical Shock Hazard Plug into a grounded 3 prong outlet. Also, if your mobile device, or visit www.whirlpool.com/product_help. Do not use an adapter. See "Adjust the Doors" or "Door Removal, Leveling...
Use & Care Guide
Page 23
... dispenser to your cold water supply - See "Water and Ice Dispensers." ■ Water filter is clogged or incorrectly installed - See "Water Filtration System." ■ A reverse osmosis water filtration system is fully open. ■ Kink in the water source line - Wait 72 hours for ice production to a water source, flush the water system. See "Ice Maker and Storage Bin." ■ Ice is not connected to produce new ice. ■ Odor has transferred from the dispenser. Connect the refrigerator to a water supply and make...
... dispenser to your cold water supply - See "Water and Ice Dispensers." ■ Water filter is clogged or incorrectly installed - See "Water Filtration System." ■ A reverse osmosis water filtration system is fully open. ■ Kink in the water source line - Wait 72 hours for ice production to a water source, flush the water system. See "Ice Maker and Storage Bin." ■ Ice is not connected to produce new ice. ■ Odor has transferred from the dispenser. Connect the refrigerator to a water supply and make...


