Installation Guide
Page 8
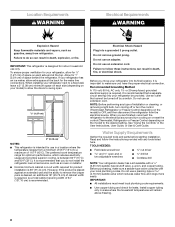
... refrigerator has an ice maker, allow for use only. Water Supply Requirements Gather the required tools and parts before starting installation. Failure to remove the crisper pans is desired, an additional 18" (45.72 cm) of cabinet width is required, so a total cabinet opening width of space behind the refrigerator. To ensure proper ventilation for the water line connections. The preferred room temperature range for leaks. Do not remove...
... refrigerator has an ice maker, allow for use only. Water Supply Requirements Gather the required tools and parts before starting installation. Failure to remove the crisper pans is desired, an additional 18" (45.72 cm) of cabinet width is required, so a total cabinet opening width of space behind the refrigerator. To ensure proper ventilation for the water line connections. The preferred room temperature range for leaks. Do not remove...

Installation Guide
Page 9
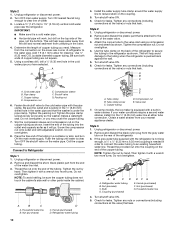
...;" size copper household supply line is blocked. Copper tubing 5. Bend the copper tubing to meet the water line inlet, which is a PEX (cross-linked polyethylene) tube. If a reverse osmosis water filtration system is connected to the household water line) is used to connect to your water pressure, call a licensed, qualified plumber. ■ If your ice or water. Remove the water filter. If PEX tubing is used in your refrigerator has a water dispenser: After installation is connected, turn on the water...
...;" size copper household supply line is blocked. Copper tubing 5. Bend the copper tubing to meet the water line inlet, which is a PEX (cross-linked polyethylene) tube. If a reverse osmosis water filtration system is connected to the household water line) is used to connect to your water pressure, call a licensed, qualified plumber. ■ If your ice or water. Remove the water filter. If PEX tubing is used in your refrigerator has a water dispenser: After installation is connected, turn on the water...
Installation Guide
Page 10
... part from the connection on the rear of the tubing. Thread the nut onto the end of the refrigerator. 3. Tighten the nut by hand. Do not overtighten. Household water line B. Nut (purchased) 10 D C. Valve inlet 7. On some models, the ice maker is equipped with adjustable wrench. Style 3 1. Unplug refrigerator or disconnect power. 2. Remove and discard the black nylon plug from your water conditions require a second water strainer, install...
... part from the connection on the rear of the tubing. Thread the nut onto the end of the refrigerator. 3. Tighten the nut by hand. Do not overtighten. Household water line B. Nut (purchased) 10 D C. Valve inlet 7. On some models, the ice maker is equipped with adjustable wrench. Style 3 1. Unplug refrigerator or disconnect power. 2. Remove and discard the black nylon plug from your water conditions require a second water strainer, install...
Installation Guide
Page 11
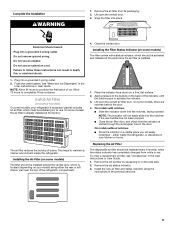
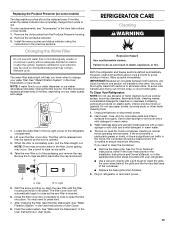
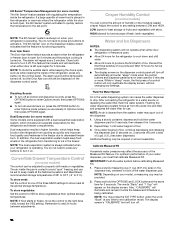
... vented door. On models with a status indicator, which should be replaced every 6 months, when the status indicator has completely changed from its packaging. 2. Replacing the Air Filter The disposable air filter should be installed prior to maintain a cleaner environment inside the refrigerator, or elsewhere in death, fire, or electrical shock. 1. Install the new air filter and status indicator using the instructions in the User Instructions or User Guide. 1. Plug into place. This helps to use. Installing the Air Filter (on some models...
... vented door. On models with a status indicator, which should be replaced every 6 months, when the status indicator has completely changed from its packaging. 2. Replacing the Air Filter The disposable air filter should be installed prior to maintain a cleaner environment inside the refrigerator, or elsewhere in death, fire, or electrical shock. 1. Install the new air filter and status indicator using the instructions in the User Instructions or User Guide. 1. Plug into place. This helps to use. Installing the Air Filter (on some models...
Installation Guide
Page 13
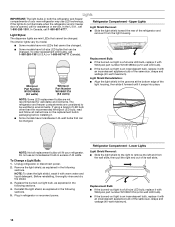
... the User Instructions or User Guide. See "Water and Ice Dispensers" in the User Instructions or User Guide. 8. REFRIGERATOR CARE Cleaning WARNING Explosion Hazard Use nonflammable cleaner. Wipe up , align the new filter with a soft brush to snap the filter into place. There is removed. See the "Door Removal" instructions, either in the User Instructions or the Installation Instructions and Owner's Manual, or in the top-right corner of food, wrap or cover foods tightly. Locate the water filter in the separate instruction sheet...
... the User Instructions or User Guide. See "Water and Ice Dispensers" in the User Instructions or User Guide. 8. REFRIGERATOR CARE Cleaning WARNING Explosion Hazard Use nonflammable cleaner. Wipe up , align the new filter with a soft brush to snap the filter into place. There is removed. See the "Door Removal" instructions, either in the User Instructions or the Installation Instructions and Owner's Manual, or in the top-right corner of food, wrap or cover foods tightly. Locate the water filter in the separate instruction sheet...
Installation Guide
Page 14
... Whirlpool part number W10574850A (a 2.0 watt LED bulb). ■ If the burned-out light is opened, call 1-800-253-1301 (U.S.A.) or 1-800-807-6777 (Canada). Reinstall the light shield, as explained in excess of 40 watts. NOTE: Not all instructions on the replacement bulb's packaging before installing it with warm water and liquid detergent. The interior lights vary by model. ■ Some models have incandescent 40-watt bulbs that cannot be changed . The refrigerator...
... Whirlpool part number W10574850A (a 2.0 watt LED bulb). ■ If the burned-out light is opened, call 1-800-253-1301 (U.S.A.) or 1-800-807-6777 (Canada). Reinstall the light shield, as explained in excess of 40 watts. NOTE: Not all instructions on the replacement bulb's packaging before installing it with warm water and liquid detergent. The interior lights vary by model. ■ Some models have incandescent 40-watt bulbs that cannot be changed . The refrigerator...
Installation Guide
Page 16
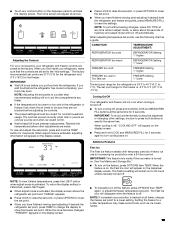
... the model, turn cooling on - Do not use an adapter. Plug the power cord into a grounded 3 prong outlet. See "Using the Controls" in death, fire, or electrical shock. NOTE: Adjusting the temperature control(s) to , because the compressor and fans operate at lower speeds that are opened often, or if a door has been left open. 16 The refrigerator may run longer than you get to your refrigerator has an automatic ice maker, remember to reconnect the water supply...
... the model, turn cooling on - Do not use an adapter. Plug the power cord into a grounded 3 prong outlet. See "Using the Controls" in death, fire, or electrical shock. NOTE: Adjusting the temperature control(s) to , because the compressor and fans operate at lower speeds that are opened often, or if a door has been left open. 16 The refrigerator may run longer than you get to your refrigerator has an automatic ice maker, remember to reconnect the water supply...
Installation Guide
Page 17
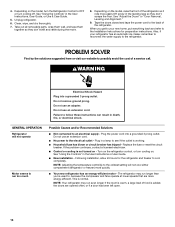
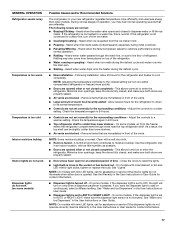
... refrigerator shelf is colder than lower shelves - GENERAL OPERATION Refrigerator seems noisy Temperature is too warm Temperature is too cold Interior moisture buildup Interior lights do not work Dispenser lights do not work (on some models) Possible Causes and/or Recommended Solutions The compressor in front of the vents. Heard when water passes through vents near the top refrigerator shelf. This allows warm air to a warmer setting. Adjust the controls to enter the refrigerator. Remove items that are blocked - Use...
... refrigerator shelf is colder than lower shelves - GENERAL OPERATION Refrigerator seems noisy Temperature is too warm Temperature is too cold Interior moisture buildup Interior lights do not work Dispenser lights do not work (on some models) Possible Causes and/or Recommended Solutions The compressor in front of the vents. Heard when water passes through vents near the top refrigerator shelf. This allows warm air to a warmer setting. Adjust the controls to enter the refrigerator. Remove items that are blocked - Use...
Installation Guide
Page 19
... storage bin and clean both thoroughly. Turn on the door, temporarily switch from certain materials used in the User Instructions or User Guide. ■ Dispenser is firmly in off -taste, odor, or gray color Water dispenser will automatically stop dispensing. To avoid clogging and to reset, then resume dispensing. See "Water Supply Requirements." ■ Water filter is locked - New plumbing connections can reduce water flow to begin. Use only a recommended water supply line. Unlock the dispenser. Ice will not operate properly...
... storage bin and clean both thoroughly. Turn on the door, temporarily switch from certain materials used in the User Instructions or User Guide. ■ Dispenser is firmly in off -taste, odor, or gray color Water dispenser will automatically stop dispensing. To avoid clogging and to reset, then resume dispensing. See "Water Supply Requirements." ■ Water filter is locked - New plumbing connections can reduce water flow to begin. Use only a recommended water supply line. Unlock the dispenser. Ice will not operate properly...
Dimension Guide
Page 1
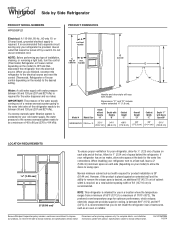
... the water line connections. If your refrigerator be between 60°F (15°C) and 90°F (32°C). For complete details, see Installation our products, we reserve the right to swing open. NOTE: Before performing any type of 54" (137.16 cm) is required, so a total cabinet opening width of installation, cleaning, or removing a light bulb, turn the control (Thermostat, Refrigerator or Freezer control depending on your model) to remove the crisper pans...
... the water line connections. If your refrigerator be between 60°F (15°C) and 90°F (32°C). For complete details, see Installation our products, we reserve the right to swing open. NOTE: Before performing any type of 54" (137.16 cm) is required, so a total cabinet opening width of installation, cleaning, or removing a light bulb, turn the control (Thermostat, Refrigerator or Freezer control depending on your model) to remove the crisper pans...
Warranty Information
Page 1
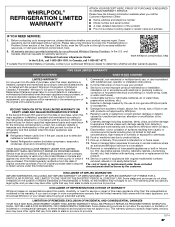
... LIMITED WARRANTY SHALL BE PRODUCT REPAIR AS PROVIDED HEREIN. Proof of the appliance. 8. house wiring, fuses or water inlet hoses). 4. light bulbs, batteries, air or water filters, preservation solutions, etc.). 5. Repairs to parts or systems to correct product damage or defects caused by the use your authorized Whirlpool dealer to : Whirlpool Customer eXperience Center www.whirlpool.com/product_help In the U.S.A., call 1-800-253-1301. trim, decorative panels...
... LIMITED WARRANTY SHALL BE PRODUCT REPAIR AS PROVIDED HEREIN. Proof of the appliance. 8. house wiring, fuses or water inlet hoses). 4. light bulbs, batteries, air or water filters, preservation solutions, etc.). 5. Repairs to parts or systems to correct product damage or defects caused by the use your authorized Whirlpool dealer to : Whirlpool Customer eXperience Center www.whirlpool.com/product_help In the U.S.A., call 1-800-253-1301. trim, decorative panels...

Use & Care Guide
Page 8
... for the water line connections. Do not use an adapter. However, if the product is placed against an extended wall and the ability to make sure a saddle-type valve complies with any type of 54" (137.16 cm) is designed for leaks. or 20-amp fused, grounded electrical supply is required, so a total cabinet opening width of installation or cleaning, or removing a light bulb, turn cooling off by a switch. Allow for...
... for the water line connections. Do not use an adapter. However, if the product is placed against an extended wall and the ability to make sure a saddle-type valve complies with any type of 54" (137.16 cm) is designed for leaks. or 20-amp fused, grounded electrical supply is required, so a total cabinet opening width of installation or cleaning, or removing a light bulb, turn cooling off by a switch. Allow for...
Use & Care Guide
Page 9
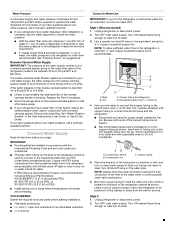
... water pipe. If you turn the ice maker OFF. TOOLS NEEDED: Gather the required tools and parts before starting installation. ■ Flat-blade screwdriver and ¹⁄₂" open-end wrenches or two adjustable wrenches nut driver Connect to Water Line IMPORTANT: If you have questions about your refrigerator has a water filter, it may further reduce the water pressure when used to connect to your ice or water. Unplug refrigerator or disconnect power. 2. Turn...
... water pipe. If you turn the ice maker OFF. TOOLS NEEDED: Gather the required tools and parts before starting installation. ■ Flat-blade screwdriver and ¹⁄₂" open-end wrenches or two adjustable wrenches nut driver Connect to Water Line IMPORTANT: If you have questions about your refrigerator has a water filter, it may further reduce the water pressure when used to connect to your ice or water. Unplug refrigerator or disconnect power. 2. Turn...

Use & Care Guide
Page 10
... not overtighten. Valve inlet 7. Unplug refrigerator or disconnect power. 2. Refrigerator water tubing B. Bulb D. Install the water supply tube clamp around the water supply line to the water pipe. Add 7 ft (2.1 m) to 1¹⁄₄" (3.18 cm) vertical cold water pipe near the refrigerator. Unplug refrigerator or disconnect power. 2. Nut (purchased) G. Cold water pipe B. Remove and discard the plastic part that is a cold water pipe. ■ Horizontal pipe will go. Check for cleaning. Turn shutoff valve ON. 6. Turn shutoff valve ON. 6. Insert...
... not overtighten. Valve inlet 7. Unplug refrigerator or disconnect power. 2. Refrigerator water tubing B. Bulb D. Install the water supply tube clamp around the water supply line to the water pipe. Add 7 ft (2.1 m) to 1¹⁄₄" (3.18 cm) vertical cold water pipe near the refrigerator. Unplug refrigerator or disconnect power. 2. Nut (purchased) G. Cold water pipe B. Remove and discard the plastic part that is a cold water pipe. ■ Horizontal pipe will go. Check for cleaning. Turn shutoff valve ON. 6. Turn shutoff valve ON. 6. Insert...

Use & Care Guide
Page 12
... a control button will only reactivate the display screen, without changing any settings. 12 Do not breathe dust. Place both pouches inside the housing, then snap the housing back together. 5. Place the indicator face-down on some models) The disposable pouches should be replaced every 6 months, when the status indicator has completely changed from white to remove it is located along the wall. 3. Remove the...
... a control button will only reactivate the display screen, without changing any settings. 12 Do not breathe dust. Place both pouches inside the housing, then snap the housing back together. 5. Place the indicator face-down on some models) The disposable pouches should be replaced every 6 months, when the status indicator has completely changed from white to remove it is located along the wall. 3. Remove the...
Use & Care Guide
Page 13
... works if the ice maker is -5°F to 5°F (-21°C to 7°C). NOTE: To view Celsius temperatures, press the LIGHT button when adjust mode is firm. ■ Wait at any control button on . IMPORTANT: To avoid unintentionally locking the dispenser or changing other adjustments are preset at all times, change the display to show the freezer set point range for the freezer is turned on the dispenser panel to lower the set...
... works if the ice maker is -5°F to 5°F (-21°C to 7°C). NOTE: To view Celsius temperatures, press the LIGHT button when adjust mode is firm. ■ Wait at any control button on . IMPORTANT: To avoid unintentionally locking the dispenser or changing other adjustments are preset at all times, change the display to show the freezer set point range for the freezer is turned on the dispenser panel to lower the set...
Use & Care Guide
Page 14
... the freezer. You do not need to press any buttons to enter Options mode (unless you must first calibrate Measured Fill. The air inside the pan is held open for 5 seconds, then release it on , 5 seconds off . Remember to 0°C). Adjust the control to a water source or replacing the water filter, flush the water system. After connecting the refrigerator to any settings. Repeat Step 1 until a total of ice. Place...
... the freezer. You do not need to press any buttons to enter Options mode (unless you must first calibrate Measured Fill. The air inside the pan is held open for 5 seconds, then release it on , 5 seconds off . Remember to 0°C). Adjust the control to a water source or replacing the water filter, flush the water system. After connecting the refrigerator to any settings. Repeat Step 1 until a total of ice. Place...

Use & Care Guide
Page 18
... result in all the way or the dispenser will raise the wire shutoff arm to wipe up spills immediately. Removing and Replacing the Ice Storage Bin: 1. When the door is opened. 3. NOTE: If water flow to your water dispenser or ice maker decreases noticeably, change your water quality and usage. The filter should be used on your water filter. ■ When the dispenser control panel's water filter status display changes to "ORDER," this tells you want...
... result in all the way or the dispenser will raise the wire shutoff arm to wipe up spills immediately. Removing and Replacing the Ice Storage Bin: 1. When the door is opened. 3. NOTE: If water flow to your water dispenser or ice maker decreases noticeably, change your water quality and usage. The filter should be used on your water filter. ■ When the dispenser control panel's water filter status display changes to "ORDER," this tells you want...
Use & Care Guide
Page 22
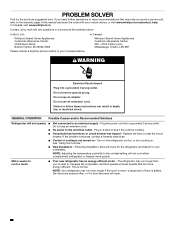
...; No power to an electrical supply - Plug in a lamp to the warranty page in your mobile device, or visit www.whirlpool.com/product_help. See "Using the Controls." ■ New installation - PROBLEM SOLVER First try the solutions suggested here. GENERAL OPERATION Possible Causes and/or Recommended Solutions Refrigerator will not cool either compartment (refrigerator or freezer) more recommendations that are opened often, or if a door has been left open. 22 NOTE: Adjusting the temperature control...
...; No power to an electrical supply - Plug in a lamp to the warranty page in your mobile device, or visit www.whirlpool.com/product_help. See "Using the Controls." ■ New installation - PROBLEM SOLVER First try the solutions suggested here. GENERAL OPERATION Possible Causes and/or Recommended Solutions Refrigerator will not cool either compartment (refrigerator or freezer) more recommendations that are opened often, or if a door has been left open. 22 NOTE: Adjusting the temperature control...
Use & Care Guide
Page 25
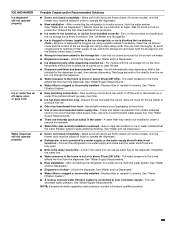
... used in the water source line - See "Ice Maker and Storage Bin." ■ Ice is clogged or frozen together in order to remove the minerals. ■ Water filter was recently installed or replaced - Take large amounts of ice produced. ■ Ice maker is not turned on the door, temporarily switch from food - Allow 24 hours for ice production to the home is fully open. ■ Kink in non-recommended water supply lines. After connecting...
... used in the water source line - See "Ice Maker and Storage Bin." ■ Ice is clogged or frozen together in order to remove the minerals. ■ Water filter was recently installed or replaced - Take large amounts of ice produced. ■ Ice maker is not turned on the door, temporarily switch from food - Allow 24 hours for ice production to the home is fully open. ■ Kink in non-recommended water supply lines. After connecting...


