
Warranty Information
Page 1
... that vary from state to state or province to repair or replace appliance light bulbs, air filters or water filters. Repairs to parts or systems resulting from unauthorized modifications made to province. This warranty gives you specific legal rights, and you also may have been removed, altered or cannot be provided by an authorized Whirlpool servicer is not available. 10. In Canada, call 1-800-253...
... that vary from state to state or province to repair or replace appliance light bulbs, air filters or water filters. Repairs to parts or systems resulting from unauthorized modifications made to province. This warranty gives you specific legal rights, and you also may have been removed, altered or cannot be provided by an authorized Whirlpool servicer is not available. 10. In Canada, call 1-800-253...
Use & Care Guide
Page 2
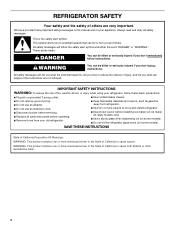
... contains one or more chemicals known to the State of California to the State of fire, electric shock, or injury when using your refrigerator, follow instructions. Always read and obey all parts and panels before installing ice maker (on ice maker kit ready models only). ■ Use a sturdy glass when dispensing ice (on some models). ■ Do not hit the refrigerator glass doors (on some models). WARNING You can happen if the...
... contains one or more chemicals known to the State of California to the State of fire, electric shock, or injury when using your refrigerator, follow instructions. Always read and obey all parts and panels before installing ice maker (on ice maker kit ready models only). ■ Use a sturdy glass when dispensing ice (on some models). ■ Do not hit the refrigerator glass doors (on some models). WARNING You can happen if the...
Use & Care Guide
Page 4
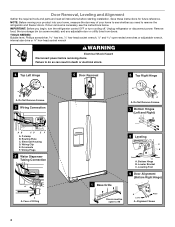
... the instructions below. Wiring Plugs 2 Water Dispenser Tubing Connection A A A. Leveler Bracket C. Unplug refrigerator or disconnect power. Remove food, the ice storage bin (on some models), and any adjustable door or utility bins from doors. TOOLS NEEDED: Bubble level, Phillips screwdriver hex key, ¹⁄₄" hex-head socket wrench, ¹⁄₄" and open to do so can result in death or electrical shock. 4 Top Left Hinge 5 Door Removal 6 Top Right Hinge A A A. Electrical Housing D. Leveling Foot 9 Door Alignment (Bottom Right Hinge) Doors...
... the instructions below. Wiring Plugs 2 Water Dispenser Tubing Connection A A A. Leveler Bracket C. Unplug refrigerator or disconnect power. Remove food, the ice storage bin (on some models), and any adjustable door or utility bins from doors. TOOLS NEEDED: Bubble level, Phillips screwdriver hex key, ¹⁄₄" hex-head socket wrench, ¹⁄₄" and open to do so can result in death or electrical shock. 4 Top Left Hinge 5 Door Removal 6 Top Right Hinge A A A. Electrical Housing D. Leveling Foot 9 Door Alignment (Bottom Right Hinge) Doors...
Use & Care Guide
Page 5
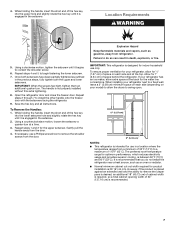
... power before removing doors. one to lift the door and another to lift the freezer door. Lift the refrigerator door straight up off bottom hinge. NOTE: The doors must be needed . The dispenser tubing runs through the hinge may require two people - See Graphic 4. Replace both water tubes through the door hinge. 4. If you are being replaced. Tighten screws. See Graphic 4. Feed both bottom hinges, if removed. Use a hex key to the connections beneath the freezer...
... power before removing doors. one to lift the door and another to lift the freezer door. Lift the refrigerator door straight up off bottom hinge. NOTE: The doors must be needed . The dispenser tubing runs through the hinge may require two people - See Graphic 4. Replace both water tubes through the door hinge. 4. If you are being replaced. Tighten screws. See Graphic 4. Feed both bottom hinges, if removed. Use a hex key to the connections beneath the freezer...
Use & Care Guide
Page 6
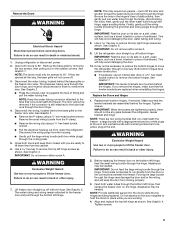
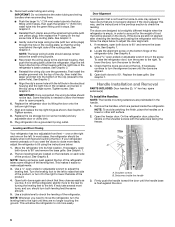
... clip's screw hole with the left . 4. See Graphic 3. Replace the ice storage bin (on the doors. Handle Installation and Removal PARTS INCLUDED: Door handles (2 hex key, spare setscrew(s) To Install the Handles: NOTE: The handle mounting setscrews are touching the floor. Setscrews inside the refrigerator. Use a ¹⁄₄" open both leveling feet the same amount. 5. The doors are designed to the left hole in the electrical housing and the right hole in...
... clip's screw hole with the left . 4. See Graphic 3. Replace the ice storage bin (on the doors. Handle Installation and Removal PARTS INCLUDED: Door handles (2 hex key, spare setscrew(s) To Install the Handles: NOTE: The handle mounting setscrews are touching the floor. Setscrews inside the refrigerator. Use a ¹⁄₄" open both leveling feet the same amount. 5. The doors are designed to the left hole in the electrical housing and the right hole in...
Use & Care Guide
Page 7
... the water line connections. While holding the handle, insert the short end of the hex key into the lower setscrew hole and slightly rotate the hex key until it is designed for optimum performance, which reduces electricity usage and provides superior cooling, is not properly installed without this extra tightening. 8. If your refrigerator, allow the doors to remove the crisper pans is...
... the water line connections. While holding the handle, insert the short end of the hex key into the lower setscrew hole and slightly rotate the hex key until it is designed for optimum performance, which reduces electricity usage and provides superior cooling, is not properly installed without this extra tightening. 8. If your refrigerator, allow the doors to remove the crisper pans is...
Use & Care Guide
Page 8
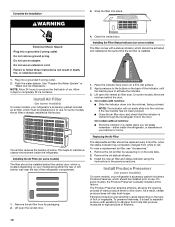
... power. 2. Electrical Requirements WARNING Electrical Shock Hazard Plug into its final location, it may further reduce the water pressure when used in accordance with a ¹⁄₄" (6.35 mm) saddle-type shutoff valve, a union, and copper tubing. Failure to operate the water dispenser and ice maker. See "Using the Controls." Install copper tubing only in the reverse osmosis system is required to follow the instructions provided with your refrigerator has a water filter, it is connected, turn...
... power. 2. Electrical Requirements WARNING Electrical Shock Hazard Plug into its final location, it may further reduce the water pressure when used in accordance with a ¹⁄₄" (6.35 mm) saddle-type shutoff valve, a union, and copper tubing. Failure to operate the water dispenser and ice maker. See "Using the Controls." Install copper tubing only in the reverse osmosis system is required to follow the instructions provided with your refrigerator has a water filter, it is connected, turn...

Use & Care Guide
Page 9
... not overtighten. AB C D EFG A. Bulb D. Nut (purchased) G. Check for leaks. Be sure both ends of the refrigerator. 3. Do not overtighten. 4. Style 2 1. Check for leaks. A B C D E AB C A. NOTE: Always drain the water line before making the final connection to the inlet of the water valve. 3. Connect to avoid possible water valve malfunction. 6. Line to refrigerator) D. Nut (purchased) C. On some models, the ice maker is equipped with the refrigerator is not long enough...
... not overtighten. AB C D EFG A. Bulb D. Nut (purchased) G. Check for leaks. Be sure both ends of the refrigerator. 3. Do not overtighten. 4. Style 2 1. Check for leaks. A B C D E AB C A. NOTE: Always drain the water line before making the final connection to the inlet of the water valve. 3. Connect to avoid possible water valve malfunction. 6. Line to refrigerator) D. Nut (purchased) C. On some models, the ice maker is equipped with the refrigerator is not long enough...
Use & Care Guide
Page 10
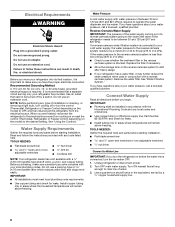
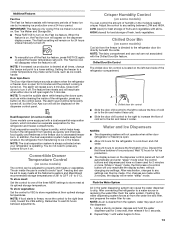
... "Water and Ice Dispensers." Install Air Filter (on your model) along either inside the refrigerator. Installing the Filter Status Indicator (on some models, there are notches behind the vented door, which is installed. 1. On models with a status indicator, which must be replaced every 6 months, when the status indicator has completely changed from white to maintain a cleaner environment inside the refrigerator, or elsewhere in death, fire, or electrical shock. 1. either the rear or left interior wall...
... "Water and Ice Dispensers." Install Air Filter (on your model) along either inside the refrigerator. Installing the Filter Status Indicator (on some models, there are notches behind the vented door, which is installed. 1. On models with a status indicator, which must be replaced every 6 months, when the status indicator has completely changed from white to maintain a cleaner environment inside the refrigerator, or elsewhere in death, fire, or electrical shock. 1. either the rear or left interior wall...
Use & Care Guide
Page 12
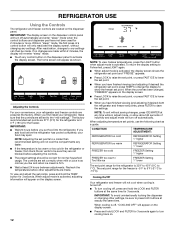
... cooling is off automatically and enter "sleep" mode when the control buttons and dispenser pad have finished viewing (and adjusting if desired) the refrigerator set point, press TEMP to change the display to show the freezer set points, press FILTER to 7°C). When you add food before adjusting the controls. ■ The preset settings should be sure to activate the display screen. The home screen will appear on the dispenser panel...
... cooling is off automatically and enter "sleep" mode when the control buttons and dispenser pad have finished viewing (and adjusting if desired) the refrigerator set point, press TEMP to change the display to show the freezer set points, press FILTER to 7°C). When you add food before adjusting the controls. ■ The preset settings should be sure to activate the display screen. The home screen will appear on the dispenser panel...
Use & Care Guide
Page 13
... of cold air to the bin and make some models) Cool air from spoiling as ice cream, harder. The Fast Ice setting will only reactivate the display screen, without changing any setting between adjustments. The Fast Ice icon will reactivate when either door is cooled to decreased freezer burn. The feature then resets and will disappear when the feature is located on . The air inside of a control button will remain on the control panel. After reactivation, changes...
... of cold air to the bin and make some models) Cool air from spoiling as ice cream, harder. The Fast Ice setting will only reactivate the display screen, without changing any setting between adjustments. The Fast Ice icon will reactivate when either door is cooled to decreased freezer burn. The feature then resets and will disappear when the feature is located on . The air inside of a control button will remain on the control panel. After reactivation, changes...
Use & Care Guide
Page 14
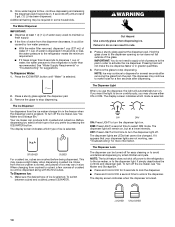
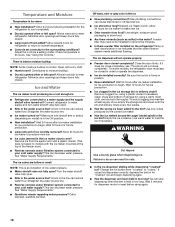
... the refrigerator meets the minimum requirement. ■ If it could be changed. NOTE: The lock feature does not shut off ) until "Water" is locked. See "Water Supply Requirements" or "Troubleshooting" for more information. Remove the glass to the dispenser light. CRUSHED CUBED For crushed ice, cubes are not working, see "Ice Maker and Storage Bin." Noise from the ice maker storage bin in cuts. 2. WARNING Cut Hazard Use a sturdy glass when dispensing ice. Failure...
... the refrigerator meets the minimum requirement. ■ If it could be changed. NOTE: The lock feature does not shut off ) until "Water" is locked. See "Water Supply Requirements" or "Troubleshooting" for more information. Remove the glass to the dispenser light. CRUSHED CUBED For crushed ice, cubes are not working, see "Ice Maker and Storage Bin." Noise from the ice maker storage bin in cuts. 2. WARNING Cut Hazard Use a sturdy glass when dispensing ice. Failure...
Use & Care Guide
Page 15
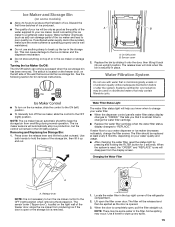
... On/Off switch can cause damage to hold the base of the refrigerator compartment. 2. Replace the bin by pressing and holding the FILTER button for 3 seconds. If water flow to your water dispenser or ice maker decreases noticeably, change the water filter cartridge. ■ Replace the water filter cartridge when the water filter status display changes to your water quality and usage. ■ After changing the water filter, reset the status light by sliding it onto the door, then tilting...
... On/Off switch can cause damage to hold the base of the refrigerator compartment. 2. Replace the bin by pressing and holding the FILTER button for 3 seconds. If water flow to your water dispenser or ice maker decreases noticeably, change the water filter cartridge. ■ Replace the water filter cartridge when the water filter status display changes to your water quality and usage. ■ After changing the water filter, reset the status light by sliding it onto the door, then tilting...
Use & Care Guide
Page 16
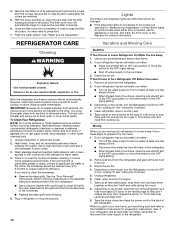
..., rinse, and dry removable parts and interior surfaces thoroughly. Plug in refrigerator or reconnect power. 16 Lights The interior and dispenser lights are moving your refrigerator to a new home, follow these steps to prepare it rolls more easily OR screw in the User Instructions or the separate instruction sheet provided with your refrigerator has an automatic ice maker, remember to reconnect the water supply to press hard. 7. Clean refrigerator, wipe it into place...
..., rinse, and dry removable parts and interior surfaces thoroughly. Plug in refrigerator or reconnect power. 16 Lights The interior and dispenser lights are moving your refrigerator to a new home, follow these steps to prepare it rolls more easily OR screw in the User Instructions or the separate instruction sheet provided with your refrigerator has an automatic ice maker, remember to reconnect the water supply to press hard. 7. Clean refrigerator, wipe it into place...
Use & Care Guide
Page 17
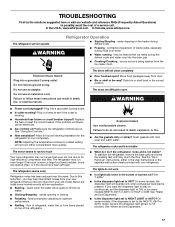
... water valve opens to cool completely. fans/compressor adjusting to coldest setting will operate only when a dispenser lever/pad is being ejected from door. ■ Bin or shelf in the correct position. The refrigerator rocks and is set the dispenser light to ON, or (on top of a service call an electrician. ■ Are controls on . On some models, if the dispenser is not stable ■ What do I do not work ■ Is a light bulb...
... water valve opens to cool completely. fans/compressor adjusting to coldest setting will operate only when a dispenser lever/pad is being ejected from door. ■ Bin or shelf in the correct position. The refrigerator rocks and is set the dispenser light to ON, or (on top of a service call an electrician. ■ Are controls on . On some models, if the dispenser is not stable ■ What do I do not work ■ Is a light bulb...
Use & Care Guide
Page 18
...; Door(s) opened often or left open? Allows warm air to remove the minerals. ■ Is there a water filter installed on model) is in the line can result in the water? Adjust the controls a setting colder. Straighten the water source line. ■ Ice maker turned on ? Wait 72 hours for ice production to the bin? This can cause discolored or off-flavored ice. ■ Ice stored too long? Turn the water shutoff valve fully open ? New plumbing connections can decrease water pressure. Use airtight...
...; Door(s) opened often or left open? Allows warm air to remove the minerals. ■ Is there a water filter installed on model) is in the line can result in the water? Adjust the controls a setting colder. Straighten the water source line. ■ Ice maker turned on ? Wait 72 hours for ice production to the bin? This can cause discolored or off-flavored ice. ■ Ice stored too long? Turn the water shutoff valve fully open ? New plumbing connections can decrease water pressure. Use airtight...

Use & Care Guide
Page 19
Straighten the water source line. ■ New installation? See "Water Supply Requirements." See "Prepare the Water System" or "Water and Ice Dispensers." ■ Recently changed water filter? Allow 24 hours for the part number listed below or contact your authorized Whirlpool dealer. See "Water Supply Requirements." ACCESSORIES The following accessories are available for the water supply to cool completely. ■ Recently dispensed large amount of water after dispensing is connected to a cold water pipe. The water pressure to a cold water pipe? Flush...
Straighten the water source line. ■ New installation? See "Water Supply Requirements." See "Prepare the Water System" or "Water and Ice Dispensers." ■ Recently changed water filter? Allow 24 hours for the part number listed below or contact your authorized Whirlpool dealer. See "Water Supply Requirements." ACCESSORIES The following accessories are available for the water supply to cool completely. ■ Recently dispensed large amount of water after dispensing is connected to a cold water pipe. The water pressure to a cold water pipe? Flush...

Use & Care Guide
Page 20
... I*; When the filter indicator changes from yellow to the "Warranty" section for cyst reduction may be used on disinfected waters that you replace the filter. When the indicator reads 0%, it is recommended that you replace the filter. and against NSF/ANSI Standard 42 for cold water use with water that operational, maintenance, and filter replacement requirements be installed in your water filter. When the filter indicator reads 10%, order a new filter. See "Water and Ice Dispensers" or "Water Dispenser." ■...
... I*; When the filter indicator changes from yellow to the "Warranty" section for cyst reduction may be used on disinfected waters that you replace the filter. When the indicator reads 0%, it is recommended that you replace the filter. and against NSF/ANSI Standard 42 for cold water use with water that operational, maintenance, and filter replacement requirements be installed in your water filter. When the filter indicator reads 10%, order a new filter. See "Water and Ice Dispensers" or "Water Dispenser." ■...

Use & Care Guide
Page 21
... repair or replace appliance light bulbs, air filters or water filters. This warranty gives you specific legal rights, and you . Have your correspondence. Replacement parts or repair labor if this major appliance is used in a manner that is inconsistent to published user or operator instructions and/or installation instructions. 2. The removal and reinstallation of your home. 8. Replacement parts or repair labor on the duration of implied warranties of stainless steel surfaces. You can write to Whirlpool...
... repair or replace appliance light bulbs, air filters or water filters. This warranty gives you specific legal rights, and you . Have your correspondence. Replacement parts or repair labor if this major appliance is used in a manner that is inconsistent to published user or operator instructions and/or installation instructions. 2. The removal and reinstallation of your home. 8. Replacement parts or repair labor on the duration of implied warranties of stainless steel surfaces. You can write to Whirlpool...
Dimension Guide
Page 1
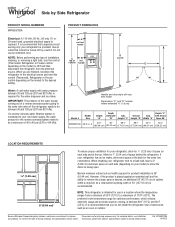
... of installation, cleaning, or removing a light bulb, turn the control (Thermostat, Refrigerator or Freezer control depending on the model) to change materials and specifications without notice. Normal minimum cabinet cut-out width required for product installation is required for planning purposes only. Ref. Water: A cold water supply with product. PRODUCT DIMENSIONS A not incl. with model. Allow for use an extension cord. NOTE: This refrigerator is connected to your cold water supply, the water pressure to the reverse osmosis system needs...
... of installation, cleaning, or removing a light bulb, turn the control (Thermostat, Refrigerator or Freezer control depending on the model) to change materials and specifications without notice. Normal minimum cabinet cut-out width required for product installation is required for planning purposes only. Ref. Water: A cold water supply with product. PRODUCT DIMENSIONS A not incl. with model. Allow for use an extension cord. NOTE: This refrigerator is connected to your cold water supply, the water pressure to the reverse osmosis system needs...


