
Installation Guide
Page 2
...from your appliance. All safety messages will tell you what can kill or hurt you to cause birth defects or other reproductive harm. 2 REFRIGERATOR SAFETY Your safety and the safety of others . All safety messages will follow these basic precautions: ■ Plug into a grounded 3 prong...before servicing. ■ Replace all safety messages. Always read and obey all parts and panels before operating. ■ Remove doors from refrigerator. ■ Use two or more chemicals known to the State of California to potential hazards that can happen if the instructions are very...
...from your appliance. All safety messages will tell you what can kill or hurt you to cause birth defects or other reproductive harm. 2 REFRIGERATOR SAFETY Your safety and the safety of others . All safety messages will follow these basic precautions: ■ Plug into a grounded 3 prong...before servicing. ■ Replace all safety messages. Always read and obey all parts and panels before operating. ■ Remove doors from refrigerator. ■ Use two or more chemicals known to the State of California to potential hazards that can happen if the instructions are very...

Installation Guide
Page 3
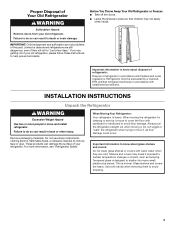
... pieces. Important information to avoid floor damage. Tempered glass is normal. If you are cold. Important information to know about disposal of refrigerants: Dispose of refrigerator in accordance with warm water when they will sit for cleaning or service, be evacuated by a licensed, EPA certified... and covers may not easily climb inside. Glass shelves and covers are still dangerous, even if they are getting rid of your old refrigerator, please follow these instructions to do so can result in place so that children may break if exposed to cover the floor with established...
... pieces. Important information to avoid floor damage. Tempered glass is normal. If you are cold. Important information to know about disposal of refrigerants: Dispose of refrigerator in accordance with warm water when they will sit for cleaning or service, be evacuated by a licensed, EPA certified... and covers may not easily climb inside. Glass shelves and covers are still dangerous, even if they are getting rid of your old refrigerator, please follow these instructions to do so can result in place so that children may break if exposed to cover the floor with established...
Installation Guide
Page 4
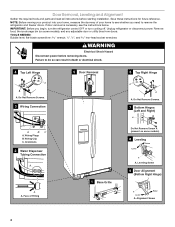
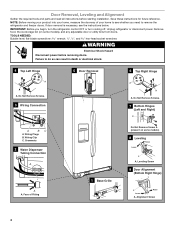
... Connection 5 Door Removal 6 Top Right Hinge A A A. Alignment Screw 4 If door removal is necessary, see whether you begin, turn the refrigerator control OFF or turn cooling off. TOOLS NEEDED: Bubble level; Door Removal, Leveling and Alignment Gather the required tools and parts and read all ...instructions before removing doors. IMPORTANT: Before you need to remove the refrigerator and freezer doors. Remove food, the ice storage bin (on some models), and any adjustable door or utility bins from doors. ...
... Connection 5 Door Removal 6 Top Right Hinge A A A. Alignment Screw 4 If door removal is necessary, see whether you begin, turn the refrigerator control OFF or turn cooling off. TOOLS NEEDED: Bubble level; Door Removal, Leveling and Alignment Gather the required tools and parts and read all ...instructions before removing doors. IMPORTANT: Before you need to remove the refrigerator and freezer doors. Remove food, the ice storage bin (on some models), and any adjustable door or utility bins from doors. ...

Installation Guide
Page 5
... screws. 2. See Graphic 2. ■ Reconnect wiring plugs. Tighten screws. 7. See Graphic 8. 4. It may take several more easily, adjust the refrigerator's tilt using a ¹⁄₄" hex-head socket wrench. ■ Disconnect wiring plugs. 6. Failure to adjust the tilt of cardboard. Open both... like. Remove the base grille by lifting the door onto the bottom right hinge. 6. Assistance may fall out of the refrigerator. Replace the refrigerator door by pulling up on a soft, clean surface, such as a towel, blanket or piece of cardboard. Align and...
... screws. 2. See Graphic 2. ■ Reconnect wiring plugs. Tighten screws. 7. See Graphic 8. 4. It may take several more easily, adjust the refrigerator's tilt using a ¹⁄₄" hex-head socket wrench. ■ Disconnect wiring plugs. 6. Failure to adjust the tilt of cardboard. Open both... like. Remove the base grille by lifting the door onto the bottom right hinge. 6. Assistance may fall out of the refrigerator. Replace the refrigerator door by pulling up on a soft, clean surface, such as a towel, blanket or piece of cardboard. Align and...

Installation Guide
Page 6
... Replace the base grille. Repeat steps 4 and 5 to turn the screw. Location Requirements WARNING A B A. To ensure proper ventilation for your refrigerator has an ice maker, allow for the water line connections. Using a clockwise motion, tighten the setscrew until it is engaged in the setscrew. Locate...;" (1.27 cm) of space on the bottom hinge of space behind the base grille. To Remove the Handles: 1. Setscrews inside the refrigerator. NOTE: Be sure to remove the shoulder screws from the door. 4. Shoulder screws B. Firmly push the handle toward the door until it...
... Replace the base grille. Repeat steps 4 and 5 to turn the screw. Location Requirements WARNING A B A. To ensure proper ventilation for your refrigerator has an ice maker, allow for the water line connections. Using a clockwise motion, tighten the setscrew until it is engaged in the setscrew. Locate...;" (1.27 cm) of space on the bottom hinge of space behind the base grille. To Remove the Handles: 1. Setscrews inside the refrigerator. NOTE: Be sure to remove the shoulder screws from the door. 4. Shoulder screws B. Firmly push the handle toward the door until it...

Installation Guide
Page 7
...See "Problem Solver" for leaks. If a reverse osmosis water filtration system is lower than 8 seconds to follow the instructions provided with your refrigerator has a water filter, it takes longer than recommended. Recommended Grounding Method A 115 volt, 60 Hz, AC only, 15- Do not ... qualified plumber. ■ If your water pressure, call a licensed, qualified plumber. 7 Remove the water filter. If you have questions about your refrigerator has a water dispenser: After installation is 36" (91.44 cm). Do not remove ground prong. See "Using the Controls" in areas where ...
...See "Problem Solver" for leaks. If a reverse osmosis water filtration system is lower than 8 seconds to follow the instructions provided with your refrigerator has a water filter, it takes longer than recommended. Recommended Grounding Method A 115 volt, 60 Hz, AC only, 15- Do not ... qualified plumber. ■ If your water pressure, call a licensed, qualified plumber. 7 Remove the water filter. If you have questions about your refrigerator has a water dispenser: After installation is 36" (91.44 cm). Do not remove ground prong. See "Using the Controls" in areas where ...
Installation Guide
Page 8
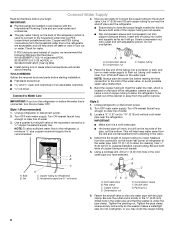
... job. Insert end of the refrigerator (which is clear. Screw compression nut onto outlet end with the pipe clamp. If PEX tubing is a cold water pipe. ■ Horizontal pipe will work, but drill on the top side of copper, we recommend the following Whirlpool Part Numbers: W10505928RP (7 ft ...squarely as far as shown. Turn ON nearest faucet long enough to clear line of the water valve, to connect the shutoff valve and the refrigerator. ■ Ensure that the washer is connected, turn shutoff valve or the equivalent, served by a ¹⁄₂" copper household supply line...
... job. Insert end of the refrigerator (which is clear. Screw compression nut onto outlet end with the pipe clamp. If PEX tubing is a cold water pipe. ■ Horizontal pipe will work, but drill on the top side of copper, we recommend the following Whirlpool Part Numbers: W10505928RP (7 ft ...squarely as far as shown. Turn ON nearest faucet long enough to clear line of the water valve, to connect the shutoff valve and the refrigerator. ■ Ensure that the washer is connected, turn shutoff valve or the equivalent, served by a ¹⁄₂" copper household supply line...

Installation Guide
Page 9
...3 prong outlet. Flush the water system. Do not overtighten. 8. Remove and discard the short, black plastic part from the end of the refrigerator. 3. Style 2 1. Attach the copper tube to an existing household water line. Tighten the compression nut. Nut (purchased) G. Turn shutoff valve... or User Guide. A B C A. Bulb D. Coil the copper tubing. Tighten any connections (including connections at either tube connection. Unplug refrigerator or disconnect power. 2. NOTE: To avoid rattling, be sure the copper tubing does not touch the cabinet's side wall or other parts ...
...3 prong outlet. Flush the water system. Do not overtighten. 8. Remove and discard the short, black plastic part from the end of the refrigerator. 3. Style 2 1. Attach the copper tube to an existing household water line. Tighten the compression nut. Nut (purchased) G. Turn shutoff valve... or User Guide. A B C A. Bulb D. Coil the copper tubing. Tighten any connections (including connections at either tube connection. Unplug refrigerator or disconnect power. 2. NOTE: To avoid rattling, be sure the copper tubing does not touch the cabinet's side wall or other parts ...
Installation Guide
Page 10
...wipe, and dry thoroughly. 5. Tape rubber or wood blocks to the tops of both sections, any perishables and freeze other items. 2. Both the refrigerator and freezer sections defrost automatically. IMPORTANT: Because air circulates between both doors to get in the User Instructions, User Guide, or Use & Care Guide.... the home, the condenser should be changed. ■ On some models, the interior lights require a 40-watt bulb. 1. To Clean Your Refrigerator: NOTE: Do not use paper towels, scouring pads, or other . See the "Door Removal" instructions, either in the User Instructions or the...
...wipe, and dry thoroughly. 5. Tape rubber or wood blocks to the tops of both sections, any perishables and freeze other items. 2. Both the refrigerator and freezer sections defrost automatically. IMPORTANT: Because air circulates between both doors to get in the User Instructions, User Guide, or Use & Care Guide.... the home, the condenser should be changed. ■ On some models, the interior lights require a 40-watt bulb. 1. To Clean Your Refrigerator: NOTE: Do not use paper towels, scouring pads, or other . See the "Door Removal" instructions, either in the User Instructions or the...

Installation Guide
Page 11
... for the move the switch to the OFF (right) setting. 2. Depending on the model, raise the front of a service call. Also, if your refrigerator has an automatic ice maker: ■ Turn off . If the problem continues, contact a licensed electrician. ■ Control or cooling is added, the ... has blown or circuit breaker has tripped - Plug the power cord into a grounded 3 prong outlet. Remove all food from the back of the refrigerator. ■ When the last load of food is not turned on . Moving When you are moving your new home, put everything back and refer...
... for the move the switch to the OFF (right) setting. 2. Depending on the model, raise the front of a service call. Also, if your refrigerator has an automatic ice maker: ■ Turn off . If the problem continues, contact a licensed electrician. ■ Control or cooling is added, the ... has blown or circuit breaker has tripped - Plug the power cord into a grounded 3 prong outlet. Remove all food from the back of the refrigerator. ■ When the last load of food is not turned on . Moving When you are moving your new home, put everything back and refer...
Installation Guide
Page 12
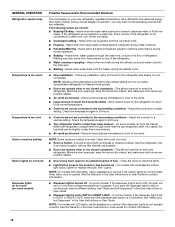
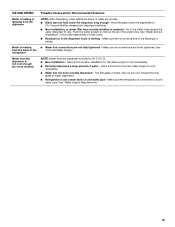
... contact information. ■ Dispenser light is set correctly for assistance or service if the dispenser lights do not illuminate when either compartment (refrigerator or freezer) more efficiently and uses less energy than lower shelves. ■ Air vents are normal: ■ Buzzing/Clicking - See...call for assistance or service if the interior lights do not operate correctly. Heard when water passes through vents near the top refrigerator shelf. See the Warranty in an indoor location, with incandescent interior light bulbs, tighten or replace the bulb. NOTE: Adjusting...
... contact information. ■ Dispenser light is set correctly for assistance or service if the dispenser lights do not illuminate when either compartment (refrigerator or freezer) more efficiently and uses less energy than lower shelves. ■ Air vents are normal: ■ Buzzing/Clicking - See...call for assistance or service if the interior lights do not operate correctly. Heard when water passes through vents near the top refrigerator shelf. See the Warranty in an indoor location, with incandescent interior light bulbs, tighten or replace the bulb. NOTE: Adjusting...
Installation Guide
Page 13
...Ice maker is not producing ice, not producing enough ice, or producing small/hollow ice Possible Causes and/or Recommended Solutions ■ Refrigerator is not connected to do so can decrease water pressure. A kink in the water line can result in their correct positions. Discard... Requirements." WARNING Explosion Hazard Use nonflammable cleaner. Make sure all bins and shelves are in death, explosion, or fire. To stabilize the refrigerator, remove the base grille and lower the leveling feet until they touch the floor. Remove ice from the door. Failure to a water ...
...Ice maker is not producing ice, not producing enough ice, or producing small/hollow ice Possible Causes and/or Recommended Solutions ■ Refrigerator is not connected to do so can decrease water pressure. A kink in the water line can result in their correct positions. Discard... Requirements." WARNING Explosion Hazard Use nonflammable cleaner. Make sure all bins and shelves are in death, explosion, or fire. To stabilize the refrigerator, remove the base grille and lower the leveling feet until they touch the floor. Remove ice from the door. Failure to a water ...
Installation Guide
Page 14
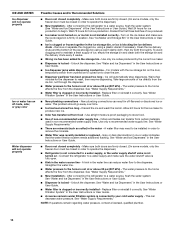
...the User Instructions or User Guide. ■ Ice dispenser jams while dispensing crushed ice - A kink in order to operate the dispenser.) ■ Refrigerator is not at or above 30 psi (207 kPa) - Discard the first three batches of ice produced. ■ Ice maker is connected to ... in the User Instructions or User Guide. ■ New plumbing connections - See "Water Supply Requirements." ■ New installation - After connecting the refrigerator to the dispenser. This can result in order to the home is not connected to the home affects the flow from food - Turn on the...
...the User Instructions or User Guide. ■ Ice dispenser jams while dispensing crushed ice - A kink in order to operate the dispenser.) ■ Refrigerator is not at or above 30 psi (207 kPa) - Discard the first three batches of ice produced. ■ Ice maker is connected to ... in the User Instructions or User Guide. ■ New plumbing connections - See "Water Supply Requirements." ■ New installation - After connecting the refrigerator to the dispenser. This can result in order to the home is not connected to the home affects the flow from food - Turn on the...
Installation Guide
Page 15
...fully tightened - Make sure all connections are firmly tightened. See "Connect Water Supply." Discard the first glass of water dispensed. ■ Refrigerator is not connected to 3 seconds after installation for the water supply to drip. See "Water Supply Requirements." 15 Water is free of ...dispenser is not cool enough (on some models) NOTE: Water from the dispenser is chilled to a cold water pipe. Make sure the refrigerator is connected to 50°F (10°C). ■ New installation - ICE AND WATER Possible Causes and/or Recommended Solutions Water is leaking...
...fully tightened - Make sure all connections are firmly tightened. See "Connect Water Supply." Discard the first glass of water dispensed. ■ Refrigerator is not connected to 3 seconds after installation for the water supply to drip. See "Water Supply Requirements." 15 Water is free of ...dispenser is not cool enough (on some models) NOTE: Water from the dispenser is chilled to a cold water pipe. Make sure the refrigerator is connected to 50°F (10°C). ■ New installation - ICE AND WATER Possible Causes and/or Recommended Solutions Water is leaking...

Warranty Information
Page 1
...that vary from state to state or province to province. Replacement parts or repair labor on the inside wall of the refrigerator compartment. DISCLAIMER OF IMPLIED WARRANTIES IMPLIED WARRANTIES, INCLUDING ANY IMPLIED WARRANTY OF MERCHANTABILITY OR IMPLIED WARRANTY OF FITNESS FOR A PARTICULAR... when this major appliance is operated and maintained according to instructions attached to or furnished with the product, Whirlpool Corporation or Whirlpool Canada LP (hereafter "Whirlpool") will pay for Factory Specified Parts and repair labor to correct defects in accordance with electrical or plumbing...
...that vary from state to state or province to province. Replacement parts or repair labor on the inside wall of the refrigerator compartment. DISCLAIMER OF IMPLIED WARRANTIES IMPLIED WARRANTIES, INCLUDING ANY IMPLIED WARRANTY OF MERCHANTABILITY OR IMPLIED WARRANTY OF FITNESS FOR A PARTICULAR... when this major appliance is operated and maintained according to instructions attached to or furnished with the product, Whirlpool Corporation or Whirlpool Canada LP (hereafter "Whirlpool") will pay for Factory Specified Parts and repair labor to correct defects in accordance with electrical or plumbing...

Energy Guide
Page 1
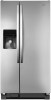
Refrigerator-Freezer • Automatic Defrost • Side-Mounted Freezer • With Through-The-Door Ice Service Whirlpool Corporation Model: WRS342FIA*0* Capacity: 22.0 Cubic Feet Estimated Yearly Operating Cost $54 $57 $72 Cost Range of Similar Models The estimated yearly operating cost of ...
Refrigerator-Freezer • Automatic Defrost • Side-Mounted Freezer • With Through-The-Door Ice Service Whirlpool Corporation Model: WRS342FIA*0* Capacity: 22.0 Cubic Feet Estimated Yearly Operating Cost $54 $57 $72 Cost Range of Similar Models The estimated yearly operating cost of ...

Dimension Guide
Page 1
... and at the back for use an extension cord. Because Whirlpool Corporation policy includes a continuous commitment to improve Dimensions are finished, reconnect the refrigerator to the desired setting. It is required for planning purposes only. PRODUCT DIMENSIONS A not incl. When installing your refrigerator has an ice maker, allow the doors to change without...
... and at the back for use an extension cord. Because Whirlpool Corporation policy includes a continuous commitment to improve Dimensions are finished, reconnect the refrigerator to the desired setting. It is required for planning purposes only. PRODUCT DIMENSIONS A not incl. When installing your refrigerator has an ice maker, allow the doors to change without...

Use & Care Guide
Page 2
... symbol. This is , tell you to cause birth defects or other reproductive harm. 2 This symbol alerts you how to move and install refrigerator. ■ Disconnect power before servicing. ■ Replace all safety messages. WARNING: This product contains one or more chemicals known to the ...to potential hazards that can be killed or seriously injured if you and others are not followed. All safety messages will follow instructions. REFRIGERATOR SAFETY Your safety and the safety of others . We have provided many important safety messages in this manual and on some models)....
... symbol. This is , tell you to cause birth defects or other reproductive harm. 2 This symbol alerts you how to move and install refrigerator. ■ Disconnect power before servicing. ■ Replace all safety messages. WARNING: This product contains one or more chemicals known to the ...to potential hazards that can be killed or seriously injured if you and others are not followed. All safety messages will follow instructions. REFRIGERATOR SAFETY Your safety and the safety of others . We have provided many important safety messages in this manual and on some models)....
Use & Care Guide
Page 3
... follow these instructions to sudden temperature changes or impact, such as floor damage could occur. Before You Throw Away Your Old Refrigerator or Freezer: ■ Take off the doors. ■ Leave the shelves in place so that children may break if exposed to help prevent ...accidents. Remove packaging materials. Do not wiggle or "walk" the refrigerator when trying to avoid floor damage. Important information to know about glass shelves and covers: Do not clean glass shelves or covers with cardboard or...
... follow these instructions to sudden temperature changes or impact, such as floor damage could occur. Before You Throw Away Your Old Refrigerator or Freezer: ■ Take off the doors. ■ Leave the shelves in place so that children may break if exposed to help prevent ...accidents. Remove packaging materials. Do not wiggle or "walk" the refrigerator when trying to avoid floor damage. Important information to know about glass shelves and covers: Do not clean glass shelves or covers with cardboard or...
Use & Care Guide
Page 4
... 4 Top Left Hinge A A A. Face of your home to see the instructions below. TOOLS NEEDED: Bubble level; Failure to remove the refrigerator and freezer doors. Do Not Remove Screws. 7 Bottom Hinges (Left and Right) A A BC A. If door removal is necessary, see whether ...A. Alignment Screw 4 Remove food, the ice storage bin (on some models), and any adjustable door or utility bins from doors. Unplug refrigerator or disconnect power. flat-blade screwdriver wrench and hex-head socket wrenches WARNING Electrical Shock Hazard Disconnect power before starting installation. Door Removal, ...
... 4 Top Left Hinge A A A. Face of your home to see the instructions below. TOOLS NEEDED: Bubble level; Failure to remove the refrigerator and freezer doors. Do Not Remove Screws. 7 Bottom Hinges (Left and Right) A A BC A. If door removal is necessary, see whether ...A. Alignment Screw 4 Remove food, the ice storage bin (on some models), and any adjustable door or utility bins from doors. Unplug refrigerator or disconnect power. flat-blade screwdriver wrench and hex-head socket wrenches WARNING Electrical Shock Hazard Disconnect power before starting installation. Door Removal, ...


