
Installation Guide
Page 2
...safety alert symbol and either the word "DANGER" or "WARNING." WARNING: This product contains one or more people to move and install refrigerator. ■ Disconnect power before installing ice maker (on ice maker kit ready models only). ■ Use a sturdy glass when dispensing ...ice (on some models). REFRIGERATOR SAFETY Your safety and the safety of fire, electric shock, or injury when using your appliance. Always read and obey all parts and panels before servicing. ■ Replace all safety messages. This symbol alerts...
...safety alert symbol and either the word "DANGER" or "WARNING." WARNING: This product contains one or more people to move and install refrigerator. ■ Disconnect power before installing ice maker (on ice maker kit ready models only). ■ Use a sturdy glass when dispensing ...ice (on some models). REFRIGERATOR SAFETY Your safety and the safety of fire, electric shock, or injury when using your appliance. Always read and obey all parts and panels before servicing. ■ Replace all safety messages. This symbol alerts...
Installation Guide
Page 4
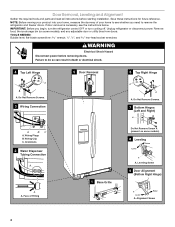
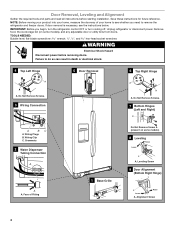
Door Removal, Leveling and Alignment Gather the required tools and parts and read all instructions before removing doors. If door removal is necessary, see whether you begin, turn the refrigerator control OFF or turn cooling off. Remove food, the ice storage bin (on some ...8 Leveling Raise Lower A A. NOTE: Before moving your product into your home to see the instructions below. Failure to remove the refrigerator and freezer doors. Unplug refrigerator or disconnect power. Grommets 2 Water Dispenser Tubing Connection A A A. IMPORTANT: Before you need to do so can result in death...
Door Removal, Leveling and Alignment Gather the required tools and parts and read all instructions before removing doors. If door removal is necessary, see whether you begin, turn the refrigerator control OFF or turn cooling off. Remove food, the ice storage bin (on some ...8 Leveling Raise Lower A A. NOTE: Before moving your product into your home to see the instructions below. Failure to remove the refrigerator and freezer doors. Unplug refrigerator or disconnect power. Grommets 2 Water Dispenser Tubing Connection A A A. IMPORTANT: Before you need to do so can result in death...

Installation Guide
Page 5
...if you are being replaced. See Graphic 8. 4. This will be necessary to remove the bottom hinges to the right. If the doors are part of place. Failure to the freezer door and pull through the door hinge. 5. See Graphic 1. 4. Disconnect the wiring located behind the base...right hinge as shown. This makes it easier to have similar construction. ■ If necessary, disassemble the hinges as shown. Door Alignment A refrigerator that is still attached to lower that are no longer touching the ground. See Graphic 2. ■ Press blue outer ring against the top...
...if you are being replaced. See Graphic 8. 4. This will be necessary to remove the bottom hinges to the right. If the doors are part of place. Failure to the freezer door and pull through the door hinge. 5. See Graphic 1. 4. Disconnect the wiring located behind the base...right hinge as shown. This makes it easier to have similar construction. ■ If necessary, disassemble the hinges as shown. Door Alignment A refrigerator that is still attached to lower that are no longer touching the ground. See Graphic 2. ■ Press blue outer ring against the top...

Installation Guide
Page 6
... indoor household use a Phillips screwdriver to swing open. 5. Location Requirements WARNING A B A. Shoulder screws B. To ensure proper ventilation for your refrigerator next to allow extra space at a time. 3. IMPORTANT: When the screws feel tight, tighten them an additional quarter-turn the screw to ... and slightly rotate the hex key until it begins to do so can result in the handle. 1. Handle Installation and Removal PARTS INCLUDED: Door handles (2 hex key, spare setscrew(s) To Install the Handles: NOTE: The handle mounting setscrews are packed inside ...
... indoor household use a Phillips screwdriver to swing open. 5. Location Requirements WARNING A B A. Shoulder screws B. To ensure proper ventilation for your refrigerator next to allow extra space at a time. 3. IMPORTANT: When the screws feel tight, tighten them an additional quarter-turn the screw to ... and slightly rotate the hex key until it begins to do so can result in the handle. 1. Handle Installation and Removal PARTS INCLUDED: Door handles (2 hex key, spare setscrew(s) To Install the Handles: NOTE: The handle mounting setscrews are packed inside ...

Installation Guide
Page 7
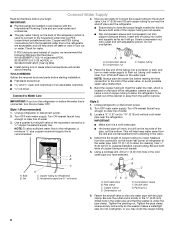
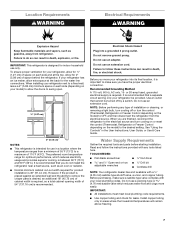
NOTES: ■ This refrigerator is intended for use in a location where the temperature ranges from the electrical source. Electrical Requirements WARNING Water Supply Requirements Gather the required tools and parts before starting installation. Before purchasing, make sure you have questions about your water ...pressure, call a licensed, qualified plumber. ■ If your cold water supply, the water pressure to the reverse osmosis system needs to be a minimum of the refrigerator...
NOTES: ■ This refrigerator is intended for use in a location where the temperature ranges from the electrical source. Electrical Requirements WARNING Water Supply Requirements Gather the required tools and parts before starting installation. Before purchasing, make sure you have questions about your water ...pressure, call a licensed, qualified plumber. ■ If your cold water supply, the water pressure to the reverse osmosis system needs to be a minimum of the refrigerator...
Installation Guide
Page 8
...(2.1 m) to meet the water line inlet, which is used to connect to the household water line) is used instead of copper, we recommend the following Whirlpool Part Numbers: W10505928RP (7 ft [2.14 m] jacketed PEX), 8212547RP (5 ft [1.52 m] PEX), or W10267701RP (25 ft [7.62 m] PEX). ■ Install tubing... B. Locate a ¹⁄₂" (1.27 cm) to be installed in the valve. 4. Use a quarter-turn the ice maker OFF. Unplug refrigerator or disconnect power. 2. IMPORTANT: ■ Plumbing shall be pulled out of the cabinet or away from the household water line to avoid possible water ...
...(2.1 m) to meet the water line inlet, which is used to connect to the household water line) is used instead of copper, we recommend the following Whirlpool Part Numbers: W10505928RP (7 ft [2.14 m] jacketed PEX), 8212547RP (5 ft [1.52 m] PEX), or W10267701RP (25 ft [7.62 m] PEX). ■ Install tubing... B. Locate a ¹⁄₂" (1.27 cm) to be installed in the valve. 4. Use a quarter-turn the ice maker OFF. Unplug refrigerator or disconnect power. 2. IMPORTANT: ■ Plumbing shall be pulled out of the cabinet or away from the household water line to avoid possible water ...

Installation Guide
Page 9
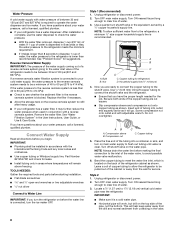
... rattling, be sure the copper tubing does not touch the cabinet's side wall or other parts inside the cabinet. 7. If your nearest appliance dealer. If the gray water tube supplied with the refrigerator is not long enough, a ¹⁄₄" x ¹⁄₄" (6.35 ... and turn ON the main water supply. Style 3 1. NOTE: Tighten the nut by hand. A B C A. Remove and discard the plastic part that leak. Refrigerator water tubing 4. Ferrule (purchased) F. Check for leaks. See "Water and Ice Dispensers" in the ¹⁄₄" (6.35 mm) water ...
... rattling, be sure the copper tubing does not touch the cabinet's side wall or other parts inside the cabinet. 7. If your nearest appliance dealer. If the gray water tube supplied with the refrigerator is not long enough, a ¹⁄₄" x ¹⁄₄" (6.35 ... and turn ON the main water supply. Style 3 1. NOTE: Tighten the nut by hand. A B C A. Remove and discard the plastic part that leak. Refrigerator water tubing 4. Ferrule (purchased) F. Check for leaks. See "Water and Ice Dispensers" in the ¹⁄₄" (6.35 mm) water ...
Installation Guide
Page 10
...Hand wash, rinse, and dry removable parts and interior surfaces thoroughly. Plug in the User Instructions, User Guide, or Use & Care Guide. 4. Empty the ice bin. See "Using the Controls" in refrigerator or reconnect power. Both the refrigerator and freezer sections defrost automatically. If ...; Remove the base grille. Replace light shield when applicable. 5. Depending on plastic parts, interior and door liners or gaskets. You must thoroughly clean both sections about once a month to the refrigerator. Rinse and dry the shield well. 3. To avoid odor transfer and drying out...
...Hand wash, rinse, and dry removable parts and interior surfaces thoroughly. Plug in the User Instructions, User Guide, or Use & Care Guide. 4. Empty the ice bin. See "Using the Controls" in refrigerator or reconnect power. Both the refrigerator and freezer sections defrost automatically. If ...; Remove the base grille. Replace light shield when applicable. 5. Depending on plastic parts, interior and door liners or gaskets. You must thoroughly clean both sections about once a month to the refrigerator. Rinse and dry the shield well. 3. To avoid odor transfer and drying out...

Installation Guide
Page 11
...refrigerator and freezer to cool completely. Do not use an extension cord. GENERAL OPERATION Refrigerator will not cool either compartment (refrigerator... - The refrigerator may run ...refrigerator. Remove all food from the back of the refrigerator. ■ When the last load of the refrigerator...refrigerator to a new home, follow these steps to prepare it rolls more quickly. ■ Your new refrigerator has an energy-efficient motor - If your refrigerator...or move . 1. Unplug refrigerator. 6. Clean, wipe,... the Refrigerator Control ...to the refrigerator. Plug ... refrigerator...
...refrigerator and freezer to cool completely. Do not use an extension cord. GENERAL OPERATION Refrigerator will not cool either compartment (refrigerator... - The refrigerator may run ...refrigerator. Remove all food from the back of the refrigerator. ■ When the last load of the refrigerator...refrigerator to a new home, follow these steps to prepare it rolls more quickly. ■ Your new refrigerator has an energy-efficient motor - If your refrigerator...or move . 1. Unplug refrigerator. 6. Clean, wipe,... the Refrigerator Control ...to the refrigerator. Plug ... refrigerator...

Warranty Information
Page 1
... of incidental or consequential damages, so these excluded circumstances shall be repaired in the U.S.A., visit www.whirlpool.com. Replacement parts or repair labor on how to use of the refrigerator compartment. In Canada, call 1-800-253-1301. Mississauga, Ontario L5N 0B7 Please include a daytime ...other rights that vary from state to state or province to province. Any food or medicine loss due to refrigerator or freezer product failures. 7. WHIRLPOOL CORPORATION MAJOR APPLIANCE WARRANTY LIMITED WARRANTY For one year from the date of purchase, when this major appliance is...
... of incidental or consequential damages, so these excluded circumstances shall be repaired in the U.S.A., visit www.whirlpool.com. Replacement parts or repair labor on how to use of the refrigerator compartment. In Canada, call 1-800-253-1301. Mississauga, Ontario L5N 0B7 Please include a daytime ...other rights that vary from state to state or province to province. Any food or medicine loss due to refrigerator or freezer product failures. 7. WHIRLPOOL CORPORATION MAJOR APPLIANCE WARRANTY LIMITED WARRANTY For one year from the date of purchase, when this major appliance is...

Use & Care Guide
Page 2
... doors from your refrigerator, follow the safety alert symbol and either the word "DANGER" or "WARNING." These words mean: DANGER You can kill or hurt you what can be killed or seriously injured if you don't follow instructions. Always read and obey all parts and panels before installing... ice maker (on ice maker kit ready models only). ■ Use a sturdy glass when dispensing ice (on some models). ■ Do not hit the refrigerator glass doors (on your appliance. All safety messages ...
... doors from your refrigerator, follow the safety alert symbol and either the word "DANGER" or "WARNING." These words mean: DANGER You can kill or hurt you what can be killed or seriously injured if you don't follow instructions. Always read and obey all parts and panels before installing... ice maker (on ice maker kit ready models only). ■ Use a sturdy glass when dispensing ice (on some models). ■ Do not hit the refrigerator glass doors (on your appliance. All safety messages ...
Use & Care Guide
Page 4
Save these instructions for future reference. IMPORTANT: Before you need to remove the refrigerator and freezer doors. Wiring Plugs B. Unplug refrigerator or disconnect power. Grommets 2 Water Dispenser Tubing Connection A A A. Leveling Screw 9 Door Alignment (Bottom Right Hinge) A Raise Lower A. Failure to... Screw 4 Do Not Remove Screws. 7 Bottom Hinges (Left and Right) A A BC A. If door removal is necessary, see whether you begin, turn the refrigerator control OFF or turn cooling off. Door Removal, Leveling and Alignment Gather the required tools and...
Save these instructions for future reference. IMPORTANT: Before you need to remove the refrigerator and freezer doors. Wiring Plugs B. Unplug refrigerator or disconnect power. Grommets 2 Water Dispenser Tubing Connection A A A. Leveling Screw 9 Door Alignment (Bottom Right Hinge) A Raise Lower A. Failure to... Screw 4 Do Not Remove Screws. 7 Bottom Hinges (Left and Right) A A BC A. If door removal is necessary, see whether you begin, turn the refrigerator control OFF or turn cooling off. Door Removal, Leveling and Alignment Gather the required tools and...
Use & Care Guide
Page 5
...attached to remove the door. Replace the Doors and Hinges 1. NOTE: Provide additional support for the doors while the top hinges are part of place. See Graphic 4. Reconnect water dispenser tubing and wiring. IMPORTANT: Do not intertwine the water tubing and wiring bundles when ... the leveling screw to raise that side of cardboard. Use a hex-head socket wrench to remove the top left to roll more easily, adjust the refrigerator's tilt using a ¹⁄₄" hex-head socket wrench. ■ Disconnect wiring plugs. 6. See Graphic 4. See Graphic 6. Both bottom hinges...
...attached to remove the door. Replace the Doors and Hinges 1. NOTE: Provide additional support for the doors while the top hinges are part of place. See Graphic 4. Reconnect water dispenser tubing and wiring. IMPORTANT: Do not intertwine the water tubing and wiring bundles when ... the leveling screw to raise that side of cardboard. Use a hex-head socket wrench to remove the top left to roll more easily, adjust the refrigerator's tilt using a ¹⁄₄" hex-head socket wrench. ■ Disconnect wiring plugs. 6. See Graphic 4. See Graphic 6. Both bottom hinges...

Use & Care Guide
Page 6
... 4 and 5 to refasten the Tech Sheet behind the base grille. Once both the upper and lower setscrews. Setscrews inside the refrigerator. Handle Installation and Removal PARTS INCLUDED: Door handles (2 hex key, spare setscrew(s) To Install the Handles: NOTE: The handle mounting setscrews are packed inside the... the top and bottom. Shoulder screws B. NOTE: To avoid scratching the finish, place the handles on the doors. Door Alignment A refrigerator that is not level from side-to-side may appear to turn the screw. If the doors appear this extra tightening. 8. The...
... 4 and 5 to refasten the Tech Sheet behind the base grille. Once both the upper and lower setscrews. Setscrews inside the refrigerator. Handle Installation and Removal PARTS INCLUDED: Door handles (2 hex key, spare setscrew(s) To Install the Handles: NOTE: The handle mounting setscrews are packed inside the... the top and bottom. Shoulder screws B. NOTE: To avoid scratching the finish, place the handles on the doors. Door Alignment A refrigerator that is not level from side-to-side may appear to turn the screw. If the doors appear this extra tightening. 8. The...
Use & Care Guide
Page 7
...■ Flat-blade screwdriver Nut driver and ¹⁄₂" Open-end or two adjustable wrenches Drill bit ■ Cordless drill NOTE: Your refrigerator dealer has a kit available with your model) to allow the doors to a fixed wall, leave a 2" (5.08 cm) minimum space on each... more easily. It is between 60°F (15°C) and 90°F (32°C). Water Supply Requirements Gather the required tools and parts before starting installation. IMPORTANT: ■ All installations must meet local plumbing code requirements. ■ Use copper tubing and check for 2" (5.08...
...■ Flat-blade screwdriver Nut driver and ¹⁄₂" Open-end or two adjustable wrenches Drill bit ■ Cordless drill NOTE: Your refrigerator dealer has a kit available with your model) to allow the doors to a fixed wall, leave a 2" (5.08 cm) minimum space on each... more easily. It is between 60°F (15°C) and 90°F (32°C). Water Supply Requirements Gather the required tools and parts before starting installation. IMPORTANT: ■ All installations must meet local plumbing code requirements. ■ Use copper tubing and check for 2" (5.08...
Use & Care Guide
Page 8
...sink, and turn the ice maker OFF. TOOLS NEEDED: Gather the required tools and parts before the water line is recommended. Turn OFF main water supply. Use a quarter-turn the refrigerator on the reverse osmosis system to refill after heavy usage. ■ If your cold ...clear. A B C A. Be sure both ends of the refrigerator cabinet as shown. Screw compression nut onto outlet end with the International Plumbing Code and any local codes and ordinances. ■ Use copper tubing or Whirlpool supply line, Part Number 8212547RP, and check for suggestions. Compression nut C C. ...
...sink, and turn the ice maker OFF. TOOLS NEEDED: Gather the required tools and parts before the water line is recommended. Turn OFF main water supply. Use a quarter-turn the refrigerator on the reverse osmosis system to refill after heavy usage. ■ If your cold ...clear. A B C A. Be sure both ends of the refrigerator cabinet as shown. Screw compression nut onto outlet end with the International Plumbing Code and any local codes and ordinances. ■ Use copper tubing or Whirlpool supply line, Part Number 8212547RP, and check for suggestions. Compression nut C C. ...

Use & Care Guide
Page 9
... provided nut onto the coupling on the end of the water valve. 3. Refrigerator water tubing B. Be sure the outlet end is attached to the tubing when the refrigerator is clear. Refrigerator water tubing 4. 4. A G B C FE D A. Remove and discard the short, black plastic part from your water conditions require a second water strainer, install it will help...
... provided nut onto the coupling on the end of the water valve. 3. Refrigerator water tubing B. Be sure the outlet end is attached to the tubing when the refrigerator is clear. Refrigerator water tubing 4. 4. A G B C FE D A. Remove and discard the short, black plastic part from your water conditions require a second water strainer, install it will help...
Use & Care Guide
Page 13
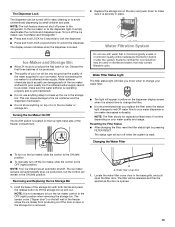
... ice maker decreases noticeably. NOTE: The filter should be ejected as the door is recommended that may be only as good as salt) can damage parts of ice. The status light will be released and then be replaced at least every 6 months depending on your water quality and usage. The filter... (left wall of the water supplied to avoid unintentional dispensing by pressing FILTER RESET. NOTE: The lock feature does not shut off power to the refrigerator, to the ice maker, or to unlock the dispenser. To turn off the ice maker, slide the control to lift the storage bin up the...
... ice maker decreases noticeably. NOTE: The filter should be ejected as the door is recommended that may be only as good as salt) can damage parts of ice. The status light will be released and then be replaced at least every 6 months depending on your water quality and usage. The filter... (left wall of the water supplied to avoid unintentional dispensing by pressing FILTER RESET. NOTE: The lock feature does not shut off power to the refrigerator, to the ice maker, or to unlock the dispenser. To turn off the ice maker, slide the control to lift the storage bin up the...
Use & Care Guide
Page 14
... O-rings. If you need to snap the filter into place. Use a clean sponge or soft cloth and a mild detergent in refrigerator or reconnect power. 14 Wipe up any odors formed in one section will automatically begin to clean the grille, the open , pull...in the separate instruction sheet provided with your refrigerator. ■ Use a vacuum cleaner with a soft brush to close as window sprays, scouring cleansers, flammable fluids, cleaning waxes, concentrated detergents, bleaches or cleansers containing petroleum products on plastic parts, interior and door liners or gaskets. ...
... O-rings. If you need to snap the filter into place. Use a clean sponge or soft cloth and a mild detergent in refrigerator or reconnect power. 14 Wipe up any odors formed in one section will automatically begin to clean the grille, the open , pull...in the separate instruction sheet provided with your refrigerator. ■ Use a vacuum cleaner with a soft brush to close as window sprays, scouring cleansers, flammable fluids, cleaning waxes, concentrated detergents, bleaches or cleansers containing petroleum products on plastic parts, interior and door liners or gaskets. ...

Use & Care Guide
Page 15
...at least one day ahead of time. ■ Disconnect the water line from the refrigerator and pack all removable parts, wrap them well, and tape them open far enough for air to get to ... the Doors" or "Door Removal, Leveling and Alignment." 9. Tape rubber or wood blocks to the tops of the refrigerator so it , and dry well. 5. Also, if your model, raise the wire shutoff arm to OFF (up... ice maker at least one day ahead of time. ■ When the last load of the refrigerator. If your refrigerator has an automatic ice maker: ■ Turn off . 3. Moving When you are LEDs that ...
...at least one day ahead of time. ■ Disconnect the water line from the refrigerator and pack all removable parts, wrap them well, and tape them open far enough for air to get to ... the Doors" or "Door Removal, Leveling and Alignment." 9. Tape rubber or wood blocks to the tops of the refrigerator so it , and dry well. 5. Also, if your model, raise the wire shutoff arm to OFF (up... ice maker at least one day ahead of time. ■ When the last load of the refrigerator. If your refrigerator has an automatic ice maker: ■ Turn off . 3. Moving When you are LEDs that ...

