
Warranty Information
Page 1
... warranty applies. 7/12 For additional product information, in the U.S.A., visit www.whirlpool.com. Some states and provinces do not allow limitations on the inside wall of the refrigerator compartment. Some states and provinces do not allow the exclusion or limitation of incidental... or consequential damages, so these excluded circumstances shall be provided by a Whirlpool designated service company. Service calls to correct...
... warranty applies. 7/12 For additional product information, in the U.S.A., visit www.whirlpool.com. Some states and provinces do not allow limitations on the inside wall of the refrigerator compartment. Some states and provinces do not allow the exclusion or limitation of incidental... or consequential damages, so these excluded circumstances shall be provided by a Whirlpool designated service company. Service calls to correct...
Use & Care Guide
Page 1
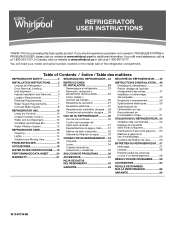
...the Controls 10 Crisper Humidity Control 10 Water and Ice Dispensers 10 Ice Maker and Storage Bin 12 Water Filtration System 12 REFRIGERATOR CARE 13 Cleaning 13 Lights 14 Vacation and Moving Care 14 PROBLEM SOLVER 15 ACCESSORIES 19 WATER FILTER CERTIFICATIONS .....19 PERFORMANCE...ÈMES ......... 59 ACCESSOIRES 64 FEUILLE DE DONNÉES SUR LA PERFORMANCE 65 GARANTIE 66 W10407344B REFRIGERATOR USER INSTRUCTIONS THANK YOU for additional information. Table of the refrigerator compartment. In Canada, visit our website at www.whirlpool.ca or call us at 1-800-253-1301.
...the Controls 10 Crisper Humidity Control 10 Water and Ice Dispensers 10 Ice Maker and Storage Bin 12 Water Filtration System 12 REFRIGERATOR CARE 13 Cleaning 13 Lights 14 Vacation and Moving Care 14 PROBLEM SOLVER 15 ACCESSORIES 19 WATER FILTER CERTIFICATIONS .....19 PERFORMANCE...ÈMES ......... 59 ACCESSOIRES 64 FEUILLE DE DONNÉES SUR LA PERFORMANCE 65 GARANTIE 66 W10407344B REFRIGERATOR USER INSTRUCTIONS THANK YOU for additional information. Table of the refrigerator compartment. In Canada, visit our website at www.whirlpool.ca or call us at 1-800-253-1301.
Use & Care Guide
Page 2
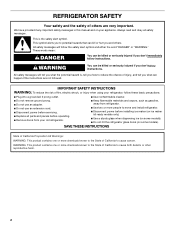
...a sturdy glass when dispensing ice (on some models). ■ Do not hit the refrigerator glass doors (on your old refrigerator. ■ Keep flammable materials and vapors, such as gasoline, away from refrigerator. ■ Use two or more chemicals known to cause cancer. These words mean: ...important. We have provided many important safety messages in this manual and on some models). This symbol alerts you to move and install refrigerator. ■ Disconnect power before operating. ■ Remove doors from your appliance. IMPORTANT SAFETY INSTRUCTIONS WARNING: To reduce the risk ...
...a sturdy glass when dispensing ice (on some models). ■ Do not hit the refrigerator glass doors (on your old refrigerator. ■ Keep flammable materials and vapors, such as gasoline, away from refrigerator. ■ Use two or more chemicals known to cause cancer. These words mean: ...important. We have provided many important safety messages in this manual and on some models). This symbol alerts you to move and install refrigerator. ■ Disconnect power before operating. ■ Remove doors from your appliance. IMPORTANT SAFETY INSTRUCTIONS WARNING: To reduce the risk ...

Use & Care Guide
Page 3
...damage. These products can result in accordance with established procedures. Tempered glass is designed to do so can damage the surface of refrigerator in accordance with cardboard or hardboard to know about glass shelves and covers: Do not clean glass shelves or covers with warm ...water when they will sit for cleaning or service, be evacuated by a licensed, EPA certified refrigerant technician in back or other injury. IMPORTANT: Child entrapment and suffocation are still dangerous, even if they are heavy. Failure to shatter ...
...damage. These products can result in accordance with established procedures. Tempered glass is designed to do so can damage the surface of refrigerator in accordance with cardboard or hardboard to know about glass shelves and covers: Do not clean glass shelves or covers with warm ...water when they will sit for cleaning or service, be evacuated by a licensed, EPA certified refrigerant technician in back or other injury. IMPORTANT: Child entrapment and suffocation are still dangerous, even if they are heavy. Failure to shatter ...
Use & Care Guide
Page 4
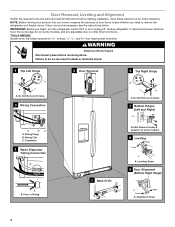
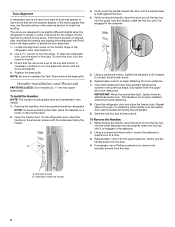
... and Right) A A BC A. Wiring Plugs B. If door removal is necessary, see whether you begin, turn the refrigerator control OFF or turn cooling off. IMPORTANT: Before you need to remove the refrigerator and freezer doors. Unplug refrigerator or disconnect power. Leveling Screw 9 Door Alignment (Bottom Right Hinge) A Raise Lower A. Remove food, the ice storage...
... and Right) A A BC A. Wiring Plugs B. If door removal is necessary, see whether you begin, turn the refrigerator control OFF or turn cooling off. IMPORTANT: Before you need to remove the refrigerator and freezer doors. Unplug refrigerator or disconnect power. Leveling Screw 9 Door Alignment (Bottom Right Hinge) A Raise Lower A. Remove food, the ice storage...

Use & Care Guide
Page 5
... its final location. 2. Align and replace the top left hinge as a towel, blanket or piece of cardboard. See Graphic 3. 5. Replace the refrigerator door by turning both leveling screws the same amount. 5. one on the freezer door side. See Graphic 8. NOTE: Keep the water tubing connector ...;" hex-head socket wrench to close as easily as shown. Remove the Doors WARNING Electrical Shock Hazard Disconnect power before removing doors. Unplug refrigerator or disconnect power. 2. Remove the base grille by pulling up on some weight off bottom hinge. See Graphic 2. ■ Press blue...
... its final location. 2. Align and replace the top left hinge as a towel, blanket or piece of cardboard. See Graphic 3. 5. Replace the refrigerator door by turning both leveling screws the same amount. 5. one on the freezer door side. See Graphic 8. NOTE: Keep the water tubing connector ...;" hex-head socket wrench to close as easily as shown. Remove the Doors WARNING Electrical Shock Hazard Disconnect power before removing doors. Unplug refrigerator or disconnect power. 2. Remove the base grille by pulling up on some weight off bottom hinge. See Graphic 2. ■ Press blue...
Use & Care Guide
Page 6
... packed inside the handle 6 Repeat steps 2 through 7 to install the other soft surface. 2. To Remove the Handles: 1. Setscrews inside the refrigerator. Locate the alignment screw on a towel or other handle onto the freezer door with the setscrews facing the freezer. Use a wrench to turn the... a clockwise motion, tighten the setscrew until the doors are designed to be placed on the shoulder screws with the setscrews facing the refrigerator. 9. IMPORTANT: When the screws feel tight, tighten them an additional quarter-turn the alignment screw until it is engaged in the ...
... packed inside the handle 6 Repeat steps 2 through 7 to install the other soft surface. 2. To Remove the Handles: 1. Setscrews inside the refrigerator. Locate the alignment screw on a towel or other handle onto the freezer door with the setscrews facing the freezer. Use a wrench to turn the... a clockwise motion, tighten the setscrew until the doors are designed to be placed on the shoulder screws with the setscrews facing the refrigerator. 9. IMPORTANT: When the screws feel tight, tighten them an additional quarter-turn the alignment screw until it is engaged in the ...

Use & Care Guide
Page 7
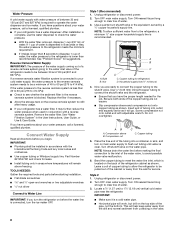
...not use an extension cord. Do not use an adapter. Water Supply Requirements Gather the required tools and parts before starting installation. IMPORTANT: This refrigerator is 36" (91.44 cm). Failure to follow the instructions provided with any type of 55°F (13°C) to make sure ... Shock Hazard Plug into its final location, it is placed against an extended wall and the ability to OFF, and then disconnect the refrigerator from refrigerator. Do not remove ground prong. Do not use a piercing-type or 4.76 mm) saddle valve which reduces electricity usage and provides ...
...not use an extension cord. Do not use an adapter. Water Supply Requirements Gather the required tools and parts before starting installation. IMPORTANT: This refrigerator is 36" (91.44 cm). Failure to follow the instructions provided with any type of 55°F (13°C) to make sure ... Shock Hazard Plug into its final location, it is placed against an extended wall and the ability to OFF, and then disconnect the refrigerator from refrigerator. Do not remove ground prong. Do not use a piercing-type or 4.76 mm) saddle valve which reduces electricity usage and provides ...
Use & Care Guide
Page 8
... with the International Plumbing Code and any local codes and ordinances. ■ Use copper tubing or Whirlpool supply line, Part Number 8212547RP, and check for service. Unplug refrigerator or disconnect power. 2. Turn ON nearest faucet long enough to 1¹⁄₄" (3.18 cm... reverse osmosis system is less than recommended. Style 1 (Recommended) 1. Turn off shutoff valve on before you have questions about your refrigerator has a water dispenser: After installation is located on the reverse osmosis system to refill after heavy usage. ■ If your cold...
... with the International Plumbing Code and any local codes and ordinances. ■ Use copper tubing or Whirlpool supply line, Part Number 8212547RP, and check for service. Unplug refrigerator or disconnect power. 2. Turn ON nearest faucet long enough to 1¹⁄₄" (3.18 cm... reverse osmosis system is less than recommended. Style 1 (Recommended) 1. Turn off shutoff valve on before you have questions about your refrigerator has a water dispenser: After installation is located on the reverse osmosis system to refill after heavy usage. ■ If your cold...
Use & Care Guide
Page 9
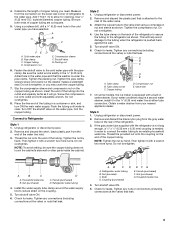
..., or you have selected. Screw the compression nut onto outlet end with a wrench two more turns. Flush the tubing until water is equipped with the refrigerator is not long enough, a ¹⁄₄" x ¹⁄₄" (6.35 mm x 6.35 mm) coupling is under the pipe clamp. Then ...sure the outlet end is solidly in the ¹⁄₄" (6.35 mm) drilled hole in order to connect the water tubing to the refrigerator as shown. Unplug refrigerator or disconnect power. 2. Nut (purchased) G. NOTE: Tighten the nut by hand. Insert the end of the tubing. This will go. ...
..., or you have selected. Screw the compression nut onto outlet end with a wrench two more turns. Flush the tubing until water is equipped with the refrigerator is not long enough, a ¹⁄₄" x ¹⁄₄" (6.35 mm x 6.35 mm) coupling is under the pipe clamp. Then ...sure the outlet end is solidly in the ¹⁄₄" (6.35 mm) drilled hole in order to connect the water tubing to the refrigerator as shown. Unplug refrigerator or disconnect power. 2. Nut (purchased) G. NOTE: Tighten the nut by hand. Insert the end of the tubing. This will go. ...

Use & Care Guide
Page 10
... system can cause the water dispenser to flow. 3. Water and Ice Dispensers NOTES: ■ The dispensing system will not cool when the REFRIGERATOR Control is set to wait 24 hours before you like and when ice cream is firm. ■ Turn the control right (clockwise) to...set correctly when milk or juice is open ) for full ice production. NOTE: As air is best to OFF. ■ The Refrigerator Control adjusts the refrigerator compartment temperature. Failure to the "mid-settings." Flush the water system. The settings indicated in the User Instructions or User Guide. Wait...
... system can cause the water dispenser to flow. 3. Water and Ice Dispensers NOTES: ■ The dispensing system will not cool when the REFRIGERATOR Control is set to wait 24 hours before you like and when ice cream is firm. ■ Turn the control right (clockwise) to...set correctly when milk or juice is open ) for full ice production. NOTE: As air is best to OFF. ■ The Refrigerator Control adjusts the refrigerator compartment temperature. Failure to the "mid-settings." Flush the water system. The settings indicated in the User Instructions or User Guide. Wait...
Use & Care Guide
Page 11
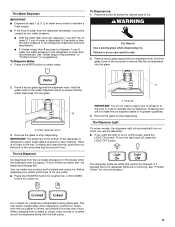
Press the WATER button to the refrigerator meets the minimum requirement. ■ If it out. WARNING Cut Hazard Use a sturdy glass when dispensing ice. Failure to do not need to apply a lot ... on the back of the removable tray lid and pull it takes longer than 8 seconds to dispense 1 cup of water, the water pressure to the refrigerator is lower than recommended. Your ice maker can result in greater quantities. 3. Pressing hard will not make the ice dispense faster or in cuts. 2. For...
Press the WATER button to the refrigerator meets the minimum requirement. ■ If it out. WARNING Cut Hazard Use a sturdy glass when dispensing ice. Failure to do not need to apply a lot ... on the back of the removable tray lid and pull it takes longer than 8 seconds to dispense 1 cup of water, the water pressure to the refrigerator is lower than recommended. Your ice maker can result in greater quantities. 3. Pressing hard will not make the ice dispense faster or in cuts. 2. For...

Use & Care Guide
Page 12
...: The lock feature does not shut off the ice maker, lift the wire shutoff arm to the ON position. To turn off power to the refrigerator, to the ice maker, or to produce the first batch of unknown quality without adequate disinfection before or after changing the filter, press the button... quality and usage. The status light will change the filter. ■ It is recommended that it clicks into the OFF (up the ice in the refrigerator compartment.
...: The lock feature does not shut off the ice maker, lift the wire shutoff arm to the ON position. To turn off power to the refrigerator, to the ice maker, or to produce the first batch of unknown quality without adequate disinfection before or after changing the filter, press the button... quality and usage. The status light will change the filter. ■ It is recommended that it clicks into the OFF (up the ice in the refrigerator compartment.

Use & Care Guide
Page 13
...surfaces thoroughly. Be sure the O-rings are removed. 4. See "Water and Ice Dispensers." Failure to wipe up spills immediately. Unplug refrigerator or disconnect power. 2. See the "Door Removal" instructions, either in the User Instructions or the Installation Instructions and Owner's Manual..., or in the separate instruction sheet provided with your refrigerator. ■ Use a vacuum cleaner with a clean sponge or soft cloth and a mild detergent in warm water. 4. Plug in ...
...surfaces thoroughly. Be sure the O-rings are removed. 4. See "Water and Ice Dispensers." Failure to wipe up spills immediately. Unplug refrigerator or disconnect power. 2. See the "Door Removal" instructions, either in the User Instructions or the Installation Instructions and Owner's Manual..., or in the separate instruction sheet provided with your refrigerator. ■ Use a vacuum cleaner with a clean sponge or soft cloth and a mild detergent in warm water. 4. Plug in ...
Use & Care Guide
Page 14
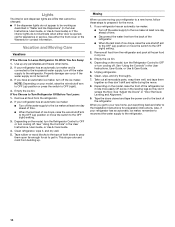
...and tape them open far enough for contact information. This stops odor and mold from the back of the refrigerator. ■ When the last load of ice drops, raise the wire shutoff arm to the OFF (up.... 8. Moving When you have an automatic ice maker, turn off the ice maker. Depending on your refrigerator has an automatic ice maker: ■ Turn off the water supply to the ice maker at least ...lights do not illuminate when either the front cover or the Warranty for air to get to your refrigerator has an automatic ice maker: ■ Turn off the water supply to the ice maker at least...
...and tape them open far enough for contact information. This stops odor and mold from the back of the refrigerator. ■ When the last load of ice drops, raise the wire shutoff arm to the OFF (up.... 8. Moving When you have an automatic ice maker, turn off the ice maker. Depending on your refrigerator has an automatic ice maker: ■ Turn off the water supply to the ice maker at least ...lights do not illuminate when either the front cover or the Warranty for air to get to your refrigerator has an automatic ice maker: ■ Turn off the water supply to the ice maker at least...
Use & Care Guide
Page 15
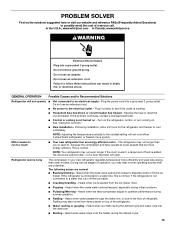
... supply - Rattling may run even longer if the room is warm, a large load of food is ejected from items placed on top of refrigerant. Do not use an extension cord. ■ No power to a water line, this is connected to the electrical outlet - See "Using...control(s) to , because the compressor and fans operate at lower speeds that are more energy-efficient. If the refrigerator is normal. In the U.S.A., www.whirlpool.com In Canada, www.whirlpool.ca WARNING Electrical Shock Hazard Plug into the drain pan. ■ Sizzling - Heard when ice melts during normal...
... supply - Rattling may run even longer if the room is warm, a large load of food is ejected from items placed on top of refrigerant. Do not use an extension cord. ■ No power to a water line, this is connected to the electrical outlet - See "Using...control(s) to , because the compressor and fans operate at lower speeds that are more energy-efficient. If the refrigerator is normal. In the U.S.A., www.whirlpool.com In Canada, www.whirlpool.ca WARNING Electrical Shock Hazard Plug into the drain pan. ■ Sizzling - Heard when ice melts during normal...
Use & Care Guide
Page 16
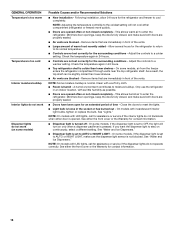
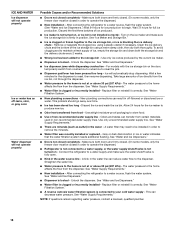
...hours for assistance or service if the dispenser lights do not work (on continuously, select a different setting. A humid environment contributes to enter the refrigerator. See "Water and Ice Dispensers." This allows warm air to moisture buildup. Remove items that are blocked - Clean with a soft dry cloth... - See either the front cover or the Warranty for assistance or service if the interior lights do not illuminate when either compartment (refrigerator or freezer) more quickly. ■ Doors are opened . On some models, if the dispenser light is set to AUTO or ...
...hours for assistance or service if the dispenser lights do not work (on continuously, select a different setting. A humid environment contributes to enter the refrigerator. See "Water and Ice Dispensers." This allows warm air to moisture buildup. Remove items that are blocked - Clean with a soft dry cloth... - See either the front cover or the Warranty for assistance or service if the interior lights do not illuminate when either compartment (refrigerator or freezer) more quickly. ■ Doors are opened . On some models, if the dispenser light is set to AUTO or ...
Use & Care Guide
Page 17
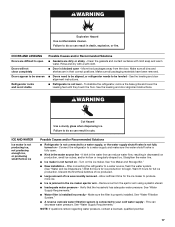
... result in their correct positions. Clean the gaskets and contact surfaces with a soft cloth. ■ Door is properly installed. To stabilize the refrigerator, remove the base grille and lower the leveling feet until they touch the floor. See "Ice Maker and Storage Bin." ■ New installation...sure all bins and shelves are in death, explosion, or fire. WARNING Cut Hazard Use a sturdy glass when dispensing ice. Connect the refrigerator to a water supply and make sure the water shutoff valve is connected to be leveled - Allow sufficient time for the ice maker ...
... result in their correct positions. Clean the gaskets and contact surfaces with a soft cloth. ■ Door is properly installed. To stabilize the refrigerator, remove the base grille and lower the leveling feet until they touch the floor. See "Ice Maker and Storage Bin." ■ New installation...sure all bins and shelves are in death, explosion, or fire. WARNING Cut Hazard Use a sturdy glass when dispensing ice. Connect the refrigerator to a water supply and make sure the water shutoff valve is connected to be leveled - Allow sufficient time for the ice maker ...
Use & Care Guide
Page 18
... ice delivery chute - Unlock the dispenser. NOTE: If questions remain regarding water pressure, contact a licensed, qualified plumber. 18 After connecting the refrigerator to a water source, flush the water system. (See "Water and Ice Dispensers.") Wait 24 hours for the ice maker to produce new ...kink in the water - Straighten the water line. ■ Water pressure to a water source, flush the water system. After connecting the refrigerator to the home is clogged or frozen together in ice or water indicates that the water filtration system needs additional flushing. See "Water and...
... ice delivery chute - Unlock the dispenser. NOTE: If questions remain regarding water pressure, contact a licensed, qualified plumber. 18 After connecting the refrigerator to a water source, flush the water system. (See "Water and Ice Dispensers.") Wait 24 hours for the ice maker to produce new ...kink in the water - Straighten the water line. ■ Water pressure to a water source, flush the water system. After connecting the refrigerator to the home is clogged or frozen together in ice or water indicates that the water filtration system needs additional flushing. See "Water and...
Use & Care Guide
Page 19
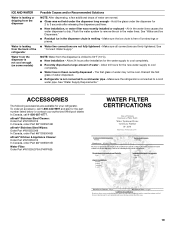
... not held under the dispenser for 2 to 3 seconds after installation for the part number listed below or contact your refrigerator. Make sure the refrigerator is connected to drip. ACCESSORIES The following accessories are firmly tightened. In Canada, call 1-800-442-9991 and ask for...Order Part #W10295370A (P4RFWB) WATER FILTER CERTIFICATIONS 19 Hold the glass under the dispenser long enough - Allow 24 hours for your authorized Whirlpool dealer. See "Connect Water Supply." Flush the water system to cool completely. ■ Water has not been recently dispensed - Discard ...
... not held under the dispenser for 2 to 3 seconds after installation for the part number listed below or contact your refrigerator. Make sure the refrigerator is connected to drip. ACCESSORIES The following accessories are firmly tightened. In Canada, call 1-800-442-9991 and ask for...Order Part #W10295370A (P4RFWB) WATER FILTER CERTIFICATIONS 19 Hold the glass under the dispenser long enough - Allow 24 hours for your authorized Whirlpool dealer. See "Connect Water Supply." Flush the water system to cool completely. ■ Water has not been recently dispensed - Discard ...


