Whirlpool EL88TRRW Support and Manuals
Get Help and Manuals for this Whirlpool item
View All Support Options Below
Free Whirlpool EL88TRRW manuals!
Problems with Whirlpool EL88TRRW?
Ask a Question
Free Whirlpool EL88TRRW manuals!
Problems with Whirlpool EL88TRRW?
Ask a Question
Popular Whirlpool EL88TRRW Manual Pages
Owners Manual - Page 3

... known to the State of California to move and install refrigerator.
■ Replace all safety messages.
Junked or abandoned refrigerators are not problems of the past. Always read and obey all parts and panels before servicing.
■ Keep flammable materials and vapors, such as gasoline, away from your old refrigerator or freezer: ■ Take off the doors.
■...
Owners Manual - Page 5

..., or electrical shock. NOTE: Provide additional support for the top hinge as shown and then disconnect the refrigerator from the cabinet. Remove the parts for the door while the hinges are finished, reconnect the refrigerator to the electrical source and reset the Temperature Control to follow these instructions can result in Top Hinge graphic.
5. See...
Owners Manual - Page 6

... not remove ground prong. Grommet B. Door Stop C. Tighten all removable door parts to door and food to
refrigerator. Do not use an extension cord. Door Stop Screws B. Replace Door and Hinges
1. Replace the parts for the door while the hinges are working.
2.
Assemble the parts of the top hinge as shown and tighten screws. Adjust the...
Owners Manual - Page 7
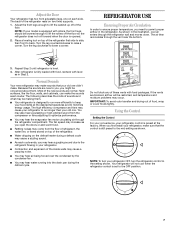
... first install your refrigerator, make sure that your model is set to the setting shown. When you open the doors or add warm food.
■ Rattling noises may come from the compressor or fans adjusting to lift the rollers off of these vents with rollers, the front legs should be restricted, and temperature and moisture problems...
Owners Manual - Page 8

... Meat Drawer (on some models)
You can be placed on the outside support is best to a colder (higher) than the times given, freeze the meat. NOTE: The meat drawer cover has one setting at a time and wait 24 hours between HIGH and LOW. This reduces the time the refrigerator door is open ) lets moist...
Owners Manual - Page 9

... bulb with a mixture of water). 4. Clean the refrigerator about once a month to keep your refrigerator. Wipe up . Remove the light shield. Remove the bin by sliding it in warm water.
Hand wash, rinse, and dry removable parts and interior
surfaces thoroughly. Replace the removable parts. 5. Hand wash, rinse, and dry it back into place. 7. Changing...
Owners Manual - Page 10

...dry thoroughly. 6. Replace the fuse or reset the circuit.
■ Is the Refrigerator Control turned to the refrigerator
cabinet.
Screw in the socket or burned out? Your refrigerator will regularly run ... the refrigerator off before you leave, follow these instructions can result in order to avoid the cost of both doors to prepare it , and dry well. 4. TROUBLESHOOTING
Try the...
Owners Manual - Page 11

... crisper cover, pans, shelves, bins, or baskets out of food just been added to the normal temperature.
■ Is the control set correctly for the refrigerator to return to the refrigerator? See "Refrigerator Features" for more tightly and take several hours for the surrounding conditions? Under warmer conditions, expect it is easy to find...
Owners Manual - Page 12

..., repair parts distributors, and service companies. ASSISTANCE OR SERVICE
Before calling for assistance or service, please check "Troubleshooting." In the U.S.A.
Whirlpool designated service technicians are made with :
■ Features and specifications on our full line of a service call Whirlpool® Appliances toll free: 1-800-253-1301.
For assistance, installation or service call...
Owners Manual - Page 13

... rights, and you ever need to know your complete model number and serial number.
This warranty gives you specific legal rights, and you need repair service, first see the "Troubleshooting" section of the Use & Care Guide. Replacement parts or repair labor on the product. Service must provide proof of purchase or installation date for other rights that vary from state to...
Installation Instructions - Page 2

...* TRIM KIT SAFETY 2
INSTALLATION REQUIREMENTS 3 Plan the Installation 3 Opening Requirements 3 Tools Needed 3 Parts Supplied 3 Electrical Requirements 4
ASSEMBLY INSTRUCTIONS 4
Assemble the Top Grille 4 Attach the Side Trim Extrusions 4
INSTALLATION INSTRUCTIONS 5 Install the Top Grille and Trim Assembly 5 Place and Align Refrigerator and Freezer 5 Move Refrigerator and Freezer to...
Installation Instructions - Page 5
...Freezer or Refrigerator: Your freezer and refrigerator are not provided with the trim kit.
2. Always pull the appliance straight out when moving the appliance for cleaning or service, be...bit.
7.
Make sure the trim does not twist.
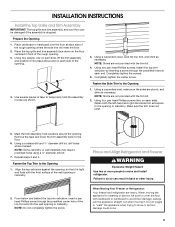
5. When moving it is dropped. INSTALLATION INSTRUCTIONS
Install the Top Grille and Trim Assembly
IMPORTANT: The top grille and trim assembly, and your...
Installation Instructions - Page 6

...service, be lowered enough to lift the rollers off of the floor to lift the cabinet up off of the opening far enough to connect the power cord to move and install refrigerator. NOTE: Provide additional support...until both the freezer and refrigerator are working.
6 Adjust the front leveler legs enough to ensure that are heavy. NOTE: If your model is flush with rollers, the...
Installation Instructions 1 - Page 1

CERTIFICATE OF CONFORMITY Under the Consumer Product Safety Improvement Act - 2008
Section 14 (a) (1) Refrigerator Safety Act - 1956
CFR title 16 Part 1750
PRODUCT CERTIFIED: Refrigerator Types R17, R18, R47, RFA17, RA18, RFA47, RP18, RB18. The following third party listing as identified by Whirlpool as follows: DATE OF MANUFACTURE: See Carton Label DATE OF TEST(S): 06...
Dimension Guide - Page 1

... without notice. When you do not install the refrigerator near an oven, radiator, or other heat source, nor in a location where the temperature will fall below 55°F (13°C). PRODUCT DIMENSIONS
C
B not incl. Depth - Instructions packed with another refrigerator or freezer. W10326802A 7/27/12
All Refrigerator
PRODUCT MODEL NUMBERS
EL88TRRW
Electrical: A 115-volt, 60-Hz, AC...
Whirlpool EL88TRRW Reviews
We have not received any reviews for Whirlpool yet.