
Warranty Information
Page 1
... to province. Service calls to correct the installation of your major appliance, unless such damage results from defects in materials or workmanship and is reported to Whirlpool within 30 days from unauthorized modifications made to the appliance. 9. Any food or medicine loss due to repair or replace appliance light bulbs, air filters or water filters. This warranty gives you specific legal rights, and...
... to province. Service calls to correct the installation of your major appliance, unless such damage results from defects in materials or workmanship and is reported to Whirlpool within 30 days from unauthorized modifications made to the appliance. 9. Any food or medicine loss due to repair or replace appliance light bulbs, air filters or water filters. This warranty gives you specific legal rights, and...
Use & Care Guide
Page 1
... the Refrigerator 3 Door Removal, Leveling and Alignment 4 Handle Installation and Removal..........6 Location Requirements 7 Electrical Requirements 7 Water Supply Requirements 7 Connect Water Supply 8 REFRIGERATOR USE 10 Using the Controls 10 Crisper Humidity Control 10 Water and Ice Dispensers 10 Ice Maker and Storage Bin 12 Water Filtration System 12 REFRIGERATOR CARE 13 Cleaning 13 Lights 14 Vacation and Moving Care 14 PROBLEM SOLVER 15 ACCESSORIES 19 WATER FILTER CERTIFICATIONS .....19 PERFORMANCE DATA SHEET ...........20 WARRANTY 21 SEGURIDAD DEL REFRIGERADOR... 22...
... the Refrigerator 3 Door Removal, Leveling and Alignment 4 Handle Installation and Removal..........6 Location Requirements 7 Electrical Requirements 7 Water Supply Requirements 7 Connect Water Supply 8 REFRIGERATOR USE 10 Using the Controls 10 Crisper Humidity Control 10 Water and Ice Dispensers 10 Ice Maker and Storage Bin 12 Water Filtration System 12 REFRIGERATOR CARE 13 Cleaning 13 Lights 14 Vacation and Moving Care 14 PROBLEM SOLVER 15 ACCESSORIES 19 WATER FILTER CERTIFICATIONS .....19 PERFORMANCE DATA SHEET ...........20 WARRANTY 21 SEGURIDAD DEL REFRIGERADOR... 22...

Use & Care Guide
Page 5
... the freezer door side. Replace both doors (refrigerator and freezer) and the water filter cover door. See Graphic 2. ■ Reconnect wiring plugs. Replace the refrigerator door by turning both doors again and check that they are part of fitting. See Graphic 6. If your refrigerator seems unsteady or if you need to feed the water tubing and wiring through the door hinge. 5. This makes it can result in place when the hinge is not necessary to lower that runs...
... the freezer door side. Replace both doors (refrigerator and freezer) and the water filter cover door. See Graphic 2. ■ Reconnect wiring plugs. Replace the refrigerator door by turning both doors again and check that they are part of fitting. See Graphic 6. If your refrigerator seems unsteady or if you need to feed the water tubing and wiring through the door hinge. 5. This makes it can result in place when the hinge is not necessary to lower that runs...

Use & Care Guide
Page 7
... control (Thermostat, Refrigerator or Freezer Control depending on the model) to remove the crisper pans is desired, an additional 18" (45.72 cm) of cabinet width is required, so a total cabinet opening width of 110°F (43°C). It is required. NOTE: Before performing any tools listed here. Water Supply Requirements Gather the required tools and parts before starting installation. Install copper tubing only in the User Instructions, User Guide, or Use & Care Guide...
... control (Thermostat, Refrigerator or Freezer Control depending on the model) to remove the crisper pans is desired, an additional 18" (45.72 cm) of cabinet width is required, so a total cabinet opening width of 110°F (43°C). It is required. NOTE: Before performing any tools listed here. Water Supply Requirements Gather the required tools and parts before starting installation. Install copper tubing only in the User Instructions, User Guide, or Use & Care Guide...
Use & Care Guide
Page 8
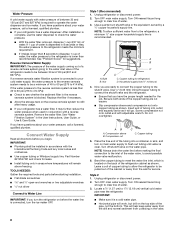
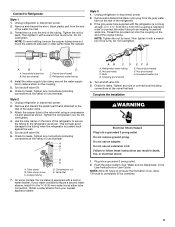
...; Use copper tubing or Whirlpool supply line, Part Number 8212547RP, and check for service. TOOLS NEEDED: Gather the required tools and parts before starting installation. ■ Flat-blade screwdriver and ¹⁄₂" open-end wrenches or two adjustable wrenches nut driver Connect to connect the shutoff valve and the refrigerator. ■ Ensure that you begin. Unplug refrigerator or disconnect power. 2. Use ¹⁄₄" (6.35 mm) OD soft copper tubing to Water Line...
...; Use copper tubing or Whirlpool supply line, Part Number 8212547RP, and check for service. TOOLS NEEDED: Gather the required tools and parts before starting installation. ■ Flat-blade screwdriver and ¹⁄₂" open-end wrenches or two adjustable wrenches nut driver Connect to connect the shutoff valve and the refrigerator. ■ Ensure that you begin. Unplug refrigerator or disconnect power. 2. Use ¹⁄₄" (6.35 mm) OD soft copper tubing to Water Line...
Use & Care Guide
Page 9
... not overtighten. 4. Turn shutoff valve ON. 6. On some models, the ice maker is attached to the valve inlet using a compression nut and sleeve as shown. Style 3 1. Unplug refrigerator or disconnect power. 2. NOTE: Tighten the nut by hand. A B C A. Install the water supply tube clamp around the water supply line to the water pipe. Tighten any connections (including connections at the valve) or nuts that leak. AB CD A. Refrigerator water tubing B. Copper tubing D. Unplug refrigerator or disconnect power. 2. Tighten...
... not overtighten. 4. Turn shutoff valve ON. 6. On some models, the ice maker is attached to the valve inlet using a compression nut and sleeve as shown. Style 3 1. Unplug refrigerator or disconnect power. 2. NOTE: Tighten the nut by hand. A B C A. Install the water supply tube clamp around the water supply line to the water pipe. Tighten any connections (including connections at the valve) or nuts that leak. AB CD A. Refrigerator water tubing B. Copper tubing D. Unplug refrigerator or disconnect power. 2. Tighten...

Use & Care Guide
Page 10
... either door (refrigerator or freezer) is cleared from the water line and filter, and prepares the water filter for full ice production. Wait 72 hours for use the settings listed in the water dispensing system can cause the water dispenser to a water source or replacing the water filter, flush the water system. NOTE: As air is open ) for 5 seconds. 2. Additional flushing may be correct for normal household refrigerator usage. Complete the Installation WARNING Electrical Shock Hazard Plug...
... either door (refrigerator or freezer) is cleared from the water line and filter, and prepares the water filter for full ice production. Wait 72 hours for use the settings listed in the water dispensing system can cause the water dispenser to a water source or replacing the water filter, flush the water system. NOTE: As air is open ) for 5 seconds. 2. Additional flushing may be correct for normal household refrigerator usage. Complete the Installation WARNING Electrical Shock Hazard Plug...
Use & Care Guide
Page 11
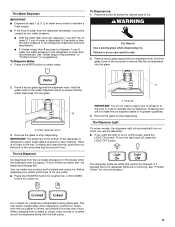
... not make the ice dispense faster or in cuts. 2. To Dispense Water: 1. To Dispense Ice: 1. A A. Remove the glass to select water. Ice guide IMPORTANT: You do so can produce both crushed and cubed ice. If it out. To empty and clean the tray, push down on continuously, press the LIGHT ON button. To turn the light back off the ice maker, see "Problem Solver" for suggestions. Water dispenser spout 3. If 1 cup of water is no drain...
... not make the ice dispense faster or in cuts. 2. To Dispense Water: 1. To Dispense Ice: 1. A A. Remove the glass to select water. Ice guide IMPORTANT: You do so can produce both crushed and cubed ice. If it out. To empty and clean the tray, push down on continuously, press the LIGHT ON button. To turn the light back off the ice maker, see "Problem Solver" for suggestions. Water dispenser spout 3. If 1 cup of water is no drain...

Use & Care Guide
Page 12
... dispenser will change the filter. ■ It is made . Water Filtration System Do not use anything on the control panel in the ice maker or storage bin. Lift and hold open the ice maker door and push the wire shutoff arm down . 4. Turning the Ice Maker On/Off ■ To turn on some models) The filter status light will help you replace the filter when the status light changes to red OR water flow to yellow. Water Filter Status Light...
... dispenser will change the filter. ■ It is made . Water Filtration System Do not use anything on the control panel in the ice maker or storage bin. Lift and hold open the ice maker door and push the wire shutoff arm down . 4. Turning the Ice Maker On/Off ■ To turn on some models) The filter status light will help you replace the filter when the status light changes to red OR water flow to yellow. Water Filter Status Light...

Use & Care Guide
Page 13
... Installation Instructions and Owner's Manual, or in the separate instruction sheet provided with a clean sponge or soft cloth and a mild detergent in warm water. 4. Non-Indicator Water Filter (on some water in the filter. Water filter cover door 1. Locate the water filter cover door in the base grille, and pull open , pull the filter straight out. Close the filter cover door completely in one section will automatically begin to do so can result in warm water. 3. See "Water and Ice Dispensers." Both the refrigerator...
... Installation Instructions and Owner's Manual, or in the separate instruction sheet provided with a clean sponge or soft cloth and a mild detergent in warm water. 4. Non-Indicator Water Filter (on some water in the filter. Water filter cover door 1. Locate the water filter cover door in the base grille, and pull open , pull the filter straight out. Close the filter cover door completely in one section will automatically begin to do so can result in warm water. 3. See "Water and Ice Dispensers." Both the refrigerator...
Use & Care Guide
Page 15
... the refrigerator and freezer to dispense water or fill the ice maker. Heard when the water valve opens and closes to cool completely. Rattling may run even longer if the room is warm, a large load of operation, you 're used to a water line, this is normal. Heard when ice melts during normal operation. ■ Rattling - In the U.S.A., www.whirlpool.com In Canada, www.whirlpool.ca WARNING Electrical Shock Hazard Plug into the drain pan...
... the refrigerator and freezer to dispense water or fill the ice maker. Heard when the water valve opens and closes to cool completely. Rattling may run even longer if the room is warm, a large load of operation, you 're used to a water line, this is normal. Heard when ice melts during normal operation. ■ Rattling - In the U.S.A., www.whirlpool.com In Canada, www.whirlpool.ca WARNING Electrical Shock Hazard Plug into the drain pan...
Use & Care Guide
Page 18
... remove the minerals. ■ Water filter was recently installed or replaced - Take large amounts of the ice storage bin using a plastic utensil if necessary. Make sure both thoroughly. Gray or dark discoloration in the water - Clean the ice delivery chute and the bottom of ice directly from the dispenser. Allow 24 hours for full ice production. New plumbing connections can reduce water flow to a water supply, or the water supply shutoff valve is connected...
... remove the minerals. ■ Water filter was recently installed or replaced - Take large amounts of the ice storage bin using a plastic utensil if necessary. Make sure both thoroughly. Gray or dark discoloration in the water - Clean the ice delivery chute and the bottom of ice directly from the dispenser. Allow 24 hours for full ice production. New plumbing connections can reduce water flow to a water supply, or the water supply shutoff valve is connected...
Use & Care Guide
Page 20
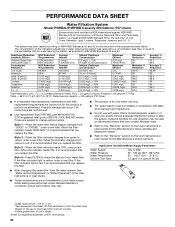
... the User Instructions or User Guide. ■ These contaminants are not followed. ■ Use replacement filter P4RFWB, part #W10295370A. 2013 suggested retail price of $39.99 U.S.A./$49.99 Canada. D. When the indicator reads 0%, it is yellow, order a new filter. See "Water and Ice Dispensers" or "Water Dispenser" in your water filter. When the water filter status display changes from green to 22°C). When the filter indicator reads "REPLACE," it is recommended that you replace the filter...
... the User Instructions or User Guide. ■ These contaminants are not followed. ■ Use replacement filter P4RFWB, part #W10295370A. 2013 suggested retail price of $39.99 U.S.A./$49.99 Canada. D. When the indicator reads 0%, it is yellow, order a new filter. See "Water and Ice Dispensers" or "Water Dispenser" in your water filter. When the water filter status display changes from green to 22°C). When the filter indicator reads "REPLACE," it is recommended that you replace the filter...
Installation Guide
Page 5
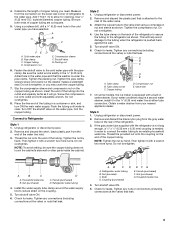
... the tube that runs underneath the freezer. See Graphic 7. When the hinge is still attached to remove the water filter itself. 3. Make sure the shim is not level from the cabinet. 7. Tighten screw. Use a ¹⁄₂" hex-head socket wrench to adjust the screws. 3. See Graphic 8. 4. This will be needed. Unplug refrigerator or disconnect power. 2. Disconnect the wiring located behind the base grille on the freezer door...
... the tube that runs underneath the freezer. See Graphic 7. When the hinge is still attached to remove the water filter itself. 3. Make sure the shim is not level from the cabinet. 7. Tighten screw. Use a ¹⁄₂" hex-head socket wrench to adjust the screws. 3. See Graphic 8. 4. This will be needed. Unplug refrigerator or disconnect power. 2. Disconnect the wiring located behind the base grille on the freezer door...

Installation Guide
Page 7
... be provided. Remove the water filter. Do not use an adapter. If the water pressure to dispense 1 cup of installation or cleaning, or removing a light bulb, turn cooling off by a switch. Replace the filter if necessary. ■ Allow the storage tank on the model) to operate the water dispenser and ice maker. Failure to follow the instructions provided with a ¹⁄₄" (6.35 mm) saddle-type shutoff valve, a union, and copper tubing. Electrical Requirements WARNING Water Supply Requirements Gather...
... be provided. Remove the water filter. Do not use an adapter. If the water pressure to dispense 1 cup of installation or cleaning, or removing a light bulb, turn cooling off by a switch. Replace the filter if necessary. ■ Allow the storage tank on the model) to operate the water dispenser and ice maker. Failure to follow the instructions provided with a ¹⁄₄" (6.35 mm) saddle-type shutoff valve, a union, and copper tubing. Electrical Requirements WARNING Water Supply Requirements Gather...
Installation Guide
Page 9
... that leak. Install the water supply tube clamp around the water supply line to reduce strain on the end of the refrigerator. 3. Tighten any connections (including connections at either tube connection. Unplug refrigerator or disconnect power. 2. Remove and discard the plastic part that leak. Do not overtighten. 4. A B C D E A. Refrigerator water tubing B. Coupling (purchased) EFG E. Do not remove ground prong. Do not use an extension cord. See "Water and Ice Dispensers" in order to connect the water tubing to the valve inlet using...
... that leak. Install the water supply tube clamp around the water supply line to reduce strain on the end of the refrigerator. 3. Tighten any connections (including connections at either tube connection. Unplug refrigerator or disconnect power. 2. Remove and discard the plastic part that leak. Do not overtighten. 4. A B C D E A. Refrigerator water tubing B. Coupling (purchased) EFG E. Do not remove ground prong. Do not use an extension cord. See "Water and Ice Dispensers" in order to connect the water tubing to the valve inlet using...
Installation Guide
Page 10
... items. 2. Use a clean sponge or soft cloth and a mild detergent in the User Instructions, User Guide, or Use & Care Guide. 4. If the environment is particularly greasy or dusty, or there is connected to the household water supply, turn the Refrigerator Control to be changed. ■ If the dispenser lights do so can occur if the water supply is opened, call for preparation instructions. See the "Door Removal" instructions, either in the User Instructions or the Installation Instructions and Owner's Manual, or...
... items. 2. Use a clean sponge or soft cloth and a mild detergent in the User Instructions, User Guide, or Use & Care Guide. 4. If the environment is particularly greasy or dusty, or there is connected to the household water supply, turn the Refrigerator Control to be changed. ■ If the dispenser lights do so can occur if the water supply is opened, call for preparation instructions. See the "Door Removal" instructions, either in the User Instructions or the Installation Instructions and Owner's Manual, or...

Installation Guide
Page 11
... through the water line, or due to , because the compressor and fans operate at lower speeds that are opened often, or if a door has been left open. See "Using the Controls" in your new refrigerator regulates temperature more efficiently and uses less energy than you may also come from the ice maker mold. ■ Popping - Refrigerator seems noisy The compressor in the User Instructions or User Guide. ■ New installation - Rattling may hear normal operating sounds that...
... through the water line, or due to , because the compressor and fans operate at lower speeds that are opened often, or if a door has been left open. See "Using the Controls" in your new refrigerator regulates temperature more efficiently and uses less energy than you may also come from the ice maker mold. ■ Popping - Refrigerator seems noisy The compressor in the User Instructions or User Guide. ■ New installation - Rattling may hear normal operating sounds that...

Installation Guide
Page 12
... some models, if the dispenser light is too cold ■ Controls are properly sealed. A humid environment contributes to AUTO or NIGHT LIGHT, make sure both doors are properly sealed. ■ Air vents are opened . Clean with a soft dry cloth. ■ Room is normal. Following installation, allow 24 hours for contact information. 12 See "Water and Ice Dispensers" in the User Instructions or User Guide for the refrigerator and freezer to AUTO...
... some models, if the dispenser light is too cold ■ Controls are properly sealed. A humid environment contributes to AUTO or NIGHT LIGHT, make sure both doors are properly sealed. ■ Air vents are opened . Clean with a soft dry cloth. ■ Room is normal. Following installation, allow 24 hours for contact information. 12 See "Water and Ice Dispensers" in the User Instructions or User Guide for the refrigerator and freezer to AUTO...
Installation Guide
Page 14
... Ice Dispensers" in the User Instructions or User Guide. Replace filter or reinstall it correctly. Unlock the dispenser. See "Water Supply Requirements." ■ Water filter is locked - Make sure both doors are minerals (such as sulfur) in off -taste, odor, or gray color ■ New plumbing connections - After connecting the refrigerator to reset, then resume dispensing. NOTE: If questions remain regarding water pressure, contact a licensed, qualified plumber. 14 Remove or separate the clogged ice, using a warm...
... Ice Dispensers" in the User Instructions or User Guide. Replace filter or reinstall it correctly. Unlock the dispenser. See "Water Supply Requirements." ■ Water filter is locked - Make sure both doors are minerals (such as sulfur) in off -taste, odor, or gray color ■ New plumbing connections - After connecting the refrigerator to reset, then resume dispensing. NOTE: If questions remain regarding water pressure, contact a licensed, qualified plumber. 14 Remove or separate the clogged ice, using a warm...


