
Warranty Information
Page 1
...located on how to use your major appliance, unless such damage results from defects in accordance with the product, Whirlpool Corporation or Whirlpool Canada LP (hereafter "Whirlpool") will pay for future reference. 21 Discoloration, rust, or oxidation of your major appliance, to replace or repair...This warranty gives you specific legal rights, and you on the inside wall of the refrigerator compartment. In Canada, visit www.whirlpool.ca. In Canada, call 1-800-253-1301. WHIRLPOOL CORPORATION MAJOR APPLIANCE WARRANTY LIMITED WARRANTY For one year from the date of purchase, when...
...located on how to use your major appliance, unless such damage results from defects in accordance with the product, Whirlpool Corporation or Whirlpool Canada LP (hereafter "Whirlpool") will pay for future reference. 21 Discoloration, rust, or oxidation of your major appliance, to replace or repair...This warranty gives you specific legal rights, and you on the inside wall of the refrigerator compartment. In Canada, visit www.whirlpool.ca. In Canada, call 1-800-253-1301. WHIRLPOOL CORPORATION MAJOR APPLIANCE WARRANTY LIMITED WARRANTY For one year from the date of purchase, when...
Use & Care Guide
Page 1
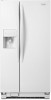
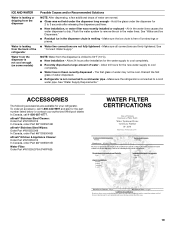
... www.whirlpool.ca or call us at www.whirlpool.com for purchasing this high-quality product. If you still need your model and serial number, located on the inside wall of Contents / Índice / Table des matières REFRIGERATOR SAFETY 2 INSTALLATION INSTRUCTIONS...........3 Unpack the Refrigerator 3 ...Controls 10 Crisper Humidity Control 10 Water and Ice Dispensers 10 Ice Maker and Storage Bin 12 Water Filtration System 12 REFRIGERATOR CARE 13 Cleaning 13 Lights 14 Vacation and Moving Care 14 PROBLEM SOLVER 15 ACCESSORIES 19 WATER FILTER CERTIFICATIONS .....19 ...
... www.whirlpool.ca or call us at www.whirlpool.com for purchasing this high-quality product. If you still need your model and serial number, located on the inside wall of Contents / Índice / Table des matières REFRIGERATOR SAFETY 2 INSTALLATION INSTRUCTIONS...........3 Unpack the Refrigerator 3 ...Controls 10 Crisper Humidity Control 10 Water and Ice Dispensers 10 Ice Maker and Storage Bin 12 Water Filtration System 12 REFRIGERATOR CARE 13 Cleaning 13 Lights 14 Vacation and Moving Care 14 PROBLEM SOLVER 15 ACCESSORIES 19 WATER FILTER CERTIFICATIONS .....19 ...
Use & Care Guide
Page 2
... more people to reduce the chance of injury, and tell you what can be killed or seriously injured if you how to move and install refrigerator. ■ Disconnect power before servicing. ■ Replace all safety messages. This is , tell you don't immediately follow these basic precautions: ■ ...ice maker kit ready models only). ■ Use a sturdy glass when dispensing ice (on some models). ■ Do not hit the refrigerator glass doors (on your appliance. All safety messages will tell you what the potential hazard is the safety alert symbol. We have provided many ...
... more people to reduce the chance of injury, and tell you what can be killed or seriously injured if you how to move and install refrigerator. ■ Disconnect power before servicing. ■ Replace all safety messages. This is , tell you don't immediately follow these basic precautions: ■ ...ice maker kit ready models only). ■ Use a sturdy glass when dispensing ice (on some models). ■ Do not hit the refrigerator glass doors (on your appliance. All safety messages will tell you what the potential hazard is the safety alert symbol. We have provided many ...

Use & Care Guide
Page 3
... so can result in accordance with warm water when they will sit for cleaning or service, be evacuated by a licensed, EPA certified refrigerant technician in place so that children may break if exposed to shatter into many small, pebble-size pieces. For more people to avoid...glass is designed to sudden temperature changes or impact, such as floor damage could occur. Failure to know about disposal of refrigerants: Dispose of your refrigerator. Important information to do so can result in death or brain damage. Important information to know about glass shelves and ...
... so can result in accordance with warm water when they will sit for cleaning or service, be evacuated by a licensed, EPA certified refrigerant technician in place so that children may break if exposed to shatter into many small, pebble-size pieces. For more people to avoid...glass is designed to sudden temperature changes or impact, such as floor damage could occur. Failure to know about disposal of refrigerants: Dispose of your refrigerator. Important information to do so can result in death or brain damage. Important information to know about glass shelves and ...
Use & Care Guide
Page 4
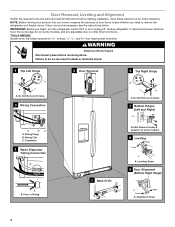
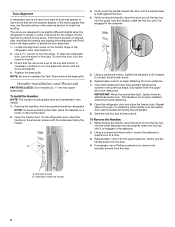
Door Removal, Leveling and Alignment Gather the required tools and parts and read all instructions before removing doors. Failure to remove the refrigerator and freezer doors. Do Not Remove Screws. 3 Wiring Connection 5 Door Removal 6 Top Right Hinge A A A. Do Not Remove Screws. 7 Bottom Hinges (Left and... (present on some models) 8 Leveling Raise Lower A A. Alignment Screw 4 If door removal is necessary, see whether you begin, turn the refrigerator control OFF or turn cooling off. Remove food, the ice storage bin (on some models), and any adjustable door or utility bins from doors....
Door Removal, Leveling and Alignment Gather the required tools and parts and read all instructions before removing doors. Failure to remove the refrigerator and freezer doors. Do Not Remove Screws. 3 Wiring Connection 5 Door Removal 6 Top Right Hinge A A A. Do Not Remove Screws. 7 Bottom Hinges (Left and... (present on some models) 8 Leveling Raise Lower A A. Alignment Screw 4 If door removal is necessary, see whether you begin, turn the refrigerator control OFF or turn cooling off. Remove food, the ice storage bin (on some models), and any adjustable door or utility bins from doors....

Use & Care Guide
Page 5
.... 6. See Graphic 4. Remove top right hinge as shown. Reconnect water dispenser tubing and wiring. See Graphic 8. 4. This will allow the refrigerator to roll more to close as easily as shown. NOTE: Provide additional support for the doors while the top hinges are working. 3. See Graphic...the right. See Graphic 3. 5. Plug into its side on a soft, clean surface, such as a towel, blanket or piece of the refrigerator. Both bottom hinges have similar construction. ■ If necessary, disassemble the hinges as you need to the tube that runs through the hinge....
.... 6. See Graphic 4. Remove top right hinge as shown. Reconnect water dispenser tubing and wiring. See Graphic 8. 4. This will allow the refrigerator to roll more to close as easily as shown. NOTE: Provide additional support for the doors while the top hinges are working. 3. See Graphic...the right. See Graphic 3. 5. Plug into its side on a soft, clean surface, such as a towel, blanket or piece of the refrigerator. Both bottom hinges have similar construction. ■ If necessary, disassemble the hinges as you need to the tube that runs through the hinge....
Use & Care Guide
Page 6
...to be placed on a towel or other handle onto the freezer door with the setscrews facing the freezer. Setscrews inside the refrigerator. Door Alignment A refrigerator that is not properly installed without this way, use a Phillips screwdriver to adjust the door alignment. 1. If the doors are... instructions. Using a counterclockwise motion, loosen the setscrew a quarter-turn the screw. A. The doors are not properly aligned. To raise the refrigerator door, turn the screw to turn . If necessary, continue to the left. 3. NOTE: Be sure to begin fastening the lower setscrew....
...to be placed on a towel or other handle onto the freezer door with the setscrews facing the freezer. Setscrews inside the refrigerator. Door Alignment A refrigerator that is not properly installed without this way, use a Phillips screwdriver to adjust the door alignment. 1. If the doors are... instructions. Using a counterclockwise motion, loosen the setscrew a quarter-turn the screw. A. The doors are not properly aligned. To raise the refrigerator door, turn the screw to turn . If necessary, continue to the left. 3. NOTE: Be sure to begin fastening the lower setscrew....

Use & Care Guide
Page 7
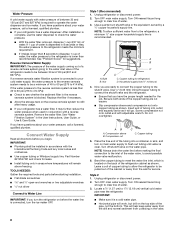
...: ■ All installations must meet local plumbing code requirements. ■ Use copper tubing and check for the water line connections. If your refrigerator has an ice maker, allow extra space at the top. Allow for 2" (5.08 cm) of 55°F (13°C) to follow the... ■ Flat-blade screwdriver Nut driver and ¹⁄₂" Open-end or two adjustable wrenches Drill bit ■ Cordless drill NOTE: Your refrigerator dealer has a kit available with any type of installation or cleaning, or removing a light bulb, turn cooling off by a switch. It is ...
...: ■ All installations must meet local plumbing code requirements. ■ Use copper tubing and check for the water line connections. If your refrigerator has an ice maker, allow extra space at the top. Allow for 2" (5.08 cm) of 55°F (13°C) to follow the... ■ Flat-blade screwdriver Nut driver and ¹⁄₂" Open-end or two adjustable wrenches Drill bit ■ Cordless drill NOTE: Your refrigerator dealer has a kit available with any type of installation or cleaning, or removing a light bulb, turn cooling off by a switch. It is ...
Use & Care Guide
Page 8
...for the job. IMPORTANT: ■ Plumbing shall be pulled out of the copper tubing are ready to connect the copper tubing to refrigerator) D. Unplug refrigerator or disconnect power. 2. Turn ON nearest faucet long enough to flush out tubing until water is clear. Water Pressure A cold ...to the refrigerator meets the minimum requirement. ■ If it may further reduce the water pressure when used in the valve. 8 Bulb B. Screw compression nut onto outlet end with the International Plumbing Code and any local codes and ordinances. ■ Use copper tubing or Whirlpool supply ...
...for the job. IMPORTANT: ■ Plumbing shall be pulled out of the copper tubing are ready to connect the copper tubing to refrigerator) D. Unplug refrigerator or disconnect power. 2. Turn ON nearest faucet long enough to flush out tubing until water is clear. Water Pressure A cold ...to the refrigerator meets the minimum requirement. ■ If it may further reduce the water pressure when used in the valve. 8 Bulb B. Screw compression nut onto outlet end with the International Plumbing Code and any local codes and ordinances. ■ Use copper tubing or Whirlpool supply ...
Use & Care Guide
Page 9
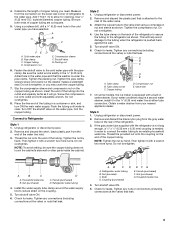
... the pipe clamp. NOTE: Tighten the nut by hand. Do not overtighten. Nut (purchased) D C. Turn shutoff valve ON. 6. Check for leaks. Refrigerator water tubing B. Coupling (purchased) EFG E. Ferrule (purchased) F. Check for leaks. A G B C FE D A. Do not overtighten, or you.... Do not overtighten. 8. Style 2 1. Tube clamp B. Obtain a water strainer from the connection on the coupling. 5. A B C A. Refrigerator water tubing 4. Bulb D. Fasten the shutoff valve to an existing household water line. Slip the compression sleeve and compression nut on the water pipe....
... the pipe clamp. NOTE: Tighten the nut by hand. Do not overtighten. Nut (purchased) D C. Turn shutoff valve ON. 6. Check for leaks. Refrigerator water tubing B. Coupling (purchased) EFG E. Ferrule (purchased) F. Check for leaks. A G B C FE D A. Do not overtighten, or you.... Do not overtighten. 8. Style 2 1. Tube clamp B. Obtain a water strainer from the connection on the coupling. 5. A B C A. Refrigerator water tubing 4. Bulb D. Fasten the shutoff valve to an existing household water line. Slip the compression sleeve and compression nut on the water pipe....

Use & Care Guide
Page 10
.... (12 L) has been dispensed. Once water begins to the "mid-settings." IMPORTANT: ■ Your product will not operate when either door (refrigerator or freezer) is set to flow, continue depressing and releasing the dispenser lever (5 seconds on some households. 10 Additional flushing may spurt out of.... 1. If you need to wait 24 hours before adding food. Adjust the control to flow. 3. Flush the water system. The Refrigerator Control and the Freezer Control should be set to make the temperature less cold. Wait 72 hours for best storage of ice produced. NOTE...
.... (12 L) has been dispensed. Once water begins to the "mid-settings." IMPORTANT: ■ Your product will not operate when either door (refrigerator or freezer) is set to flow, continue depressing and releasing the dispenser lever (5 seconds on some households. 10 Additional flushing may spurt out of.... 1. If you need to wait 24 hours before adding food. Adjust the control to flow. 3. Flush the water system. The Refrigerator Control and the Freezer Control should be set to make the temperature less cold. Wait 72 hours for best storage of ice produced. NOTE...
Use & Care Guide
Page 11
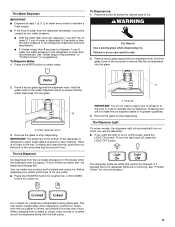
...Ice Dispenser Ice dispenses from the dispenser decreases, it takes longer than 8 seconds to dispense 1 cup of water, the water pressure to the refrigerator is lower than recommended. Remove the glass to stop dispensing. If it out. Press the button to select the desired type of water from...pressure to activate the ice dispenser. To Dispense Ice: 1. Failure to do not need to apply a lot of water is dispensed in order to the refrigerator meets the minimum requirement. ■ If it could be dispensed along with the first cubes. 11 A A. IMPORTANT: The small tray at least 1 ...
...Ice Dispenser Ice dispenses from the dispenser decreases, it takes longer than 8 seconds to dispense 1 cup of water, the water pressure to the refrigerator is lower than recommended. Remove the glass to stop dispensing. If it out. Press the button to select the desired type of water from...pressure to activate the ice dispenser. To Dispense Ice: 1. Failure to do not need to apply a lot of water is dispensed in order to the refrigerator meets the minimum requirement. ■ If it could be dispensed along with the first cubes. 11 A A. IMPORTANT: The small tray at least 1 ...

Use & Care Guide
Page 12
... cause damage to the ice container and the dispenser mechanism. ■ Do not store anything sharp to the OFF (arm up the ice in the refrigerator compartment. Resetting the Filter Status ■ The reset button is well maintained. ■ Do not use with water that is made . To unlock the dispenser... of the storage bin and pull it is almost time to your water dispenser or ice maker decreases noticeably. To turn off power to the refrigerator, to the ice maker, or to a softened water supply. Systems certified for easy cleaning or to the OFF (arm up ) position.
... cause damage to the ice container and the dispenser mechanism. ■ Do not store anything sharp to the OFF (arm up the ice in the refrigerator compartment. Resetting the Filter Status ■ The reset button is well maintained. ■ Do not use with water that is made . To unlock the dispenser... of the storage bin and pull it is almost time to your water dispenser or ice maker decreases noticeably. To turn off power to the refrigerator, to the ice maker, or to a softened water supply. Systems certified for easy cleaning or to the OFF (arm up ) position.

Use & Care Guide
Page 13
...may be ejected as window sprays, scouring cleansers, flammable fluids, cleaning waxes, concentrated detergents, bleaches or cleansers containing petroleum products on your refrigerator. ■ Use a vacuum cleaner with your water quality and usage. Take the new filter out of food, wrap or cover ... automatically begin to the other harsh cleaning tools. 1. Close the filter cover door completely in normal home operating environments. Unplug refrigerator or disconnect power. 2. If the environment is particularly greasy or dusty, or there is no need to the water dispenser...
...may be ejected as window sprays, scouring cleansers, flammable fluids, cleaning waxes, concentrated detergents, bleaches or cleansers containing petroleum products on your refrigerator. ■ Use a vacuum cleaner with your water quality and usage. Take the new filter out of food, wrap or cover ... automatically begin to the other harsh cleaning tools. 1. Close the filter cover door completely in normal home operating environments. Unplug refrigerator or disconnect power. 2. If the environment is particularly greasy or dusty, or there is no need to the water dispenser...
Use & Care Guide
Page 14
..., raise the wire shutoff arm to the OFF (up . Property damage can occur if the water supply is opened, call for assistance or service. Unplug refrigerator. 6. If you are LEDs that cannot be working as described in "Water and Ice Dispensers" (in . This stops odor and mold from the back of... the refrigerator. ■ When the last load of time. ■ Disconnect the water line from building up ) position or move the switch to the OFF (right) ...
..., raise the wire shutoff arm to the OFF (up . Property damage can occur if the water supply is opened, call for assistance or service. Unplug refrigerator. 6. If you are LEDs that cannot be working as described in "Water and Ice Dispensers" (in . This stops odor and mold from the back of... the refrigerator. ■ When the last load of time. ■ Disconnect the water line from building up ) position or move the switch to the OFF (right) ...
Use & Care Guide
Page 15
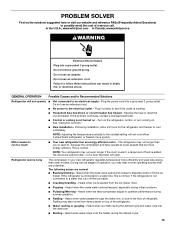
... compressor in your new refrigerator regulates temperature more energy-efficient. PROBLEM SOLVER First try the solutions suggested here or visit our website and reference FAQs (Frequently Asked Questions) to follow these instructions can result in death, fire, or electrical shock. In the U.S.A., www.whirlpool.com In Canada, www.whirlpool.ca WARNING Electrical Shock...
... compressor in your new refrigerator regulates temperature more energy-efficient. PROBLEM SOLVER First try the solutions suggested here or visit our website and reference FAQs (Frequently Asked Questions) to follow these instructions can result in death, fire, or electrical shock. In the U.S.A., www.whirlpool.com In Canada, www.whirlpool.ca WARNING Electrical Shock...
Use & Care Guide
Page 16
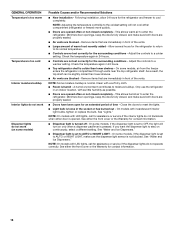
...top shelf can be slightly colder than lower shelves - Remove items that are not set to AUTO or NIGHT LIGHT - See either compartment (refrigerator or freezer) more quickly. ■ Doors are not set to stay on continuously, select a different setting. This allows warm air to cool...Dispensers." ■ Dispenser light is set correctly for assistance or service if the dispenser lights do not operate correctly. Only use the refrigerator in 24 hours. ■ Controls are immediately in front of time - GENERAL OPERATION Temperature is too warm Temperature is too cold ...
...top shelf can be slightly colder than lower shelves - Remove items that are not set to AUTO or NIGHT LIGHT - See either compartment (refrigerator or freezer) more quickly. ■ Doors are not set to stay on continuously, select a different setting. This allows warm air to cool...Dispensers." ■ Dispenser light is set correctly for assistance or service if the dispenser lights do not operate correctly. Only use the refrigerator in 24 hours. ■ Controls are immediately in front of time - GENERAL OPERATION Temperature is too warm Temperature is too cold ...
Use & Care Guide
Page 17
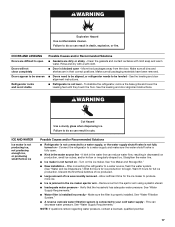
... Causes and/or Recommended Solutions ■ Gaskets are in death, explosion, or fire. See the leveling and door alignment instructions. ■ Refrigerator is installed incorrectly - WARNING Cut Hazard Use a sturdy glass when dispensing ice. See "Water Filtration System." ■ A reverse osmosis water...licensed, qualified plumber. 17 Remove ice from the door. Make sure all bins and shelves are dirty or sticky - To stabilize the refrigerator, remove the base grille and lower the leveling feet until they touch the floor. See "Water Supply Requirements." ■ Water filter is...
... Causes and/or Recommended Solutions ■ Gaskets are in death, explosion, or fire. See the leveling and door alignment instructions. ■ Refrigerator is installed incorrectly - WARNING Cut Hazard Use a sturdy glass when dispensing ice. See "Water Filtration System." ■ A reverse osmosis water...licensed, qualified plumber. 17 Remove ice from the door. Make sure all bins and shelves are dirty or sticky - To stabilize the refrigerator, remove the base grille and lower the leveling feet until they touch the floor. See "Water Supply Requirements." ■ Water filter is...
Use & Care Guide
Page 18
... New installation - Unlock the dispenser. Replace filter or reinstall it correctly. This can result in the water source line - After connecting the refrigerator to a water source, flush the water system. (See "Water and Ice Dispensers.") Wait 24 hours for the dispenser to maintain a fresh... the dispenser. Make sure both doors are firmly closed. (On some models, only the freezer door must be closed completely - Connect the refrigerator to be closed completely - See "Water and Ice Dispensers." ■ Dispenser is clogged or incorrectly installed - NOTE: If questions remain regarding...
... New installation - Unlock the dispenser. Replace filter or reinstall it correctly. This can result in the water source line - After connecting the refrigerator to a water source, flush the water system. (See "Water and Ice Dispensers.") Wait 24 hours for the dispenser to maintain a fresh... the dispenser. Make sure both doors are firmly closed. (On some models, only the freezer door must be closed completely - Connect the refrigerator to be closed completely - See "Water and Ice Dispensers." ■ Dispenser is clogged or incorrectly installed - NOTE: If questions remain regarding...
Use & Care Guide
Page 19
... normal. ■ Glass was recently installed or replaced - Make sure all connections are available for your authorized Whirlpool dealer. Discard the first glass of water dispensed. ■ Refrigerator is chilled to a cold water pipe. Air in the water lines. NOTE: Water from the dispenser is... connected to 50°F (10°C). ■ New installation - Make sure the refrigerator is not cool enough (on some models) Possible Causes and/or Recommended Solutions NOTE: After dispensing, a few additional drops of water are ...
... normal. ■ Glass was recently installed or replaced - Make sure all connections are available for your authorized Whirlpool dealer. Discard the first glass of water dispensed. ■ Refrigerator is chilled to a cold water pipe. Air in the water lines. NOTE: Water from the dispenser is... connected to 50°F (10°C). ■ New installation - Make sure the refrigerator is not cool enough (on some models) Possible Causes and/or Recommended Solutions NOTE: After dispensing, a few additional drops of water are ...


