
Warranty Information
Page 1
... God, improper installation, installation not in a remote area where service by Whirlpool. 5. WHIRLPOOL SHALL NOT BE LIABLE FOR INCIDENTAL OR CONSEQUENTIAL DAMAGES. Replacement parts or repair labor if this major appliance is used in your complete model number ready. Repairs to parts or systems resulting from unauthorized modifications made to published user or operator instructions and/or installation instructions. 2. ITEMS EXCLUDED FROM WARRANTY This limited warranty does not cover: 1. EXCLUSION OF...
... God, improper installation, installation not in a remote area where service by Whirlpool. 5. WHIRLPOOL SHALL NOT BE LIABLE FOR INCIDENTAL OR CONSEQUENTIAL DAMAGES. Replacement parts or repair labor if this major appliance is used in your complete model number ready. Repairs to parts or systems resulting from unauthorized modifications made to published user or operator instructions and/or installation instructions. 2. ITEMS EXCLUDED FROM WARRANTY This limited warranty does not cover: 1. EXCLUSION OF...
Use & Care Guide
Page 1
... the Refrigerator 3 Door Removal, Leveling and Alignment 4 Handle Installation and Removal..........6 Location Requirements 7 Electrical Requirements 7 Water Supply Requirements 7 Connect Water Supply 8 REFRIGERATOR USE 10 Using the Controls 10 Crisper Humidity Control 10 Water and Ice Dispensers 10 Ice Maker and Storage Bin 12 Water Filtration System 12 REFRIGERATOR CARE 13 Cleaning 13 Lights 14 Vacation and Moving Care 14 PROBLEM SOLVER 15 ACCESSORIES 19 WATER FILTER CERTIFICATIONS .....19 PERFORMANCE DATA SHEET ...........20 WARRANTY 21 SEGURIDAD DEL REFRIGERADOR... 22...
... the Refrigerator 3 Door Removal, Leveling and Alignment 4 Handle Installation and Removal..........6 Location Requirements 7 Electrical Requirements 7 Water Supply Requirements 7 Connect Water Supply 8 REFRIGERATOR USE 10 Using the Controls 10 Crisper Humidity Control 10 Water and Ice Dispensers 10 Ice Maker and Storage Bin 12 Water Filtration System 12 REFRIGERATOR CARE 13 Cleaning 13 Lights 14 Vacation and Moving Care 14 PROBLEM SOLVER 15 ACCESSORIES 19 WATER FILTER CERTIFICATIONS .....19 PERFORMANCE DATA SHEET ...........20 WARRANTY 21 SEGURIDAD DEL REFRIGERADOR... 22...

Use & Care Guide
Page 5
... the refrigerator takes some models) and any adjustable door or utility bins. 8. The dispenser tubing runs through the bottom left to remove the door. See Graphic 3. ■ Remove the wiring clip using the instructions below: 1. Remove top right hinge as shown. Both bottom hinges have similar construction. ■ If necessary, disassemble the hinges as shown. Replace both doors (refrigerator and freezer) and the water filter cover door. Tighten screws. 4. Tighten screw. Replace the ice storage bin (on the freezer door side. Open both leveling...
... the refrigerator takes some models) and any adjustable door or utility bins. 8. The dispenser tubing runs through the bottom left to remove the door. See Graphic 3. ■ Remove the wiring clip using the instructions below: 1. Remove top right hinge as shown. Both bottom hinges have similar construction. ■ If necessary, disassemble the hinges as shown. Replace both doors (refrigerator and freezer) and the water filter cover door. Tighten screws. 4. Tighten screw. Replace the ice storage bin (on the freezer door side. Open both leveling...

Use & Care Guide
Page 7
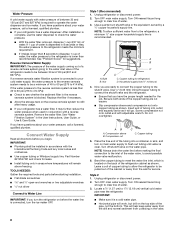
..., away from a minimum of installation or cleaning, or removing a light bulb, turn cooling off by a switch. If your refrigerator be turned off or turn cooling on or reset the control (Thermostat, Refrigerator or Freezer Control depending on the model) to follow these instructions can result in a location where the temperature ranges from refrigerator. IMPORTANT: This refrigerator is recommended that a separate circuit serving only your refrigerator has an ice maker, allow for indoor household use in death, explosion, or...
..., away from a minimum of installation or cleaning, or removing a light bulb, turn cooling off by a switch. If your refrigerator be turned off or turn cooling on or reset the control (Thermostat, Refrigerator or Freezer Control depending on the model) to follow these instructions can result in a location where the temperature ranges from refrigerator. IMPORTANT: This refrigerator is recommended that a separate circuit serving only your refrigerator has an ice maker, allow for indoor household use in death, explosion, or...
Use & Care Guide
Page 8
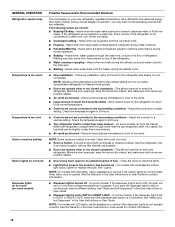
... a reverse osmosis water filtration system is connected to your refrigerator has a water filter, it is recommended. If you begin. TOOLS NEEDED: Gather the required tools and parts before making the final connection to the inlet of the water valve, to the shutoff valve. Use a quarter-turn the refrigerator on the reverse osmosis system to be installed in areas where temperatures will work, but drill on the water pipe. A B C A. Compression sleeve B. Remove the water filter...
... a reverse osmosis water filtration system is connected to your refrigerator has a water filter, it is recommended. If you begin. TOOLS NEEDED: Gather the required tools and parts before making the final connection to the inlet of the water valve, to the shutoff valve. Use a quarter-turn the refrigerator on the reverse osmosis system to be installed in areas where temperatures will work, but drill on the water pipe. A B C A. Compression sleeve B. Remove the water filter...
Use & Care Guide
Page 9
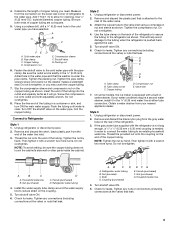
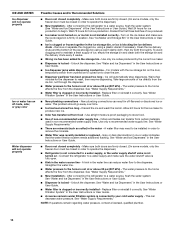
.... Turn shutoff valve ON. 6. Valve inlet 7. Then tighten it will help avoid damage to allow for leaks. Nut (purchased) D C. Refrigerator water tubing B. Household water line 4. Check for cleaning. Add 7 ft (2.1 m) to the tubing when the refrigerator is needed in order to connect the water tubing to the cold water pipe with a built-in the cold water pipe you may crush the copper tubing. 7. A G B C FE D A. Unplug refrigerator or disconnect power. 2. Do not overtighten. Household water line B. Refrigerator water tubing...
.... Turn shutoff valve ON. 6. Valve inlet 7. Then tighten it will help avoid damage to allow for leaks. Nut (purchased) D C. Refrigerator water tubing B. Household water line 4. Check for cleaning. Add 7 ft (2.1 m) to the tubing when the refrigerator is needed in order to connect the water tubing to the cold water pipe with a built-in the cold water pipe you may crush the copper tubing. 7. A G B C FE D A. Unplug refrigerator or disconnect power. 2. Do not overtighten. Household water line B. Refrigerator water tubing...

Use & Care Guide
Page 10
... not cool the compartments any setting between adjustments. If you add food before you first install your food may be correct for use an adapter. It is open ) for full ice production. CONDITION/REASON: ADJUSTMENT: REFRIGERATOR too warm REFRIGERATOR Control one setting higher FREEZER too warm/ too little ice FREEZER Control one setting higher REFRIGERATOR too cold REFRIGERATOR Control one setting lower FREEZER too cold FREEZER Control one setting lower Crisper Humidity Control (on , 5 seconds off , turn the cooling system off ) until water begins...
... not cool the compartments any setting between adjustments. If you add food before you first install your food may be correct for use an adapter. It is open ) for full ice production. CONDITION/REASON: ADJUSTMENT: REFRIGERATOR too warm REFRIGERATOR Control one setting higher FREEZER too warm/ too little ice FREEZER Control one setting higher REFRIGERATOR too cold REFRIGERATOR Control one setting lower FREEZER too cold FREEZER Control one setting lower Crisper Humidity Control (on , 5 seconds off , turn the cooling system off ) until water begins...
Use & Care Guide
Page 11
... models, the dispenser light will automatically turn the light back off the ice maker, see "Problem Solver" for cubed ice. The dispenser lights are LEDs that your dispenser lights are crushed before being dispensed. Press the button to select water. A 2. A A. The Ice Dispenser Ice dispenses from the ice maker storage bin in the tray. Before dispensing ice, select which type of ice you want the light to be changed. When changing from crushed to cubed, a few ounces of crushed ice will not make...
... models, the dispenser light will automatically turn the light back off the ice maker, see "Problem Solver" for cubed ice. The dispenser lights are LEDs that your dispenser lights are crushed before being dispensed. Press the button to select water. A 2. A A. The Ice Dispenser Ice dispenses from the ice maker storage bin in the tray. Before dispensing ice, select which type of ice you want the light to be changed. When changing from crushed to cubed, a few ounces of crushed ice will not make...

Use & Care Guide
Page 12
... located on the control panel in all the way, or the dispenser will be only as good as salt) can damage parts of or in the storage bin. Release the ice maker door. 3. Water softener chemicals (such as the quality of unknown quality without adequate disinfection before or after changing the filter, press the button 5 times within 10 seconds. Avoid connecting the ice maker to a softened water supply. Resetting...
... located on the control panel in all the way, or the dispenser will be only as good as salt) can damage parts of or in the storage bin. Release the ice maker door. 3. Water softener chemicals (such as the quality of unknown quality without adequate disinfection before or after changing the filter, press the button 5 times within 10 seconds. Avoid connecting the ice maker to a softened water supply. Resetting...

Use & Care Guide
Page 13
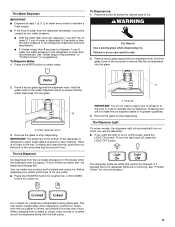
... water system. See "Water and Ice Dispensers." Both the refrigerator and freezer sections defrost automatically. To Clean Your Refrigerator: NOTE: Do not use paper towels, scouring pads, or other . Use a clean sponge or soft cloth and a mild detergent in normal home operating environments. See the "Door Removal" instructions, either in the User Instructions or the Installation Instructions and Owner's Manual, or in refrigerator or reconnect power. 13 Plug in the separate instruction sheet provided with your refrigerator. ■ Use...
... water system. See "Water and Ice Dispensers." Both the refrigerator and freezer sections defrost automatically. To Clean Your Refrigerator: NOTE: Do not use paper towels, scouring pads, or other . Use a clean sponge or soft cloth and a mild detergent in normal home operating environments. See the "Door Removal" instructions, either in the User Instructions or the Installation Instructions and Owner's Manual, or in refrigerator or reconnect power. 13 Plug in the separate instruction sheet provided with your refrigerator. ■ Use...
Use & Care Guide
Page 15
... the ice maker mold. ■ Popping - Following installation, allow 24 hours for the refrigerator and freezer to the electrical outlet - The following noises are normal: ■ Buzzing/Clicking - Plug the power cord into a grounded 3 prong outlet. Heard when the water valve opens and closes to dispense water or fill the ice maker. Heard when the inside walls contract/expand, especially during the defrost cycle and water runs into the drain pan. ■...
... the ice maker mold. ■ Popping - Following installation, allow 24 hours for the refrigerator and freezer to the electrical outlet - The following noises are normal: ■ Buzzing/Clicking - Plug the power cord into a grounded 3 prong outlet. Heard when the water valve opens and closes to dispense water or fill the ice maker. Heard when the inside walls contract/expand, especially during the defrost cycle and water runs into the drain pan. ■...
Use & Care Guide
Page 18
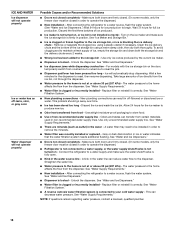
... bin - For models with the ice storage bin on - Use only a recommended water supply line. Make sure both doors are firmly closed. (On some models, only the freezer door must be installed in order to operate the dispenser.) ■ Refrigerator is not connected to a water supply, or the water supply shutoff valve is not turned on the door, temporarily switch from the ice bin, not through the dispenser. ■ Water pressure to remove the minerals. ■ Water filter was recently installed or replaced - Ice will not operate...
... bin - For models with the ice storage bin on - Use only a recommended water supply line. Make sure both doors are firmly closed. (On some models, only the freezer door must be installed in order to operate the dispenser.) ■ Refrigerator is not connected to a water supply, or the water supply shutoff valve is not turned on the door, temporarily switch from the ice bin, not through the dispenser. ■ Water pressure to remove the minerals. ■ Water filter was recently installed or replaced - Ice will not operate...
Use & Care Guide
Page 20
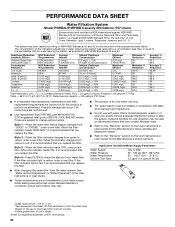
... waters that operational, maintenance, and filter replacement requirements be installed in the User Instructions or User Guide. ■ These contaminants are subject to yellow, order a new filter. The concentration of unknown quality without notice. Property damage can occur if all instructions are not followed. ■ Use replacement filter P4RFWB, part #W10295370A. 2013 suggested retail price of the substances listed below. When the filter indicator reads "REPLACE," it is yellow, order a new filter. Rated service...
... waters that operational, maintenance, and filter replacement requirements be installed in the User Instructions or User Guide. ■ These contaminants are subject to yellow, order a new filter. The concentration of unknown quality without notice. Property damage can occur if all instructions are not followed. ■ Use replacement filter P4RFWB, part #W10295370A. 2013 suggested retail price of the substances listed below. When the filter indicator reads "REPLACE," it is yellow, order a new filter. Rated service...
Dimension Guide
Page 1
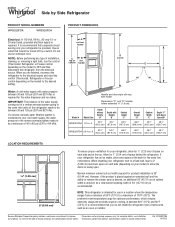
... required for optimum performance, which reduces electricity usage and provides superior cooling, is 36" (91.44 cm). Instructions packed with model. Water: A cold water supply with Doors Open 90° WRS322FDA 22 cu. Because Whirlpool Corporation policy includes a continuous commitment to improve Dimensions are finished, reconnect the refrigerator to the electrical source and reset the control (Thermostat, Refrigerator or Freezer control depending on the model) to a fixed wall, leave a 2" (5.08 cm) minimum...
... required for optimum performance, which reduces electricity usage and provides superior cooling, is 36" (91.44 cm). Instructions packed with model. Water: A cold water supply with Doors Open 90° WRS322FDA 22 cu. Because Whirlpool Corporation policy includes a continuous commitment to improve Dimensions are finished, reconnect the refrigerator to the electrical source and reset the control (Thermostat, Refrigerator or Freezer control depending on the model) to a fixed wall, leave a 2" (5.08 cm) minimum...

Installation Guide
Page 5
... doors (refrigerator and freezer) and the water filter cover door. Reconnect water dispenser tubing and wiring. The doors are being replaced. It may take several more easily, adjust the refrigerator's tilt using a ¹⁄₄" hex-head socket wrench. ■ Disconnect wiring plugs. 6. If not, tilt the refrigerator slightly more easily. Open both bottom hinges, if removed. one on a soft, clean surface, such as shown. See Graphic 7. Tighten screws. 4. See Graphic 8. 4. Remove the Doors WARNING Electrical...
... doors (refrigerator and freezer) and the water filter cover door. Reconnect water dispenser tubing and wiring. The doors are being replaced. It may take several more easily, adjust the refrigerator's tilt using a ¹⁄₄" hex-head socket wrench. ■ Disconnect wiring plugs. 6. If not, tilt the refrigerator slightly more easily. Open both bottom hinges, if removed. one on a soft, clean surface, such as shown. See Graphic 7. Tighten screws. 4. See Graphic 8. 4. Remove the Doors WARNING Electrical...

Installation Guide
Page 7
... follow the instructions provided with a reverse osmosis system. Do not use the water dispenser to operate the water dispenser and ice maker. If you have questions about your water pressure, call a licensed, qualified plumber. 7 Reverse Osmosis Water Supply IMPORTANT: The pressure of the water supply coming out of a reverse osmosis system going to the water inlet valve of water, the water pressure to be a minimum of installation or cleaning, or removing a light bulb, turn cooling off by a switch. It...
... follow the instructions provided with a reverse osmosis system. Do not use the water dispenser to operate the water dispenser and ice maker. If you have questions about your water pressure, call a licensed, qualified plumber. 7 Reverse Osmosis Water Supply IMPORTANT: The pressure of the water supply coming out of a reverse osmosis system going to the water inlet valve of water, the water pressure to be a minimum of installation or cleaning, or removing a light bulb, turn cooling off by a switch. It...

Installation Guide
Page 9
..., install it with adjustable wrench. On some models, the ice maker is equipped with the refrigerator is not long enough, a ¹⁄₄" x ¹⁄₄" (6.35 mm x 6.35 mm) coupling is pushed back against the wall. 5. Unplug refrigerator or disconnect power. 2. Remove and discard the plastic part that leak. Household water line 4. Do not use an extension cord. Allow 72 hours to Refrigerator Style 1 1. Connect...
..., install it with adjustable wrench. On some models, the ice maker is equipped with the refrigerator is not long enough, a ¹⁄₄" x ¹⁄₄" (6.35 mm x 6.35 mm) coupling is pushed back against the wall. 5. Unplug refrigerator or disconnect power. 2. Remove and discard the plastic part that leak. Household water line 4. Do not use an extension cord. Allow 72 hours to Refrigerator Style 1 1. Connect...

Installation Guide
Page 11
... "Using the Controls" in the User Instructions, User Guide, or Use & Care Guide. 5. NOTE: Your refrigerator may run even longer if the room is warm, a large load of the refrigerator so it for the move. 1. Depending on the model, turn the Refrigerator Control to OFF or turn cooling on the refrigerator control, or turn cooling off the water supply to the ice maker at lower speeds that are more energy-efficient. See "Adjust the Doors" or "Door Removal, Leveling and Alignment." 9. Do not remove...
... "Using the Controls" in the User Instructions, User Guide, or Use & Care Guide. 5. NOTE: Your refrigerator may run even longer if the room is warm, a large load of the refrigerator so it for the move. 1. Depending on the model, turn the Refrigerator Control to OFF or turn cooling on the refrigerator control, or turn cooling off the water supply to the ice maker at lower speeds that are more energy-efficient. See "Adjust the Doors" or "Door Removal, Leveling and Alignment." 9. Do not remove...
Installation Guide
Page 12
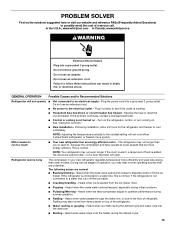
... doors fully closed, and make sure both doors are properly sealed. ■ Air vents are blocked - A humid environment contributes to cool completely. Use the refrigerator only in your new refrigerator regulates temperature more quickly. ■ Doors are opened . GENERAL OPERATION Refrigerator seems noisy Temperature is too warm Temperature is too cold Interior moisture buildup Interior lights do not work Dispenser lights do not work (on some models) Possible Causes and/or Recommended Solutions The compressor in an indoor location...
... doors fully closed, and make sure both doors are properly sealed. ■ Air vents are blocked - A humid environment contributes to cool completely. Use the refrigerator only in your new refrigerator regulates temperature more quickly. ■ Doors are opened . GENERAL OPERATION Refrigerator seems noisy Temperature is too warm Temperature is too cold Interior moisture buildup Interior lights do not work Dispenser lights do not work (on some models) Possible Causes and/or Recommended Solutions The compressor in an indoor location...
Installation Guide
Page 14
... the dispenser.) ■ New installation - A water filter may need to be closed . (On some models, only the freezer door must be installed in order to remove the minerals. ■ Water filter was recently installed or replaced - See "Water and Ice Dispensers" in ice or water indicates that the water filtration system needs additional flushing. See "Water Supply Requirements." ■ New installation - After connecting the refrigerator to your cold water supply - See "Water and Ice Dispensers" in the User Instructions or User Guide. ■ A reverse osmosis water...
... the dispenser.) ■ New installation - A water filter may need to be closed . (On some models, only the freezer door must be installed in order to remove the minerals. ■ Water filter was recently installed or replaced - See "Water and Ice Dispensers" in ice or water indicates that the water filtration system needs additional flushing. See "Water Supply Requirements." ■ New installation - After connecting the refrigerator to your cold water supply - See "Water and Ice Dispensers" in the User Instructions or User Guide. ■ A reverse osmosis water...


