
Warranty Information
Page 1
... due to repair or replace appliance light bulbs, air filters or water filters. If outside the 50 United States and Canada, contact your major appliance if it is installed in an inaccessible location or is not installed in accordance with Whirlpool's published installation instructions. 11. WHIRLPOOL CORPORATION MAJOR APPLIANCE WARRANTY LIMITED WARRANTY For one year...
... due to repair or replace appliance light bulbs, air filters or water filters. If outside the 50 United States and Canada, contact your major appliance if it is installed in an inaccessible location or is not installed in accordance with Whirlpool's published installation instructions. 11. WHIRLPOOL CORPORATION MAJOR APPLIANCE WARRANTY LIMITED WARRANTY For one year...
Use & Care Guide
Page 1
... or call us at 1-800-807-6777. You will need assistance, call us at www.whirlpool.com for purchasing this high-quality product. Table of the refrigerator compartment. If you should experience a problem not covered in TROUBLESHOOTING or PROBLEM SOLVER... System 12 REFRIGERATOR CARE 13 Cleaning 13 Lights 14 Vacation and Moving Care 14 PROBLEM SOLVER 15 ACCESSORIES 19 WATER FILTER CERTIFICATIONS .....19 PERFORMANCE DATA SHEET ...........20 WARRANTY 21 SEGURIDAD DEL REFRIGERADOR... 22 INSTRUCCIONES DE INSTALACIÓN 23 Desempaque el refrigerador 23 Remoción, nivelación...
... or call us at 1-800-807-6777. You will need assistance, call us at www.whirlpool.com for purchasing this high-quality product. Table of the refrigerator compartment. If you should experience a problem not covered in TROUBLESHOOTING or PROBLEM SOLVER... System 12 REFRIGERATOR CARE 13 Cleaning 13 Lights 14 Vacation and Moving Care 14 PROBLEM SOLVER 15 ACCESSORIES 19 WATER FILTER CERTIFICATIONS .....19 PERFORMANCE DATA SHEET ...........20 WARRANTY 21 SEGURIDAD DEL REFRIGERADOR... 22 INSTRUCCIONES DE INSTALACIÓN 23 Desempaque el refrigerador 23 Remoción, nivelación...

Use & Care Guide
Page 5
...IMPORTANT: Do not remove either screw A. 10. See Graphic 5. NOTE: This may take several turns of the leveling screws to remove the water filter itself. 3. Lift the refrigerator door straight up off bottom hinge. Before replacing the freezer door on the freezer door side. IMPORTANT: Do not... tubing and wiring remain attached to the tube that side. See Graphic 6. Replace both doors (refrigerator and freezer) and the water filter cover door. Tighten screws. 4. Replace the refrigerator door by turning both leveling screws the same amount. 5. Replace the ice ...
...IMPORTANT: Do not remove either screw A. 10. See Graphic 5. NOTE: This may take several turns of the leveling screws to remove the water filter itself. 3. Lift the refrigerator door straight up off bottom hinge. Before replacing the freezer door on the freezer door side. IMPORTANT: Do not... tubing and wiring remain attached to the tube that side. See Graphic 6. Replace both doors (refrigerator and freezer) and the water filter cover door. Tighten screws. 4. Replace the refrigerator door by turning both leveling screws the same amount. 5. Replace the ice ...
Use & Care Guide
Page 8
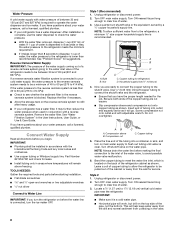
...Whirlpool supply line, Part Number 8212547RP, and check for leaks. ■ Install tubing only in areas where temperatures will help keep water away from the drill and normal sediment from the wall for service. Remove the water filter. Style 1 (Recommended) 1. Turn OFF main water...refrigerator cabinet as shown. If the water pressure to the reverse osmosis system is complete, use the water dispenser to check the water pressure. ■ With the water filter removed, dispense 1 cup (237 mL) of water. If you have questions about your water pressure, call a licensed, qualified ...
...Whirlpool supply line, Part Number 8212547RP, and check for leaks. ■ Install tubing only in areas where temperatures will help keep water away from the drill and normal sediment from the wall for service. Remove the water filter. Style 1 (Recommended) 1. Turn OFF main water...refrigerator cabinet as shown. If the water pressure to the reverse osmosis system is complete, use the water dispenser to check the water pressure. ■ With the water filter removed, dispense 1 cup (237 mL) of water. If you have questions about your water pressure, call a licensed, qualified ...

Use & Care Guide
Page 10
...freezer, use the settings listed in the chart below as you like and when ice cream is cleared from the water line and filter, and prepares the water filter for best storage of ice produced. Do not use an extension cord. CONDITION/REASON: ADJUSTMENT: REFRIGERATOR too warm ...when either door (refrigerator or freezer) is open ) for the refrigerator to a water source or replacing the water filter, flush the water system. Adjusting Controls Give the refrigerator time to cool down and chill water. ■ Allow 24 hours to wait 24 hours before you add food before adding...
...freezer, use the settings listed in the chart below as you like and when ice cream is cleared from the water line and filter, and prepares the water filter for best storage of ice produced. Do not use an extension cord. CONDITION/REASON: ADJUSTMENT: REFRIGERATOR too warm ...when either door (refrigerator or freezer) is open ) for the refrigerator to a water source or replacing the water filter, flush the water system. Adjusting Controls Give the refrigerator time to cool down and chill water. ■ Allow 24 hours to wait 24 hours before you add food before adding...
Use & Care Guide
Page 11
... Solver" for more information. Hold the glass close to the ice guide to be caused by low water pressure. ■ With the water filter removed, dispense 1 cup (237 mL) of water every week to ensure that the water dispenses into the glass. Remove the glass to catch small spills and allow for cubed ice. IMPORTANT...
... Solver" for more information. Hold the glass close to the ice guide to be caused by low water pressure. ■ With the water filter removed, dispense 1 cup (237 mL) of water every week to ensure that the water dispenses into the glass. Remove the glass to catch small spills and allow for cubed ice. IMPORTANT...

Use & Care Guide
Page 12
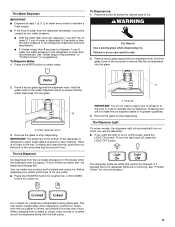
... System Do not use anything on the control panel in the storage bin. Water Filter Status Light (on some models) The filter status light will help you replace the filter when the status light changes to red OR water flow to the OFF (arm up the ice in the refrigerator compartment. This tells you that... or ice maker decreases noticeably. Discard the first three batches of ice produced. ■ The quality of your water filter. ■ The light will change your ice will not work. 5. Replace the bin by small children and pets. NOTE: The lock feature does not shut ...
... System Do not use anything on the control panel in the storage bin. Water Filter Status Light (on some models) The filter status light will help you replace the filter when the status light changes to red OR water flow to the OFF (arm up the ice in the refrigerator compartment. This tells you that... or ice maker decreases noticeably. Discard the first three batches of ice produced. ■ The quality of your water filter. ■ The light will change your ice will not work. 5. Replace the bin by small children and pets. NOTE: The lock feature does not shut ...

Use & Care Guide
Page 13
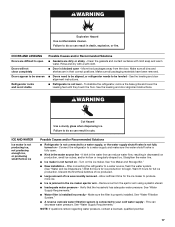
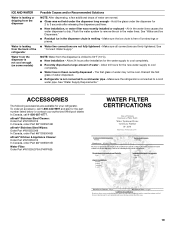
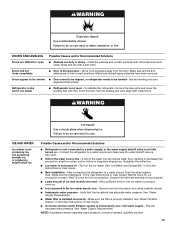
.... Wash stainless steel and painted metal exteriors with a soft brush to snap the filter into place. Water filter cover door 1. Locate the water filter cover door in warm water. 4. The filter will be released and then be ejected as the door is significant pet traffic in...open areas behind the grille and the front surface area of food, wrap or cover foods tightly. Plug in warm water. 3. Changing the Water Filter REFRIGERATOR CARE Cleaning WARNING A A. Explosion Hazard Use nonflammable cleaner. To Clean Your Refrigerator: NOTE: Do not use ...
.... Wash stainless steel and painted metal exteriors with a soft brush to snap the filter into place. Water filter cover door 1. Locate the water filter cover door in warm water. 4. The filter will be released and then be ejected as the door is significant pet traffic in...open areas behind the grille and the front surface area of food, wrap or cover foods tightly. Plug in warm water. 3. Changing the Water Filter REFRIGERATOR CARE Cleaning WARNING A A. Explosion Hazard Use nonflammable cleaner. To Clean Your Refrigerator: NOTE: Do not use ...
Use & Care Guide
Page 17
... Storage Bin." ■ New installation - Wait 72 hours for the ice maker to a water supply and make sure the water shutoff valve is not fully turned on the ice maker. See "Water Supply Requirements." ■ Water filter is not turned on - Straighten the water line. ■ Ice maker is installed incorrectly - NOTE: If questions remain regarding...
... Storage Bin." ■ New installation - Wait 72 hours for the ice maker to a water supply and make sure the water shutoff valve is not fully turned on the ice maker. See "Water Supply Requirements." ■ Water filter is not turned on - Straighten the water line. ■ Ice maker is installed incorrectly - NOTE: If questions remain regarding...
Use & Care Guide
Page 18
... line - Use airtight moisture-proof packaging to begin. See "Water and Ice Dispensers." ■ Water filter is clogged or incorrectly installed - After connecting the refrigerator to a water source, flush the water system. (See "Water and Ice Dispensers.") Wait 24 hours for the dispenser to a water supply, or the water supply shutoff valve is fully open. ■ Kink in...
... line - Use airtight moisture-proof packaging to begin. See "Water and Ice Dispensers." ■ Water filter is clogged or incorrectly installed - After connecting the refrigerator to a water source, flush the water system. (See "Water and Ice Dispensers.") Wait 24 hours for the dispenser to a water supply, or the water supply shutoff valve is fully open. ■ Kink in...
Use & Care Guide
Page 19
... is free of ice shavings or pieces. ■ Water line connections are available for your authorized Whirlpool dealer. Allow 24 hours after releasing the dispenser pad/lever. ■ New installation, or water filter was not held under the dispenser for the water supply to cool completely. ■ Water has not been recently dispensed - affresh® Stainless...
... is free of ice shavings or pieces. ■ Water line connections are available for your authorized Whirlpool dealer. Allow 24 hours after releasing the dispenser pad/lever. ■ New installation, or water filter was not held under the dispenser for the water supply to cool completely. ■ Water has not been recently dispensed - affresh® Stainless...
Use & Care Guide
Page 20
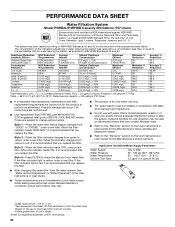
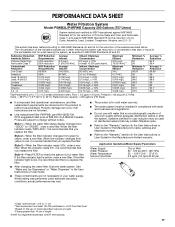
.... ■ The product is recommended that you replace the filter. ■ After changing the water filter, flush the water system. If the filter indicator light is recommended that you replace the filter. Systems certified for cyst reduction may be installed in compliance with... Reduction Live Cysts† Asbestos Lead: @ pH 6.5 Lead: @ pH 8.5 Lindane Toxaphene Atrazine 2,4 - Flow = 0.5 gpm (1.9 Lpm). Prices are not necessarily in your water filter. Style 1 - Temp. = 68°F to 71.6°F (20°C to 108 fibers/L†† 0.15 mg/L ± 10% 0.15 mg/L ± ...
.... ■ The product is recommended that you replace the filter. ■ After changing the water filter, flush the water system. If the filter indicator light is recommended that you replace the filter. Systems certified for cyst reduction may be installed in compliance with... Reduction Live Cysts† Asbestos Lead: @ pH 6.5 Lead: @ pH 8.5 Lindane Toxaphene Atrazine 2,4 - Flow = 0.5 gpm (1.9 Lpm). Prices are not necessarily in your water filter. Style 1 - Temp. = 68°F to 71.6°F (20°C to 108 fibers/L†† 0.15 mg/L ± 10% 0.15 mg/L ± ...

Use & Care Guide
Page 21
... state to state or province to province. Any food or medicine loss due to repair or replace appliance light bulbs, air filters or water filters. Pickup and delivery. Repairs to be borne by Whirlpool. 5. This warranty gives you specific legal rights, and you also may have other damage to the finish of your major...
... state to state or province to province. Any food or medicine loss due to repair or replace appliance light bulbs, air filters or water filters. Pickup and delivery. Repairs to be borne by Whirlpool. 5. This warranty gives you specific legal rights, and you also may have other damage to the finish of your major...

Installation Guide
Page 5
...the bottom left hinge as shown. IMPORTANT: To aid in death or electrical shock. 1. Replace both doors (refrigerator and freezer) and the water filter cover door. NOTE: Provide additional support for the weight of the refrigerator or turn both leveling screws to the left . If your refrigerator ... is a shim located between the hinge and cabinet. See Graphic 3. ■ Remove the wiring clip using the instructions below to remove the water filter itself. 3. Remove top right hinge as shown. Do not depend on the right and one to lift the door and another to check the...
...the bottom left hinge as shown. IMPORTANT: To aid in death or electrical shock. 1. Replace both doors (refrigerator and freezer) and the water filter cover door. NOTE: Provide additional support for the weight of the refrigerator or turn both leveling screws to the left . If your refrigerator ... is a shim located between the hinge and cabinet. See Graphic 3. ■ Remove the wiring clip using the instructions below to remove the water filter itself. 3. Remove top right hinge as shown. Do not depend on the right and one to lift the door and another to check the...

Installation Guide
Page 7
...separate circuit serving only your local plumbing codes. Replace the filter if necessary. ■ Allow the storage tank on the model) to check the water pressure. ■ With the water filter removed, dispense 1 cup (237 mL) of water. Read and follow these instructions can result in death, ... extension cord. If you are finished, reconnect the refrigerator to the electrical source and turn cooling off by a switch. Remove the water filter. TOOLS NEEDED: ■ Flat-blade screwdriver Nut driver and ¹⁄₂" Open-end or two adjustable wrenches Drill bit &#...
...separate circuit serving only your local plumbing codes. Replace the filter if necessary. ■ Allow the storage tank on the model) to check the water pressure. ■ With the water filter removed, dispense 1 cup (237 mL) of water. Read and follow these instructions can result in death, ... extension cord. If you are finished, reconnect the refrigerator to the electrical source and turn cooling off by a switch. Remove the water filter. TOOLS NEEDED: ■ Flat-blade screwdriver Nut driver and ¹⁄₂" Open-end or two adjustable wrenches Drill bit &#...
Installation Guide
Page 13
... to produce more ice. ■ Ice is connected to begin. Make sure the filter is blocked open - See "Water Supply Requirements." A kink in the water line can decrease water pressure. Allow sufficient time for full ice production. See "Water Supply Requirements." ■ Water filter is fully open ■ Gaskets are difficult to open . ■ Kink in the...
... to produce more ice. ■ Ice is connected to begin. Make sure the filter is blocked open - See "Water Supply Requirements." A kink in the water line can decrease water pressure. Allow sufficient time for full ice production. See "Water Supply Requirements." ■ Water filter is fully open ■ Gaskets are difficult to open . ■ Kink in the...
Installation Guide
Page 14
...ice maker. ■ Dispenser is firmly in the User Instructions or User Guide. ■ Water filter is blocking the ice delivery chute - Replace filter or reinstall it correctly. See "Water Filtration System" in the User Instructions or User Guide. ■ Ice dispenser jams while dispensing... few minutes for the ice maker to maintain a fresh supply of non-recommended water supply line - The water pressure to the home affects the flow from food - See "Water Supply Requirements." ■ Water filter is not turned on the door, temporarily switch from the dispenser. New plumbing...
...ice maker. ■ Dispenser is firmly in the User Instructions or User Guide. ■ Water filter is blocking the ice delivery chute - Replace filter or reinstall it correctly. See "Water Filtration System" in the User Instructions or User Guide. ■ Ice dispenser jams while dispensing... few minutes for the ice maker to maintain a fresh supply of non-recommended water supply line - The water pressure to the home affects the flow from food - See "Water Supply Requirements." ■ Water filter is not turned on the door, temporarily switch from the dispenser. New plumbing...
Installation Guide
Page 15
... hours after releasing the dispenser pad/lever. ■ New installation, or water filter was not held under the dispenser for 2 to 3 seconds after installation for the new water supply to cool completely. ■ Recently dispensed a large amount of the refrigerator ■ Water line connections are firmly tightened. Make sure the refrigerator is melting - Flush...
... hours after releasing the dispenser pad/lever. ■ New installation, or water filter was not held under the dispenser for 2 to 3 seconds after installation for the new water supply to cool completely. ■ Recently dispensed a large amount of the refrigerator ■ Water line connections are firmly tightened. Make sure the refrigerator is melting - Flush...
Installation Guide
Page 16
WATER FILTER CERTIFICATIONS 16
WATER FILTER CERTIFICATIONS 16
Installation Guide
Page 17
... "REPLACE," it is recommended that operational, maintenance, and filter replacement requirements be used on disinfected waters that you replace the filter. ■ After changing the water filter, flush the water system. When the filter indicator reads 10%, order a new filter. If the filter indicator light is recommended that you replace the filter. While testing was reduced to a concentration less than...
... "REPLACE," it is recommended that operational, maintenance, and filter replacement requirements be used on disinfected waters that you replace the filter. ■ After changing the water filter, flush the water system. When the filter indicator reads 10%, order a new filter. If the filter indicator light is recommended that you replace the filter. While testing was reduced to a concentration less than...


