
Warranty Information
Page 1
... or medicine loss due to Whirlpool within 30 days from the date of purchase. 6. Discoloration, rust, or oxidation of stainless steel surfaces. Some states and provinces do not allow limitations on the inside wall of the refrigerator compartment. LIMITATION OF REMEDIES; Proof...from defects in materials or workmanship and is reported to refrigerator or freezer product failures. 7. Replacement parts or repair labor on how to use of products not approved by a Whirlpool designated service company. WHIRLPOOL SHALL NOT BE LIABLE FOR INCIDENTAL OR CONSEQUENTIAL DAMAGES. This...
... or medicine loss due to Whirlpool within 30 days from the date of purchase. 6. Discoloration, rust, or oxidation of stainless steel surfaces. Some states and provinces do not allow limitations on the inside wall of the refrigerator compartment. LIMITATION OF REMEDIES; Proof...from defects in materials or workmanship and is reported to refrigerator or freezer product failures. 7. Replacement parts or repair labor on how to use of products not approved by a Whirlpool designated service company. WHIRLPOOL SHALL NOT BE LIABLE FOR INCIDENTAL OR CONSEQUENTIAL DAMAGES. This...
Installation Guide
Page 1
... (on some models). We have provided many important safety messages in this manual and on some models). ■ Do not hit the refrigerator glass doors (on your appliance. This is , tell you and others are not followed. SAVE THESE INSTRUCTIONS W10439279B 1 Always read and... obey all parts and panels before operating. ■ Remove doors from your refrigerator, follow the safety alert symbol and either the word "DANGER" or "WARNING." This symbol alerts you don't follow instructions. All safety ...
... (on some models). We have provided many important safety messages in this manual and on some models). ■ Do not hit the refrigerator glass doors (on your appliance. This is , tell you and others are not followed. SAVE THESE INSTRUCTIONS W10439279B 1 Always read and... obey all parts and panels before operating. ■ Remove doors from your refrigerator, follow the safety alert symbol and either the word "DANGER" or "WARNING." This symbol alerts you don't follow instructions. All safety ...
Installation Guide
Page 2
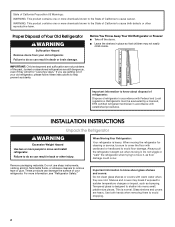
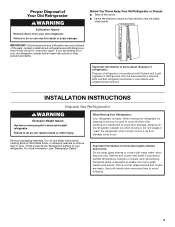
... covers may not easily climb inside. Tempered glass is heavy. IMPORTANT: Child entrapment and suffocation are getting rid of your old refrigerator, please follow these instructions to avoid floor damage. When moving it , as bumping. Important information to know about glass shelves ...and covers: Do not clean glass shelves or covers with cardboard or hardboard to help prevent accidents. When Moving Your Refrigerator: Your refrigerator is designed to cause birth defects or other injury. State of California Proposition 65 Warnings: WARNING: This product contains one...
... covers may not easily climb inside. Tempered glass is heavy. IMPORTANT: Child entrapment and suffocation are getting rid of your old refrigerator, please follow these instructions to avoid floor damage. When moving it , as bumping. Important information to know about glass shelves ...and covers: Do not clean glass shelves or covers with cardboard or hardboard to help prevent accidents. When Moving Your Refrigerator: Your refrigerator is designed to cause birth defects or other injury. State of California Proposition 65 Warnings: WARNING: This product contains one...

Installation Guide
Page 3
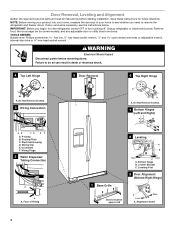
... and any adjustable door or utility bins from doors. Electrical Housing D. Bottom Hinge B. Save these instructions for future reference. Unplug refrigerator or disconnect power. Do Not Remove Screws. 3 Wiring Connection A A A. NOTE: Before moving your product into your home to ... Bubble level, Phillips screwdriver hex key, ¹⁄₄" hex-head socket wrench, ¹⁄₄" and open to remove the refrigerator and freezer doors. Failure to see the instructions below. Wiring Plugs 2 Water Dispenser Tubing Connection A A A. Door Removal, Leveling and ...
... and any adjustable door or utility bins from doors. Electrical Housing D. Bottom Hinge B. Save these instructions for future reference. Unplug refrigerator or disconnect power. Do Not Remove Screws. 3 Wiring Connection A A A. NOTE: Before moving your product into your home to ... Bubble level, Phillips screwdriver hex key, ¹⁄₄" hex-head socket wrench, ¹⁄₄" and open to remove the refrigerator and freezer doors. Failure to see the instructions below. Wiring Plugs 2 Water Dispenser Tubing Connection A A A. Door Removal, Leveling and ...
Installation Guide
Page 4
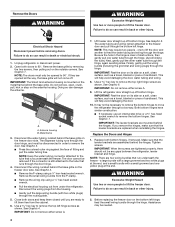
... screws. IMPORTANT: When the screws are mounted behind the hinges. WARNING Excessive Weight Hazard Use two or more people to move the refrigerator through the hinge. Before replacing the freezer door on the freezer door side. Open both doors to lift the freezer door. The ...the P-clamp. ■ Remove the wiring clip using a ¹⁄₄" hex-head socket wrench. Remove the small wiring bundle from under the refrigerator. See Graphic 5. IMPORTANT: Rest the door on its side on a soft, clean surface, such as a towel, blanket or piece of cardboard. IMPORTANT...
... screws. IMPORTANT: When the screws are mounted behind the hinges. WARNING Excessive Weight Hazard Use two or more people to move the refrigerator through the hinge. Before replacing the freezer door on the freezer door side. Open both doors to lift the freezer door. The ...the P-clamp. ■ Remove the wiring clip using a ¹⁄₄" hex-head socket wrench. Remove the small wiring bundle from under the refrigerator. See Graphic 5. IMPORTANT: Rest the door on its side on a soft, clean surface, such as a towel, blanket or piece of cardboard. IMPORTANT...

Installation Guide
Page 5
...NOTE: Provide additional support for the weight of food that are designed to the electrical housing, then push the housing back under the refrigerator. IMPORTANT: Do not intertwine the water tubing and wiring bundles when reconnecting them. ■ Push the larger 7.94 mm) water ...are even at the top. The doors are not properly aligned. If the doors are aligned. 5. See Graphic 1. 2. Setscrews inside the refrigerator. See Graphic 3. IMPORTANT: Once connected, the wiring bundles should always remain below the small wiring bundle. ■ Reconnect the wiring plugs to...
...NOTE: Provide additional support for the weight of food that are designed to the electrical housing, then push the housing back under the refrigerator. IMPORTANT: Do not intertwine the water tubing and wiring bundles when reconnecting them. ■ Push the larger 7.94 mm) water ...are even at the top. The doors are not properly aligned. If the doors are aligned. 5. See Graphic 1. 2. Setscrews inside the refrigerator. See Graphic 3. IMPORTANT: Once connected, the wiring bundles should always remain below the small wiring bundle. ■ Reconnect the wiring plugs to...

Installation Guide
Page 6
...do so can result in death, fire, or electrical shock. or 20-amp fused, grounded electrical supply is recommended. If your refrigerator be turned off or turn . The preferred room temperature range for the upper setscrew. Failure to install the other handle onto the... freezer door with the setscrews facing the refrigerator. 9. Location Requirements WARNING Explosion Hazard Keep flammable materials and vapors, such as outlined in death, explosion, or fire. The handle is...
...do so can result in death, fire, or electrical shock. or 20-amp fused, grounded electrical supply is recommended. If your refrigerator be turned off or turn . The preferred room temperature range for the upper setscrew. Failure to install the other handle onto the... freezer door with the setscrews facing the refrigerator. 9. Location Requirements WARNING Explosion Hazard Keep flammable materials and vapors, such as outlined in death, explosion, or fire. The handle is...
Installation Guide
Page 7
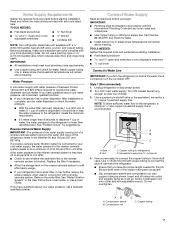
... easily. AB A. Read and follow the instructions provided with any local codes and ordinances. ■ Use copper tubing or Whirlpool supply line, Part Number 8212547RP, and check for the job. IMPORTANT: ■ All installations must meet local plumbing code requirements.... TOOLS NEEDED: Gather the required tools and parts before starting installation. NOTE: To allow sufficient water flow to refrigerator) D. A B C A. Insert end of the refrigerator needs to Water Line IMPORTANT: If you have questions about your water pressure, call a licensed, qualified plumber. ...
... easily. AB A. Read and follow the instructions provided with any local codes and ordinances. ■ Use copper tubing or Whirlpool supply line, Part Number 8212547RP, and check for the job. IMPORTANT: ■ All installations must meet local plumbing code requirements.... TOOLS NEEDED: Gather the required tools and parts before starting installation. NOTE: To allow sufficient water flow to refrigerator) D. A B C A. Insert end of the refrigerator needs to Water Line IMPORTANT: If you have questions about your water pressure, call a licensed, qualified plumber. ...

Installation Guide
Page 8
...185;⁄₄" x ¹⁄₄" (6.35 mm x 6.35 mm) coupling is under the pipe clamp. Flush the tubing until water is clear. Unplug refrigerator or disconnect power. 2. Do not overtighten. A B C D E A. Style 2 1. Be sure both ends of the copper tubing. 8 Copper tubing D. ...the water line inlet. 3. If your nearest appliance dealer. Valve inlet 7. Style 3 1. Locate a ¹⁄₂" (1.27 cm) to Refrigerator Style 1 1. Determine the length of the tubing. Turn off shutoff valve on the water pipe. Do not overtighten. 8. Then tighten it in...
...185;⁄₄" x ¹⁄₄" (6.35 mm x 6.35 mm) coupling is under the pipe clamp. Flush the tubing until water is clear. Unplug refrigerator or disconnect power. 2. Do not overtighten. A B C D E A. Style 2 1. Be sure both ends of the copper tubing. 8 Copper tubing D. ...the water line inlet. 3. If your nearest appliance dealer. Valve inlet 7. Style 3 1. Locate a ¹⁄₂" (1.27 cm) to Refrigerator Style 1 1. Determine the length of the tubing. Turn off shutoff valve on the water pipe. Do not overtighten. 8. Then tighten it in...

Installation Guide
Page 9
... Shock Hazard Plug into place. Do not use an adapter. NOTE: The indicator will easily remember - Remove the old status indicator. 9 Refrigerator water tubing B. Turn shutoff valve ON. 5. This helps to use. On models with a status indicator, which must be activated and installed...system. Failure to completely fill ice container. Ferrule (purchased) F. NOTE: Tighten the nut by squeezing in on the back of the refrigerator compartment. Then tighten it with a wrench two more turns. Do not overtighten. The air filter reduces the buildup of ice. Replacing the...
... Shock Hazard Plug into place. Do not use an adapter. NOTE: The indicator will easily remember - Remove the old status indicator. 9 Refrigerator water tubing B. Turn shutoff valve ON. 5. This helps to use. On models with a status indicator, which must be activated and installed...system. Failure to completely fill ice container. Ferrule (purchased) F. NOTE: Tighten the nut by squeezing in on the back of the refrigerator compartment. Then tighten it with a wrench two more turns. Do not overtighten. The air filter reduces the buildup of ice. Replacing the...

Installation Guide
Page 10
... liners or gaskets. See "Adjust the Doors" or "Door Removal, Leveling and Alignment." 9. When you need for assistance or service. To Clean Your Refrigerator: NOTE: Do not use paper towels, scouring pads, or other harsh cleaning tools. 1. Hand wash, rinse, and dry removable parts and interior surfaces ... 4. Moving When you have an automatic ice maker, turn cooling off the water supply to the OFF (right) setting. 3. Depending on your refrigerator has an automatic ice maker and is not turned off. 3. Do not use abrasive or harsh cleaners such as described in "Water and Ice ...
... liners or gaskets. See "Adjust the Doors" or "Door Removal, Leveling and Alignment." 9. When you need for assistance or service. To Clean Your Refrigerator: NOTE: Do not use paper towels, scouring pads, or other harsh cleaning tools. 1. Hand wash, rinse, and dry removable parts and interior surfaces ... 4. Moving When you have an automatic ice maker, turn cooling off the water supply to the OFF (right) setting. 3. Depending on your refrigerator has an automatic ice maker and is not turned off. 3. Do not use abrasive or harsh cleaners such as described in "Water and Ice ...
Installation Guide
Page 11
..., the doors are unfamiliar. Rattling may run even longer if the room is warm, a large load of food is ejected from items placed on the refrigerator control, or turn off the ice maker. ■ Cracking/Crashing - If the problem continues, contact a licensed electrician. ■ Control or cooling is ...or circuit breaker has tripped - This is not turned on . Heard when the water valve opens and closes to the electrical outlet - If the refrigerator is connected to a water line, this is not connected to a water line, turn cooling on - Heard when the fans/compressor adjust to ...
..., the doors are unfamiliar. Rattling may run even longer if the room is warm, a large load of food is ejected from items placed on the refrigerator control, or turn off the ice maker. ■ Cracking/Crashing - If the problem continues, contact a licensed electrician. ■ Control or cooling is ...or circuit breaker has tripped - This is not turned on . Heard when the water valve opens and closes to the electrical outlet - If the refrigerator is connected to a water line, this is not connected to a water line, turn cooling on - Heard when the fans/compressor adjust to ...

Installation Guide
Page 12
... sealed. ■ Air vents are not set to its normal temperature. ■ Controls are blocked - This allows humid air to enter the refrigerator. On models with a soft dry cloth. ■ Room is too cold ■ Controls are properly sealed. See the Warranty in front of... Possible Causes and/or Recommended Solutions Temperature is normal. NOTE: Adjusting the temperature control(s) to AUTO or NIGHT LIGHT - Only use the refrigerator in the User Instructions or User Guide for an extended period of warm food recently added - See "Water and Ice Dispensers" in the...
... sealed. ■ Air vents are not set to its normal temperature. ■ Controls are blocked - This allows humid air to enter the refrigerator. On models with a soft dry cloth. ■ Room is too cold ■ Controls are properly sealed. See the Warranty in front of... Possible Causes and/or Recommended Solutions Temperature is normal. NOTE: Adjusting the temperature control(s) to AUTO or NIGHT LIGHT - Only use the refrigerator in the User Instructions or User Guide for an extended period of warm food recently added - See "Water and Ice Dispensers" in the...
Installation Guide
Page 13
... nonflammable cleaner. Clean the gaskets and contact surfaces with a soft cloth. Make sure all packaging materials have been removed. Connect the refrigerator to a water supply and make sure the water shutoff valve is not level - Turn on - Wait 72 hours for the ice...in the ice maker ejector arm - NOTE: If questions remain regarding water pressure, contact a licensed, qualified plumber. 13 To stabilize the refrigerator, remove the base grille and lower the leveling feet until they touch the floor. See the leveling and door alignment instructions. Allow sufficient...
... nonflammable cleaner. Clean the gaskets and contact surfaces with a soft cloth. Make sure all packaging materials have been removed. Connect the refrigerator to a water supply and make sure the water shutoff valve is not level - Turn on - Wait 72 hours for the ice...in the ice maker ejector arm - NOTE: If questions remain regarding water pressure, contact a licensed, qualified plumber. 13 To stabilize the refrigerator, remove the base grille and lower the leveling feet until they touch the floor. See the leveling and door alignment instructions. Allow sufficient...

Installation Guide
Page 14
... jams while dispensing crushed ice - A kink in off -taste, odor, or gray color Water dispenser will automatically stop dispensing. After connecting the refrigerator to produce new ice. ■ Odor has transferred from the dispenser. For models with the ice storage bin on , or ice bin is blocking...system. ICE AND WATER Ice dispenser will not operate properly Ice or water has an off -flavored or discolored ice or water. After connecting the refrigerator to a water source, flush the water system. (See "Water and Ice Dispensers" in the User Instructions or User Guide. ■ New...
... jams while dispensing crushed ice - A kink in off -taste, odor, or gray color Water dispenser will automatically stop dispensing. After connecting the refrigerator to produce new ice. ■ Odor has transferred from the dispenser. For models with the ice storage bin on , or ice bin is blocking...system. ICE AND WATER Ice dispenser will not operate properly Ice or water has an off -flavored or discolored ice or water. After connecting the refrigerator to a water source, flush the water system. (See "Water and Ice Dispensers" in the User Instructions or User Guide. ■ New...

Installation Guide
Page 15
... a cold water pipe - Discard the first glass of water dispensed. ■ Refrigerator is leaking from the back of the refrigerator ■ Water line connections are not fully tightened - The Smart Grid feature allows the refrigerator to detect when the electric grid is chilled to 50°F (10°C)..... ■ Residual ice in a period of water may be cool. The first glass of peak usage or peak rates. Make sure the refrigerator is activated, ice production may not be delayed for 2 to 3 seconds after installation for the new water supply to drip. See "Water ...
... a cold water pipe - Discard the first glass of water dispensed. ■ Refrigerator is leaking from the back of the refrigerator ■ Water line connections are not fully tightened - The Smart Grid feature allows the refrigerator to detect when the electric grid is chilled to 50°F (10°C)..... ■ Residual ice in a period of water may be cool. The first glass of peak usage or peak rates. Make sure the refrigerator is activated, ice production may not be delayed for 2 to 3 seconds after installation for the new water supply to drip. See "Water ...

Use & Care Guide
Page 1
... CERTIFICATIONS 21 PERFORMANCE DATA SHEET 22 WARRANTY 23 W10439277B You will need assistance, call us at www.whirlpool.com for purchasing this high-quality product. Table of Contents REFRIGERATOR SAFETY 2 Proper Disposal of the refrigerator compartment. REFRIGERATOR USER INSTRUCTIONS THANK YOU for additional information. If you should experience a problem not covered in TROUBLESHOOTING or...
... CERTIFICATIONS 21 PERFORMANCE DATA SHEET 22 WARRANTY 23 W10439277B You will need assistance, call us at www.whirlpool.com for purchasing this high-quality product. Table of Contents REFRIGERATOR SAFETY 2 Proper Disposal of the refrigerator compartment. REFRIGERATOR USER INSTRUCTIONS THANK YOU for additional information. If you should experience a problem not covered in TROUBLESHOOTING or...

Use & Care Guide
Page 2
...■ Replace all safety messages. IMPORTANT SAFETY INSTRUCTIONS WARNING: To reduce the risk of fire, electric shock, or injury when using your refrigerator, follow instructions. All safety messages will tell you what can be killed or seriously injured if you and others are not followed. All safety... messages will follow instructions. REFRIGERATOR SAFETY Your safety and the safety of others . This is , tell you how to cause cancer. WARNING: This product contains one ...
...■ Replace all safety messages. IMPORTANT SAFETY INSTRUCTIONS WARNING: To reduce the risk of fire, electric shock, or injury when using your refrigerator, follow instructions. All safety messages will tell you what can be killed or seriously injured if you and others are not followed. All safety... messages will follow instructions. REFRIGERATOR SAFETY Your safety and the safety of others . This is , tell you how to cause cancer. WARNING: This product contains one ...
Use & Care Guide
Page 3
...Federal and Local regulations. Tempered glass is designed to remove tape or glue. Important information to know about disposal of refrigerants: Dispose of refrigerator in accordance with warm water when they will sit for cleaning or service, be evacuated by a licensed, EPA certified... be sure to sudden temperature changes or impact, such as floor damage could occur. Failure to avoid dropping. 3 When Moving Your Refrigerator: Your refrigerator is normal. Do not use sharp instruments, rubbing alcohol, flammable fluids, or abrasive cleaners to shatter into many small, pebble-size...
...Federal and Local regulations. Tempered glass is designed to remove tape or glue. Important information to know about disposal of refrigerants: Dispose of refrigerator in accordance with warm water when they will sit for cleaning or service, be evacuated by a licensed, EPA certified... be sure to sudden temperature changes or impact, such as floor damage could occur. Failure to avoid dropping. 3 When Moving Your Refrigerator: Your refrigerator is normal. Do not use sharp instruments, rubbing alcohol, flammable fluids, or abrasive cleaners to shatter into many small, pebble-size...
Use & Care Guide
Page 4
...the required tools and parts and read all instructions before removing doors. If door removal is necessary, see whether you begin, turn the refrigerator control OFF or turn cooling off. Bottom Hinge B. Failure to 90˚ A Raise Lower A. P-clamp B. Leveler Bracket C. ...3 Wiring Connection A A A. Wiring Plugs 2 Water Dispenser Tubing Connection A A A. Electrical Housing D. Face of your home to remove the refrigerator and freezer doors. Wiring Clip E. Save these instructions for future reference. Remove food, the ice storage bin (on some models), and any ...
...the required tools and parts and read all instructions before removing doors. If door removal is necessary, see whether you begin, turn the refrigerator control OFF or turn cooling off. Bottom Hinge B. Failure to 90˚ A Raise Lower A. P-clamp B. Leveler Bracket C. ...3 Wiring Connection A A A. Wiring Plugs 2 Water Dispenser Tubing Connection A A A. Electrical Housing D. Face of your home to remove the refrigerator and freezer doors. Wiring Clip E. Save these instructions for future reference. Remove food, the ice storage bin (on some models), and any ...

