Warranty Information
Page 1
... or installation, installation not in -home repair. 12. Before contacting us to use inconsistent with original model/serial numbers removed, altered or not easily determined. In-home instruction on the right to chemicals. 10. light bulbs, batteries, air or water filters, preservation solutions, etc.). 5. Discoloration, rust or oxidation of purchase, when this limited warranty. 1. Travel or transportation expenses for the remaining term of the Use and Care Guide...
... or installation, installation not in -home repair. 12. Before contacting us to use inconsistent with original model/serial numbers removed, altered or not easily determined. In-home instruction on the right to chemicals. 10. light bulbs, batteries, air or water filters, preservation solutions, etc.). 5. Discoloration, rust or oxidation of purchase, when this limited warranty. 1. Travel or transportation expenses for the remaining term of the Use and Care Guide...
Use & Care Guide
Page 3
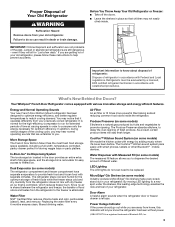
... system pairs easily with various innovative storage and energy efficient features. MicroEdge® Glo Shelves (on some models) The refrigerator compartment and freezer compartment have separate evaporators to filtered ice. Door Alarm A helpful alarm sounds when the refrigerator door or freezer drawer is controlled, which reduces freezer burn. IMPORTANT: Child entrapment and suffocation are still dangerous - Your Whirlpool® French Door Refrigerator comes equipped with smart phones, tablets or other Bluetooth...
... system pairs easily with various innovative storage and energy efficient features. MicroEdge® Glo Shelves (on some models) The refrigerator compartment and freezer compartment have separate evaporators to filtered ice. Door Alarm A helpful alarm sounds when the refrigerator door or freezer drawer is controlled, which reduces freezer burn. IMPORTANT: Child entrapment and suffocation are still dangerous - Your Whirlpool® French Door Refrigerator comes equipped with smart phones, tablets or other Bluetooth...
Use & Care Guide
Page 4
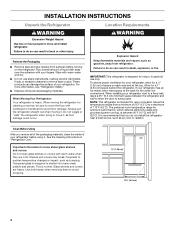
.... Allow for optimum performance, which reduces electricity usage and provides superior cooling, is between the refrigerator and wall to allow extra space at the top. If your refrigerator has an ice maker, allow the door to swing open. Glass shelves and covers are cold. Rub a small amount of liquid dish soap over the adhesive with warm water when they are heavy. For more people...
.... Allow for optimum performance, which reduces electricity usage and provides superior cooling, is between the refrigerator and wall to allow extra space at the top. If your refrigerator has an ice maker, allow the door to swing open. Glass shelves and covers are cold. Rub a small amount of liquid dish soap over the adhesive with warm water when they are heavy. For more people...

Use & Care Guide
Page 8
... ice cubes could be provided. Do not remove ground prong. Water Supply Requirements A cold water supply with the requirements of the refrigerator. Holding the drawer front by a switch. Return all removable door parts to doors and the food to their full extension. 2. Reset the controls. Replace Drawer Front 1. Use an outlet that a separate circuit serving only your refrigerator has a water filter, it is connected to your refrigerator into a grounded 3 prong outlet. 2. See "Using the Control(s)." Reverse Osmosis Water Supply...
... ice cubes could be provided. Do not remove ground prong. Water Supply Requirements A cold water supply with the requirements of the refrigerator. Holding the drawer front by a switch. Return all removable door parts to doors and the food to their full extension. 2. Reset the controls. Replace Drawer Front 1. Use an outlet that a separate circuit serving only your refrigerator has a water filter, it is connected to your refrigerator into a grounded 3 prong outlet. 2. See "Using the Control(s)." Reverse Osmosis Water Supply...
Use & Care Guide
Page 9
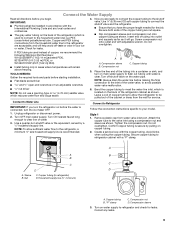
... connect the shutoff valve and the refrigerator. ■ Ensure that you turn the ice maker OFF. 1. AB C A. Leave a coil of copper tubing to allow sufficient water flow to the refrigerator, a minimum ¹⁄₂" size household supply line is clear. Turn OFF main water supply. Connect to Refrigerator Follow the connection instructions specific to your ice or water. Secure copper tubing to refrigerator cabinet with the copper tubing. Nut C. Compression nut D. If PEX tubing is used to connect...
... connect the shutoff valve and the refrigerator. ■ Ensure that you turn the ice maker OFF. 1. AB C A. Leave a coil of copper tubing to allow sufficient water flow to the refrigerator, a minimum ¹⁄₂" size household supply line is clear. Turn OFF main water supply. Connect to Refrigerator Follow the connection instructions specific to your ice or water. Secure copper tubing to refrigerator cabinet with the copper tubing. Nut C. Compression nut D. If PEX tubing is used to connect...
Use & Care Guide
Page 11
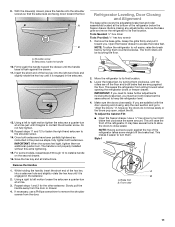
... necessary, use a Phillips screwdriver to install a handle on the second drawer. 16. Before making any adjustments, remove the base grille and move the refrigerator to turn . Tools Needed: ¹⁄₄" hex driver Tools Provided: ¹⁄₈" hex key wrench 1. Grasp the grille firmly and pull it easier to its final location. 3. Open the freezer drawer to keep the refrigerator level. 4. Lower the brake feet, by turning them...
... necessary, use a Phillips screwdriver to install a handle on the second drawer. 16. Before making any adjustments, remove the base grille and move the refrigerator to turn . Tools Needed: ¹⁄₄" hex driver Tools Provided: ¹⁄₈" hex key wrench 1. Grasp the grille firmly and pull it easier to its final location. 3. Open the freezer drawer to keep the refrigerator level. 4. Lower the brake feet, by turning them...
Use & Care Guide
Page 12
...; turn both refrigerator doors closed, pull out the freezer drawer. Make sure the doors are still in place after the system. O-ring cover B. Using a ¹⁄₄" hex driver, turn ), until the brake feet are aligned. To Align the Doors: ■ Keeping both brake feet clockwise the same amount until it locks into place. 4. Do not use with the Door Handle Installation Instructions) into the housing. 5. Take the water filter out...
...; turn both refrigerator doors closed, pull out the freezer drawer. Make sure the doors are still in place after the system. O-ring cover B. Using a ¹⁄₄" hex driver, turn ), until the brake feet are aligned. To Align the Doors: ■ Keeping both brake feet clockwise the same amount until it locks into place. 4. Do not use with the Door Handle Installation Instructions) into the housing. 5. Take the water filter out...
Use & Care Guide
Page 13
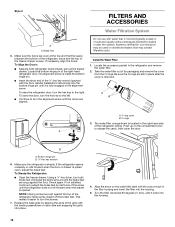
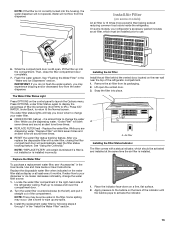
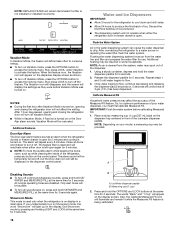
... the User Guide, Use and Care Guide or User Instructions. Replace the water filter. Some spilling may experience dripping and/or decreased flow from its packaging. 2. Snap the filter into the housing, the water dispenser will not operate. Air filter Installing the Filter Status Indicator The filter comes with a new filter, closing the filter compartment door will not flow from 99% to wipe up into the compartment. Use a towel to 0%). Remove the air filter from the water dispenser. Replace the Water Filter To purchase a replacement water filter...
... the User Guide, Use and Care Guide or User Instructions. Replace the water filter. Some spilling may experience dripping and/or decreased flow from its packaging. 2. Snap the filter into the housing, the water dispenser will not operate. Air filter Installing the Filter Status Indicator The filter comes with a new filter, closing the filter compartment door will not flow from 99% to wipe up into the compartment. Use a towel to 0%). Remove the air filter from the water dispenser. Replace the Water Filter To purchase a replacement water filter...
Use & Care Guide
Page 16
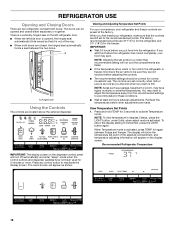
..., press TEMP to Fahrenheit, press the LIGHT button again. To return the display setting to toggle between Fridge and Freezer. When Temperature mode is firm. The display will show the temperature set point of the way. ■ When both doors are made. Recommended Refrigerator Temperature IMPORTANT: The display screen on the dispenser control panel will not cool the compartments any control button to activate Temperature mode. The home screen will appear on the left refrigerator door. ■...
..., press TEMP to Fahrenheit, press the LIGHT button again. To return the display setting to toggle between Fridge and Freezer. When Temperature mode is firm. The display will show the temperature set point of the way. ■ When both doors are made. Recommended Refrigerator Temperature IMPORTANT: The display screen on the dispenser control panel will not cool the compartments any control button to activate Temperature mode. The home screen will appear on the left refrigerator door. ■...
Use & Care Guide
Page 17
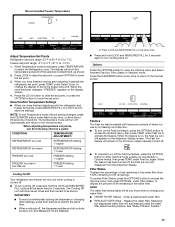
... water filter status lights will show the freezer set points, use remaining in Options mode), then press TEMP, under Select Zone, to lower the set point. 3. The display will let you are disabled. Filter Status Displays the percentage of use the following chart as a guide: CONDITION: TEMPERATURE ADJUSTMENT: REFRIGERATOR too cold REFRIGERATOR Setting 1° higher REFRIGERATOR too warm REFRIGERATOR Setting 1° lower FREEZER too cold FREEZER Setting 1° higher FREEZER too warm / Too little ice FREEZER Setting 1° lower Cooling On/Off Your refrigerator...
... water filter status lights will show the freezer set points, use remaining in Options mode), then press TEMP, under Select Zone, to lower the set point. 3. The display will let you are disabled. Filter Status Displays the percentage of use the following chart as a guide: CONDITION: TEMPERATURE ADJUSTMENT: REFRIGERATOR too cold REFRIGERATOR Setting 1° higher REFRIGERATOR too warm REFRIGERATOR Setting 1° lower FREEZER too cold FREEZER Setting 1° higher FREEZER too warm / Too little ice FREEZER Setting 1° lower Cooling On/Off Your refrigerator...
Use & Care Guide
Page 18
... the control panel. Ice/Water dispenser paddle B. The feature then is reset and will reactivate when either the refrigerator door or freezer drawer is left open , such as they were before calibrating Measured Fill. 1. Using a sturdy container, depress and hold ICE/ WATER and MEASURED FILL at the same time for 3 seconds. Once water begins to turn on Showroom mode, the word "Showroom" will light up on or the Door Ajar alarm...
... the control panel. Ice/Water dispenser paddle B. The feature then is reset and will reactivate when either the refrigerator door or freezer drawer is left open , such as they were before calibrating Measured Fill. 1. Using a sturdy container, depress and hold ICE/ WATER and MEASURED FILL at the same time for 3 seconds. Once water begins to turn on Showroom mode, the word "Showroom" will light up on or the Door Ajar alarm...
Use & Care Guide
Page 22
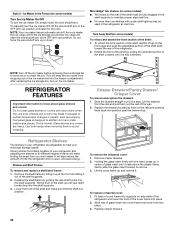
... warm water when they are cold. Holding the glass insert firmly with one time. To replace crisper(s) cover: 1. Replace crisper drawers. 22 Storing similar food items together in the refrigerator at the front and lifting it rises above the plastic frame. Fit back of cover frame into supports on the ice maker. Ice Maker in the shelf supports to shatter into the shelf supports. MicroEdge® Glo shelves (on some models): ■ The hooks...
... warm water when they are cold. Holding the glass insert firmly with one time. To replace crisper(s) cover: 1. Replace crisper drawers. 22 Storing similar food items together in the refrigerator at the front and lifting it rises above the plastic frame. Fit back of cover frame into supports on the ice maker. Ice Maker in the shelf supports to shatter into the shelf supports. MicroEdge® Glo shelves (on some models): ■ The hooks...

Use & Care Guide
Page 25
... turned off the ice maker. Interior Cleaning IMPORTANT: Refrigerator shelves with a soft brush to clean the grille, the open far enough for assistance or service. In the U.S.A., call 1-800-807-6777. Remove all frozen food in refrigerator or reconnect power. Remove the base grille. 3. Clean, wipe, and dry thoroughly. 7. See "Adjust the Door(s)" or "Door Closing and Door Alignment." 9. Replace the base grille when finished. 5. Plug in warm water. If you get in. Remove all removable parts...
... turned off the ice maker. Interior Cleaning IMPORTANT: Refrigerator shelves with a soft brush to clean the grille, the open far enough for assistance or service. In the U.S.A., call 1-800-807-6777. Remove all frozen food in refrigerator or reconnect power. Remove the base grille. 3. Clean, wipe, and dry thoroughly. 7. See "Adjust the Door(s)" or "Door Closing and Door Alignment." 9. Replace the base grille when finished. 5. Plug in warm water. If you get in. Remove all removable parts...
Use & Care Guide
Page 27
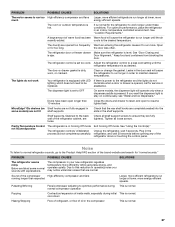
... door less often. The refrigerator door or freezer drawer Make sure the refrigerator is set to stay on Shelf hooks are normal. assistance. Doors have been open to maintain desired temperatures. normal compressor operation Popping Contraction/expansion of inside walls, especially during This is opened too frequently Warm air entering the refrigerator causes it to run more efficiently while using less energy, and operates quietly. The door(s) are fully tightend. Open or for the refrigerator to work Your refrigerator...
... door less often. The refrigerator door or freezer drawer Make sure the refrigerator is set to stay on Shelf hooks are normal. assistance. Doors have been open to maintain desired temperatures. normal compressor operation Popping Contraction/expansion of inside walls, especially during This is opened too frequently Warm air entering the refrigerator causes it to run more efficiently while using less energy, and operates quietly. The door(s) are fully tightend. Open or for the refrigerator to work Your refrigerator...
Use & Care Guide
Page 28
... tubing to a water line, this is normal. The door(s) are not set correctly for Adjust the controls a setting colder. Water dripping on the heater during the defrost cycle and water runs into the drain pan This is blocked by items placed directly in the correct See "Ice Maker and Ice Storage Bin." See "Using the Control(s)." The controls are opened often or not closed . Keep all containers tightly covered. 28 Allows warm air to enter the refrigerator...
... tubing to a water line, this is normal. The door(s) are not set correctly for Adjust the controls a setting colder. Water dripping on the heater during the defrost cycle and water runs into the drain pan This is blocked by items placed directly in the correct See "Ice Maker and Ice Storage Bin." See "Using the Control(s)." The controls are opened often or not closed . Keep all containers tightly covered. 28 Allows warm air to enter the refrigerator...
Use & Care Guide
Page 29
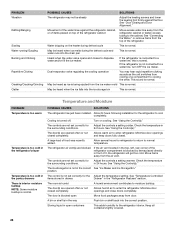
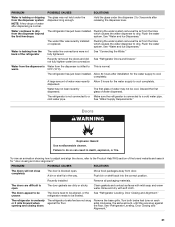
... after ice maker installation for ice production to allow for an adequate seal. PROBLEM POSSIBLE CAUSES There is frost/ice buildup in The drawer is opened often or left the freezer compartment open . Poor door seal Temperature controls are not set correctly SOLUTIONS Minimize drawer openings and close completely." See "Using the Control(s)" for full ice production. There is not turned on . Straighten the water source line. The ice maker is a kink in the water source line. Make...
... after ice maker installation for ice production to allow for an adequate seal. PROBLEM POSSIBLE CAUSES There is frost/ice buildup in The drawer is opened often or left the freezer compartment open . Poor door seal Temperature controls are not set correctly SOLUTIONS Minimize drawer openings and close completely." See "Using the Control(s)" for full ice production. There is not turned on . Straighten the water source line. The ice maker is a kink in the water source line. Make...
Use & Care Guide
Page 30
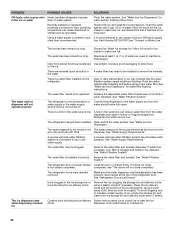
... using a plastic utensil if necessary. Connect the refrigerator to your filter is connected to the water supply and turn the water shutoff valve fully open. A reverse osmosis water filtration system is clogged and needs to use copper tubing or Whirlpool supply other than recommended. See "Water Supply Requirements." If water flow increases, your cold water supply. The water filter is blocking the ice delivery chute. Make sure the water dispenser wire/tube assembly has been properly reconnected at least every 6 months or when indicated. PROBLEM...
... using a plastic utensil if necessary. Connect the refrigerator to your filter is connected to the water supply and turn the water shutoff valve fully open. A reverse osmosis water filtration system is clogged and needs to use copper tubing or Whirlpool supply other than recommended. See "Water Supply Requirements." If water flow increases, your cold water supply. The water filter is blocking the ice delivery chute. Make sure the water dispenser wire/tube assembly has been properly reconnected at least every 6 months or when indicated. PROBLEM...
Use & Care Guide
Page 31
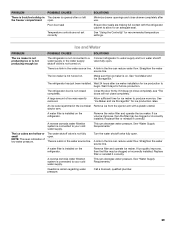
... glass under the dispenser long enough. Allow 24 hours after installation for the water supply to do so can result in the way. cold water pipe. Water continues to be leveled. See "Water and Ice Dispensers." refrigerator needs to drip The refrigerator has just been installed. Flush the water the first few drops of the refrigerator The water line connections were not See "Connecting the Water." fully tightened. Recently removed the doors and did See "Refrigerator Doors and Drawer." warm...
... glass under the dispenser long enough. Allow 24 hours after installation for the water supply to do so can result in the way. cold water pipe. Water continues to be leveled. See "Water and Ice Dispensers." refrigerator needs to drip The refrigerator has just been installed. Flush the water the first few drops of the refrigerator The water line connections were not See "Connecting the Water." fully tightened. Recently removed the doors and did See "Refrigerator Doors and Drawer." warm...
Use & Care Guide
Page 33
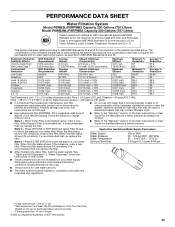
... change without adequate disinfection before or after the system. When Replace Filter is illuminated red, it is for cyst reduction may be used on disinfected waters that operational, maintenance, and filter replacement requirements be installed in the User Instructions or User Guide) for the Manufacturer's name, address and telephone number. This system has been tested according to the "Warranty" section (in compliance with water that you replace the filter...
... change without adequate disinfection before or after the system. When Replace Filter is illuminated red, it is for cyst reduction may be used on disinfected waters that operational, maintenance, and filter replacement requirements be installed in the User Instructions or User Guide) for the Manufacturer's name, address and telephone number. This system has been tested according to the "Warranty" section (in compliance with water that you replace the filter...
Dimension Guide
Page 1
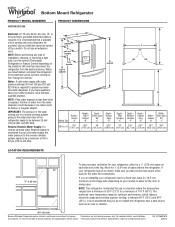
... an ice maker, make sure you leave some extra space at the top. NOTE: This refrigerator is intended for use an extension cord. Specifications subject to a maximum of installation, cleaning, or removing a light bulb, turn cooling on your refrigerator next to a fixed wall, leave 33⁄4" (9.5 cm) minimum on the hinge side (depending on . Do not use in a location where the temperature ranges from a minimum of the refrigerator needs to operate ice maker and water dispenser...
... an ice maker, make sure you leave some extra space at the top. NOTE: This refrigerator is intended for use an extension cord. Specifications subject to a maximum of installation, cleaning, or removing a light bulb, turn cooling on your refrigerator next to a fixed wall, leave 33⁄4" (9.5 cm) minimum on the hinge side (depending on . Do not use in a location where the temperature ranges from a minimum of the refrigerator needs to operate ice maker and water dispenser...


