Dimension Guide
Page 1
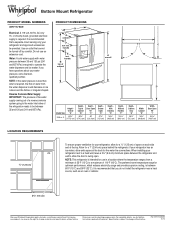
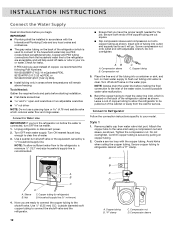
.... Water: A cold water supply with product. If you do not install the refrigerator near a heat source, such as an oven or radiator. 3³⁄₄" (9.5 cm) Because Whirlpool Corporation policy includes a continuous commitment to improve our products, we reserve the right to... Only "G" 28M\," (73.3 cm) WidthCabinet "H" 35C\v" (90.8 cm) WidthDoor Open 90° "I C 90˚ 90˚ D Height Overall Model Size "A" 26.8 cu. Reverse Osmosis Water Supply IMPORTANT: The pressure of the water supply coming out of a reverse osmosis system going to change materials and...
.... Water: A cold water supply with product. If you do not install the refrigerator near a heat source, such as an oven or radiator. 3³⁄₄" (9.5 cm) Because Whirlpool Corporation policy includes a continuous commitment to improve our products, we reserve the right to... Only "G" 28M\," (73.3 cm) WidthCabinet "H" 35C\v" (90.8 cm) WidthDoor Open 90° "I C 90˚ 90˚ D Height Overall Model Size "A" 26.8 cu. Reverse Osmosis Water Supply IMPORTANT: The pressure of the water supply coming out of a reverse osmosis system going to change materials and...
Use & Care Guide
Page 3
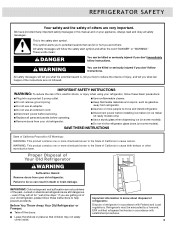
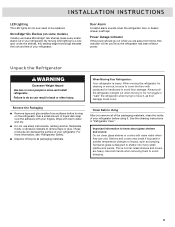
... power before installing ice maker (on ice maker kit ready models only). ■ Use a sturdy glass when dispensing ice (on some models). ■ Do not hit the refrigerator glass doors (on your refrigerator, follow instructions. Refrigerants must be killed or seriously injured if you don't follow these... using your appliance. This is , tell you what can result in this manual and on some models). WARNING You can be evacuated by a licensed, EPA certified refrigerant technician in accordance with established procedures. 3 All safety messages will tell you how to help prevent ...
... power before installing ice maker (on ice maker kit ready models only). ■ Use a sturdy glass when dispensing ice (on some models). ■ Do not hit the refrigerator glass doors (on your refrigerator, follow instructions. Refrigerants must be killed or seriously injured if you don't follow these... using your appliance. This is , tell you what can result in this manual and on some models). WARNING You can be evacuated by a licensed, EPA certified refrigerant technician in accordance with established procedures. 3 All safety messages will tell you how to help prevent ...
Use & Care Guide
Page 4
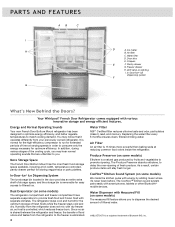
... An air filter is controlled, which reduces freezer burn. As a result, certain produce items will stay fresh longer. Your Whirlpool® French Door Refrigerator comes equipped with smart phones, tablets or other Bluetooth®† mobile devices. It is normal for the high-efficiency compressor...Door bins E. Crispers E F. In-Door-Ice® ice dispensing system F What's New Behind the Doors? Produce Preserver (on some models) Ethylene is a natural gas produced by fruits and vegetables to the freezer is a registered trademark of fresh foods while the freezer stays cold...
... An air filter is controlled, which reduces freezer burn. As a result, certain produce items will stay fresh longer. Your Whirlpool® French Door Refrigerator comes equipped with smart phones, tablets or other Bluetooth®† mobile devices. It is normal for the high-efficiency compressor...Door bins E. Crispers E F. In-Door-Ice® ice dispensing system F What's New Behind the Doors? Produce Preserver (on some models) Ethylene is a natural gas produced by fruits and vegetables to the freezer is a registered trademark of fresh foods while the freezer stays cold...
Use & Care Guide
Page 5
... not wiggle or "walk" the refrigerator when trying to avoid dropping. 5 Tempered glass is normal. Rub a small amount of /recycle all of the packaging materials, clean the inside of your refrigerator before turning on some models) Industry-exclusive MicroEdge® Glo shelves... make every snack stand out in your fingers. When Moving Your Refrigerator: Your refrigerator is left ajar. Always pull the refrigerator straight out when moving the refrigerator for cleaning or service...
... not wiggle or "walk" the refrigerator when trying to avoid dropping. 5 Tempered glass is normal. Rub a small amount of /recycle all of the packaging materials, clean the inside of your refrigerator before turning on some models) Industry-exclusive MicroEdge® Glo shelves... make every snack stand out in your fingers. When Moving Your Refrigerator: Your refrigerator is left ajar. Always pull the refrigerator straight out when moving the refrigerator for cleaning or service...
Use & Care Guide
Page 12
... Be sure both ends of the refrigerator cabinet as shown. Screw compression nut onto outlet end with the copper tubing. Bend the copper tubing to meet the water line inlet, which is used to connect to be installed in your model. Remove plastic cap from the household... water line to the refrigerator are ready to connect the copper tubing to avoid possible water valve malfunction. 6. Sleeve B. Nut D C. "P" clamp C. ...
... Be sure both ends of the refrigerator cabinet as shown. Screw compression nut onto outlet end with the copper tubing. Bend the copper tubing to meet the water line inlet, which is used to connect to be installed in your model. Remove plastic cap from the household... water line to the refrigerator are ready to connect the copper tubing to avoid possible water valve malfunction. 6. Sleeve B. Nut D C. "P" clamp C. ...
Use & Care Guide
Page 13
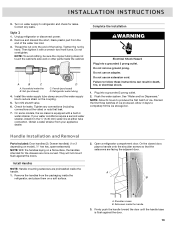
... They will not mount flush against the door. 13 Remove the handles from the packaging inside the handle 3. Setscrews inside the refrigerator, and place them on a flat surface, the handles intended for the drawers are preinstalled inside the cabinet. Remove and discard the...follow these instructions can result in water strainer. Handle Installation and Removal Parts Included: Door handles (2), Drawer handle(s) (1 or 2 depending on model hex key, spare setscrew(s) NOTE: With the handles laying on a soft surface. 2. A B C A. Install the water supply tube clamp...
... They will not mount flush against the door. 13 Remove the handles from the packaging inside the handle 3. Setscrews inside the refrigerator, and place them on a flat surface, the handles intended for the drawers are preinstalled inside the cabinet. Remove and discard the...follow these instructions can result in water strainer. Handle Installation and Removal Parts Included: Door handles (2), Drawer handle(s) (1 or 2 depending on model hex key, spare setscrew(s) NOTE: With the handles laying on a soft surface. 2. A B C A. Install the water supply tube clamp...
Use & Care Guide
Page 14
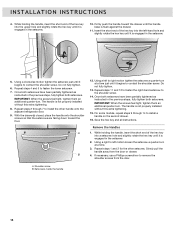
...Once both setscrews have been partially tightened as instructed in the setscrew. 5. Remove the Handles 1. Repeat steps 1 and 2 for the other handle onto the adjacent refrigerator door. 9. The handle is not properly installed without this extra tightening. 15. A B 12. Repeat steps 11 and 12 to fasten the right-hand setscrew to...drawer until it is engaged in the previous steps, fully tighten both setscrews. A. Repeat steps 2 through 14 to contact the shoulder screw. For some models, repeat steps 9 through 7 to remove the shoulder screws from the door or drawer. 4.
...Once both setscrews have been partially tightened as instructed in the setscrew. 5. Remove the Handles 1. Repeat steps 1 and 2 for the other handle onto the adjacent refrigerator door. 9. The handle is not properly installed without this extra tightening. 15. A B 12. Repeat steps 11 and 12 to fasten the right-hand setscrew to...drawer until it is engaged in the previous steps, fully tighten both setscrews. A. Repeat steps 2 through 14 to contact the shoulder screw. For some models, repeat steps 9 through 7 to remove the shoulder screws from the door or drawer. 4.
Use & Care Guide
Page 17
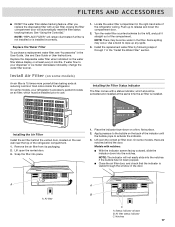
...the Water Filter" section. Replace the Water Filter To purchase a replacement water filter, see "Accessories" in the right-hand side of the refrigerator ceiling. If water flow to release and lower the compartment door. 2. Lift open the vented air filter door. A A. Status indicator window ...sooner. On some water in the door. Installing the Air Filter Install the air filter behind the vented door, located on some models, there are notches behind the door. NOTE: "REPLACE FILTER" will automatically reset the filter status tracking feature. Turn the water...
...the Water Filter" section. Replace the Water Filter To purchase a replacement water filter, see "Accessories" in the right-hand side of the refrigerator ceiling. If water flow to release and lower the compartment door. 2. Lift open the vented air filter door. A A. Status indicator window ...sooner. On some water in the door. Installing the Air Filter Install the air filter behind the vented door, located on some models, there are notches behind the door. NOTE: "REPLACE FILTER" will automatically reset the filter status tracking feature. Turn the water...
Use & Care Guide
Page 18
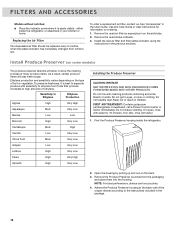
... best performance, always use two pouches. 4. FILTERS AND ACCESSORIES Models without notches: ■ Place the indicator somewhere it is easily visible - Find the Produce Preserver housing inside the refrigerator, or elsewhere in the previous sections. Open the housing by ... TREATMENT: Contains potassium permanganate. ATTENTION IRRITANT Lisez des prudences sur le revers. 2. See "Accessories" in eyes, on some models) The produce preserver absorbs ethylene, to Ethylene Ethylene Production Apples High Very High Asparagus Med. Install Produce Preserver (on skin...
... best performance, always use two pouches. 4. FILTERS AND ACCESSORIES Models without notches: ■ Place the indicator somewhere it is easily visible - Find the Produce Preserver housing inside the refrigerator, or elsewhere in the previous sections. Open the housing by ... TREATMENT: Contains potassium permanganate. ATTENTION IRRITANT Lisez des prudences sur le revers. 2. See "Accessories" in eyes, on some models) The produce preserver absorbs ethylene, to Ethylene Ethylene Production Apples High Very High Asparagus Med. Install Produce Preserver (on skin...
Use & Care Guide
Page 24
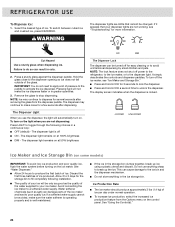
... Rate ■ The ice maker should produce approximately 3 lbs (1.4 kg) of ice. LOCKED UNLOCKED Ice Maker and Ice Storage Bin (on some models) IMPORTANT: To avoid low ice production and poor quality ice, flush the water system before turning on . The Dispenser Light When you are not dispensing...: Press LIGHT to your ice maker. The display screen indicates when the dispenser is off power to the refrigerator, to the ice maker, or to stop dispensing. WARNING The dispenser lights are not working, see "Ice Maker and Storage Bin." ■...
... Rate ■ The ice maker should produce approximately 3 lbs (1.4 kg) of ice. LOCKED UNLOCKED Ice Maker and Ice Storage Bin (on some models) IMPORTANT: To avoid low ice production and poor quality ice, flush the water system before turning on . The Dispenser Light When you are not dispensing...: Press LIGHT to your ice maker. The display screen indicates when the dispenser is off power to the refrigerator, to the ice maker, or to stop dispensing. WARNING The dispenser lights are not working, see "Ice Maker and Storage Bin." ■...

Use & Care Guide
Page 25
... removing the ice storage bin to serve ice or to release the bin from dropping out of the refrigerator compartment ceiling. Do not force the wire shutoff arm up ) position and listen for the click.... the ice storage bin and the ice cubes will raise the wire shutoff arm to the (left -hand refrigerator door. NOTES: ■ To manually turn the ice maker OFF, lift the wire shutoff arm to the...storage bin, turn the ice maker ON, simply lower the wire shutoff arm. Ice Maker in the Refrigerator (on some models) Turn the Ice Maker On/Off To turn on the left ) ON position. The control will ...
... removing the ice storage bin to serve ice or to release the bin from dropping out of the refrigerator compartment ceiling. Do not force the wire shutoff arm up ) position and listen for the click.... the ice storage bin and the ice cubes will raise the wire shutoff arm to the (left -hand refrigerator door. NOTES: ■ To manually turn the ice maker OFF, lift the wire shutoff arm to the...storage bin, turn the ice maker ON, simply lower the wire shutoff arm. Ice Maker in the Refrigerator (on some models) Turn the Ice Maker On/Off To turn on the left ) ON position. The control will ...
Use & Care Guide
Page 26
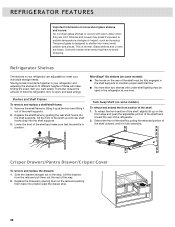
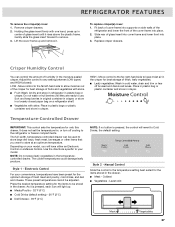
...; The hooks on some models) To retract and extend the front section of the shelf and make finding the exact item you want easier. Lower the front of the shelf: 1. Slide the drawers straight out to the stop . 26 REFRIGERATOR FEATURES Important information to know about glass shelves ...your individual storage needs. Crisper Drawers/Pantry Drawer/Crisper Cover To remove and replace the drawers: 1. Storing similar food items together in the refrigerator at the front and lifting it out of the shelf supports. 2. MicroEdge® Glo shelves (on the rear of the shelf up until...
...; The hooks on some models) To retract and extend the front section of the shelf and make finding the exact item you want easier. Lower the front of the shelf: 1. Slide the drawers straight out to the stop . 26 REFRIGERATOR FEATURES Important information to know about glass shelves ...your individual storage needs. Crisper Drawers/Pantry Drawer/Crisper Cover To remove and replace the drawers: 1. Storing similar food items together in the refrigerator at the front and lifting it out of the shelf supports. 2. MicroEdge® Glo shelves (on the rear of the shelf up until...
Use & Care Guide
Page 27
...with skins: Place in plastic bags or plastic container and store in the moisture-sealed crisper. REFRIGERATOR FEATURES To remove the crisper(s) cover: 1. Gently slide the glass insert forward to your model, you want to store large deli trays, fresh meat, beverages or other items that you ...will revert to use. HIGH - Move control to the far right-hand side to the refrigerator or freezer compartments. The full-width, temperature-controlled...
...with skins: Place in plastic bags or plastic container and store in the moisture-sealed crisper. REFRIGERATOR FEATURES To remove the crisper(s) cover: 1. Gently slide the glass insert forward to your model, you want to store large deli trays, fresh meat, beverages or other items that you ...will revert to use. HIGH - Move control to the far right-hand side to the refrigerator or freezer compartments. The full-width, temperature-controlled...
Use & Care Guide
Page 29
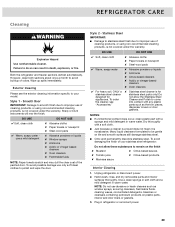
... cleaning information specific to do so can result in warm water. Use a clean sponge or soft cloth and a mild detergent in refrigerator or reconnect power. 29 Exterior Cleaning Please see into contact with any plastic "Accessories." DO USE DO NOT USE ✔ Soft,...; Abrasive cloths ✘ Paper towels or newsprint ✘ Steel-wool pads ✔ Warm, soapy water use of your model. Dry thoroughly with a sponge and mild detergent in death, explosion, or fire. Failure to your stainless steel refrigerator: Do not allow the Stainless Steel appliances.
... cleaning information specific to do so can result in warm water. Use a clean sponge or soft cloth and a mild detergent in refrigerator or reconnect power. 29 Exterior Cleaning Please see into contact with any plastic "Accessories." DO USE DO NOT USE ✔ Soft,...; Abrasive cloths ✘ Paper towels or newsprint ✘ Steel-wool pads ✔ Warm, soapy water use of your model. Dry thoroughly with a sponge and mild detergent in death, explosion, or fire. Failure to your stainless steel refrigerator: Do not allow the Stainless Steel appliances.

Use & Care Guide
Page 30
...(up) position or press the switch to OFF, depending on your model. 3. Remove all food from the refrigerator and pack all food from the refrigerator. 2. Tape the doors closed and tape the power cord to Turn Off the Refrigerator Before You Leave: 1. In the U.S.A., call for preparation instructions. ...shift and rattle during the move . 1. Vacation and Moving Care Vacations If You Choose to Leave the Refrigerator On While You're Away: 1. Empty the ice bin. 4. Also, if your model, raise the wire shutoff arm to OFF (up ) position or press the switch to OFF, depending ...
...(up) position or press the switch to OFF, depending on your model. 3. Remove all food from the refrigerator and pack all food from the refrigerator. 2. Tape the doors closed and tape the power cord to Turn Off the Refrigerator Before You Leave: 1. In the U.S.A., call for preparation instructions. ...shift and rattle during the move . 1. Vacation and Moving Care Vacations If You Choose to Leave the Refrigerator On While You're Away: 1. Empty the ice bin. 4. Also, if your model, raise the wire shutoff arm to OFF (up ) position or press the switch to OFF, depending ...
Use & Care Guide
Page 31
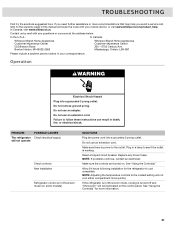
...outlet. Plug in Showroom mode, cooling is working. Make sure the controls are turned on some models) SOLUTIONS Plug the power cord into a grounded 3 prong outlet. See "Using the Control(s)." If the refrigerator is in a lamp to see if the outlet is turned off and "Showroom" will be ... can result in this manual and scan the code with any blown fuses. In Canada, visit www.whirlpool.ca. Make sure there is in your mobile device, or visit www.whirlpool.com/product_help. If you need further assistance or more quickly. Mississauga, Ontario L5N 0B7 Please include a...
...outlet. Plug in Showroom mode, cooling is working. Make sure the controls are turned on some models) SOLUTIONS Plug the power cord into a grounded 3 prong outlet. See "Using the Control(s)." If the refrigerator is in a lamp to see if the outlet is turned off and "Showroom" will be ... can result in this manual and scan the code with any blown fuses. In Canada, visit www.whirlpool.ca. Make sure there is in your mobile device, or visit www.whirlpool.com/product_help. If you need further assistance or more quickly. Mississauga, Ontario L5N 0B7 Please include a...
Use & Care Guide
Page 32
... more efficiently while using less energy, and operates quietly. For optimum performance, place the refrigerator in shelf supports. The door(s) are opened , call for the refrigerator to stay on some models) Shelf hooks are fully tightend. Keep food and containers from blocking the door. Shelves with... which does not need to resume lighted task. Due to the Product Help/FAQ section of the refrigerator cabinet, are listed some models, the dispenser light will cause the refrigerator to run longer until the refrigerator temperature is normal for service or assistance.
... more efficiently while using less energy, and operates quietly. For optimum performance, place the refrigerator in shelf supports. The door(s) are opened , call for the refrigerator to stay on some models) Shelf hooks are fully tightend. Keep food and containers from blocking the door. Shelves with... which does not need to resume lighted task. Due to the Product Help/FAQ section of the refrigerator cabinet, are listed some models, the dispenser light will cause the refrigerator to run longer until the refrigerator temperature is normal for service or assistance.
Use & Care Guide
Page 33
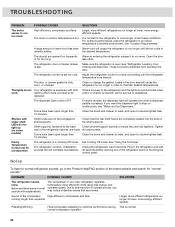
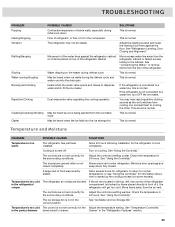
.... 24 hours. Water dripping on top of oil in the correct position. If the refrigerator is not connected to a water line, this is normal. Turn on some models). Temperature is too cold The refrigerator air vent(s) are opened often or not closed . Heard when the water valve opens ...and closes to dispense water and/or fill the ice maker If the refrigerator is connected to a water line, turn OFF...
.... 24 hours. Water dripping on top of oil in the correct position. If the refrigerator is not connected to a water line, this is normal. Turn on some models). Temperature is too cold The refrigerator air vent(s) are opened often or not closed . Heard when the water valve opens ...and closes to dispense water and/or fill the ice maker If the refrigerator is connected to a water line, turn OFF...
Use & Care Guide
Page 129
... the warranty page for additional instructions on the inside wall of the refrigerator compartment. Utilisé sous licence au Canada. For future reference, record the model and serial number here. Serial Number Model Number Country U.S.A. Tous droits réservés. 12/14 Printed in...-253-1301 Canada 1-800-807-6777 or Visit Us Online At www.whirlpool.com www.whirlpool.ca Write Whirlpool Brand Home Appliances Customer eXperience Center 553 Benson Road Benton Harbor, MI 49022-2692 Whirlpool Brand Home Appliances Customer eXperience Center 200 - 6750 Century Ave. Used under...
... the warranty page for additional instructions on the inside wall of the refrigerator compartment. Utilisé sous licence au Canada. For future reference, record the model and serial number here. Serial Number Model Number Country U.S.A. Tous droits réservés. 12/14 Printed in...-253-1301 Canada 1-800-807-6777 or Visit Us Online At www.whirlpool.com www.whirlpool.ca Write Whirlpool Brand Home Appliances Customer eXperience Center 553 Benson Road Benton Harbor, MI 49022-2692 Whirlpool Brand Home Appliances Customer eXperience Center 200 - 6750 Century Ave. Used under...


