Dimension Guide
Page 1
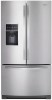
...) WidthDoor Open 90° "I C 90˚ 90˚ D Height Overall Model Size "A" 26.8 cu. Use an outlet that a separate circuit serving only your refrigerator has an ice maker, allow the door to change materials and specifications without notice. NOTE: If the water pressure is less than what is recommended that cannot be provided. PRODUCT DIMENSIONS H G cabinet F not incl. NOTE: This refrigerator is required. Dimensions are...
...) WidthDoor Open 90° "I C 90˚ 90˚ D Height Overall Model Size "A" 26.8 cu. Use an outlet that a separate circuit serving only your refrigerator has an ice maker, allow the door to change materials and specifications without notice. NOTE: If the water pressure is less than what is recommended that cannot be provided. PRODUCT DIMENSIONS H G cabinet F not incl. NOTE: This refrigerator is required. Dimensions are...
Use & Care Guide
Page 2
... - Cooling On/Off 21 Please read the Use and Care Instructions in this guide before operating your purchase and welcome to the Whirlpool Brand family of Your Old Refrigerator 3 PARTS AND FEATURES 4 What's New Behind the Doors 4 INSTALLATION INSTRUCTIONS 5 Unpack the Refrigerator 5 - The Dispenser Light 24 - Final Steps 9 Remove and Replace Freezer Drawer Front 10 - Complete the Installation 13 Handle Installation and Removal 13 - The Water Filter Status Light 16 - Ice Production Rate 24 - Style 1 - Shelves and Shelf Frames 26 - Interior Cleaning 29...
... - Cooling On/Off 21 Please read the Use and Care Instructions in this guide before operating your purchase and welcome to the Whirlpool Brand family of Your Old Refrigerator 3 PARTS AND FEATURES 4 What's New Behind the Doors 4 INSTALLATION INSTRUCTIONS 5 Unpack the Refrigerator 5 - The Dispenser Light 24 - Final Steps 9 Remove and Replace Freezer Drawer Front 10 - Complete the Installation 13 Handle Installation and Removal 13 - The Water Filter Status Light 16 - Ice Production Rate 24 - Style 1 - Shelves and Shelf Frames 26 - Interior Cleaning 29...
Use & Care Guide
Page 4
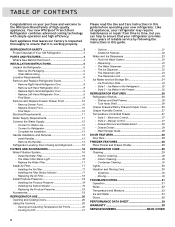
.... Energy and Normal Operating Sounds Your new French Door Bottom Mount refrigerator has been designed to optimize energy efficiency, and better regulate temperatures to the freezer is controlled, which reduces freezer burn. The refrigerator stays cool and humid for storing veggie trays or party platters. Replacing the water filter every 6 months ensures clean, filtered drinking water. As a result, certain produce items will stay fresh longer. PARTS AND FEATURES AB C I . Air filter C. In-Door-Ice® ice dispensing...
.... Energy and Normal Operating Sounds Your new French Door Bottom Mount refrigerator has been designed to optimize energy efficiency, and better regulate temperatures to the freezer is controlled, which reduces freezer burn. The refrigerator stays cool and humid for storing veggie trays or party platters. Replacing the water filter every 6 months ensures clean, filtered drinking water. As a result, certain produce items will stay fresh longer. PARTS AND FEATURES AB C I . Air filter C. In-Door-Ice® ice dispensing...
Use & Care Guide
Page 5
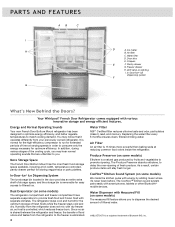
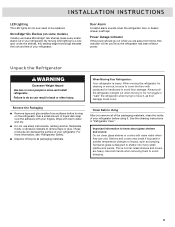
... break if exposed to move it . Glass shelves and covers are cold. By moving LED lighting to shatter into many small, pebble-size pieces. Door Alarm A helpful alarm sounds when the refrigerator door or freezer drawer is normal. Unpack the Refrigerator WARNING Excessive Weight Hazard Use two or more information, see "Refrigerator Safety." ■ Dispose of your fingers. Wipe with warm water when they are heavy. These products...
... break if exposed to move it . Glass shelves and covers are cold. By moving LED lighting to shatter into many small, pebble-size pieces. Door Alarm A helpful alarm sounds when the refrigerator door or freezer drawer is normal. Unpack the Refrigerator WARNING Excessive Weight Hazard Use two or more information, see "Refrigerator Safety." ■ Dispose of your fingers. Wipe with warm water when they are heavy. These products...
Use & Care Guide
Page 11
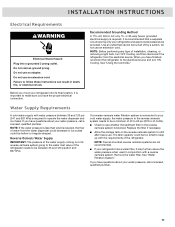
... ice cubes could be hollow or irregular shaped. When you have the proper electrical connection. See "Using the Control(s)." Remove the water filter. Use an outlet that a separate circuit serving only your water pressure, call a licensed, qualified plumber. Reverse Osmosis Water Supply IMPORTANT: The pressure of the water supply coming out of a reverse osmosis system going to the water inlet valve of the refrigerator needs to be a minimum of the refrigerator. Replace...
... ice cubes could be hollow or irregular shaped. When you have the proper electrical connection. See "Using the Control(s)." Remove the water filter. Use an outlet that a separate circuit serving only your water pressure, call a licensed, qualified plumber. Reverse Osmosis Water Supply IMPORTANT: The pressure of the water supply coming out of a reverse osmosis system going to the water inlet valve of the refrigerator needs to be a minimum of the refrigerator. Replace...
Use & Care Guide
Page 12
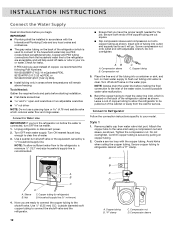
...-linked polyethylene) tube. Copper tubing 5. NOTE: Always drain the water line before making the final connection to clear line of copper, we recommend the following Part Numbers: W10505928RP (7 ft [2.14 m] jacketed PEX), 8212547RP (5 ft [1.52 m] PEX), or W10267701RP (25 ft [7.62 m] PEX). ■ Install tubing only in accordance with adjustable wrench. Now you turn OFF the ice maker. 1. "P" clamp C. Compression nut C C. Place the free end of the...
...-linked polyethylene) tube. Copper tubing 5. NOTE: Always drain the water line before making the final connection to clear line of copper, we recommend the following Part Numbers: W10505928RP (7 ft [2.14 m] jacketed PEX), 8212547RP (5 ft [1.52 m] PEX), or W10267701RP (25 ft [7.62 m] PEX). ■ Install tubing only in accordance with adjustable wrench. Now you turn OFF the ice maker. 1. "P" clamp C. Compression nut C C. Place the free end of the...

Use & Care Guide
Page 15
... Door Handle Installation Instructions) into the bottom hinge pin until it is inside the bottom hinge pin. ■ Insert the short end of the right-hand refrigerator door. Locate the bottom hinge pin of the ¹⁄₈" hex key wrench (packed with the door opening the refrigerator doors or freezer drawer. Front roller 15 Remove the base grille. Make sure the doors close easily or the doors pop open , adjust the brake feet...
... Door Handle Installation Instructions) into the bottom hinge pin until it is inside the bottom hinge pin. ■ Insert the short end of the right-hand refrigerator door. Locate the bottom hinge pin of the ¹⁄₈" hex key wrench (packed with the door opening the refrigerator doors or freezer drawer. Front roller 15 Remove the base grille. Make sure the doors close easily or the doors pop open , adjust the brake feet...
Use & Care Guide
Page 16
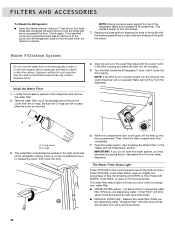
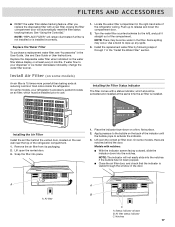
... when to change your water filter. ■ ORDER FILTER (yellow) - The water filter status lights will sound three times. 16 NOTE: Having someone push against the floor. Water Filtration System Do not use with the leveling assemblies on the control panel to adjust the brake feet by aligning the ends of the refrigerator ceiling. Install the Water Filter 1. Press OPTIONS, under Back, to return to turn both brake feet clockwise the...
... when to change your water filter. ■ ORDER FILTER (yellow) - The water filter status lights will sound three times. 16 NOTE: Having someone push against the floor. Water Filtration System Do not use with the leveling assemblies on the control panel to adjust the brake feet by aligning the ends of the refrigerator ceiling. Install the Water Filter 1. Press OPTIONS, under Back, to return to turn both brake feet clockwise the...
Use & Care Guide
Page 17
... installed or is 15 times more powerful than baking soda at the same time the air filter is visible through 7 in the "Install the Water Filter" section. Install the replacement water filter by following steps 2 through the window in the right-hand side of the compartment. Locate the water filter compartment in the door. Turn the water filter counterclockwise (to the bubble on some water in the User Guide, Use and Care Guide or User Instructions...
... installed or is 15 times more powerful than baking soda at the same time the air filter is visible through 7 in the "Install the Water Filter" section. Install the replacement water filter by following steps 2 through the window in the right-hand side of the compartment. Locate the water filter compartment in the door. Turn the water filter counterclockwise (to the bubble on some water in the User Guide, Use and Care Guide or User Instructions...
Use & Care Guide
Page 20
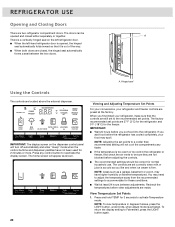
... shown. 20 Viewing and Adjusting Temperature Set Points For your convenience, your refrigerator, make sure that it is too warm or too cold in degrees Celsius, press the LIGHT button, under Units, when adjust mode is firm. Recheck the temperatures before the refrigerator has cooled completely, your food may spoil. Press and hold TEMP for 2 minutes or more. Hinged seal Using the Controls The controls are two refrigerator compartment doors. The home...
... shown. 20 Viewing and Adjusting Temperature Set Points For your convenience, your refrigerator, make sure that it is too warm or too cold in degrees Celsius, press the LIGHT button, under Units, when adjust mode is firm. Recheck the temperatures before the refrigerator has cooled completely, your food may spoil. Press and hold TEMP for 2 minutes or more. Hinged seal Using the Controls The controls are two refrigerator compartment doors. The home...
Use & Care Guide
Page 21
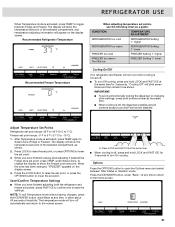
... been changed, "FREEZER" appears on the display screen. A. The display will show the Freezer zone set points, use the following chart as a guide: CONDITION: TEMPERATURE ADJUSTMENT: REFRIGERATOR too cold REFRIGERATOR Setting 1° higher REFRIGERATOR too warm REFRIGERATOR Setting 1° lower FREEZER too cold FREEZER Setting 1° higher FREEZER too warm / Too little ice FREEZER Setting 1° lower Cooling On/Off Your refrigerator and freezer will blink seven times and then remain lit as shown. 2. Press the LOCK button to raise the set point...
... been changed, "FREEZER" appears on the display screen. A. The display will show the Freezer zone set points, use the following chart as a guide: CONDITION: TEMPERATURE ADJUSTMENT: REFRIGERATOR too cold REFRIGERATOR Setting 1° higher REFRIGERATOR too warm REFRIGERATOR Setting 1° lower FREEZER too cold FREEZER Setting 1° higher FREEZER too warm / Too little ice FREEZER Setting 1° lower Cooling On/Off Your refrigerator and freezer will blink seven times and then remain lit as shown. 2. Press the LOCK button to raise the set point...

Use & Care Guide
Page 22
... door is left open again for 5 minutes. ■ NOTE: To mute the audible alarm while keeping the doors open for 5 minutes and cooling is not installed or installed incorrectly. ■ To turn off Vacation Mode, press the OPTIONS button to access the Options menu, then press LOCK to change your water filter. ■ ORDER FILTER (Yellow) - The feature then is reset and will display the settings as while cleaning the inside...
... door is left open again for 5 minutes. ■ NOTE: To mute the audible alarm while keeping the doors open for 5 minutes and cooling is not installed or installed incorrectly. ■ To turn off Vacation Mode, press the OPTIONS button to access the Options menu, then press LOCK to change your water filter. ■ ORDER FILTER (Yellow) - The feature then is reset and will display the settings as while cleaning the inside...

Use & Care Guide
Page 23
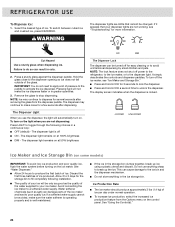
... the ice maker, see "Ice Maker and Storage Bin." To Dispense Water: 1. Select water. 2. To Clean the Ice Dispenser Chute: Humidity causes ice to a water source or replacing the water filter, flush the water system. Noise from the ice crusher is not dispensed regularly, it takes longer than recommended. See "Water Supply Requirements." ■ Ice travels from the system, water may be required in size. ■ When changing from the water line and filter and prepares the water filter for use. To turn...
... the ice maker, see "Ice Maker and Storage Bin." To Dispense Water: 1. Select water. 2. To Clean the Ice Dispenser Chute: Humidity causes ice to a water source or replacing the water filter, flush the water system. Noise from the ice crusher is not dispensed regularly, it takes longer than recommended. See "Water Supply Requirements." ■ Ice travels from the system, water may be required in size. ■ When changing from the water line and filter and prepares the water filter for use. To turn...
Use & Care Guide
Page 24
... quality ice, flush the water system before turning on at 50% brightness ON DIM The Dispenser Lock The dispenser can damage parts of your ice will be avoided, make noise for the storage bin to poor quality ice. Avoid connecting the ice maker to the dispenser opening so ice does not fall outside of ice. REFRIGERATOR USE To Dispense Ice: 1. Select the desired type of ice produced. WARNING The dispenser lights are not working, see "Ice Maker and Storage Bin...
... quality ice, flush the water system before turning on at 50% brightness ON DIM The Dispenser Lock The dispenser can damage parts of your ice will be avoided, make noise for the storage bin to poor quality ice. Avoid connecting the ice maker to the dispenser opening so ice does not fall outside of ice. REFRIGERATOR USE To Dispense Ice: 1. Select the desired type of ice produced. WARNING The dispenser lights are not working, see "Ice Maker and Storage Bin...

Use & Care Guide
Page 30
... service. Empty the ice bin. NOTE: Depending on your new home, put everything back and refer to the refrigerator. Empty the ice bin. 4. Unplug refrigerator. 6. Property damage can occur if the water supply is opened, call for the move . 8. Tape rubber or wood blocks to get to your model. 2. Take out all removable parts, wrap them well, and tape them open far enough for preparation instructions. REFRIGERATOR CARE Condenser Cleaning...
... service. Empty the ice bin. NOTE: Depending on your new home, put everything back and refer to the refrigerator. Empty the ice bin. 4. Unplug refrigerator. 6. Property damage can occur if the water supply is opened, call for the move . 8. Tape rubber or wood blocks to get to your model. 2. Take out all removable parts, wrap them well, and tape them open far enough for preparation instructions. REFRIGERATOR CARE Condenser Cleaning...
Use & Care Guide
Page 32
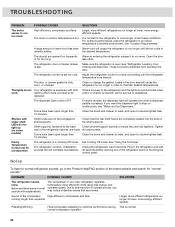
... is power to ensure they are loose all loose screws. If you may notice unfamiliar noises that the rear shelf hooks are completely seated into the slots in your new refrigerator regulates temperature more energy efficient speeds. Adjust the refrigerator control to a less cold setting until the air cools to the Product Help/FAQ section of the refrigerator doors or touching the control panel. The door or drawer gasket is set too cold. The dispenser light...
... is power to ensure they are loose all loose screws. If you may notice unfamiliar noises that the rear shelf hooks are completely seated into the slots in your new refrigerator regulates temperature more energy efficient speeds. Adjust the refrigerator control to a less cold setting until the air cools to the Product Help/FAQ section of the refrigerator doors or touching the control panel. The door or drawer gasket is set too cold. The dispenser light...
Use & Care Guide
Page 33
... to dispense water and/or fill the ice maker If the refrigerator is connected to the cabinet. Cooling is blocked by items placed directly in the correct position. Allows warm air to a water line, turn OFF the ice maker. If the air vent located in the top, left, rear corner of the refrigerator in the compressor This is too cold The refrigerator air vent(s) are not set correctly for Adjust the controls a setting warmer. See "Using the Control(s)." Drawer...
... to dispense water and/or fill the ice maker If the refrigerator is connected to the cabinet. Cooling is blocked by items placed directly in the correct position. Allows warm air to a water line, turn OFF the ice maker. If the air vent located in the top, left, rear corner of the refrigerator in the compressor This is too cold The refrigerator air vent(s) are not set correctly for Adjust the controls a setting warmer. See "Using the Control(s)." Drawer...

Use & Care Guide
Page 34
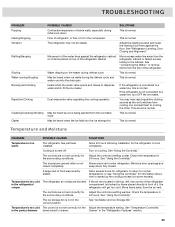
... O U B L E S H O O T I N G PROBLEM There is interior moisture buildup NOTE: Some moisture buildup is jammed in the ice maker Remove ice from door. The door(s) are not set correctly. Straighten the water source line. Minimize drawer openings and close drawer completely after ice maker installation for ice maker to your cold water Requirements." Make sure the ice maker is not fully open . Replace filter or reinstall it correctly. The water shutoff valve is on . Turn the water shutoff valve fully open . There is connected to enter the refrigerator. Remove...
... O U B L E S H O O T I N G PROBLEM There is interior moisture buildup NOTE: Some moisture buildup is jammed in the ice maker Remove ice from door. The door(s) are not set correctly. Straighten the water source line. Minimize drawer openings and close drawer completely after ice maker installation for ice maker to your cold water Requirements." Make sure the ice maker is not fully open . Replace filter or reinstall it correctly. The water shutoff valve is on . Turn the water shutoff valve fully open . There is connected to enter the refrigerator. Remove...
Use & Care Guide
Page 35
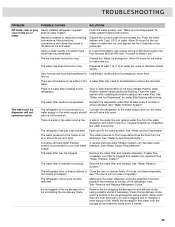
...-flavored ice and water. See "Water Supply Requirements." See "Water Filtration System." Remove the ice clogging the storage bin and delivery chute, using a warm, damp cloth, then dry both the storage bin and delivery chute every 2 weeks. 35 See "Water and Ice Dispensers" for water filter flushing instructions. Discard ice. Wash ice storage bin. The water filter is Close the door or drawer firmly. Recently installed or replaced plumbing connections. Allow 24 hours for the ice maker to make new ice, and...
...-flavored ice and water. See "Water Supply Requirements." See "Water Filtration System." Remove the ice clogging the storage bin and delivery chute, using a warm, damp cloth, then dry both the storage bin and delivery chute every 2 weeks. 35 See "Water and Ice Dispensers" for water filter flushing instructions. Discard ice. Wash ice storage bin. The water filter is Close the door or drawer firmly. Recently installed or replaced plumbing connections. Allow 24 hours for the ice maker to make new ice, and...
Use & Care Guide
Page 38
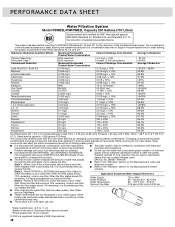
... trace levels, these compounds can occur if all instructions are not necessarily in your water supply. warranty. When the filter status shows 10% remaining, order a new filter. Temp. = 68°F to 71.6°F (20°C to check the status of your water filter. local laws and regulations. waters that may vary. ■ The product is microbiologically unsafe or of unknown ■ Use replacement filter P9RFWB2L, part...
... trace levels, these compounds can occur if all instructions are not necessarily in your water supply. warranty. When the filter status shows 10% remaining, order a new filter. Temp. = 68°F to 71.6°F (20°C to check the status of your water filter. local laws and regulations. waters that may vary. ■ The product is microbiologically unsafe or of unknown ■ Use replacement filter P9RFWB2L, part...


