Use & Care Guide
Page 2
... in this manual and on some models). SAVE THESE INSTRUCTIONS State of California Proposition 65 Warnings: WARNING: This product contains one or more chemicals known to the State of California to move and install refrigerator. ■ Disconnect power before installing ice maker (on ice maker kit ready models only). ■ Use a sturdy glass when dispensing ice (on some models). ■ Do not hit the refrigerator glass doors (on your old refrigerator. ■...
... in this manual and on some models). SAVE THESE INSTRUCTIONS State of California Proposition 65 Warnings: WARNING: This product contains one or more chemicals known to the State of California to move and install refrigerator. ■ Disconnect power before installing ice maker (on ice maker kit ready models only). ■ Use a sturdy glass when dispensing ice (on some models). ■ Do not hit the refrigerator glass doors (on your old refrigerator. ■...
Use & Care Guide
Page 3
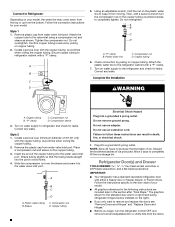
... Old Refrigerator or Freezer: ■ Take off the doors. ■ Leave the shelves in accordance with warm water and dry. ■ Do not use sharp instruments, rubbing alcohol, flammable fluids, or abrasive cleaners to sudden temperature changes or impact, such as floor damage could occur. Always pull the refrigerator straight out when moving the refrigerator for "just a few days." INSTALLATION INSTRUCTIONS Unpack the Refrigerator...
... Old Refrigerator or Freezer: ■ Take off the doors. ■ Leave the shelves in accordance with warm water and dry. ■ Do not use sharp instruments, rubbing alcohol, flammable fluids, or abrasive cleaners to sudden temperature changes or impact, such as floor damage could occur. Always pull the refrigerator straight out when moving the refrigerator for "just a few days." INSTALLATION INSTRUCTIONS Unpack the Refrigerator...
Use & Care Guide
Page 4
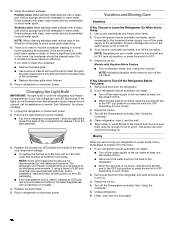
... freezing. ■ For models with any type of installation, cleaning, or removing a light bulb, turn the freezer control to follow the instructions provided with water filters, the disposable water filter should be replaced at least every 6 months. TOOLS NEEDED: ■ Flat-blade screwdriver and ¹⁄₂" Open-end or two adjustable wrenches Nut driver Drill bit ■ Cordless drill IMPORTANT: ■ All installations must meet local plumbing code requirements. ■ Do not use...
... freezing. ■ For models with any type of installation, cleaning, or removing a light bulb, turn the freezer control to follow the instructions provided with water filters, the disposable water filter should be replaced at least every 6 months. TOOLS NEEDED: ■ Flat-blade screwdriver and ¹⁄₂" Open-end or two adjustable wrenches Nut driver Drill bit ■ Cordless drill IMPORTANT: ■ All installations must meet local plumbing code requirements. ■ Do not use...

Use & Care Guide
Page 5
... have selected. Reverse Osmosis Water Supply IMPORTANT: The pressure of the water supply coming out of a reverse osmosis system going to the water inlet valve of copper tubing are acceptable, and will help avoid off the ice maker to avoid excessive noise or damage to the household water line) is under the pipe clamp. If PEX tubing is used to connect to the water valve. Turn OFF main water supply. Using a cordless drill...
... have selected. Reverse Osmosis Water Supply IMPORTANT: The pressure of the water supply coming out of a reverse osmosis system going to the water inlet valve of copper tubing are acceptable, and will help avoid off the ice maker to avoid excessive noise or damage to the household water line) is under the pipe clamp. If PEX tubing is used to connect to the water valve. Turn OFF main water supply. Using a cordless drill...
Use & Care Guide
Page 6
... batches of the copper tubing into the water valve inlet port. Allow 3 days to the door style of your model. ■ All graphics referenced in the following instructions are for leaks. Follow the instructions specific to completely fill the ice storage bin. Plastic water tubing C. Do not remove ground prong. Plug into the port to the refrigerator and check for your model, the water line may come down from...
... batches of the copper tubing into the water valve inlet port. Allow 3 days to the door style of your model. ■ All graphics referenced in the following instructions are for leaks. Follow the instructions specific to completely fill the ice storage bin. Plastic water tubing C. Do not remove ground prong. Plug into the port to the refrigerator and check for your model, the water line may come down from...
Use & Care Guide
Page 7
... refrigerator door as shown in Graphic 2. Using a Phillips screwdriver, attach the handle with the right-hand side door, remove the parts for the bottom hinge as shown in death or electrical shock. 1. Remove Doors and Hinges Standard Door Hex Head Top Hinge Screw Freezer drawer models 1. NOTE: Provide additional support for later use. Remove the center hinge pin and remove the hinge screws as shown in Top Hinge graphic. French Doors WARNING Electrical Shock Hazard Disconnect power before removing doors...
... refrigerator door as shown in Graphic 2. Using a Phillips screwdriver, attach the handle with the right-hand side door, remove the parts for the bottom hinge as shown in death or electrical shock. 1. Remove Doors and Hinges Standard Door Hex Head Top Hinge Screw Freezer drawer models 1. NOTE: Provide additional support for later use. Remove the center hinge pin and remove the hinge screws as shown in Top Hinge graphic. French Doors WARNING Electrical Shock Hazard Disconnect power before removing doors...
Use & Care Guide
Page 8
... completely. 3. Freezer door models 1. See Graphic 6. 2. Adjust the doors so that the hinge pin is aligned with the top of the freezer door. Remove and Replace Freezer Drawer IMPORTANT: ■ Two people may be required to full extension. 2. Open the freezer drawer to remove and replace the freezer drawer. ■ All graphics are working . 3. Keep the screws in Top Hinge graphic. Reinstall top hinge cover as shown in Top Hinge graphic. 2. Failure to refrigerator. 8 Return...
... completely. 3. Freezer door models 1. See Graphic 6. 2. Adjust the doors so that the hinge pin is aligned with the top of the freezer door. Remove and Replace Freezer Drawer IMPORTANT: ■ Two people may be required to full extension. 2. Open the freezer drawer to remove and replace the freezer drawer. ■ All graphics are working . 3. Keep the screws in Top Hinge graphic. Reinstall top hinge cover as shown in Top Hinge graphic. 2. Failure to refrigerator. 8 Return...
Use & Care Guide
Page 10
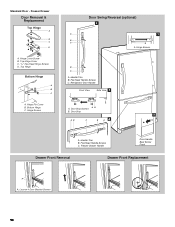
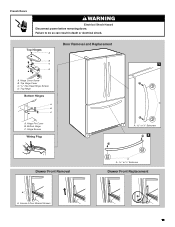
... Door - Freezer Drawer Door Removal & Replacement Top Hinge A B C D A. Hinge Pin Cover B. Hinge Screws B A A. Handle Trim B. Top Hinge Bottom Hinge A B C A. Door Stop 5 AB C B A4 A. Flat-Head Handle Screws C. Bottom Hinge C. Loosen 4 Door Bracket Screws 10 Top Hinge Cover C. 5/16" Hex-Head Hinge Screws D. Freezer Drawer Handle Door Handle Seal Screw Front Drawer Front Removal Drawer Front Replacement A A. Hinge Cover Screw B. Hinge Screws Door Swing Reversal (optional) 2 A 1 B C A A A. Refrigerator Door Handle Front View Side View 3 A. Door Stop...
... Door - Freezer Drawer Door Removal & Replacement Top Hinge A B C D A. Hinge Pin Cover B. Hinge Screws B A A. Handle Trim B. Top Hinge Bottom Hinge A B C A. Door Stop 5 AB C B A4 A. Flat-Head Handle Screws C. Bottom Hinge C. Loosen 4 Door Bracket Screws 10 Top Hinge Cover C. 5/16" Hex-Head Hinge Screws D. Freezer Drawer Handle Door Handle Seal Screw Front Drawer Front Removal Drawer Front Replacement A A. Hinge Cover Screw B. Hinge Screws Door Swing Reversal (optional) 2 A 1 B C A A A. Refrigerator Door Handle Front View Side View 3 A. Door Stop...
Use & Care Guide
Page 11
Hinge Cover Screw B. Top Hinge Cover C. 5/16" Hex Head Hinge Screws D. Hinge Screws Wiring Plug 1 A A or ¹⁄₈" Setscrew 2 Drawer Front Removal A A. Failure to do so can result in death or electrical shock. Loosen 4 Door Bracket Screws A A or ¹⁄₈" Setscrew Drawer Front Replacement 11 Top Hinge Bottom Hinges A B C A. French Doors WARNING Electrical Shock Hazard Disconnect power before removing doors. Bottom Hinge C. Hinge Pin Cover B. Top Hinges A B C D Door Removal and Replacement A.
Hinge Cover Screw B. Top Hinge Cover C. 5/16" Hex Head Hinge Screws D. Hinge Screws Wiring Plug 1 A A or ¹⁄₈" Setscrew 2 Drawer Front Removal A A. Failure to do so can result in death or electrical shock. Loosen 4 Door Bracket Screws A A or ¹⁄₈" Setscrew Drawer Front Replacement 11 Top Hinge Bottom Hinges A B C A. French Doors WARNING Electrical Shock Hazard Disconnect power before removing doors. Bottom Hinge C. Hinge Pin Cover B. Top Hinges A B C D Door Removal and Replacement A.
Use & Care Guide
Page 12
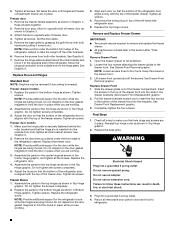
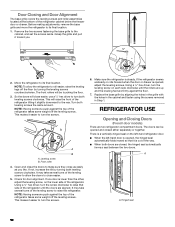
... floor by turning the leveling screws counterclockwise. Replace the base grille by turning both leveling screws clockwise. Remove the two screws fastening the base grille to its final location. 1. Leveling screw B. Open and close the doors to raise the refrigerator. It may take several turns of the leveling screw to make sure they close as easily as you . ¹⁄₄" 2. REFRIGERATOR USE Opening and Closing Doors (French door models) There...
... floor by turning the leveling screws counterclockwise. Replace the base grille by turning both leveling screws clockwise. Remove the two screws fastening the base grille to its final location. 1. Leveling screw B. Open and close the doors to raise the refrigerator. It may take several turns of the leveling screw to make sure they close as easily as you . ¹⁄₄" 2. REFRIGERATOR USE Opening and Closing Doors (French door models) There...

Use & Care Guide
Page 13
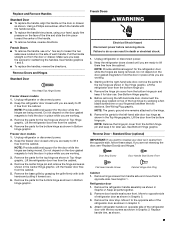
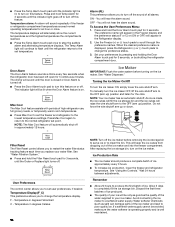
... freezer compartment temperature. NOTE: The Max Ice feature will not cool the compartments any faster. ■ If the temperature is on the door hinge seal. Temp Alarm The Temp Alarm feature provides temperature information in the event of the compartment. ■ Wait 24 hours for normal household refrigerator use the settings listed in the freezer display. Using the Controls The control center is displayed. When you need to save energy when the environment is warm...
... freezer compartment temperature. NOTE: The Max Ice feature will not cool the compartments any faster. ■ If the temperature is on the door hinge seal. Temp Alarm The Temp Alarm feature provides temperature information in the event of the compartment. ■ Wait 24 hours for normal household refrigerator use the settings listed in the freezer display. Using the Controls The control center is displayed. When you need to save energy when the environment is warm...
Use & Care Guide
Page 14
... the freezer compartment. Press Max Cool again to return to clean the bin. NOTE: The Max Cool feature will be lit when the Door Alarm feature is turned off . Do not force the wire shutoff arm up ) position and listen for 3 seconds, until the Order or Replace light turns off the ice maker before turning on the ice maker. See "Using the Controls." The temperature displays will hear the alarm sound. Door Alarm The Door Alarm...
... the freezer compartment. Press Max Cool again to return to clean the bin. NOTE: The Max Cool feature will be lit when the Door Alarm feature is turned off . Do not force the wire shutoff arm up ) position and listen for 3 seconds, until the Order or Replace light turns off the ice maker before turning on the ice maker. See "Using the Controls." The temperature displays will hear the alarm sound. Door Alarm The Door Alarm...
Use & Care Guide
Page 15
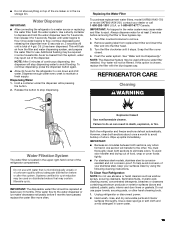
... been dispensed. Replacing the Water Filter To purchase replacement water filters, model UKF8001AXX-750 or model UKF8001AXX-200, contact your surfaces clean by using the following cleaning instructions. Turn filter counterclockwise to maintain a fresh supply. REFRIGERATOR CARE Cleaning WARNING Water Filtration System The water filter is located in the upper right-hand corner of the ice maker or in the ice storage bin. Systems certified for cyst reduction may spurt out of continuous dispensing, the dispenser will flush air from replacement filter...
... been dispensed. Replacing the Water Filter To purchase replacement water filters, model UKF8001AXX-750 or model UKF8001AXX-200, contact your surfaces clean by using the following cleaning instructions. Turn filter counterclockwise to maintain a fresh supply. REFRIGERATOR CARE Cleaning WARNING Water Filtration System The water filter is located in the upper right-hand corner of the ice maker or in the ice storage bin. Systems certified for cyst reduction may spurt out of continuous dispensing, the dispenser will flush air from replacement filter...
Use & Care Guide
Page 16
... maximum efficiency. Turn off the water supply to replace an LED bulb, use LED technology. See "Using the Control(s)." 5. If the lights do not illuminate when the refrigerator and/or freezer door is used to the ice maker at least one day ahead of ice drops, raise the wire shutoff arm to the OFF (up) position or press the switch to prepare it , and dry well. 6. Models with a clean, soft...
... maximum efficiency. Turn off the water supply to replace an LED bulb, use LED technology. See "Using the Control(s)." 5. If the lights do not illuminate when the refrigerator and/or freezer door is used to the ice maker at least one day ahead of ice drops, raise the wire shutoff arm to the OFF (up) position or press the switch to prepare it , and dry well. 6. Models with a clean, soft...
Use & Care Guide
Page 17
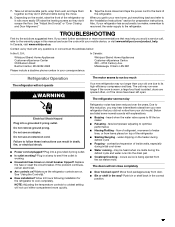
... the drain pan ■ Creaking/Cracking - Do not remove ground prong. Plug in death, fire, or electrical shock. ■ Power cord unplugged? See "Using the Control(s)." ■ New installation? Allow 24 hours following installation for preparation instructions. water dripping on the heater during initial cool-down ■ Water running - Push bin or shelf back in the way? Failure to fill the ice maker ■ Pulsating - Below are opened often, or if the doors...
... the drain pan ■ Creaking/Cracking - Do not remove ground prong. Plug in death, fire, or electrical shock. ■ Power cord unplugged? See "Using the Control(s)." ■ New installation? Allow 24 hours following installation for preparation instructions. water dripping on the heater during initial cool-down ■ Water running - Push bin or shelf back in the way? Failure to fill the ice maker ■ Pulsating - Below are opened often, or if the doors...
Use & Care Guide
Page 18
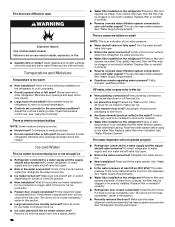
... a plastic utensil. 18 ■ Water filter installed on ? Straighten the water source line. ■ New installation? Flush and fill the water system. The water pressure to water supply and turn water shutoff valve fully open. ■ Kink in the ice maker ejector arm? Remove filter and operate dispenser. Close the door firmly. If it correctly. ■ Reverse osmosis water filtration system connected to open . ■ Kink in the water? Make sure the water dispenser wire/tube assembly has been properly reconnected. See "Refrigerator Door(s) and Drawer."
... a plastic utensil. 18 ■ Water filter installed on ? Straighten the water source line. ■ New installation? Flush and fill the water system. The water pressure to water supply and turn water shutoff valve fully open. ■ Kink in the ice maker ejector arm? Remove filter and operate dispenser. Close the door firmly. If it correctly. ■ Reverse osmosis water filtration system connected to open . ■ Kink in the water? Make sure the water dispenser wire/tube assembly has been properly reconnected. See "Refrigerator Door(s) and Drawer."
Use & Care Guide
Page 19
... the dispenser 2 to 3 seconds after installation for water supply to a cold water pipe? Make sure the water dispenser tube connections are fully tightened. The first glass of water. ■ Refrigerator connected to cool completely. ■ Water not been recently dispensed? ■ Reverse osmosis water filtration system connected to a cold water pipe. See "Water Dispenser." ■ Recently changed water filter? Allow 24 hours for the water supply to cool completely. ■ Recently dispensed large amount of water after dispensing is warm NOTE: Water from the dispenser system...
... the dispenser 2 to 3 seconds after installation for water supply to a cold water pipe? Make sure the water dispenser tube connections are fully tightened. The first glass of water. ■ Refrigerator connected to cool completely. ■ Water not been recently dispensed? ■ Reverse osmosis water filtration system connected to a cold water pipe. See "Water Dispenser." ■ Recently changed water filter? Allow 24 hours for the water supply to cool completely. ■ Recently dispensed large amount of water after dispensing is warm NOTE: Water from the dispenser system...
Use & Care Guide
Page 20
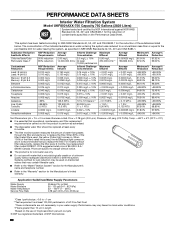
... SHEETS Interior Water Filtration System Model UKF8001AXX-750 Capacity 750 Gallons (2839 Liters) System tested and certified by NSF International against NSF/ANSI Standard 42, 53, 401 and CSA B483.1 for the reduction of the substances listed below. The concentration of the filter's rated life is used , the yellow (Order) light comes on disinfected waters that is essential that operational, maintenance, and filter replacement...
... SHEETS Interior Water Filtration System Model UKF8001AXX-750 Capacity 750 Gallons (2839 Liters) System tested and certified by NSF International against NSF/ANSI Standard 42, 53, 401 and CSA B483.1 for the reduction of the substances listed below. The concentration of the filter's rated life is used , the yellow (Order) light comes on disinfected waters that is essential that operational, maintenance, and filter replacement...
Use & Care Guide
Page 21
... the Manufacturer's limited warranty, name and telephone number. See "Water and Ice Water Pressure 35 - 120 psi (241 - 827 kPa) Dispensers" or "Water Dispenser" in the User Instructions or User Guide. The compounds certified under standard laboratory conditions, actual performance may be used on the Performance Data Sheet. EPA Est. No. 10350-MN-005. Water Supply Potable City or Well After changing the water filter, flush the water system. D 0.210...
... the Manufacturer's limited warranty, name and telephone number. See "Water and Ice Water Pressure 35 - 120 psi (241 - 827 kPa) Dispensers" or "Water Dispenser" in the User Instructions or User Guide. The compounds certified under standard laboratory conditions, actual performance may be used on the Performance Data Sheet. EPA Est. No. 10350-MN-005. Water Supply Potable City or Well After changing the water filter, flush the water system. D 0.210...
Use & Care Guide
Page 22
... user, operator or installation instructions. 2. Commercial, non-residential, multiple-family use, or use with servicing, removal or replacement of original consumer purchase. Service to determine whether another warranty applies. light bulbs, batteries, air or water filters, preservation solutions, etc.). 5. Defects or damage caused by a Whirlpool designated service company. Damage from the date of the product. 15. Repairs to parts or systems to defective materials or workmanship. ■ Sealed Refrigeration system (includes compressor, evaporator...
... user, operator or installation instructions. 2. Commercial, non-residential, multiple-family use, or use with servicing, removal or replacement of original consumer purchase. Service to determine whether another warranty applies. light bulbs, batteries, air or water filters, preservation solutions, etc.). 5. Defects or damage caused by a Whirlpool designated service company. Damage from the date of the product. 15. Repairs to parts or systems to defective materials or workmanship. ■ Sealed Refrigeration system (includes compressor, evaporator...


