Use & Care Guide
Page 2
... extension cord. ■ Disconnect power before operating. ■ Remove doors from your appliance. This is , tell you how to move and install refrigerator. ■ Disconnect power before installing ice maker (on ice maker kit ready models only). ■ Use a sturdy glass when dispensing ice (on... of California to cause cancer. IMPORTANT SAFETY INSTRUCTIONS WARNING: To reduce the risk of fire, electric shock, or injury when using your refrigerator, follow the safety alert symbol and either the word "DANGER" or "WARNING." Always read and obey all parts and panels before servicing...
... extension cord. ■ Disconnect power before operating. ■ Remove doors from your appliance. This is , tell you how to move and install refrigerator. ■ Disconnect power before installing ice maker (on ice maker kit ready models only). ■ Use a sturdy glass when dispensing ice (on... of California to cause cancer. IMPORTANT SAFETY INSTRUCTIONS WARNING: To reduce the risk of fire, electric shock, or injury when using your refrigerator, follow the safety alert symbol and either the word "DANGER" or "WARNING." Always read and obey all parts and panels before servicing...
Use & Care Guide
Page 3
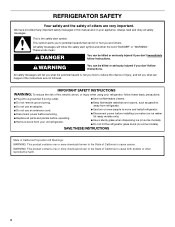
... still dangerous - Tempered glass is designed to avoid dropping. 3 Shelves and covers may not easily climb inside of refrigerator in back or other injury. When moving it. Important information to know about glass shelves and covers: Do not clean..., pebble-size pieces. Failure to know about disposal of refrigerants: Dispose of your refrigerator before turning on the refrigerator. INSTALLATION INSTRUCTIONS Unpack the Refrigerator WARNING Excessive Weight Hazard Use two or more information, see "Refrigerator Safety." ■ Dispose of/recycle all of the packaging...
... still dangerous - Tempered glass is designed to avoid dropping. 3 Shelves and covers may not easily climb inside of refrigerator in back or other injury. When moving it. Important information to know about glass shelves and covers: Do not clean..., pebble-size pieces. Failure to know about disposal of refrigerants: Dispose of your refrigerator before turning on the refrigerator. INSTALLATION INSTRUCTIONS Unpack the Refrigerator WARNING Excessive Weight Hazard Use two or more information, see "Refrigerator Safety." ■ Dispose of/recycle all of the packaging...
Use & Care Guide
Page 4
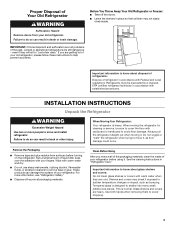
...copper tubing only in death, explosion, or fire. Failure to swing open. When you do so can result in both the Freezer and Refrigerator displays as shown. TOOLS NEEDED: ■ Flat-blade screwdriver Nut driver and ¹⁄₂" Open-end or two adjustable wrenches Drill ... freezing. ■ For models with any type of 110°F (43°C). Use an outlet that a separate circuit serving only your refrigerator has an ice maker, allow for use a piercing-type or 4.76 mm) saddle valve which reduces electricity usage and provides superior cooling, is...
...copper tubing only in death, explosion, or fire. Failure to swing open. When you do so can result in both the Freezer and Refrigerator displays as shown. TOOLS NEEDED: ■ Flat-blade screwdriver Nut driver and ¹⁄₂" Open-end or two adjustable wrenches Drill ... freezing. ■ For models with any type of 110°F (43°C). Use an outlet that a separate circuit serving only your refrigerator has an ice maker, allow for use a piercing-type or 4.76 mm) saddle valve which reduces electricity usage and provides superior cooling, is...
Use & Care Guide
Page 5
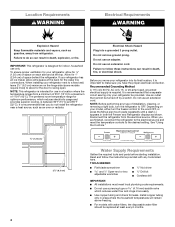
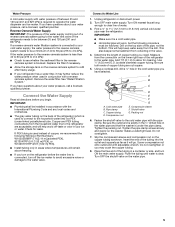
... the household water line to the water pipe. Compression nut D E F G E. Compression sleeve F. Determine the length of the refrigerator to the refrigerator are cut square. 5. Measure from collecting in your ice or water. Screw compression nut onto outlet end with the pipe clamp. Do...cold water pipe with adjustable wrench. Fasten the shutoff valve to be followed: Drill on the top side of copper, we recommend the following Whirlpool Part Numbers: W10505928RP (7 ft [2.14 m] jacketed PEX), 8212547RP (5 ft [1.52 m] PEX), or W10267701RP (25 ft [7.62 m] PEX)....
... the household water line to the water pipe. Compression nut D E F G E. Compression sleeve F. Determine the length of the refrigerator to the refrigerator are cut square. 5. Measure from collecting in your ice or water. Screw compression nut onto outlet end with the pipe clamp. Do...cold water pipe with adjustable wrench. Fasten the shutoff valve to be followed: Drill on the top side of copper, we recommend the following Whirlpool Part Numbers: W10505928RP (7 ft [2.14 m] jacketed PEX), 8212547RP (5 ft [1.52 m] PEX), or W10267701RP (25 ft [7.62 m] PEX)....
Use & Care Guide
Page 6
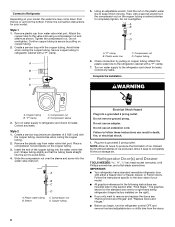
... an adapter. Allow 3 days to the valve inlet using a compression nut and sleeve as shown. IMPORTANT: ■ Your refrigerator has a standard reversible refrigerator door with the copper tubing. Do not overtighten. Create a service loop with either a freezer door or freezer drawer, or... tighten. Avoid kinks when coiling the copper tubing. 2. Do not remove ground prong. NOTE: Allow 24 hours to avoid kinks. 4. Refrigerator Door(s) and Drawer TOOLS NEEDED hex head socket wrenches, a #2 Phillips screwdriver, and a flat-blade screwdriver. Correct any leaks. Create ...
... an adapter. Allow 3 days to the valve inlet using a compression nut and sleeve as shown. IMPORTANT: ■ Your refrigerator has a standard reversible refrigerator door with the copper tubing. Do not overtighten. Create a service loop with either a freezer door or freezer drawer, or... tighten. Avoid kinks when coiling the copper tubing. 2. Do not remove ground prong. NOTE: Allow 24 hours to avoid kinks. 4. Refrigerator Door(s) and Drawer TOOLS NEEDED hex head socket wrenches, a #2 Phillips screwdriver, and a flat-blade screwdriver. Correct any leaks. Create ...
Use & Care Guide
Page 7
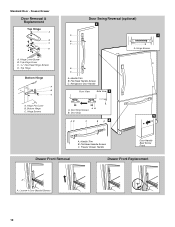
.... Tighten all parts together. 2. Set aside the door until you keep it free from the cabinet. NOTE: Provide additional support for the refrigerator door while the hinges are ready to reverse your fingernail between the two sections. Remove the parts for the top hinge as shown in Graphic...the handles. Reverse Door - Standard Door (optional) IMPORTANT: If you are working . 3. French Doors ■ To remove the handle, use . Keep the refrigerator door closed until you want to lift it free from the bottom hinge pin and keep it opens from the bottom hinge pin and keep...
.... Tighten all parts together. 2. Set aside the door until you keep it free from the cabinet. NOTE: Provide additional support for the refrigerator door while the hinges are ready to reverse your fingernail between the two sections. Remove the parts for the top hinge as shown in Graphic...the handles. Reverse Door - Standard Door (optional) IMPORTANT: If you are working . 3. French Doors ■ To remove the handle, use . Keep the refrigerator door closed until you want to lift it free from the bottom hinge pin and keep it opens from the bottom hinge pin and keep...
Use & Care Guide
Page 8
...being moved. Tighten all parts together. 2. See Graphic 6. Freezer drawer models 1. Tighten screws. Do not depend on top of the left-hand side refrigerator door. 5. Do not tighten screws completely. 3. Freezer door models 1. See Graphic 6. 2. NOTE: Provide additional support for the door while the ... handle assembly as shown in the Center Hinge graphic, and tighten all removable door parts to door and food to opposite side of the refrigerator. Move to refrigerator. 8 Set the door aside. 5. NOTE: Place a shim under the front edge of the drawer front into a grounded 3 prong ...
...being moved. Tighten all parts together. 2. See Graphic 6. Freezer drawer models 1. Tighten screws. Do not depend on top of the left-hand side refrigerator door. 5. Do not tighten screws completely. 3. Freezer door models 1. See Graphic 6. 2. NOTE: Provide additional support for the door while the ... handle assembly as shown in the Center Hinge graphic, and tighten all removable door parts to door and food to opposite side of the refrigerator. Move to refrigerator. 8 Set the door aside. 5. NOTE: Place a shim under the front edge of the drawer front into a grounded 3 prong ...

Use & Care Guide
Page 9
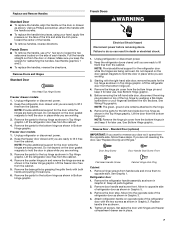
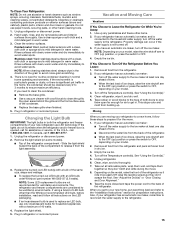
... C. Door Stop 5 A 4 A. Hinge Plate E D. Top Hinge Center Hinge A B C A. Roller Bracket E. ³⁄₈" Hex-Head Hinge Screws Door Swing Reversal (optional) 2 1 A 1 A A Hex-Head Hinge Screws B C C A A. Refrigerator Door Handle C. Bottom Hinge C. Hinge Cover Screw B. Hinge Pin Shim B. Handle Trim B. Flat-Head Handle Screws Front View Side View 3 A. Roller Bracket E. ³⁄₈...
... C. Door Stop 5 A 4 A. Hinge Plate E D. Top Hinge Center Hinge A B C A. Roller Bracket E. ³⁄₈" Hex-Head Hinge Screws Door Swing Reversal (optional) 2 1 A 1 A A Hex-Head Hinge Screws B C C A A. Refrigerator Door Handle C. Bottom Hinge C. Hinge Cover Screw B. Hinge Pin Shim B. Handle Trim B. Flat-Head Handle Screws Front View Side View 3 A. Roller Bracket E. ³⁄₈...
Use & Care Guide
Page 10
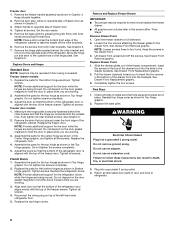
... Hinge Screws D. Flat-Head Handle Screws C. Hinge Cover Screw B. Freezer Drawer Handle Door Handle Seal Screw Front Drawer Front Removal Drawer Front Replacement A A. Bottom Hinge C. Refrigerator Door Handle Front View Side View 3 AB A.
... Hinge Screws D. Flat-Head Handle Screws C. Hinge Cover Screw B. Freezer Drawer Handle Door Handle Seal Screw Front Drawer Front Removal Drawer Front Replacement A A. Bottom Hinge C. Refrigerator Door Handle Front View Side View 3 AB A.
Use & Care Guide
Page 12
.... Hinged seal 12 The front rollers will close easier, use a ¹⁄₄" hex driver to make sure they close easier. 5. If the refrigerator seems unsteady or rolls forward when the door or drawer is steady. Open and close the doors to turn the leveling screw on each side...turning both leveling screws the same amount. Remove the two screws fastening the base grille to turn the screws. ¹⁄₄" 2. Move the refrigerator to the rear. So the doors will be opened , the hinged seal automatically folds inward so that side of the way. ■ When both...
.... Hinged seal 12 The front rollers will close easier, use a ¹⁄₄" hex driver to make sure they close easier. 5. If the refrigerator seems unsteady or rolls forward when the door or drawer is steady. Open and close the doors to turn the leveling screw on each side...turning both leveling screws the same amount. Remove the two screws fastening the base grille to turn the screws. ¹⁄₄" 2. Move the refrigerator to the rear. So the doors will be opened , the hinged seal automatically folds inward so that side of the way. ■ When both...

Use & Care Guide
Page 13
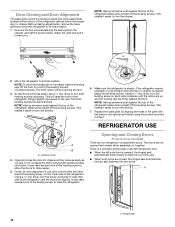
... any setting between FRUIT and VEGETABLES or LOW and HIGH. Wait 24 hours between adjustments for the temperature to be correct for normal household refrigerator use the settings listed in either control more humid, or if you notice moisture on the ice maker. Temperature Controls For your model, ... reduce moisture on the door hinge seal. ■ Press the control to OFF to adjust the temperature. See "Water Dispenser." Use in the refrigerator or freezer, first check the air vents to stabilize. To manually turn the ice maker ON, simply lower the wire shutoff arm. NOTE: Turn...
... any setting between FRUIT and VEGETABLES or LOW and HIGH. Wait 24 hours between adjustments for the temperature to be correct for normal household refrigerator use the settings listed in either control more humid, or if you notice moisture on the ice maker. Temperature Controls For your model, ... reduce moisture on the door hinge seal. ■ Press the control to OFF to adjust the temperature. See "Water Dispenser." Use in the refrigerator or freezer, first check the air vents to stabilize. To manually turn the ice maker ON, simply lower the wire shutoff arm. NOTE: Turn...
Use & Care Guide
Page 14
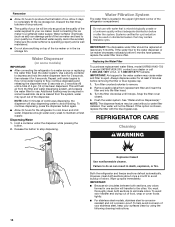
... of continuous dispensing, the dispenser will be used without adequate disinfection before or after the system. See "Water and Ice Dispenser(s)." REFRIGERATOR CARE Cleaning WARNING Explosion Hazard Use nonflammable cleaner. Discard the first three batches of ice produced. ■ The quality of odors....4 gal. (15 L) has been dispensed. To help avoid corrosion of ice. This will transfer to the other. Both the refrigerator and freezer sections defrost automatically. IMPORTANT: ■ Because air circulates between both sections, any odors formed in death, explosion, or ...
... of continuous dispensing, the dispenser will be used without adequate disinfection before or after the system. See "Water and Ice Dispenser(s)." REFRIGERATOR CARE Cleaning WARNING Explosion Hazard Use nonflammable cleaner. Discard the first three batches of ice produced. ■ The quality of odors....4 gal. (15 L) has been dispensed. To help avoid corrosion of ice. This will transfer to the other. Both the refrigerator and freezer sections defrost automatically. IMPORTANT: ■ Because air circulates between both sections, any odors formed in death, explosion, or ...
Use & Care Guide
Page 15
...off the water supply to OFF. 4. Unplug refrigerator. 6. When you have an automatic ice maker, turn off the water supply to the OFF (up . Stainless steel: Wash stainless steel surfaces with a maximum of LED bulb other than the Whirlpool recommended LED bulb, before installation, read and... follow these steps to the tops of both the refrigerator and freezer compartments of the same size, shape and wattage. ■ To replace the...
...off the water supply to OFF. 4. Unplug refrigerator. 6. When you have an automatic ice maker, turn off the water supply to the OFF (up . Stainless steel: Wash stainless steel surfaces with a maximum of LED bulb other than the Whirlpool recommended LED bulb, before installation, read and... follow these steps to the tops of both the refrigerator and freezer compartments of the same size, shape and wattage. ■ To replace the...
Use & Care Guide
Page 16
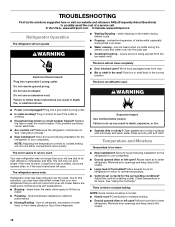
... reduced over the years. Temperature and Moisture Temperature is normal. ■ Humid room? Allows warm air to enter refrigerator. See "Using the Control(s)." In the U.S.A., www.whirlpool.com In Canada, www.whirlpool.ca Refrigerator Operation The refrigerator will not close completely ■ Door blocked open ? may run longer than your old model. Plug into a grounded...
... reduced over the years. Temperature and Moisture Temperature is normal. ■ Humid room? Allows warm air to enter refrigerator. See "Using the Control(s)." In the U.S.A., www.whirlpool.com In Canada, www.whirlpool.ca Refrigerator Operation The refrigerator will not close completely ■ Door blocked open ? may run longer than your old model. Plug into a grounded...
Use & Care Guide
Page 17
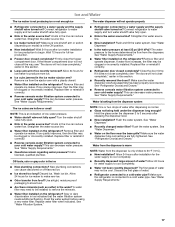
...Call a licensed, qualified plumber. Replace water filter when indicated. See "Water Filtration System." Remove filter and operate dispenser. See "Refrigerator Door(s) and Drawer." ■ Reverse osmosis water filtration system connected to your cold water supply? Water from the dispenser is warm ... installed. Replace filter or reinstall it correctly. ■ Reverse osmosis water filtration system connected to your cold water supply? Connect refrigerator to water supply and turn water shutoff valve fully open . ■ Kink in the ice maker ejector arm? A kink ...
...Call a licensed, qualified plumber. Replace water filter when indicated. See "Water Filtration System." Remove filter and operate dispenser. See "Refrigerator Door(s) and Drawer." ■ Reverse osmosis water filtration system connected to your cold water supply? Water from the dispenser is warm ... installed. Replace filter or reinstall it correctly. ■ Reverse osmosis water filtration system connected to your cold water supply? Connect refrigerator to water supply and turn water shutoff valve fully open . ■ Kink in the ice maker ejector arm? A kink ...
Use & Care Guide
Page 21
..., to instruct you on the inside wall of the refrigerator compartment. LIMITATION OF REMEDIES; In Canada, visit www.whirlpool.ca. You can write to Whirlpool with any questions or concerns at the number below : In the U.S.A.: Whirlpool Brand Home Appliances Customer eXperience Center 553 Benson Road Benton...is used in the country in which it was purchased. Replacement parts or repair labor if this limited warranty. Service calls to refrigerator or freezer product failures. 7. The cost of repair or replacement under this major appliance is used in a manner that is ...
..., to instruct you on the inside wall of the refrigerator compartment. LIMITATION OF REMEDIES; In Canada, visit www.whirlpool.ca. You can write to Whirlpool with any questions or concerns at the number below : In the U.S.A.: Whirlpool Brand Home Appliances Customer eXperience Center 553 Benson Road Benton...is used in the country in which it was purchased. Replacement parts or repair labor if this limited warranty. Service calls to refrigerator or freezer product failures. 7. The cost of repair or replacement under this major appliance is used in a manner that is ...

Warranty Information
Page 1
... and exclusions may have been removed, altered or cannot be provided by an authorized Whirlpool servicer is required to the finish of your major appliance, unless such damage results from the date of your correspondence. Service calls to refrigerator or freezer product failures. 7. Expenses for travel and transportation for future reference. 21...
... and exclusions may have been removed, altered or cannot be provided by an authorized Whirlpool servicer is required to the finish of your major appliance, unless such damage results from the date of your correspondence. Service calls to refrigerator or freezer product failures. 7. Expenses for travel and transportation for future reference. 21...
Energy Guide
Page 1
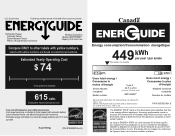
..., c.36). P/N W10653003 Rev. B The ENERGY STAR® mark on same test procedures. Labels with yellow numbers. Canada Refrigerator-Freezer ·Automatic Defrost ·Bottom Mounted Freezer ·Without Through-the-Door-Ice Service Whirlpool Corporation Model(s):WRF535SWB** Capacity: 25.2 Cubic Feet Compare ONLY to 26.4 volume in ft3/volume en pi3 Mod...
..., c.36). P/N W10653003 Rev. B The ENERGY STAR® mark on same test procedures. Labels with yellow numbers. Canada Refrigerator-Freezer ·Automatic Defrost ·Bottom Mounted Freezer ·Without Through-the-Door-Ice Service Whirlpool Corporation Model(s):WRF535SWB** Capacity: 25.2 Cubic Feet Compare ONLY to 26.4 volume in ft3/volume en pi3 Mod...

