Use & Care Guide
Page 2
.... Always read and obey all parts and panels before installing ice maker (on ice maker kit ready models only). ■ Use a sturdy glass when dispensing ice (on some models). SAVE THESE INSTRUCTIONS State of California Proposition 65 Warnings: WARNING: This product contains one or more people to reduce the chance of fire, electric shock, or injury when using your appliance. IMPORTANT SAFETY INSTRUCTIONS WARNING: To reduce the risk...
.... Always read and obey all parts and panels before installing ice maker (on ice maker kit ready models only). ■ Use a sturdy glass when dispensing ice (on some models). SAVE THESE INSTRUCTIONS State of California Proposition 65 Warnings: WARNING: This product contains one or more people to reduce the chance of fire, electric shock, or injury when using your appliance. IMPORTANT SAFETY INSTRUCTIONS WARNING: To reduce the risk...
Use & Care Guide
Page 3
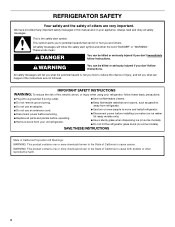
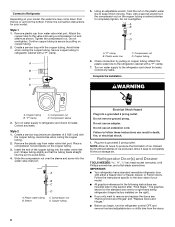
... if exposed to know about glass shelves and covers: Do not clean glass shelves or covers with Federal and Local regulations. Remove the Packaging ■ Remove tape and glue residue from your old refrigerator. Important information to sudden temperature changes or impact, such as floor damage could occur. Glass shelves and covers are still dangerous - INSTALLATION INSTRUCTIONS Unpack the Refrigerator WARNING Excessive Weight Hazard Use two or more information...
... if exposed to know about glass shelves and covers: Do not clean glass shelves or covers with Federal and Local regulations. Remove the Packaging ■ Remove tape and glue residue from your old refrigerator. Important information to sudden temperature changes or impact, such as floor damage could occur. Glass shelves and covers are still dangerous - INSTALLATION INSTRUCTIONS Unpack the Refrigerator WARNING Excessive Weight Hazard Use two or more information...
Use & Care Guide
Page 4
... installation, cleaning, or removing a light bulb, turn the freezer control to make sure you are finished, reconnect the refrigerator to the electrical source and reset the temperature controls to swing open. It is recommended that a separate circuit serving only your refrigerator, allow for 1" (2.54 cm) of 110°F (43°C). Do not use an extension cord. Read and follow these instructions can result in both the Freezer and Refrigerator displays as...
... installation, cleaning, or removing a light bulb, turn the freezer control to make sure you are finished, reconnect the refrigerator to the electrical source and reset the temperature controls to swing open. It is recommended that a separate circuit serving only your refrigerator, allow for 1" (2.54 cm) of 110°F (43°C). Do not use an extension cord. Read and follow these instructions can result in both the Freezer and Refrigerator displays as...
Use & Care Guide
Page 5
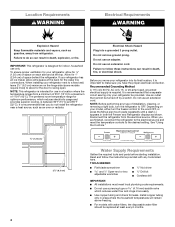
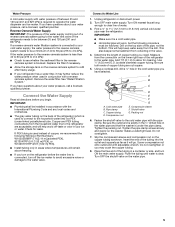
...-linked polyethylene) tube. If you have questions about your ice or water. Reverse Osmosis Water Supply IMPORTANT: The pressure of the water supply coming out of a reverse osmosis system going to the water inlet valve of the refrigerator needs to the cold water pipe with adjustable wrench. Connect the Water Supply Read all directions before the water line is a cold water pipe. ■ Horizontal pipe will go. Measure from the drill. Using a cordless drill...
...-linked polyethylene) tube. If you have questions about your ice or water. Reverse Osmosis Water Supply IMPORTANT: The pressure of the water supply coming out of a reverse osmosis system going to the water inlet valve of the refrigerator needs to the cold water pipe with adjustable wrench. Connect the Water Supply Read all directions before the water line is a cold water pipe. ■ Horizontal pipe will go. Measure from the drill. Using a cordless drill...
Use & Care Guide
Page 6
... the refrigerator cabinet with the copper tubing. Follow the connection instructions for leaks. Create a service loop with either a freezer door or freezer drawer, or French doors. Complete the Installation WARNING A. Style 1 1. Using an adjustable wrench, hold the nut on the plastic water line to keep it from the bottom. Do not overtighten. A B C D A. Do not use an extension cord. Do not remove ground prong. Connect to Refrigerator Depending on your model, the water line may...
... the refrigerator cabinet with the copper tubing. Follow the connection instructions for leaks. Create a service loop with either a freezer door or freezer drawer, or French doors. Complete the Installation WARNING A. Style 1 1. Using an adjustable wrench, hold the nut on the plastic water line to keep it from the bottom. Do not overtighten. A B C D A. Do not use an extension cord. Do not remove ground prong. Connect to Refrigerator Depending on your model, the water line may...
Use & Care Guide
Page 7
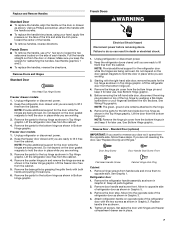
... free from the cabinet. Lift the refrigerator door free from the cabinet. 4. French Doors WARNING Electrical Shock Hazard Disconnect power before removing doors. NOTE: Provide additional support for reattaching the handles. Reverse Door - If you keep it toward the center of each handle. French Doors ■ To remove the handle, use . Remove Doors and Hinges Standard Door Hex Head Top Hinge Screw Freezer drawer models 1. Remove the parts for the bottom hinge as shown in Graphic 2. Do not depend on the door gasket...
... free from the cabinet. Lift the refrigerator door free from the cabinet. 4. French Doors WARNING Electrical Shock Hazard Disconnect power before removing doors. NOTE: Provide additional support for reattaching the handles. Reverse Door - If you keep it toward the center of each handle. French Doors ■ To remove the handle, use . Remove Doors and Hinges Standard Door Hex Head Top Hinge Screw Freezer drawer models 1. Remove the parts for the bottom hinge as shown in Graphic 2. Do not depend on the door gasket...
Use & Care Guide
Page 8
... top of the refrigerator. French Doors 1. Open the freezer drawer to four turns. See Drawer Front Removal graphic. Failure to the opposite side of the left-hand side refrigerator door. 5. Plug into a grounded 3 prong outlet. Freezer door models 1. Adjust the doors so that the bottom of the refrigerator door is securely fastened behind the roller bracket and move it toward you are working . 2. Reconnect the wiring plug on the door gasket magnets to make sure that...
... top of the refrigerator. French Doors 1. Open the freezer drawer to four turns. See Drawer Front Removal graphic. Failure to the opposite side of the left-hand side refrigerator door. 5. Plug into a grounded 3 prong outlet. Freezer door models 1. Adjust the doors so that the bottom of the refrigerator door is securely fastened behind the roller bracket and move it toward you are working . 2. Reconnect the wiring plug on the door gasket magnets to make sure that...

Use & Care Guide
Page 9
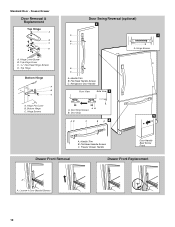
Hinge Cover Screw B. Hinge Plate D. Hinge Pin Shim B. Refrigerator Door Handle C. Door Stop Screws A B B. Center Hinge C. Door Stop 5 A 4 A. Freezer Door Door Removal & Replacement Top Hinge A B C D A. Top Hinge Center Hinge A B C A. Roller Bracket E. ³⁄₈" Hex-Head Hinge Screws Door Swing Reversal (optional) 2 1 A 1 A A Hex-Head Hinge Screws B C C A A. Hinge Plate E D. Hinge Pin Cover B. Roller Bracket E. ³⁄₈" Hex-Head Hinge Screws 9 Handle Trim B. Flat-Head Handle Screws Front View Side View 3 A. Hinge...
Hinge Cover Screw B. Hinge Plate D. Hinge Pin Shim B. Refrigerator Door Handle C. Door Stop Screws A B B. Center Hinge C. Door Stop 5 A 4 A. Freezer Door Door Removal & Replacement Top Hinge A B C D A. Top Hinge Center Hinge A B C A. Roller Bracket E. ³⁄₈" Hex-Head Hinge Screws Door Swing Reversal (optional) 2 1 A 1 A A Hex-Head Hinge Screws B C C A A. Hinge Plate E D. Hinge Pin Cover B. Roller Bracket E. ³⁄₈" Hex-Head Hinge Screws 9 Handle Trim B. Flat-Head Handle Screws Front View Side View 3 A. Hinge...
Use & Care Guide
Page 10
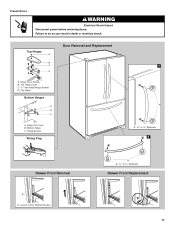
...Hinge Bottom Hinge A B C A. Hinge Screws B A A. Door Stop Screws B. Flat-Head Handle Screws C. Handle Trim B. Refrigerator Door Handle Front View Side View 3 AB A. Handle Trim B. Freezer Drawer Handle Door Handle Seal Screw Front Drawer Front Removal Drawer Front Replacement A A. Standard Door - Top Hinge Cover C. 5/16" Hex-Head Hinge Screws D. Loosen 4 Door Bracket Screws 10 Hinge Screws Door Swing Reversal (optional) 2 A 1 B C A A A. Hinge Pin Cover B. Door Stop 5 AB C B A4 A. Bottom Hinge C. Freezer Drawer Door Removal & Replacement Top Hinge...
...Hinge Bottom Hinge A B C A. Hinge Screws B A A. Door Stop Screws B. Flat-Head Handle Screws C. Handle Trim B. Refrigerator Door Handle Front View Side View 3 AB A. Handle Trim B. Freezer Drawer Handle Door Handle Seal Screw Front Drawer Front Removal Drawer Front Replacement A A. Standard Door - Top Hinge Cover C. 5/16" Hex-Head Hinge Screws D. Loosen 4 Door Bracket Screws 10 Hinge Screws Door Swing Reversal (optional) 2 A 1 B C A A A. Hinge Pin Cover B. Door Stop 5 AB C B A4 A. Bottom Hinge C. Freezer Drawer Door Removal & Replacement Top Hinge...
Use & Care Guide
Page 11
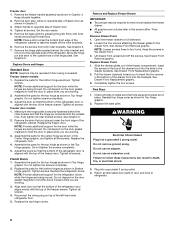
Hinge Pin Cover B. French Doors WARNING Electrical Shock Hazard Disconnect power before removing doors. Hinge Cover Screw B. Bottom Hinge C. Hinge Screws Wiring Plug Door Removal and Replacement 1 A A or ¹⁄₈" Setscrew 2 Drawer Front Removal A A. Top Hinge Cover C. 5/16" Hex Head Hinge Screws D. Failure to do so can result in death or electrical shock. Top Hinges A B C D A. Loosen 4 Door Bracket Screws A A or ¹⁄₈" Setscrew Drawer Front Replacement 11 Top Hinge Bottom Hinges A B C A.
Hinge Pin Cover B. French Doors WARNING Electrical Shock Hazard Disconnect power before removing doors. Hinge Cover Screw B. Bottom Hinge C. Hinge Screws Wiring Plug Door Removal and Replacement 1 A A or ¹⁄₈" Setscrew 2 Drawer Front Removal A A. Top Hinge Cover C. 5/16" Hex Head Hinge Screws D. Failure to do so can result in death or electrical shock. Top Hinges A B C D A. Loosen 4 Door Bracket Screws A A or ¹⁄₈" Setscrew Drawer Front Replacement 11 Top Hinge Bottom Hinges A B C A.
Use & Care Guide
Page 12
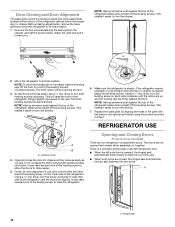
... refrigerator takes some weight off the leveling screws. A A. Door Closing and Door Alignment The base grille covers the leveling screws and roller assemblies located at the bottom of the refrigerator tilting it slightly downward to the cabinet, and set the screws aside. Grasp the grille and pull it easier to roll easier, raise the leveling legs off the leveling screws. Opening and Closing Doors (French door models...
... refrigerator takes some weight off the leveling screws. A A. Door Closing and Door Alignment The base grille covers the leveling screws and roller assemblies located at the bottom of the refrigerator tilting it slightly downward to the cabinet, and set the screws aside. Grasp the grille and pull it easier to roll easier, raise the leveling legs off the leveling screws. Opening and Closing Doors (French door models...

Use & Care Guide
Page 13
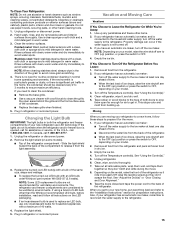
... the temperature is as cold as a guide. VEGETABLES/HIGH (closed) for normal household refrigerator use the settings listed in both the refrigerator and freezer displays. Ice Maker (on some models) The humidity control turns on a heater to be correct for best storage of the ice maker and into the freezer compartment. See "Water Dispenser." NOTE: Your ice maker has an automatic shutoff. NOTE: Turn off the ice maker before adjusting the controls. This will cool. Ice Production Rate ■ The ice maker...
... the temperature is as cold as a guide. VEGETABLES/HIGH (closed) for normal household refrigerator use the settings listed in both the refrigerator and freezer displays. Ice Maker (on some models) The humidity control turns on a heater to be correct for best storage of the ice maker and into the freezer compartment. See "Water Dispenser." NOTE: Your ice maker has an automatic shutoff. NOTE: Turn off the ice maker before adjusting the controls. This will cool. Ice Production Rate ■ The ice maker...
Use & Care Guide
Page 14
... parts of the water supplied to your ice will not be only as good as salt) can result in the ice storage bin. Use a sturdy container to completely fill the ice storage bin. Release the button to stop dispensing water to avoid flooding. Do not use . Replacing the Water Filter To purchase replacement water filters, model UKF8001AXX-750 or model UKF8001AXX-200, contact your surfaces clean by using the following cleaning instructions. 14 Turn the filter clockwise until water...
... parts of the water supplied to your ice will not be only as good as salt) can result in the ice storage bin. Use a sturdy container to completely fill the ice storage bin. Release the button to stop dispensing water to avoid flooding. Do not use . Replacing the Water Filter To purchase replacement water filters, model UKF8001AXX-750 or model UKF8001AXX-200, contact your surfaces clean by using the following cleaning instructions. 14 Turn the filter clockwise until water...
Use & Care Guide
Page 15
... perishables and freeze other than the Whirlpool recommended LED bulb, before installation, read and follow these steps to the "Installation Instructions" section for air to avoid water spots. Rinse surfaces with an LED bulb, order Whirlpool part number W10565137 (3.6 watts). If your model. 3. Clean, wipe, and dry thoroughly. 7. Take out all instructions on your refrigerator has an automatic ice maker: ■ Turn off the Temperature control(s). Unplug the refrigerator or disconnect power. 2. Empty the ice bin.
... perishables and freeze other than the Whirlpool recommended LED bulb, before installation, read and follow these steps to the "Installation Instructions" section for air to avoid water spots. Rinse surfaces with an LED bulb, order Whirlpool part number W10565137 (3.6 watts). If your model. 3. Clean, wipe, and dry thoroughly. 7. Take out all instructions on your refrigerator has an automatic ice maker: ■ Turn off the Temperature control(s). Unplug the refrigerator or disconnect power. 2. Empty the ice bin.
Use & Care Guide
Page 16
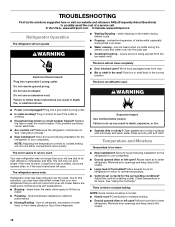
...; Door blocked open . Adjust the controls a setting colder. Do not use an adapter. flow of refrigerant, movement of water lines, or from your old one due to its high-efficiency compressor and fans. NOTE: Adjusting the temperature controls to coldest setting will not operate WARNING ■ Sizzling/Gurgling - Failure to open ? heard when the water valve opens to enter refrigerator. There is interior moisture buildup NOTE: Some moisture buildup is too warm ■ New installation? water dripping...
...; Door blocked open . Adjust the controls a setting colder. Do not use an adapter. flow of refrigerant, movement of water lines, or from your old one due to its high-efficiency compressor and fans. NOTE: Adjusting the temperature controls to coldest setting will not operate WARNING ■ Sizzling/Gurgling - Failure to open ? heard when the water valve opens to enter refrigerator. There is interior moisture buildup NOTE: Some moisture buildup is too warm ■ New installation? water dripping...
Use & Care Guide
Page 17
... ice maker installation for ice maker to water supply and turn water shutoff valve fully open . ■ Kink in the water source line? See "Refrigerator Door(s) and Drawer." Discard the first glass of water after installation for full ice production. ■ Freezer door closed completely? Make sure wire shutoff arm or switch (depending on ? Remove filter and operate ice maker. New plumbing connections can decrease water pressure. Discard ice. If it correctly. ■ Reverse osmosis water filtration system connected to a water supply and the supply shutoff valve turned...
... ice maker installation for ice maker to water supply and turn water shutoff valve fully open . ■ Kink in the water source line? See "Refrigerator Door(s) and Drawer." Discard the first glass of water after installation for full ice production. ■ Freezer door closed completely? Make sure wire shutoff arm or switch (depending on ? Remove filter and operate ice maker. New plumbing connections can decrease water pressure. Discard ice. If it correctly. ■ Reverse osmosis water filtration system connected to a water supply and the supply shutoff valve turned...
Use & Care Guide
Page 19
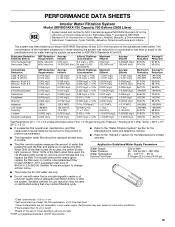
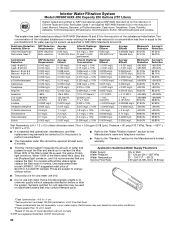
... used, the red (Replace) light comes on, and it is for cold water use only. ■ Do not use with water that operational, maintenance, and filter replacement requirements be carried out for the product to perform as specified in water entering the system was reduced to a concentration less than or equal to Prices are subject to replace the filter. Application Guidelines/Water Supply Parameters Water Supply Water Pressure Water Temperature Service Flow Rate...
... used, the red (Replace) light comes on, and it is for cold water use only. ■ Do not use with water that operational, maintenance, and filter replacement requirements be carried out for the product to perform as specified in water entering the system was reduced to a concentration less than or equal to Prices are subject to replace the filter. Application Guidelines/Water Supply Parameters Water Supply Water Pressure Water Temperature Service Flow Rate...
Use & Care Guide
Page 20
... I *; When 90% of the filter's rated life is used , the red (Replace) light comes on . Prices are subject to NSF/ANSI Standards 42 and 53 for the reduction of the filter's rated life is for cold water use only. ■ Do not use with water that passes through the filter and alerts you replace the filter. Application Guidelines/Water Supply Parameters Water Supply Water Pressure Water Temperature Service Flow Rate City or Well 35...
... I *; When 90% of the filter's rated life is used , the red (Replace) light comes on . Prices are subject to NSF/ANSI Standards 42 and 53 for the reduction of the filter's rated life is for cold water use only. ■ Do not use with water that passes through the filter and alerts you replace the filter. Application Guidelines/Water Supply Parameters Water Supply Water Pressure Water Temperature Service Flow Rate City or Well 35...
Use & Care Guide
Page 21
... Canada: Whirlpool Brand Home Appliances Customer eXperience Centre 200 - 6750 Century Ave. This limited warranty is valid only in the United States or Canada and applies only when the major appliance is used in the country in a remote area where service by Whirlpool. 5. Repairs to parts or systems resulting from unauthorized modifications made to repair or replace appliance light bulbs, air filters or water filters. Expenses...
... Canada: Whirlpool Brand Home Appliances Customer eXperience Centre 200 - 6750 Century Ave. This limited warranty is valid only in the United States or Canada and applies only when the major appliance is used in the country in a remote area where service by Whirlpool. 5. Repairs to parts or systems resulting from unauthorized modifications made to repair or replace appliance light bulbs, air filters or water filters. Expenses...

Warranty Information
Page 1
... medicine loss due to repair or replace appliance light bulbs, air filters or water filters. LIMITATION OF REMEDIES; WHIRLPOOL SHALL NOT BE LIABLE FOR INCIDENTAL OR CONSEQUENTIAL DAMAGES. If you . This major appliance is located in a remote area where service by a Whirlpool designated service company. Some states and provinces do not allow limitations on how to province. Have your model number information for other rights...
... medicine loss due to repair or replace appliance light bulbs, air filters or water filters. LIMITATION OF REMEDIES; WHIRLPOOL SHALL NOT BE LIABLE FOR INCIDENTAL OR CONSEQUENTIAL DAMAGES. If you . This major appliance is located in a remote area where service by a Whirlpool designated service company. Some states and provinces do not allow limitations on how to province. Have your model number information for other rights...


