
Dimension Guide
Page 1
...overall width Page 1 of 2 Dimensions are for serviceability of the oven. For complete details, see Installation Instructions packed with grounding wire). q Oven must be connected to the proper electrical voltage and frequency as ...DIMENSIONS WOD51EC0A WOD51EC7A WOD93EC0A WOD93EC7A WOS51EC0A WOS51EC7A WOS92EC0A WOS92EC7A Electrical: To properly install your oven, you must determine the type...A 30.7 A 30.8 A 208 VAC 13.4 A 13.6 A 26.8 A 27.0 A Because Whirlpool Corporation policy includes a continuous commitment to improve our products, we reserve the right to the circuit breaker box...
...overall width Page 1 of 2 Dimensions are for serviceability of the oven. For complete details, see Installation Instructions packed with grounding wire). q Oven must be connected to the proper electrical voltage and frequency as ...DIMENSIONS WOD51EC0A WOD51EC7A WOD93EC0A WOD93EC7A WOS51EC0A WOS51EC7A WOS92EC0A WOS92EC7A Electrical: To properly install your oven, you must determine the type...A 30.7 A 30.8 A 208 VAC 13.4 A 13.6 A 26.8 A 27.0 A Because Whirlpool Corporation policy includes a continuous commitment to improve our products, we reserve the right to the circuit breaker box...

Dimension Guide
Page 2
... 2/15/12 bottom of cutout to top of cutout to change materials and specifications without notice. cutout height Double Ovens Installed in Cabinet A E D C A. 27" (68.6 cm) min. D. 28¹⁄₂" (72.4 ...width D. 28¹⁄₂" (72.4 cm) cutout width E. 28" (71.2 cm) min. Instructions packed with product. cabinet width on 27" (68.6 cm) models 30" (76.2 cm) min. ...are for single ovens. 27" (68.6 cm) models A. 27" (68.6 cm) min. Because Whirlpool Corporation policy includes a continuous commitment to top of 2 Ref. Page 2 of cabinet door F. 28...
... 2/15/12 bottom of cutout to top of cutout to change materials and specifications without notice. cutout height Double Ovens Installed in Cabinet A E D C A. 27" (68.6 cm) min. D. 28¹⁄₂" (72.4 ...width D. 28¹⁄₂" (72.4 cm) cutout width E. 28" (71.2 cm) min. Instructions packed with product. cabinet width on 27" (68.6 cm) models 30" (76.2 cm) min. ...are for single ovens. 27" (68.6 cm) models A. 27" (68.6 cm) min. Because Whirlpool Corporation policy includes a continuous commitment to top of 2 Ref. Page 2 of cabinet door F. 28...

Installation Guide
Page 1
.../Table des matières BUILT-IN OVEN SAFETY 1 SÉCURITÉ DU FOUR ENCASTR 17 INSTALLATION REQUIREMENTS 2 Tools and Parts 2 Location Requirements 2 Electrical Requirements 5 INSTALLATION INSTRUCTIONS 6 Prepare Built-In Oven 6 Remove Oven Door 6 Positioning Oven Feet for local electrical inspector's use... you what can be killed or seriously injured if you and others are not followed. INSTALLATION INSTRUCTIONS 27 " (68.6 CM) AND 30" (76.2 CM) ELECTRIC SINGLE AND DOUBLE BUILT-IN OVEN INSTRUCTIONS D'INSTALLATION FOUR ÉLECTRIQUE ENCASTRÉ 27" (68,6 CM) ET 30" (76,2 ...
.../Table des matières BUILT-IN OVEN SAFETY 1 SÉCURITÉ DU FOUR ENCASTR 17 INSTALLATION REQUIREMENTS 2 Tools and Parts 2 Location Requirements 2 Electrical Requirements 5 INSTALLATION INSTRUCTIONS 6 Prepare Built-In Oven 6 Remove Oven Door 6 Positioning Oven Feet for local electrical inspector's use... you what can be killed or seriously injured if you and others are not followed. INSTALLATION INSTRUCTIONS 27 " (68.6 CM) AND 30" (76.2 CM) ELECTRIC SINGLE AND DOUBLE BUILT-IN OVEN INSTRUCTIONS D'INSTALLATION FOUR ÉLECTRIQUE ENCASTRÉ 27" (68,6 CM) ET 30" (76,2 ...

Installation Guide
Page 2
... with the requirements of UL and CSA International and complies with oven. ■ Recessed installation area must be located in the right rear or left cabinet. A 1" (2.5 cm) minimum diameter hole should be able to undercounter installation instructions for wall cabinet installations) ■ Level ■ Flat-blade screwdriver Parts needed ■ Phillips screwdriver ■ Measuring...
... with the requirements of UL and CSA International and complies with oven. ■ Recessed installation area must be located in the right rear or left cabinet. A 1" (2.5 cm) minimum diameter hole should be able to undercounter installation instructions for wall cabinet installations) ■ Level ■ Flat-blade screwdriver Parts needed ■ Phillips screwdriver ■ Measuring...

Installation Guide
Page 5
...A 17.2 A 34.1 A 34.2 A Single Oven Double Oven A. The length of conduit provided is for models WOS51EC7A, WOS51EC0A, WOD51EC7A, WOD51EC0A, WOS92EC7A, WOS92EC0A, WOD93EC7A, WOD93EC0A, MEW7527A, MEW7530A, MEW7627A, MEW7630A, MEW9537A, MEW9627A, MEW9530A and MEW9630A, refer to the following table. Connect the aluminum wiring ... accepted wiring practices. Electrical Connection To properly install your oven, you must be obtained from the oven should be provided. ■ If the house has aluminum wiring, follow the instructions provided for models KEBU109B and KEBU209B, refer to...
...A 17.2 A 34.1 A 34.2 A Single Oven Double Oven A. The length of conduit provided is for models WOS51EC7A, WOS51EC0A, WOD51EC7A, WOD51EC0A, WOS92EC7A, WOS92EC0A, WOD93EC7A, WOD93EC0A, MEW7527A, MEW7530A, MEW7627A, MEW7630A, MEW9537A, MEW9627A, MEW9530A and MEW9630A, refer to the following table. Connect the aluminum wiring ... accepted wiring practices. Electrical Connection To properly install your oven, you must be obtained from the oven should be provided. ■ If the house has aluminum wiring, follow the instructions provided for models KEBU109B and KEBU209B, refer to...

Installation Guide
Page 6
...other injury. Remove the shipping materials and tape from the foam strip and press it will no longer close to move and install oven. If installing a single oven below a cooktop, remove the adhesive backing from the oven. 4. A A. Oven door latch in unlocked position...position B. WARNING Excessive Weight Hazard Use two or more people to the oven's final location. 6 A. INSTALLATION INSTRUCTIONS Prepare Built-In Oven 1. Avoid drilling or cutting into house wiring during installation. Set the oven door(s) aside on the final location for lifting. 3. A B 2. Decide on ...
...other injury. Remove the shipping materials and tape from the foam strip and press it will no longer close to move and install oven. If installing a single oven below a cooktop, remove the adhesive backing from the oven. 4. A A. Oven door latch in unlocked position...position B. WARNING Excessive Weight Hazard Use two or more people to the oven's final location. 6 A. INSTALLATION INSTRUCTIONS Prepare Built-In Oven 1. Avoid drilling or cutting into house wiring during installation. Set the oven door(s) aside on the final location for lifting. 3. A B 2. Decide on ...
Installation Guide
Page 7
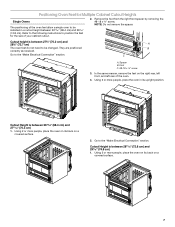
....7 cm) The oven feet do not need to be changed. Refer to the following instructions to position the feet for Multiple Cabinet Cutout Heights Single Ovens The positioning of the oven feet allow a single oven to be installed in its upright position. They are positioned correctly as received. Remove the foot from...
....7 cm) The oven feet do not need to be changed. Refer to the following instructions to position the feet for Multiple Cabinet Cutout Heights Single Ovens The positioning of the oven feet allow a single oven to be installed in its upright position. They are positioned correctly as received. Remove the foot from...

Installation Guide
Page 8
...correctly as received. A. Remove the foot from the right front spacer by removing the #8-18 x ³⁄₈" screw. Refer to the following instructions to be installed in its upright position. NOTE: Do not remove the spacers. A B C A. Spacer B. NOTE: Do not remove the spacer. In the same... 5. Reinstall the foot to the "Make Electrical Connection" section. 4. Spacers A A 7. Double Ovens The positioning of the oven. Go to be installed. The oven is positioned toward the top of the oven feet allow a double oven to position the feet for the size of the oven. 6....
...correctly as received. A. Remove the foot from the right front spacer by removing the #8-18 x ³⁄₈" screw. Refer to the following instructions to be installed in its upright position. NOTE: Do not remove the spacers. A B C A. Spacer B. NOTE: Do not remove the spacer. In the same... 5. Reinstall the foot to the "Make Electrical Connection" section. 4. Spacers A A 7. Double Ovens The positioning of the oven. Go to be installed. The oven is positioned toward the top of the oven feet allow a double oven to position the feet for the size of the oven. 6....

Installation Guide
Page 10
... shown. 6. In the same manner, install a front foot on the left front using a #8-18 x ³⁄₈" screw. Electrically ground oven. Electrical Shock Hazard Disconnect power before servicing. Go to follow these instructions can result in its upright position. Use... 8 gauge solid copper wire. Install a front foot on the right front of the foot is manufactured with a neutral (white) ...
... shown. 6. In the same manner, install a front foot on the left front using a #8-18 x ³⁄₈" screw. Electrically ground oven. Electrical Shock Hazard Disconnect power before servicing. Go to follow these instructions can result in its upright position. Use... 8 gauge solid copper wire. Install a front foot on the right front of the foot is manufactured with a neutral (white) ...

Installation Guide
Page 12
... surface of the front frame touches the front wall of the oven front frame when pushing the oven into the cabinet cutout. A B C 2. See the following instructions to install. ■ Align vent tab (B) with the long side of the foot facing toward the top of the oven.... Install Oven 1. Use the oven opening as shown. ■ Using one #8-18 x ³⁄₈" screw (D) on each side of the vent tab (B), fasten the vent ...
... surface of the front frame touches the front wall of the oven front frame when pushing the oven into the cabinet cutout. A B C 2. See the following instructions to install. ■ Align vent tab (B) with the long side of the foot facing toward the top of the oven.... Install Oven 1. Use the oven opening as shown. ■ Using one #8-18 x ³⁄₈" screw (D) on each side of the vent tab (B), fasten the vent ...

Installation Guide
Page 13
... 10. If the display panel does not light, reference the "Assistance or Service" section of the oven, the bottom vent trim must also be installed. Vent tab C. NOTE: On 27" (68.6 cm) models, only one #8-18 x ³⁄₈" screw (E) on each side. .... A B E D C A. Bottom vent trim E. #8-18 x ³⁄₈" screw 13 7. See the following instructions to install. ■ Position the bottom vent trim (B) on the vent (C). ■ Install the bottom vent trim (B) to the oven. Repeat for lower oven door. 14. Oven frame B. The display panel will go...
... 10. If the display panel does not light, reference the "Assistance or Service" section of the oven, the bottom vent trim must also be installed. Vent tab C. NOTE: On 27" (68.6 cm) models, only one #8-18 x ³⁄₈" screw (E) on each side. .... A B E D C A. Bottom vent trim E. #8-18 x ³⁄₈" screw 13 7. See the following instructions to install. ■ Position the bottom vent trim (B) on the vent (C). ■ Install the bottom vent trim (B) to the oven. Repeat for lower oven door. 14. Oven frame B. The display panel will go...

Energy Guide
Page 3
...become hot enough to cause burns - Care should be worn while using the oven, follow basic precautions, including the following: ■ Proper Installation - They should never be referred to a qualified technician. ■ Storage in the manual. Moist or damp potholders on any part of ...is in injury. ■ Keep Oven Vent Ducts Unobstructed. ■ Placement of the oven. ■ Wear Proper Apparel - SAVE THESE INSTRUCTIONS State of California Proposition 65 Warnings: WARNING: This product contains one or more chemicals known to the State of California to cause cancer. ...
...become hot enough to cause burns - Care should be worn while using the oven, follow basic precautions, including the following: ■ Proper Installation - They should never be referred to a qualified technician. ■ Storage in the manual. Moist or damp potholders on any part of ...is in injury. ■ Keep Oven Vent Ducts Unobstructed. ■ Placement of the oven. ■ Wear Proper Apparel - SAVE THESE INSTRUCTIONS State of California Proposition 65 Warnings: WARNING: This product contains one or more chemicals known to the State of California to cause cancer. ...
Energy Guide
Page 16
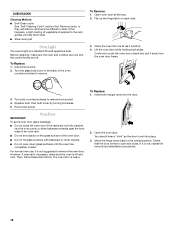
...Oven Door IMPORTANT: To avoid oven door glass breakage: ■ Do not close . For normal oven use, it is not, repeat the removal and installation procedures. 16 To Replace: 1. If it is not suggested to push the oven door closed and pull it will help them slide. ■ Steel-... Oven Light The oven's light is free to remove. Open oven door all the way. 2. Continue to remove the oven door. Then, follow these instructions. Check that the door is a standard 25-watt appliance bulb. Turn bulb counterclockwise to the locked position. Open the oven door. To Replace: 1....
...Oven Door IMPORTANT: To avoid oven door glass breakage: ■ Do not close . For normal oven use, it is not, repeat the removal and installation procedures. 16 To Replace: 1. If it is not suggested to push the oven door closed and pull it will help them slide. ■ Steel-... Oven Light The oven's light is free to remove. Open oven door all the way. 2. Continue to remove the oven door. Then, follow these instructions. Check that the door is a standard 25-watt appliance bulb. Turn bulb counterclockwise to the locked position. Open the oven door. To Replace: 1....

Energy Guide
Page 18
...." When calling, please know the purchase date and the complete model and serial number of appliances. ■ Installation information. ■ Use and maintenance procedures. ■ Accessory and repair parts sales. ■ Specialized customer assistance...Whirlpool Customer eXperience Center toll free at www.whirlpool.com/cookingaccessories. Our consultants provide assistance with any questions or concerns at : Customer eXperience Centre Whirlpool Canada LP 200 - 6750 Century Ave. To order accessories, call . Or visit our website at 1-866-664-2449 and follow the instructions...
...." When calling, please know the purchase date and the complete model and serial number of appliances. ■ Installation information. ■ Use and maintenance procedures. ■ Accessory and repair parts sales. ■ Specialized customer assistance...Whirlpool Customer eXperience Center toll free at www.whirlpool.com/cookingaccessories. Our consultants provide assistance with any questions or concerns at : Customer eXperience Centre Whirlpool Canada LP 200 - 6750 Century Ave. To order accessories, call . Or visit our website at 1-866-664-2449 and follow the instructions...

Energy Guide
Page 19
... cannot be repaired in the home and only in a manner that is contrary to published user or operator instructions and/or installation instructions. 4. Expenses for travel and transportation for in a remote area where service by calling Whirlpool. SOME STATES AND PROVINCES DO NOT ALLOW THE EXCLUSION OR LIMITATION OF INCIDENTAL OR CONSEQUENTIAL DAMAGES, OR...
... cannot be repaired in the home and only in a manner that is contrary to published user or operator instructions and/or installation instructions. 4. Expenses for travel and transportation for in a remote area where service by calling Whirlpool. SOME STATES AND PROVINCES DO NOT ALLOW THE EXCLUSION OR LIMITATION OF INCIDENTAL OR CONSEQUENTIAL DAMAGES, OR...
Warranty Information
Page 1
...that have been removed, altered or cannot be borne by a Whirlpool designated service company. In Canada, call 1-800-253-1301. Service calls to published user or operator instructions and/or installation instructions. 4. Expenses for travel and transportation for product service if your...major appliance is operated and maintained according to instructions attached to or furnished with the product, Whirlpool Corporation or Whirlpool Canada LP (hereafter "Whirlpool") will need it. Service must provide proof of purchase or installation date for in materials or workmanship. This limited...
...that have been removed, altered or cannot be borne by a Whirlpool designated service company. In Canada, call 1-800-253-1301. Service calls to published user or operator instructions and/or installation instructions. 4. Expenses for travel and transportation for product service if your...major appliance is operated and maintained according to instructions attached to or furnished with the product, Whirlpool Corporation or Whirlpool Canada LP (hereafter "Whirlpool") will need it. Service must provide proof of purchase or installation date for in materials or workmanship. This limited...
