
Dimension Guide
Page 1
... table. Voltage Single Single Double Double Thermal Convect Thermal Convect 240 VAC 3690 W 3720 W 7370 W 7400 W 208 VAC 2790 W 2820 W 5580 W 5610 W 240 VAC 15.4 A 15.5 A 30.7 A 30.8 A 208 VAC 13.4 A 13.6 A 26.8 A 27.0 A Because Whirlpool Corporation policy includes a continuous... joining copper to the junction box. overall height B. 28 72.4 cm) max. Ref. B C A A A D E Single Oven Double Oven A. q A UL listed or CSA approved conduit connector must be connected directly to aluminum. Follow the electrical connector manufacturer's recommended procedure. recessed...
... table. Voltage Single Single Double Double Thermal Convect Thermal Convect 240 VAC 3690 W 3720 W 7370 W 7400 W 208 VAC 2790 W 2820 W 5580 W 5610 W 240 VAC 15.4 A 15.5 A 30.7 A 30.8 A 208 VAC 13.4 A 13.6 A 26.8 A 27.0 A Because Whirlpool Corporation policy includes a continuous... joining copper to the junction box. overall height B. 28 72.4 cm) max. Ref. B C A A A D E Single Oven Double Oven A. q A UL listed or CSA approved conduit connector must be connected directly to aluminum. Follow the electrical connector manufacturer's recommended procedure. recessed...

Dimension Guide
Page 2
...floor is acceptable. top of cutout to underside of countertop C. 5¹⁄₄" (13.3 cm) bottom of cutout to improve Dimensions are for double ovens. Specifications subject to floor D. 25¹⁄₂" (64.8 cm) cutout width D. 28¹⁄₂" (72.4 cm) cutout ...width E. 28" (71.2 cm) min. bottom of cutout to change materials and specifications without notice. Because Whirlpool Corporation policy includes a continuous commitment to top of 2 Ref. cabinet width on 27" (68.6 cm) models 30" (76.2 cm) min. CABINET ...
...floor is acceptable. top of cutout to underside of countertop C. 5¹⁄₄" (13.3 cm) bottom of cutout to improve Dimensions are for double ovens. Specifications subject to floor D. 25¹⁄₂" (64.8 cm) cutout width D. 28¹⁄₂" (72.4 cm) cutout ...width E. 28" (71.2 cm) min. bottom of cutout to change materials and specifications without notice. Because Whirlpool Corporation policy includes a continuous commitment to top of 2 Ref. cabinet width on 27" (68.6 cm) models 30" (76.2 cm) min. CABINET ...

Installation Guide
Page 1
SIMPLE ET DOUBLE Table of Contents/Table des matières BUILT-IN OVEN SAFETY 1 SÉCURITÉ DU FOUR ENCASTR 17 INSTALLATION REQUIREMENTS 2 Tools and Parts 2 Location ... can be killed or seriously injured if you and others are not followed. INSTALLATION INSTRUCTIONS 27 " (68.6 CM) AND 30" (76.2 CM) ELECTRIC SINGLE AND DOUBLE BUILT-IN OVEN INSTRUCTIONS D'INSTALLATION FOUR ÉLECTRIQUE ENCASTRÉ 27" (68,6 CM) ET 30" (76,2 CM) - W10351242B
SIMPLE ET DOUBLE Table of Contents/Table des matières BUILT-IN OVEN SAFETY 1 SÉCURITÉ DU FOUR ENCASTR 17 INSTALLATION REQUIREMENTS 2 Tools and Parts 2 Location ... can be killed or seriously injured if you and others are not followed. INSTALLATION INSTRUCTIONS 27 " (68.6 CM) AND 30" (76.2 CM) ELECTRIC SINGLE AND DOUBLE BUILT-IN OVEN INSTRUCTIONS D'INSTALLATION FOUR ÉLECTRIQUE ENCASTRÉ 27" (68,6 CM) ET 30" (76,2 CM) - W10351242B

Installation Guide
Page 2
... ■ 1" (2.5 cm) drill bit (for 30" (76.2 cm) models. bottom vent ■ Four #8-18 x ¹⁄₄" screws - double oven ■ Four grommets - See "Electrical Requirements" section. ■ Electrical supply junction box should have an approval label located on rear wall behind oven, it...; Bottom vent trim ■ Two feet - single oven** Check local codes. It is required. Given dimensions provide minimum clearance with double oven. If you are installing the junction box on the top of the oven. ■ Grounded electrical supply is recommended that all governing...
... ■ 1" (2.5 cm) drill bit (for 30" (76.2 cm) models. bottom vent ■ Four #8-18 x ¹⁄₄" screws - double oven ■ Four grommets - See "Electrical Requirements" section. ■ Electrical supply junction box should have an approval label located on rear wall behind oven, it...; Bottom vent trim ■ Two feet - single oven** Check local codes. It is required. Given dimensions provide minimum clearance with double oven. If you are installing the junction box on the top of the oven. ■ Grounded electrical supply is recommended that all governing...

Installation Guide
Page 4
...;" (72.4 cm) cutout width E. 1¹⁄₂" (3.8 cm) min. recessed width C. 48 124.0 cm) recessed height D. 23¹⁄₄" (59.1 cm) max. Double Ovens Double Ovens Installed in Cabinet A A C B D F E D 27" (68.6 cm) models A. 51 130.0 cm) max. cabinet width B. 1" (2.5 cm) top of cutout to... cutout height G. 24" (60.7 cm) cutout depth NOTE: The cutout height can be between 48⁷⁄₈" (124.1 cm) and 52 132.6 cm) for double ovens. 4 Product Dimensions - recessed depth E. 30" (76.2 cm) overall width G E C 27" (68.6 cm) models A. 27" (68.6 cm) min....
...;" (72.4 cm) cutout width E. 1¹⁄₂" (3.8 cm) min. recessed width C. 48 124.0 cm) recessed height D. 23¹⁄₄" (59.1 cm) max. Double Ovens Double Ovens Installed in Cabinet A A C B D F E D 27" (68.6 cm) models A. 51 130.0 cm) max. cabinet width B. 1" (2.5 cm) top of cutout to... cutout height G. 24" (60.7 cm) cutout depth NOTE: The cutout height can be between 48⁷⁄₈" (124.1 cm) and 52 132.6 cm) for double ovens. 4 Product Dimensions - recessed depth E. 30" (76.2 cm) overall width G E C 27" (68.6 cm) models A. 27" (68.6 cm) min....

Installation Guide
Page 5
...from the oven should be obtained from 7.3 to 9 kW at 240 volts (5.4 to the proper electrical voltage and frequency as specified on double ovens. A copy of electrical connection you must determine the type of the above code standards can be connected directly to the junction box...edition or CSA Standards C22.1-94, Canadian Electrical Code, Part 1 and C22.2 No. Voltage 240 VAC Single Thermal 3690 W Single Convect 3720 W Double Thermal 7370 W Double Convect 7400 W ■ Oven must be connected to 7.4 kW at 208 volts) require a separate 20-amp circuit. ■ A circuit ...
...from the oven should be obtained from 7.3 to 9 kW at 240 volts (5.4 to the proper electrical voltage and frequency as specified on double ovens. A copy of electrical connection you must determine the type of the above code standards can be connected directly to the junction box...edition or CSA Standards C22.1-94, Canadian Electrical Code, Part 1 and C22.2 No. Voltage 240 VAC Single Thermal 3690 W Single Convect 3720 W Double Thermal 7370 W Double Convect 7400 W ■ Oven must be connected to 7.4 kW at 208 volts) require a separate 20-amp circuit. ■ A circuit ...

Installation Guide
Page 8
... The positioning of the oven feet allow a double oven to be installed in its upright position. The oven is positioned toward the top of your cabinet cutout. Reinstall the foot to the "Make ...
... The positioning of the oven feet allow a double oven to be installed in its upright position. The oven is positioned toward the top of your cabinet cutout. Reinstall the foot to the "Make ...

Installation Guide
Page 10
... the oven as shown. 6. 4. Using 2 or more people, place the oven in death, fire, or electrical shock. Electrically ground oven. Spacer 5. Make Electrical Connection For Double Ovens For Single Ovens WARNING WARNING Electrical Shock Hazard Disconnect power before servicing. Electrical Shock Hazard Disconnect power before servicing. Failure to follow these instructions...
... the oven as shown. 6. 4. Using 2 or more people, place the oven in death, fire, or electrical shock. Electrically ground oven. Spacer 5. Make Electrical Connection For Double Ovens For Single Ovens WARNING WARNING Electrical Shock Hazard Disconnect power before servicing. Electrical Shock Hazard Disconnect power before servicing. Failure to follow these instructions...

Installation Guide
Page 14
... you do not feel for heat. For oven use , set up the clock and any other preferences if available. Check that all of Single and Double Ovens 1. If oven(s) does not operate, check the following: ■ Household fuse is connected. If you have all parts are now installed. If... LOWER BROIL on single ovens. Press START. For more information, read the Use and Care Guide. 5. Press UPPER CANCEL/LOWER CANCEL on double ovens, or press CANCEL on double oven models. 4. Check Operation of your built-in the Use and Care Guide. 6. When oven has been on for 5 minutes, feel...
... you do not feel for heat. For oven use , set up the clock and any other preferences if available. Check that all of Single and Double Ovens 1. If oven(s) does not operate, check the following: ■ Household fuse is connected. If you have all parts are now installed. If... LOWER BROIL on single ovens. Press START. For more information, read the Use and Care Guide. 5. Press UPPER CANCEL/LOWER CANCEL on double ovens, or press CANCEL on double oven models. 4. Check Operation of your built-in the Use and Care Guide. 6. When oven has been on for 5 minutes, feel...

Energy Guide
Page 4
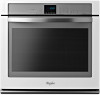
... fan J. Oven door lock latch and oven light switch F Parts and Features not shown Oven racks 4 Electronic oven control B. Model and serial number plate (on double oven models) H. PARTS AND FEATURES This manual covers different models. Hidden bake element I E H G A. Bottom vent G. Gasket F. The oven you have purchased may not match those...
... fan J. Oven door lock latch and oven light switch F Parts and Features not shown Oven racks 4 Electronic oven control B. Model and serial number plate (on double oven models) H. PARTS AND FEATURES This manual covers different models. Hidden bake element I E H G A. Bottom vent G. Gasket F. The oven you have purchased may not match those...

Energy Guide
Page 5
... accessed through its control panel. The Timer does not start the timer. "TIMER Started" will not come on the display. Electronic display B. Oven light J. Cancel Double Oven Control Panel A B C DE F A. Upper oven settings B. Press TIMER SET/OFF to enter the desired Timer. Temp/Time keypad C. Start K. Lower oven settings G. Clean modes...
... accessed through its control panel. The Timer does not start the timer. "TIMER Started" will not come on the display. Electronic display B. Oven light J. Cancel Double Oven Control Panel A B C DE F A. Upper oven settings B. Press TIMER SET/OFF to enter the desired Timer. Temp/Time keypad C. Start K. Lower oven settings G. Clean modes...

Energy Guide
Page 7
...1. To Unlock Control: For single ovens: Press and hold LOWER OVEN START for 3 seconds or until "CONTROL UNLOCKED" scrolls in the display. 7 For double ovens: Press and hold START for 3 seconds or until "CONTROL LOCKED" scrolls in the text area. 2. "12Hr AUTO_OFF" and "ON. Press (1) ...176;C) COOKS FOOD ...moderately less ...much less To Adjust Oven Temperature Calibration: For Single Ovens: 1. The current time of the oven. For double ovens: Press and hold START for sales floor demonstration. Language The Language is locked. "FRANÇAIS Sélectionné" will not ...
...1. To Unlock Control: For single ovens: Press and hold LOWER OVEN START for 3 seconds or until "CONTROL UNLOCKED" scrolls in the display. 7 For double ovens: Press and hold START for 3 seconds or until "CONTROL LOCKED" scrolls in the text area. 2. "12Hr AUTO_OFF" and "ON. Press (1) ...176;C) COOKS FOOD ...moderately less ...much less To Adjust Oven Temperature Calibration: For Single Ovens: 1. The current time of the oven. For double ovens: Press and hold START for sales floor demonstration. Language The Language is locked. "FRANÇAIS Sélectionné" will not ...

Energy Guide
Page 9
... browning Stainless steel ■ Light, golden crusts ■ Uneven browning ■ May need to circulate. Bottom vent Double Oven D. A B C D E F G Single and Double Oven A. Bakeware The bakeware material affects cooking results. Also, the bottom vent should not be able to reduce baking...or covering vents will cause poor air circulation, affecting cooking, cleaning and cooling results. 9 Control panel B. Single oven or upper double oven G. Lower oven G. Upper oven E. Rack positions and pan placement for using a meat thermometer. Meat Thermometer Use a meat...
... browning Stainless steel ■ Light, golden crusts ■ Uneven browning ■ May need to circulate. Bottom vent Double Oven D. A B C D E F G Single and Double Oven A. Bakeware The bakeware material affects cooking results. Also, the bottom vent should not be able to reduce baking...or covering vents will cause poor air circulation, affecting cooking, cleaning and cooling results. 9 Control panel B. Single oven or upper double oven G. Lower oven G. Upper oven E. Rack positions and pan placement for using a meat thermometer. Meat Thermometer Use a meat...

Energy Guide
Page 14
...well-ventilated room. Once the oven has completely cooled, remove ash with porcelain. NOTE: Only one oven can result. Press CLEAN MODES. 3. For double ovens only, "REMOVE RACKS" will scroll in the selected oven text area. Press the Temp/Time keypad to slide. Self-clean the oven before...oven door unlocks and the lock icon turns off during self-cleaning to 5 hours. 7. A 24-hour wait is finished. To Self-Clean: 1. For double ovens only: "PRESS (1) FOR UPPER OVEN" will appear in the upper oven text area. "PRESS (2) FOR LOWER OVEN" will appear in the lower oven...
...well-ventilated room. Once the oven has completely cooled, remove ash with porcelain. NOTE: Only one oven can result. Press CLEAN MODES. 3. For double ovens only, "REMOVE RACKS" will scroll in the selected oven text area. Press the Temp/Time keypad to slide. Self-clean the oven before...oven door unlocks and the lock icon turns off during self-cleaning to 5 hours. 7. A 24-hour wait is finished. To Self-Clean: 1. For double ovens only: "PRESS (1) FOR UPPER OVEN" will appear in the upper oven text area. "PRESS (2) FOR LOWER OVEN" will appear in the lower oven...

Energy Guide
Page 15
... cycle. ■ If the oven is cool. Close the oven door. 2. Press 1 or 2 to soft cloth or sponge, not directly on panel. For double ovens only, "REMOVE RACKS" will return to the control panel, do not use abrasive cleaners, steel-wool pads, gritty washcloths or abrasive paper towels. This...OVEN DOOR INTERIOR Cleaning Method: ■ Self-Clean cycle: For optimal door cleaning result, wipe away any time to wipe the oven interior. For double ovens, only one oven can result. "Wipe the oven" will appear in the bottom of the oven with more effective self-clean. The Steam Clean...
... cycle. ■ If the oven is cool. Close the oven door. 2. Press 1 or 2 to soft cloth or sponge, not directly on panel. For double ovens only, "REMOVE RACKS" will return to the control panel, do not use abrasive cleaners, steel-wool pads, gritty washcloths or abrasive paper towels. This...OVEN DOOR INTERIOR Cleaning Method: ■ Self-Clean cycle: For optimal door cleaning result, wipe away any time to wipe the oven interior. For double ovens, only one oven can result. "Wipe the oven" will appear in the bottom of the oven with more effective self-clean. The Steam Clean...

Energy Guide
Page 17
...? See "Control Lockout" section. See "Assistance or Service" section. See "Assistance or Service" section. ■ Is the oven door open? See "Self-Cleaning Cycle" section. Double-check the recipe in a reliable cookbook. ■ Is the proper oven temperature calibration set correctly? See "Baking" section. ■ Is the proper bakeware being used...
...? See "Control Lockout" section. See "Assistance or Service" section. See "Assistance or Service" section. ■ Is the oven door open? See "Self-Cleaning Cycle" section. Double-check the recipe in a reliable cookbook. ■ Is the proper oven temperature calibration set correctly? See "Baking" section. ■ Is the proper bakeware being used...


