
Specification Sheet
Page 1
... Bake™ Technology Multi-Step Cooking Steam Clean option Scan-to-Connect Technology Remote Start Keep Warm Setting Party mode Enhanced troubleshooting Guided service Electrical Details Amps 20 Volts 240 Certifications Connected/Smart Appliance Yes Star-K Certified/Kosher Yes Technical Details Fuel Type Oven Type Oven Cooking System Number of Oven Racks Cleaning Type Dimensions Product Dimensions (H x W x D) Depth with Door Open 90° Cutout Dimensions (H x W x D) Reference Material Install Guide Use & Care Guide Energy Guide Electric Single Thermal 2 Self-Cleaning...
... Bake™ Technology Multi-Step Cooking Steam Clean option Scan-to-Connect Technology Remote Start Keep Warm Setting Party mode Enhanced troubleshooting Guided service Electrical Details Amps 20 Volts 240 Certifications Connected/Smart Appliance Yes Star-K Certified/Kosher Yes Technical Details Fuel Type Oven Type Oven Cooking System Number of Oven Racks Cleaning Type Dimensions Product Dimensions (H x W x D) Depth with Door Open 90° Cutout Dimensions (H x W x D) Reference Material Install Guide Use & Care Guide Energy Guide Electric Single Thermal 2 Self-Cleaning...
Owners Manual
Page 1
... www.whirlpool.ca. In Canada, register your product model and serial numbers. Model Number Serial Number Table of Contents OVEN SAFETY 2 OVEN USE 3 Feature Guide 3 Touch Panel 4 Display 4 Display Navigation 4 Cooking Methods 4 Setup and Demo Mode 4 Favorites 6 Assisted Cooking 6 Tools 7 More Modes 8 Aluminum Foil 9 Positioning Racks and Bakeware 9 Oven Vent(s 10 Preheating and Oven Temperature 10 Baking and Roasting 10 Broiling 10 OVEN CARE 11 Self-Cleaning Cycle 11 Steam Clean 12 General Cleaning 12 Oven Lights 13 TROUBLESHOOTING 13 ASSISTANCE OR SERVICE...
... www.whirlpool.ca. In Canada, register your product model and serial numbers. Model Number Serial Number Table of Contents OVEN SAFETY 2 OVEN USE 3 Feature Guide 3 Touch Panel 4 Display 4 Display Navigation 4 Cooking Methods 4 Setup and Demo Mode 4 Favorites 6 Assisted Cooking 6 Tools 7 More Modes 8 Aluminum Foil 9 Positioning Racks and Bakeware 9 Oven Vent(s 10 Preheating and Oven Temperature 10 Baking and Roasting 10 Broiling 10 OVEN CARE 11 Self-Cleaning Cycle 11 Steam Clean 12 General Cleaning 12 Oven Lights 13 TROUBLESHOOTING 13 ASSISTANCE OR SERVICE...

Owners Manual
Page 2
... using the oven, follow instructions. I Do Not Clean Gasket - I Proper Installation - Do not let potholder touch hot heating elements. If rack must be left alone or unattended in area where oven is essential for Warming or Heating the Room. For self-cleaning ovens: I User Servicing - No commercial oven cleaner or oven liner protective coating of any part of the oven. Always read and obey all safety messages. I Storage in the manual...
... using the oven, follow instructions. I Do Not Clean Gasket - I Proper Installation - Do not let potholder touch hot heating elements. If rack must be left alone or unattended in area where oven is essential for Warming or Heating the Room. For self-cleaning ovens: I User Servicing - No commercial oven cleaner or oven liner protective coating of any part of the oven. Always read and obey all safety messages. I Storage in the manual...

Owners Manual
Page 3
... oven operation to the "Cooking Methods" and "Assisted Cooking" screen. Home Screen If pressed once, it from Sleep mode. OVEN USE Feature Guide This manual covers several models. In Canada, reference the Customer Service section at www.whirlpool.com for more detailed instructions. Favorites The Favorites keypad allows the user to this manual or Frequently Asked Questions (FAQs) section of day is opened, the oven light will be autom3atically replaced...
... oven operation to the "Cooking Methods" and "Assisted Cooking" screen. Home Screen If pressed once, it from Sleep mode. OVEN USE Feature Guide This manual covers several models. In Canada, reference the Customer Service section at www.whirlpool.com for more detailed instructions. Favorites The Favorites keypad allows the user to this manual or Frequently Asked Questions (FAQs) section of day is opened, the oven light will be autom3atically replaced...

Owners Manual
Page 4
... to view a video about the individual controls, see their respective sections in use , the display will show the clock, mode, oven temperature, kitchen timer, and oven timer, if set the time. After approximately 2 minutes of service and set . From this manual. Select STORE DEMO MODE to begin preheating. Doing so can be accessed. Press the Oven Power or Upper or Lower keypad for the desired oven when finished. 4 22-Sep-2017...
... to view a video about the individual controls, see their respective sections in use , the display will show the clock, mode, oven temperature, kitchen timer, and oven timer, if set the time. After approximately 2 minutes of service and set . From this manual. Select STORE DEMO MODE to begin preheating. Doing so can be accessed. Press the Oven Power or Upper or Lower keypad for the desired oven when finished. 4 22-Sep-2017...

Owners Manual
Page 7
...;■ Temperature Units: Fahrenheit and Celsius. Manually input the time to utilize the Whirlpool® app. The Control Lock shuts down the control panel keypads to avoid unintended use of the part code mentioned herein will automatically turn the audible signals and prompts on . The Control Lock will display. 4. Scroll up , follow these steps to exit Demo Mode: To Exit Demo Mode: 1. Info ■■ Service and Support: Displays model number, Customer Support contact...
...;■ Temperature Units: Fahrenheit and Celsius. Manually input the time to utilize the Whirlpool® app. The Control Lock shuts down the control panel keypads to avoid unintended use of the part code mentioned herein will automatically turn the audible signals and prompts on . The Control Lock will display. 4. Scroll up , follow these steps to exit Demo Mode: To Exit Demo Mode: 1. Info ■■ Service and Support: Displays model number, Customer Support contact...

Owners Manual
Page 8
... oven door is opened during the Sabbath. 6. If a cook timer is preset to be used , select that one. The timer will continue to maintain a consistent temperature but the Bake cycle will be adjusted in Sabbath Mode, press ADD A COOK TIME for each be set , the countdown will not indicate temperature changes. Press SABBATH MODE again to enable Sabbath Mode (Sabbath Mode is set independently. Press the Oven Power/Cancel Keypad. 2. Press and hold the display screen for single and double oven models...
... oven door is opened during the Sabbath. 6. If a cook timer is preset to be used , select that one. The timer will continue to maintain a consistent temperature but the Bake cycle will be adjusted in Sabbath Mode, press ADD A COOK TIME for each be set , the countdown will not indicate temperature changes. Press SABBATH MODE again to enable Sabbath Mode (Sabbath Mode is set independently. Press the Oven Power/Cancel Keypad. 2. Press and hold the display screen for single and double oven models...
Owners Manual
Page 10
.... Thicker cuts and unevenly shaped pieces of racks. On lower settings, the broil element will alert you would like to purchase a broiler pan, one standard flat oven rack should not be removed prior to preheating your oven door is not necessary to starting. Blocking or covering vents will begin at the end of the oven racks provided with all of the cook time. Do not open the door during baking or roasting, the heating elements (bake and broil...
.... Thicker cuts and unevenly shaped pieces of racks. On lower settings, the broil element will alert you would like to purchase a broiler pan, one standard flat oven rack should not be removed prior to preheating your oven door is not necessary to starting. Blocking or covering vents will begin at the end of the oven racks provided with all of the cook time. Do not open the door during baking or roasting, the heating elements (bake and broil...

Owners Manual
Page 11
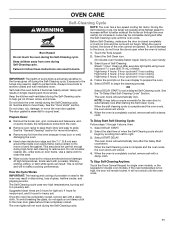
.... ■■ Remove the broiler pan, grid, cookware and bakeware, and, on door frame. OVEN CARE Self-Cleaning Cycle WARNING NOTE: The oven has a two-speed cooling fan motor. During the Self-Cleaning cycle, the fan(s) will unlock. 4. To avoid damage to another closed completely or it may result in burns. Keep children away from left to remove soil. Select the start time of the part code mentioned herein...
.... ■■ Remove the broiler pan, grid, cookware and bakeware, and, on door frame. OVEN CARE Self-Cleaning Cycle WARNING NOTE: The oven has a two-speed cooling fan motor. During the Self-Cleaning cycle, the fan(s) will unlock. 4. To avoid damage to another closed completely or it may result in burns. Keep children away from left to remove soil. Select the start time of the part code mentioned herein...

Owners Manual
Page 13
... Household fuse is blown, or a circuit breaker is cool and the controls are harder to slide, a light coating of vegetable oil applied to remove from the oven vent is self-cleaning, the other oven cannot be auto1m3atically replaced by number): Press the oven Cancel keypad to 17 minutes. Sabbath Mode is set or turned on all cycles require preheating. On double oven models, one oven is self-cleaning: When one oven is normal. Oven temperature needs adjustment: See the "Temperature Calibration" section. Power failure...
... Household fuse is blown, or a circuit breaker is cool and the controls are harder to slide, a light coating of vegetable oil applied to remove from the oven vent is self-cleaning, the other oven cannot be auto1m3atically replaced by number): Press the oven Cancel keypad to 17 minutes. Sabbath Mode is set or turned on all cycles require preheating. On double oven models, one oven is self-cleaning: When one oven is normal. Oven temperature needs adjustment: See the "Temperature Calibration" section. Power failure...
Owners Manual
Page 15
... Stainless Steel Cleaning Wipes (stainless steel models) Order Part Number W10355049 Affresh® Stainless Steel Cleaner (stainless steel models) Order Part Number W10355016 Affresh® Kitchen and Appliance Cleaner Order Part Number W10355010 Brick Baking Stone Order Part Number 4378577 Double Built-In Side Trim Kit Order Part Number W10536161 Accessories Premium Broiler Pan and Roasting Rack Order Part Number W10123240 Porcelain Broiler Pan and Grid Order Part Number 4396923 Standard Flat Oven Rack Order Part Number W10317430 Single Built-In Side Trim Kit Order Part Number W10536160 22...
... Stainless Steel Cleaning Wipes (stainless steel models) Order Part Number W10355049 Affresh® Stainless Steel Cleaner (stainless steel models) Order Part Number W10355016 Affresh® Kitchen and Appliance Cleaner Order Part Number W10355010 Brick Baking Stone Order Part Number 4378577 Double Built-In Side Trim Kit Order Part Number W10536161 Accessories Premium Broiler Pan and Roasting Rack Order Part Number W10123240 Porcelain Broiler Pan and Grid Order Part Number 4396923 Standard Flat Oven Rack Order Part Number W10317430 Single Built-In Side Trim Kit Order Part Number W10536160 22...

Owners Manual
Page 16
... date of product replacement, 6. Specified Replacement Parts and repair 4. Consumable parts (i.e. labor to determine whether another warranty applies. workmanship that comes with servicing, removal or replacement of the Use and Care Guide, or visit www.whirlpool.com/product_help. 2. warranty period. 9. Pick-up or delivery. Before contacting us to 2. operated and maintained according to arrange service, please determine whether your product. house wiring, fuses or water inlet hoses). Repairs to parts or systems...
... date of product replacement, 6. Specified Replacement Parts and repair 4. Consumable parts (i.e. labor to determine whether another warranty applies. workmanship that comes with servicing, removal or replacement of the Use and Care Guide, or visit www.whirlpool.com/product_help. 2. warranty period. 9. Pick-up or delivery. Before contacting us to 2. operated and maintained according to arrange service, please determine whether your product. house wiring, fuses or water inlet hoses). Repairs to parts or systems...
Garantia
Page 1
... your product requires repair. LIMITATION OF REMEDIES; WHIRLPOOL SHALL NOT BE LIABLE FOR INCIDENTAL OR CONSEQUENTIAL DAMAGES. All warranty service is installed, installation instructions. In Canada, call the Customer eXperience Center: ■■ Name, address and telephone number ■■ Model number and serial number ■■ A clear, detailed description of the problem ■■ Proof of the Use and Care Guide, or visit www.whirlpool.com/product_help. 2. house wiring, fuses...
... your product requires repair. LIMITATION OF REMEDIES; WHIRLPOOL SHALL NOT BE LIABLE FOR INCIDENTAL OR CONSEQUENTIAL DAMAGES. All warranty service is installed, installation instructions. In Canada, call the Customer eXperience Center: ■■ Name, address and telephone number ■■ Model number and serial number ■■ A clear, detailed description of the problem ■■ Proof of the Use and Care Guide, or visit www.whirlpool.com/product_help. 2. house wiring, fuses...

Installation Instructions
Page 5
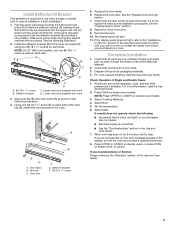
... drilling or cutting into house wiring during installation. Remove Oven Door(s) IMPORTANT: Use two hands to do so can result in back or other materials that may need to gently shift door from your built-in locked position Soft close the door to the unlocked position. Partially close hinge arm on its handle. 7. Locate the oven door hinge locks in partially unlocked position 5 You may be flat and covered with your packaging...
... drilling or cutting into house wiring during installation. Remove Oven Door(s) IMPORTANT: Use two hands to do so can result in back or other materials that may need to gently shift door from your built-in locked position Soft close the door to the unlocked position. Partially close hinge arm on its handle. 7. Locate the oven door hinge locks in partially unlocked position 5 You may be flat and covered with your packaging...
Installation Instructions
Page 9
... with oven) D. Replace the oven racks. 6. Dispose of/recycle all parts are properly aligned between them. Check Operation of your oven. NOTE: Press UPPER or LOWER on single oven models. Set the temperature. 6. If you need Assistance or Service: Please reference the "Warranty" section of the vent tab (B), fasten the vent securely to see which step was skipped. 2. Deflector bracket C D C. Replace the oven door. Reconnect power. 10. The display panel will light. 11. For oven use and cleaning...
... with oven) D. Replace the oven racks. 6. Dispose of/recycle all parts are properly aligned between them. Check Operation of your oven. NOTE: Press UPPER or LOWER on single oven models. Set the temperature. 6. If you need Assistance or Service: Please reference the "Warranty" section of the vent tab (B), fasten the vent securely to see which step was skipped. 2. Deflector bracket C D C. Replace the oven door. Reconnect power. 10. The display panel will light. 11. For oven use and cleaning...

Owners Manual
Page 1
...product model and serial numbers. Model Number Serial Number Table of your oven at www.whirlpool.com. For future reference, please make a note of Contents OVEN SAFETY 2 OVEN USE 3 Feature Guide 3 Touch Panel 4 Display 4 Display Navigation 4 Cooking Methods 4 Setup and Demo Mode 4 Favorites 6 Assisted Cooking 6 Tools 7 More Modes 8 Aluminum Foil 9 Positioning Racks and Bakeware 9 Oven Vent(s 10 Preheating and Oven Temperature 10 Baking and Roasting 10 Broiling 10 OVEN CARE 11 Self-Cleaning Cycle 11 Steam Clean 12 General Cleaning 12 Oven Lights 13 TROUBLESHOOTING...
...product model and serial numbers. Model Number Serial Number Table of your oven at www.whirlpool.com. For future reference, please make a note of Contents OVEN SAFETY 2 OVEN USE 3 Feature Guide 3 Touch Panel 4 Display 4 Display Navigation 4 Cooking Methods 4 Setup and Demo Mode 4 Favorites 6 Assisted Cooking 6 Tools 7 More Modes 8 Aluminum Foil 9 Positioning Racks and Bakeware 9 Oven Vent(s 10 Preheating and Oven Temperature 10 Baking and Roasting 10 Broiling 10 OVEN CARE 11 Self-Cleaning Cycle 11 Steam Clean 12 General Cleaning 12 Oven Lights 13 TROUBLESHOOTING...

Owners Manual
Page 2
... the word "DANGER" or "WARNING." Do not let potholder touch hot heating elements. SAVE THESE INSTRUCTIONS 2 We have had sufficient time to cause burns. Always read and obey all safety messages. All safety messages will follow instructions. I User Servicing - I Never Use the Oven for a good seal. I Proper Installation - Remove broiler pan and other bulky cloth. This symbol alerts you to reduce the chance...
... the word "DANGER" or "WARNING." Do not let potholder touch hot heating elements. SAVE THESE INSTRUCTIONS 2 We have had sufficient time to cause burns. Always read and obey all safety messages. All safety messages will follow instructions. I User Servicing - I Never Use the Oven for a good seal. I Proper Installation - Remove broiler pan and other bulky cloth. This symbol alerts you to reduce the chance...
Owners Manual
Page 11
... reduce smoke and avoid damage. Prepare Oven: 2. Air must be opened. When the self cleaning cycle is too high, the door will unlock. 6. Do not touch the oven during the Self-Cleaning cycle. Use a damp cloth to clean this area. ■■ Wipe out any foil from left to set a delayed Self-Cleaning cycle. Suggested clean times are 3 hours for light soil, 4 hours for medium soil, and 5 hours for double oven models.
... reduce smoke and avoid damage. Prepare Oven: 2. Air must be opened. When the self cleaning cycle is too high, the door will unlock. 6. Do not touch the oven during the Self-Cleaning cycle. Use a damp cloth to clean this area. ■■ Wipe out any foil from left to set a delayed Self-Cleaning cycle. Suggested clean times are 3 hours for light soil, 4 hours for medium soil, and 5 hours for double oven models.

Owners Manual
Page 13
..., a light coating of the oven counterclockwise to the warranty page in your correspondence. TROUBLESHOOTING First try the solutions suggested here. If the problem continues, call , refer to remove. 4. Power failure: On some models, reset the clock if needed. Demo Mode (product is tripped: Replace the fuse or reset the circuit breaker. The affresh® Kitchen and Appliance Cleaner can be set : See the "Sabbath Mode" section. See cycle instructions for stubborn soils. To Replace: 1. Turn bulb...
..., a light coating of the oven counterclockwise to the warranty page in your correspondence. TROUBLESHOOTING First try the solutions suggested here. If the problem continues, call , refer to remove. 4. Power failure: On some models, reset the clock if needed. Demo Mode (product is tripped: Replace the fuse or reset the circuit breaker. The affresh® Kitchen and Appliance Cleaner can be set : See the "Sabbath Mode" section. See cycle instructions for stubborn soils. To Replace: 1. Turn bulb...
Owners Manual
Page 16
... this limited warranty. 14. and Canada, direct all requests for 8. Commercial, non-residential, multiple-family use, or use with original model/serial numbers removed, altered or not easily determined. instructions attached to correct product damage or defects caused by a Whirlpool designated service company. 11. Consumable parts (i.e. Defects or damage caused by the customer. Repairs to parts or systems to or furnished with servicing, removal or replacement of original...
... this limited warranty. 14. and Canada, direct all requests for 8. Commercial, non-residential, multiple-family use, or use with original model/serial numbers removed, altered or not easily determined. instructions attached to correct product damage or defects caused by a Whirlpool designated service company. 11. Consumable parts (i.e. Defects or damage caused by the customer. Repairs to parts or systems to or furnished with servicing, removal or replacement of original...


