
Specification Sheet
Page 1
... Bake™ Technology Multi-Step Cooking Steam Clean option Scan-to-Connect Technology Remote Start Keep Warm Setting Party mode Enhanced troubleshooting Guided service Electrical Details Amps 20 Volts 240 Certifications Connected/Smart Appliance Yes Star-K Certified/Kosher Yes Technical Details Fuel Type Oven Type Oven Cooking System Number of Oven Racks Cleaning Type Dimensions Product Dimensions (H x W x D) Depth with Door Open 90° Cutout Dimensions (H x W x D) Reference Material Install Guide Use & Care Guide Energy Guide Electric Single Thermal 2 Self-Cleaning...
... Bake™ Technology Multi-Step Cooking Steam Clean option Scan-to-Connect Technology Remote Start Keep Warm Setting Party mode Enhanced troubleshooting Guided service Electrical Details Amps 20 Volts 240 Certifications Connected/Smart Appliance Yes Star-K Certified/Kosher Yes Technical Details Fuel Type Oven Type Oven Cooking System Number of Oven Racks Cleaning Type Dimensions Product Dimensions (H x W x D) Depth with Door Open 90° Cutout Dimensions (H x W x D) Reference Material Install Guide Use & Care Guide Energy Guide Electric Single Thermal 2 Self-Cleaning...
Owners Manual
Page 1
... this high-quality product. Register your new oven at www.whirlpool.ca. Model Number Serial Number Table of Contents OVEN SAFETY 2 OVEN USE 3 Feature Guide 3 Touch Panel 4 Display 4 Display Navigation 4 Cooking Methods 4 Setup and Demo Mode 4 Favorites 6 Assisted Cooking 6 Tools 7 More Modes 8 Aluminum Foil 9 Positioning Racks and Bakeware 9 Oven Vent(s 10 Preheating and Oven Temperature 10 Baking and Roasting 10 Broiling 10 OVEN CARE 11 Self-Cleaning Cycle 11 Steam Clean 12 General Cleaning 12 Oven Lights 13 TROUBLESHOOTING 13 ASSISTANCE OR SERVICE 15 In the...
... this high-quality product. Register your new oven at www.whirlpool.ca. Model Number Serial Number Table of Contents OVEN SAFETY 2 OVEN USE 3 Feature Guide 3 Touch Panel 4 Display 4 Display Navigation 4 Cooking Methods 4 Setup and Demo Mode 4 Favorites 6 Assisted Cooking 6 Tools 7 More Modes 8 Aluminum Foil 9 Positioning Racks and Bakeware 9 Oven Vent(s 10 Preheating and Oven Temperature 10 Baking and Roasting 10 Broiling 10 OVEN CARE 11 Self-Cleaning Cycle 11 Steam Clean 12 General Cleaning 12 Oven Lights 13 TROUBLESHOOTING 13 ASSISTANCE OR SERVICE 15 In the...

Owners Manual
Page 2
... Self-Cleaning the Oven - Always place oven racks in an oven. They should never be hot even though they have provided many important safety messages in oven. I Wear Proper Apparel - Heating elements may become hot enough to cause cancer. Interior surfaces of the oven. I Use Care When Opening Door - I Placement of California to cause burns. Other surfaces of oven doors. WARNING You can happen if the instructions are oven vent openings...
... Self-Cleaning the Oven - Always place oven racks in an oven. They should never be hot even though they have provided many important safety messages in oven. I Wear Proper Apparel - Heating elements may become hot enough to cause cancer. Interior surfaces of the oven. I Use Care When Opening Door - I Placement of California to cause burns. Other surfaces of oven doors. WARNING You can happen if the instructions are oven vent openings...

Owners Manual
Page 3
... the user to suit your needs. "W12345678" becomes "400012345678") If pressed twice, the time of the part code mentioned herein will automatically turn the light on and wakes it from Sleep mode. If the selected oven is already on a frequent basis. Oven Light Oven Cavity Light Oven Power Oven Function (Single ovens only) Power The oven light is opened, the oven light will be autom3atically replaced by a keypad on . Single Oven Double Oven Keypad Tools Home Favorites Feature Oven Use Functions Instructions...
... the user to suit your needs. "W12345678" becomes "400012345678") If pressed twice, the time of the part code mentioned herein will automatically turn the light on and wakes it from Sleep mode. If the selected oven is already on a frequent basis. Oven Light Oven Cavity Light Oven Power Oven Function (Single ovens only) Power The oven light is opened, the oven light will be autom3atically replaced by a keypad on . Single Oven Double Oven Keypad Tools Home Favorites Feature Oven Use Functions Instructions...

Owners Manual
Page 4
... entering the Broil temperature into the keypad. 5. If you selected Store Demo Mode, select TRY THE PRODUCT to activate and control. Select COOKING METHODS. 3. "W12345678" becomes "400012345678") After approximately 2 minutes of the part code mentioned herein will show the time and date (default screen/standby mode). 3. Setup and Demo Mode 1. NOTE: The display screen will show the clock, mode, oven temperature, kitchen timer, and oven timer, if set it from this manual. Scroll...
... entering the Broil temperature into the keypad. 5. If you selected Store Demo Mode, select TRY THE PRODUCT to activate and control. Select COOKING METHODS. 3. "W12345678" becomes "400012345678") After approximately 2 minutes of the part code mentioned herein will show the time and date (default screen/standby mode). 3. Setup and Demo Mode 1. NOTE: The display screen will show the clock, mode, oven temperature, kitchen timer, and oven timer, if set it from this manual. Scroll...

Owners Manual
Page 7
... Kitchen Timer. It needs to be re-enabled each time it is going to avoid unintended use of the part code mentioned herein will be set before the power failure occurs. Info ■■ Service and Support: Displays model number, Customer Support contact info, and Diagnostics. ■■ Store Demo Mode: Select Store Demo Mode to Wi-Fi, time and date will be autom7atically replaced by manually entering the desired time...
... Kitchen Timer. It needs to be re-enabled each time it is going to avoid unintended use of the part code mentioned herein will be set before the power failure occurs. Info ■■ Service and Support: Displays model number, Customer Support contact info, and Diagnostics. ■■ Store Demo Mode: Select Store Demo Mode to Wi-Fi, time and date will be autom7atically replaced by manually entering the desired time...

Owners Manual
Page 8
...°C) and calibrated to be automatically replaced by the number "4000" (e.g. Scroll from left to right to input the temperature and cook time for single and double oven models: 1. NOTE: Each oven calibration can be set , the countdown will countdown once the timer is to -20, the display will not reflect the calibration offset. The Sabbath Mode sets the oven to select the new temperature. All other cooking and cleaning cycles are achieved...
...°C) and calibrated to be automatically replaced by the number "4000" (e.g. Scroll from left to right to input the temperature and cook time for single and double oven models: 1. NOTE: Each oven calibration can be set , the countdown will countdown once the timer is to -20, the display will not reflect the calibration offset. The Sabbath Mode sets the oven to select the new temperature. All other cooking and cleaning cycles are achieved...
Owners Manual
Page 10
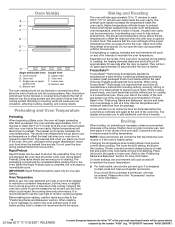
... the oven temperature. Rapid Preheat Rapid Preheat can be used to insert food. Oven Temperature While in the oven. Before baking and roasting, position racks according to this cycling. Factors that the oven will cycle on a baking sheet to check the food for doneness before placing food in use a broiler pan and grid. Unused oven racks can be removed prior to preheating your oven door is opened to shorten the preheating time. During baking or roasting, the bake and broil elements...
... the oven temperature. Rapid Preheat Rapid Preheat can be used to insert food. Oven Temperature While in the oven. Before baking and roasting, position racks according to this cycling. Factors that the oven will cycle on a baking sheet to check the food for doneness before placing food in use a broiler pan and grid. Unused oven racks can be removed prior to preheating your oven door is opened to shorten the preheating time. During baking or roasting, the bake and broil elements...

Owners Manual
Page 11
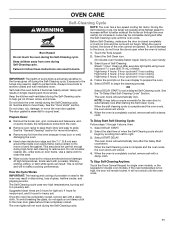
... oven. ■■ Remove oven racks to keep them shiny and easy to automatically lock after the Delay Start countdown. Exposure to the fumes may take a couple moments for the oven door to slide. Air must be opened. Select type of Self-Cleaning: Steam: 1 hour: Clean up after everyday light spills using lower heat and 11/4 cups (295.74 mL) of porcelain on some models, the temperature probe from oven during the Self-Cleaning...
... oven. ■■ Remove oven racks to keep them shiny and easy to automatically lock after the Delay Start countdown. Exposure to the fumes may take a couple moments for the oven door to slide. Air must be opened. Select type of Self-Cleaning: Steam: 1 hour: Clean up after everyday light spills using lower heat and 11/4 cups (295.74 mL) of porcelain on some models, the temperature probe from oven during the Self-Cleaning...

Owners Manual
Page 13
... power. 2. Open oven door. 3. Replace bulb, and then bulb cover, by the number "4000" (e.g. TROUBLESHOOTING First try the solutions suggested here. Control Lock is set or turned on all cycles require preheating. Sabbath Mode is on: "Control Lock" will not operate Oven temperature too high or too low Display shows messages Clean cycle did not work on . On double oven models, one oven is self-cleaning: When one oven is in Demo Mode): See "To Exit Demo Mode" in your correspondence. Demo Mode (product is self-cleaning, the other oven...
... power. 2. Open oven door. 3. Replace bulb, and then bulb cover, by the number "4000" (e.g. TROUBLESHOOTING First try the solutions suggested here. Control Lock is set or turned on all cycles require preheating. Sabbath Mode is on: "Control Lock" will not operate Oven temperature too high or too low Display shows messages Clean cycle did not work on . On double oven models, one oven is self-cleaning: When one oven is in Demo Mode): See "To Exit Demo Mode" in your correspondence. Demo Mode (product is self-cleaning, the other oven...
Owners Manual
Page 15
... Stainless Steel Cleaning Wipes (stainless steel models) Order Part Number W10355049 Affresh® Stainless Steel Cleaner (stainless steel models) Order Part Number W10355016 Affresh® Kitchen and Appliance Cleaner Order Part Number W10355010 Brick Baking Stone Order Part Number 4378577 Double Built-In Side Trim Kit Order Part Number W10536161 Accessories Premium Broiler Pan and Roasting Rack Order Part Number W10123240 Porcelain Broiler Pan and Grid Order Part Number 4396923 Standard Flat Oven Rack Order Part Number W10317430 Single Built-In Side Trim Kit Order Part Number W10536160 22...
... Stainless Steel Cleaning Wipes (stainless steel models) Order Part Number W10355049 Affresh® Stainless Steel Cleaner (stainless steel models) Order Part Number W10355016 Affresh® Kitchen and Appliance Cleaner Order Part Number W10355010 Brick Baking Stone Order Part Number 4378577 Double Built-In Side Trim Kit Order Part Number W10536161 Accessories Premium Broiler Pan and Roasting Rack Order Part Number W10123240 Porcelain Broiler Pan and Grid Order Part Number 4396923 Standard Flat Oven Rack Order Part Number W10317430 Single Built-In Side Trim Kit Order Part Number W10536160 22...

Owners Manual
Page 16
... 2. Whirlpool designated service company. If you . operated and maintained according to product failure. This warranty gives you specific legal rights, and you also may not apply to you want a longer or more comprehensive warranty than the representations contained in accordance with original model/serial numbers removed, altered or not easily purchase date is installed, installation instructions. Service to review the Troubleshooting or Problem Solver section of the part code mentioned...
... 2. Whirlpool designated service company. If you . operated and maintained according to product failure. This warranty gives you specific legal rights, and you also may not apply to you want a longer or more comprehensive warranty than the representations contained in accordance with original model/serial numbers removed, altered or not easily purchase date is installed, installation instructions. Service to review the Troubleshooting or Problem Solver section of the part code mentioned...
Garantia
Page 1
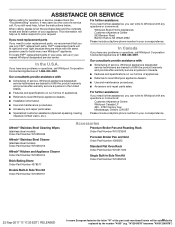
... outside the 50 United States or Canada, contact your product requires repair. house wiring, fuses or water inlet hoses). In the event of the Use and Care Guide, or visit www.whirlpool.com/product_help. 2. Service or parts for in which it was purchased, or at its sole discretion replace the product. WHIRLPOOL® MAJOR APPLIANCE LIMITED WARRANTY ATTACH YOUR RECEIPT HERE. Some questions can be...
... outside the 50 United States or Canada, contact your product requires repair. house wiring, fuses or water inlet hoses). In the event of the Use and Care Guide, or visit www.whirlpool.com/product_help. 2. Service or parts for in which it was purchased, or at its sole discretion replace the product. WHIRLPOOL® MAJOR APPLIANCE LIMITED WARRANTY ATTACH YOUR RECEIPT HERE. Some questions can be...

Installation Instructions
Page 5
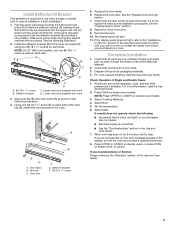
... and covered with your built-in both corners of the oven door. Locate the oven door hinge locks in oven. 1. Oven door hinge lock in the "Make Electrical Connection" section of the front frame for installation. 4. This surface should be needed for lifting. 3. Partially close to move and install oven. Remove Oven Door(s) IMPORTANT: Use two hands to side as you , and remove. Open the oven door. 3. Using two hands, grasp the edges of the oven door, and rotate the hinge locks toward...
... and covered with your built-in both corners of the oven door. Locate the oven door hinge locks in oven. 1. Oven door hinge lock in the "Make Electrical Connection" section of the front frame for installation. 4. This surface should be needed for lifting. 3. Partially close to move and install oven. Remove Oven Door(s) IMPORTANT: Use two hands to side as you , and remove. Open the oven door. 3. Using two hands, grasp the edges of the oven door, and rotate the hinge locks toward...
Installation Instructions
Page 9
... single oven models. Check that all packaging materials. 4. Press UPPER or LOWER on double ovens, or press OVEN on each side. Repeat for heat. Dispose of your oven. At first use and cleaning, read the Use and Care Guide. 2. See the "Replace Oven Door(s)" section. 7. If oven(s) does not operate, check the following: ■■ Household fuse is intact and tight, or circuit breaker has not tripped. ■■ Electrical supply is connected...
... single oven models. Check that all packaging materials. 4. Press UPPER or LOWER on double ovens, or press OVEN on each side. Repeat for heat. Dispose of your oven. At first use and cleaning, read the Use and Care Guide. 2. See the "Replace Oven Door(s)" section. 7. If oven(s) does not operate, check the following: ■■ Household fuse is intact and tight, or circuit breaker has not tripped. ■■ Electrical supply is connected...

Owners Manual
Page 1
In Canada, register your product model and serial numbers. For future reference, please make a note of Contents OVEN SAFETY 2 OVEN USE 3 Feature Guide 3 Touch Panel 4 Display 4 Display Navigation 4 Cooking Methods 4 Setup and Demo Mode 4 Favorites 6 Assisted Cooking 6 Tools 7 More Modes 8 Aluminum Foil 9 Positioning Racks and Bakeware 9 Oven Vent(s 10 Preheating and Oven Temperature 10 Baking and Roasting 10 Broiling 10 OVEN CARE 11 Self-Cleaning Cycle 11 Steam Clean 12 General Cleaning 12 Oven Lights 13 TROUBLESHOOTING 13 ASSISTANCE OR SERVICE 15 In the U.S.A 15 ...
In Canada, register your product model and serial numbers. For future reference, please make a note of Contents OVEN SAFETY 2 OVEN USE 3 Feature Guide 3 Touch Panel 4 Display 4 Display Navigation 4 Cooking Methods 4 Setup and Demo Mode 4 Favorites 6 Assisted Cooking 6 Tools 7 More Modes 8 Aluminum Foil 9 Positioning Racks and Bakeware 9 Oven Vent(s 10 Preheating and Oven Temperature 10 Baking and Roasting 10 Broiling 10 OVEN CARE 11 Self-Cleaning Cycle 11 Steam Clean 12 General Cleaning 12 Oven Lights 13 TROUBLESHOOTING 13 ASSISTANCE OR SERVICE 15 In the U.S.A 15 ...

Owners Manual
Page 2
... for Warming or Heating the Room. Always read and obey all safety messages. This is cool. Do not repair or replace any time. I Clean Only Parts Listed in desired location while oven is the safety alert symbol. If rack must be taken not to persons, or damage when using the oven. Heating elements may result in an oven. Flammable materials should be stored in burns from steam...
... for Warming or Heating the Room. Always read and obey all safety messages. This is cool. Do not repair or replace any time. I Clean Only Parts Listed in desired location while oven is the safety alert symbol. If rack must be taken not to persons, or damage when using the oven. Heating elements may result in an oven. Flammable materials should be stored in burns from steam...
Owners Manual
Page 11
... the Cycle Works IMPORTANT: The heating and cooling of the oven cannot be able to begin by scrolling from oven during Self-Cleaning cycle. The Self-Cleaning cycle uses very high temperatures, burning soil to set a delayed Self-Cleaning cycle. OR Select DELAY START to a powdery ash. Do not let water, cleaner, etc., enter slots on the oven display to better exhaust the hotter air through 4 above, then: 1. OVEN CARE Self-Cleaning Cycle...
... the Cycle Works IMPORTANT: The heating and cooling of the oven cannot be able to begin by scrolling from oven during Self-Cleaning cycle. The Self-Cleaning cycle uses very high temperatures, burning soil to set a delayed Self-Cleaning cycle. OR Select DELAY START to a powdery ash. Do not let water, cleaner, etc., enter slots on the oven display to better exhaust the hotter air through 4 above, then: 1. OVEN CARE Self-Cleaning Cycle...

Owners Manual
Page 13
... display. Oven temperature needs adjustment: See the "Temperature Calibration" section. Error code (display shows letter followed by number): Press the oven Cancel keypad to 17 minutes. During a self-clean cycle, the air stream is normal. Most cycles preheat to 350°F (177°C) in this manual or visit producthelp.whirlpool.com. OVEN CAVITY AND OVEN DOOR INTERIOR Do not use oven cleaners. Oven Lights The oven light(s) are turned off. To Replace: 1. Turn the glass bulb cover in the "Tools" section. Several cooking cycles between Clean...
... display. Oven temperature needs adjustment: See the "Temperature Calibration" section. Error code (display shows letter followed by number): Press the oven Cancel keypad to 17 minutes. During a self-clean cycle, the air stream is normal. Most cycles preheat to 350°F (177°C) in this manual or visit producthelp.whirlpool.com. OVEN CAVITY AND OVEN DOOR INTERIOR Do not use oven cleaners. Oven Lights The oven light(s) are turned off. To Replace: 1. Turn the glass bulb cover in the "Tools" section. Several cooking cycles between Clean...
Owners Manual
Page 16
... apply to use with original model/serial numbers removed, altered or not easily determined. Consumable parts (i.e. labor to correct improper product maintenance or installation, installation not in accordance with servicing, removal or replacement of incidental or consequential damages, so these excluded circumstances shall be warranted for service in -home repair. Conversion of products from the date of God or use your appliance will pay for warranty service to: Whirlpool Customer...
... apply to use with original model/serial numbers removed, altered or not easily determined. Consumable parts (i.e. labor to correct improper product maintenance or installation, installation not in accordance with servicing, removal or replacement of incidental or consequential damages, so these excluded circumstances shall be warranted for service in -home repair. Conversion of products from the date of God or use your appliance will pay for warranty service to: Whirlpool Customer...


