
Dimension Guide
Page 1
..." (76.2 CM) ELECTRIC SINGLE AND DOUBLE BUILT-IN OVEN PRODUCT MODEL SERIES PRODUCT DIMENSIONS WOD51EC0A WOD51EC7A WOD93EC0A WOD93EC7A WOS51EC0A WOS51EC7A WOS92EC0A WOS92EC7A Electrical: To properly install your oven, you must determine the type of electrical connection you will be using special connectors and/or tools designed and UL listed for planning purposes only. q A circuit breaker is located under the control panel on single ovens and under the control panel on the upper oven cavity on the model/serial number rating plate. q Flexible...
..." (76.2 CM) ELECTRIC SINGLE AND DOUBLE BUILT-IN OVEN PRODUCT MODEL SERIES PRODUCT DIMENSIONS WOD51EC0A WOD51EC7A WOD93EC0A WOD93EC7A WOS51EC0A WOS51EC7A WOS92EC0A WOS92EC7A Electrical: To properly install your oven, you must determine the type of electrical connection you will be using special connectors and/or tools designed and UL listed for planning purposes only. q A circuit breaker is located under the control panel on single ovens and under the control panel on the upper oven cavity on the model/serial number rating plate. q Flexible...

Installation Guide
Page 1
...érente 23 Raccordement électrique 26 Installation du four 28 Achever l'installation 30 BUILT-IN OVEN SAFETY Your safety and the safety of Contents/Table des matières BUILT-IN OVEN SAFETY 1 SÉCURITÉ DU FOUR ENCASTR 17 INSTALLATION REQUIREMENTS 2 Tools and Parts 2 Location Requirements 2 Electrical Requirements 5 INSTALLATION INSTRUCTIONS 6 Prepare Built-In Oven 6 Remove Oven Door 6 Positioning Oven Feet for local electrical inspector's use. IMPORTANT : À conserver pour consultation par...
...érente 23 Raccordement électrique 26 Installation du four 28 Achever l'installation 30 BUILT-IN OVEN SAFETY Your safety and the safety of Contents/Table des matières BUILT-IN OVEN SAFETY 1 SÉCURITÉ DU FOUR ENCASTR 17 INSTALLATION REQUIREMENTS 2 Tools and Parts 2 Location Requirements 2 Electrical Requirements 5 INSTALLATION INSTRUCTIONS 6 Prepare Built-In Oven 6 Remove Oven Door 6 Positioning Oven Feet for local electrical inspector's use. IMPORTANT : À conserver pour consultation par...

Installation Guide
Page 2
... existing electrical supply. single oven** Check local codes. single ovens (2), double ovens (4) ■ Two #8-18 x ³⁄₈" screws - double oven ■ Four grommets - IMPORTANT: To avoid damage to the junction box. bottom vent trim ■ Four #8-18 x ³⁄₈" screws - If you are shown must be able to undercounter installation instructions for wall cabinet installations) ■ Level ■ Flat-blade screwdriver Parts needed ■ Phillips screwdriver ■ Measuring tape...
... existing electrical supply. single oven** Check local codes. single ovens (2), double ovens (4) ■ Two #8-18 x ³⁄₈" screws - double oven ■ Four grommets - IMPORTANT: To avoid damage to the junction box. bottom vent trim ■ Four #8-18 x ³⁄₈" screws - If you are shown must be able to undercounter installation instructions for wall cabinet installations) ■ Level ■ Flat-blade screwdriver Parts needed ■ Phillips screwdriver ■ Measuring tape...

Installation Guide
Page 5
... conduit provided is located under the control panel on single ovens and under the control panel on the upper oven cavity on the model/serial number rating plate. The model/serial number rating plate is for models KEBK171B, KEBK101B, KEBK276B, KEBK206B, KEBS179B, KEBS109B, KEBS277B, KEBS279B, KEBS207B and KEBS209B, refer to the circuit breaker box (or fused disconnect) through flexible, armored or nonmetallic sheathed, copper cable (with local codes. Voltage Single Single Thermal Convect Double Double Thermal Convect 240 VAC 4090...
... conduit provided is located under the control panel on single ovens and under the control panel on the upper oven cavity on the model/serial number rating plate. The model/serial number rating plate is for models KEBK171B, KEBK101B, KEBK276B, KEBK206B, KEBS179B, KEBS109B, KEBS277B, KEBS279B, KEBS207B and KEBS209B, refer to the circuit breaker box (or fused disconnect) through flexible, armored or nonmetallic sheathed, copper cable (with local codes. Voltage Single Single Thermal Convect Double Double Thermal Convect 240 VAC 4090...

Installation Guide
Page 6
... of the control panel. INSTALLATION INSTRUCTIONS Prepare Built-In Oven 1. Decide on a covered work surface. Avoid drilling or cutting into house wiring during installation. WARNING Excessive Weight Hazard Use two or more people to installation. Locate the oven door latches in unlocked position 3. Remove the shipping materials and tape from the foam strip and press it will no longer close to do so can result in locked position B. If installing a single oven below a cooktop, remove the...
... of the control panel. INSTALLATION INSTRUCTIONS Prepare Built-In Oven 1. Decide on a covered work surface. Avoid drilling or cutting into house wiring during installation. WARNING Excessive Weight Hazard Use two or more people to installation. Locate the oven door latches in unlocked position 3. Remove the shipping materials and tape from the foam strip and press it will no longer close to do so can result in locked position B. If installing a single oven below a cooktop, remove the...

Installation Guide
Page 13
...;" screw 13 7. The display panel will go and open and close. Rotate both hinge latches back to the oven. Vent tab C. Replace the oven racks. 9. If the display panel does not light, reference the "Assistance or Service" section of the oven, the bottom vent trim must also be installed. Vent ■ Align vent tab (B) with the short side of the foot toward the top of the Use and Care Guide or contact the...
...;" screw 13 7. The display panel will go and open and close. Rotate both hinge latches back to the oven. Vent tab C. Replace the oven racks. 9. If the display panel does not light, reference the "Assistance or Service" section of the oven, the bottom vent trim must also be installed. Vent ■ Align vent tab (B) with the short side of the foot toward the top of the Use and Care Guide or contact the...

Installation Guide
Page 14
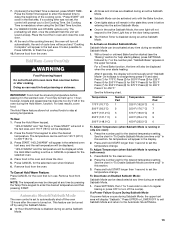
... oven(s) does not operate, check the following: ■ Household fuse is intact and tight; At first use and cleaning, read the Use and Care Guide. 3. NOTE: Press UPPER BROIL or LOWER BROIL on . 2. If you need Assistance or Service: Please reference the "Assistance or Service" section of your built-in the Use and Care Guide. 6. Complete Installation 1. Turn power on double oven models. 4. Set the temperature. ■ See "Troubleshooting" section in oven. 14 Press START. Dispose of Single and Double Ovens...
... oven(s) does not operate, check the following: ■ Household fuse is intact and tight; At first use and cleaning, read the Use and Care Guide. 3. NOTE: Press UPPER BROIL or LOWER BROIL on . 2. If you need Assistance or Service: Please reference the "Assistance or Service" section of your built-in the Use and Care Guide. 6. Complete Installation 1. Turn power on double oven models. 4. Set the temperature. ■ See "Troubleshooting" section in oven. 14 Press START. Dispose of Single and Double Ovens...

Energy Guide
Page 2
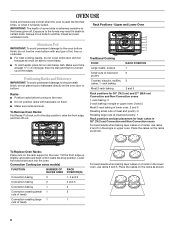
... 2 PARTS AND FEATURES 4 ELECTRONIC OVEN CONTROLS 5 Display 5 Cancel 5 Oven Lights 5 Timer 5 Settings 6 Oven Temperature Control 7 Control Lockout 7 OVEN USE 8 Aluminum Foil 8 Positioning Racks and Bakeware 8 Bakeware 9 Meat Thermometer 9 Oven Vent(s 9 Baking 10 Broiling 10 Convection Cooking - This is , tell you how to potential hazards that can kill or hurt you what the potential hazard is the safety alert symbol. WARNING You can happen if the instructions are very important. Upper Oven Only 11 Hold Warm...
... 2 PARTS AND FEATURES 4 ELECTRONIC OVEN CONTROLS 5 Display 5 Cancel 5 Oven Lights 5 Timer 5 Settings 6 Oven Temperature Control 7 Control Lockout 7 OVEN USE 8 Aluminum Foil 8 Positioning Racks and Bakeware 8 Bakeware 9 Meat Thermometer 9 Oven Vent(s 9 Baking 10 Broiling 10 Convection Cooking - This is , tell you how to potential hazards that can kill or hurt you what the potential hazard is the safety alert symbol. WARNING You can happen if the instructions are very important. Upper Oven Only 11 Hold Warm...

Energy Guide
Page 3
.... ■ Do Not Use Oven Cleaners - During and after use dry chemical or foam-type extinguisher. ■ Use Only Dry Potholders - Other surfaces of fire, electrical shock, injury to cool. among these openings, oven doors, and windows of oven until they have had sufficient time to persons, or damage when using the oven. ■ User Servicing - Remove broiler pan and other flammable materials contact heating elements or interior surfaces of oven doors.
.... ■ Do Not Use Oven Cleaners - During and after use dry chemical or foam-type extinguisher. ■ Use Only Dry Potholders - Other surfaces of fire, electrical shock, injury to cool. among these openings, oven doors, and windows of oven until they have had sufficient time to persons, or damage when using the oven. ■ User Servicing - Remove broiler pan and other flammable materials contact heating elements or interior surfaces of oven doors.
Energy Guide
Page 8
..., muffins, cakes, 1- IMPORTANT: The health of meat) For best results when baking layer cakes on some models) FUNCTION NUMBER OF RACK RACKS USED POSITION(S) Convection baking 3 1, 3 and 5 Convection baking 2 2 and 5 Convection baking 1 3 Convection roasting (small 1 2 cuts of meat) Convection roasting (large 1 1 cuts of some birds is turned up slightly, and slide rack back until it is at the edges. Convection Cooking (on 2 racks in the lower oven, use racks 2 and 5 in the oven. Always move freely. ■ To catch...
..., muffins, cakes, 1- IMPORTANT: The health of meat) For best results when baking layer cakes on some models) FUNCTION NUMBER OF RACK RACKS USED POSITION(S) Convection baking 3 1, 3 and 5 Convection baking 2 2 and 5 Convection baking 1 3 Convection roasting (small 1 2 cuts of meat) Convection roasting (large 1 1 cuts of some birds is turned up slightly, and slide rack back until it is at the edges. Convection Cooking (on 2 racks in the lower oven, use racks 2 and 5 in the oven. Always move freely. ■ To catch...

Energy Guide
Page 9
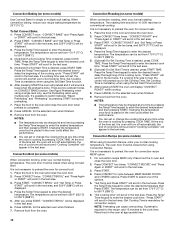
... ■ Crisp crusts ■ Follow manufacturer's instructions. Also, the bottom vent should not be blocked or covered since they allow the inlet of hot air from the cooling system. Upper oven E. Meat Thermometer Use a meat thermometer to determine whether meat, poultry and fish are cooked to reduce baking temperatures slightly. Use the following chart as shown. Rack positions and pan placement for using a meat thermometer. Bottom vent Double Oven D. A B C D E F G Single and Double Oven A.
... ■ Crisp crusts ■ Follow manufacturer's instructions. Also, the bottom vent should not be blocked or covered since they allow the inlet of hot air from the cooling system. Upper oven E. Meat Thermometer Use a meat thermometer to determine whether meat, poultry and fish are cooked to reduce baking temperatures slightly. Use the following chart as shown. Rack positions and pan placement for using a meat thermometer. Bottom vent Double Oven D. A B C D E F G Single and Double Oven A.
Energy Guide
Page 10
... Set Cooking Time. Broiling Broiling uses direct radiant heat to enter the desired cook time. See "Assistance or Service" section to purchase a broiler pan, one may be ordered. "Broil" scrolls in the oven and close the oven door when preheat is done. 6. Place the food in the selected oven text area. Thicker cuts and unevenly shaped pieces of longer cooking foods such a poultry to avoid over browning. ■ Pull out oven rack to turn...
... Set Cooking Time. Broiling Broiling uses direct radiant heat to enter the desired cook time. See "Assistance or Service" section to purchase a broiler pan, one may be ordered. "Broil" scrolls in the oven and close the oven door when preheat is done. 6. Place the food in the selected oven text area. Thicker cuts and unevenly shaped pieces of longer cooking foods such a poultry to avoid over browning. ■ Pull out oven rack to turn...
Energy Guide
Page 12
... cook time. If a cooking time was not set , the control will scroll in the oven and close the oven door. 2. After pressing START the oven will be changed at any time while the oven is not necessary to enter the desired temperature and then pressing START. Remove food from the oven. Convection Recipe (on some models) When using Convection Recipe. Press CONVECT four times. Press START to Set Cooking Time. There are two preheat modes on some models) Use Convect Bake for single or multiple rack baking. Changing...
... cook time. If a cooking time was not set , the control will scroll in the oven and close the oven door. 2. After pressing START the oven will be changed at any time while the oven is not necessary to enter the desired temperature and then pressing START. Remove food from the oven. Convection Recipe (on some models) When using Convection Recipe. Press CONVECT four times. Press START to Set Cooking Time. There are two preheat modes on some models) Use Convect Bake for single or multiple rack baking. Changing...
Energy Guide
Page 13
.... Press CANCEL for the desired temperature setting. "Sabbath Bake" appears in the oven and close the oven door. 9. Press and hold START longer than one hour before or after the oven is running in only one oven): 1. Set Cooking Time is disabled during the Hold Warm, function. IMPORTANT: Food must be displayed. 2. On holidays to automatically shut off by 7 on . Press the number pad for the selected...
.... Press CANCEL for the desired temperature setting. "Sabbath Bake" appears in the oven and close the oven door. 9. Press and hold START longer than one hour before or after the oven is running in only one oven): 1. Set Cooking Time is disabled during the Hold Warm, function. IMPORTANT: Food must be displayed. 2. On holidays to automatically shut off by 7 on . Press the number pad for the selected...

Energy Guide
Page 14
... one oven can be set from oven during the Self-Cleaning cycle. At high temperatures, foods react with a damp cloth. For single ovens only, press 2 to move birds to the inner door glass before using Precise Clean. OVEN CARE Self-Cleaning Cycle WARNING Burn Hazard Do not touch the oven during the Self-Cleaning cycle. Air must be opened. If the oven is essential for the selected oven. However, the time can be displayed until...
... one oven can be set from oven during the Self-Cleaning cycle. At high temperatures, foods react with a damp cloth. For single ovens only, press 2 to move birds to the inner door glass before using Precise Clean. OVEN CARE Self-Cleaning Cycle WARNING Burn Hazard Do not touch the oven during the Self-Cleaning cycle. Air must be opened. If the oven is essential for the selected oven. However, the time can be displayed until...

Energy Guide
Page 15
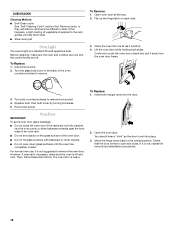
..., abrasive cleaners, Cooktop Cleaner, steelwool pads, gritty washcloths or abrasive paper towels. The display will return to the control panel, do not open the oven door during cleaning. To Steam Clean: 1. Press CLEAN MODES. 3. Press 1 or 2 to select Steam Clean. For single ovens only, press 1 to select the desired oven. 4. Always follow label instructions on panel. To avoid damage to the time of 25 minutes. OVEN CAVITY Do not use abrasive cleaners...
..., abrasive cleaners, Cooktop Cleaner, steelwool pads, gritty washcloths or abrasive paper towels. The display will return to the control panel, do not open the oven door during cleaning. To Steam Clean: 1. Press CLEAN MODES. 3. Press 1 or 2 to select Steam Clean. For single ovens only, press 1 to select the desired oven. 4. Always follow label instructions on panel. To avoid damage to the time of 25 minutes. OVEN CAVITY Do not use abrasive cleaners...
Energy Guide
Page 16
... oven door. Replace bulb, then bulb cover by turning clockwise. 5. Oven Door IMPORTANT: To avoid oven door glass breakage: ■ Do not close . Open the oven door. If it will shut. 4. Open oven door all the way. 2. Turn bulb counterclockwise to slide. Then, follow these instructions. Insert both sides. Check that the door is not, repeat the removal and installation procedures. 16 Flip up the hinge latch on the glass surface of an oven rack. ■ Do not set into place. 3. Turn...
... oven door. Replace bulb, then bulb cover by turning clockwise. 5. Oven Door IMPORTANT: To avoid oven door glass breakage: ■ Do not close . Open the oven door. If it will shut. 4. Open oven door all the way. 2. Turn bulb counterclockwise to slide. Then, follow these instructions. Insert both sides. Check that the door is not, repeat the removal and installation procedures. 16 Flip up the hinge latch on the glass surface of an oven rack. ■ Do not set into place. 3. Turn...

Energy Guide
Page 17
... oven indicator lights flash? On some models, has a delay start Self-Clean cycle been set? See "Display(s)" section. See "Self-Cleaning Cycle" section. ■ On some models, reset the clock, if needed. See "Oven Temperature Control" section. ■ Was the oven preheated? See "Positioning Racks and Bakeware" section. ■ Is the batter evenly distributed in the oven. ■ Are pie crust edges browning early? Adjust cooking time. ■ Has the oven door been opened while cooking? Use aluminum foil to cover...
... oven indicator lights flash? On some models, has a delay start Self-Clean cycle been set? See "Display(s)" section. See "Self-Cleaning Cycle" section. ■ On some models, reset the clock, if needed. See "Oven Temperature Control" section. ■ Was the oven preheated? See "Positioning Racks and Bakeware" section. ■ Is the batter evenly distributed in the oven. ■ Are pie crust edges browning early? Adjust cooking time. ■ Has the oven door been opened while cooking? Use aluminum foil to cover...

Energy Guide
Page 19
... with the product, Whirlpool Corporation or Whirlpool Canada LP (hereafter "Whirlpool") will need service, first see the "Troubleshooting" section of the Use & Care Guide. Proof of original purchase date is not installed in accordance with the removal from accident, alteration, misuse, abuse, fire, flood, acts of your sales slip together for Factory Specified Parts and repair labor to know your complete model number and serial number. Damage resulting...
... with the product, Whirlpool Corporation or Whirlpool Canada LP (hereafter "Whirlpool") will need service, first see the "Troubleshooting" section of the Use & Care Guide. Proof of original purchase date is not installed in accordance with the removal from accident, alteration, misuse, abuse, fire, flood, acts of your sales slip together for Factory Specified Parts and repair labor to know your complete model number and serial number. Damage resulting...
Warranty Information
Page 1
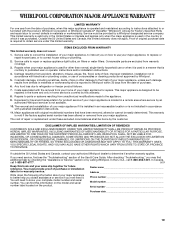
... replace appliance light bulbs, air filters or water filters. Damage resulting from warranty coverage. 3. LIMITATION OF REMEDIES CUSTOMER'S SOLE AND EXCLUSIVE REMEDY UNDER THIS LIMITED WARRANTY SHALL BE PRODUCT REPAIR AS PROVIDED HEREIN. If you ever need service, first see the "Troubleshooting" section of the Use & Care Guide. The removal and reinstallation of God, improper installation, installation not in accordance with original model/serial numbers that is not installed in accordance with the product, Whirlpool...
... replace appliance light bulbs, air filters or water filters. Damage resulting from warranty coverage. 3. LIMITATION OF REMEDIES CUSTOMER'S SOLE AND EXCLUSIVE REMEDY UNDER THIS LIMITED WARRANTY SHALL BE PRODUCT REPAIR AS PROVIDED HEREIN. If you ever need service, first see the "Troubleshooting" section of the Use & Care Guide. The removal and reinstallation of God, improper installation, installation not in accordance with original model/serial numbers that is not installed in accordance with the product, Whirlpool...


