Garantia
Page 1
...; Name, address and telephone number ■■ Model number and serial number ■■ A clear, detailed description of the problem ■■ Proof of the product. 15. Commercial, non-residential, multiple-family use, or use inconsistent with servicing, removal or replacement of purchase including dealer or retailer name and address IF YOU NEED SERVICE: 1. house wiring, fuses or water inlet hoses). Specified Replacement Parts and repair 4. Damage from the...
...; Name, address and telephone number ■■ Model number and serial number ■■ A clear, detailed description of the problem ■■ Proof of the product. 15. Commercial, non-residential, multiple-family use, or use inconsistent with servicing, removal or replacement of purchase including dealer or retailer name and address IF YOU NEED SERVICE: 1. house wiring, fuses or water inlet hoses). Specified Replacement Parts and repair 4. Damage from the...

Installation Instructions
Page 2
... of cabinet cutout. ■■ Floor must be able to support a single oven weight of 129 lbs (59 kg) for 27" (68.6 cm) models or 154 lbs (70 kg) for wall cabinet installations) ■■ Level ■■ Flat-blade screwdriver Parts Needed ■■ #8-14 x 1" screws - (2) single ovens, (4) double ovens included with any tools listed here. All safety messages will follow the instructions provided with built-in this manual...
... of cabinet cutout. ■■ Floor must be able to support a single oven weight of 129 lbs (59 kg) for 27" (68.6 cm) models or 154 lbs (70 kg) for wall cabinet installations) ■■ Level ■■ Flat-blade screwdriver Parts Needed ■■ #8-14 x 1" screws - (2) single ovens, (4) double ovens included with any tools listed here. All safety messages will follow the instructions provided with built-in this manual...
Installation Instructions
Page 3
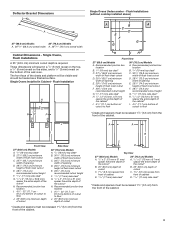
...) spacer the entire depth of the cutout* H. A B A C D E F G G H IH Front View 27" (68.6 cm) Models A. Deflector Bracket Dimensions Single Ovens Undercounter - Recommended junction box location B. 3/4" (19 mm) top cleat* C. 271/4" (69.2 cm) minimum width of flush inset cutout D. 257/8" (65.7 cm) minimum width of opening E. 291/4" (74.3 cm) minimum height of flush inset cutout F. 281/2" (72.4 cm) recommended cutout height G. 11/16" (17 mm) side...
...) spacer the entire depth of the cutout* H. A B A C D E F G G H IH Front View 27" (68.6 cm) Models A. Deflector Bracket Dimensions Single Ovens Undercounter - Recommended junction box location B. 3/4" (19 mm) top cleat* C. 271/4" (69.2 cm) minimum width of flush inset cutout D. 257/8" (65.7 cm) minimum width of opening E. 291/4" (74.3 cm) minimum height of flush inset cutout F. 281/2" (72.4 cm) recommended cutout height G. 11/16" (17 mm) side...
Installation Instructions
Page 4
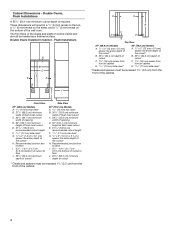
... the wall oven. Cabinet Dimensions - Double Ovens, Flush Installations A 253/8" (64.4 cm) minimum cutout depth is required. The front face of the cleats and platform will result in Cabinet - Recommended junction box location I Front View 27" (68.6 cm) Models A. 9/16" (14 mm) top cleat* B. 271/4" (69.2 cm) minimum width of flush inset cutout C. 257/8" (65.7 cm) minimum width of opening D. 52" (132.1 cm) minimum height of...
... the wall oven. Cabinet Dimensions - Double Ovens, Flush Installations A 253/8" (64.4 cm) minimum cutout depth is required. The front face of the cleats and platform will result in Cabinet - Recommended junction box location I Front View 27" (68.6 cm) Models A. 9/16" (14 mm) top cleat* B. 271/4" (69.2 cm) minimum width of flush inset cutout C. 257/8" (65.7 cm) minimum width of opening D. 52" (132.1 cm) minimum height of...

Installation Instructions
Page 5
... prepared covered work surface with the oven installation, go to the oven's final location. Avoid drilling or cutting into house wiring during installation. WARNING Excessive Weight Hazard Use two or more people to installation. Open the oven door. 3. Oven door hinge lock in the "Make Electrical Connection" section of the oven door, and rotate the hinge locks toward you, and remove. To avoid floor damage, set the oven onto cardboard prior to move and install oven. Set the oven door(s) aside on its handle...
... prepared covered work surface with the oven installation, go to the oven's final location. Avoid drilling or cutting into house wiring during installation. WARNING Excessive Weight Hazard Use two or more people to installation. Open the oven door. 3. Oven door hinge lock in the "Make Electrical Connection" section of the oven door, and rotate the hinge locks toward you, and remove. To avoid floor damage, set the oven onto cardboard prior to move and install oven. Set the oven door(s) aside on its handle...

Installation Instructions
Page 6
... the door hinge locks. At a 45° angle, align door hinges with your built-in a recommended cutout height of the oven feet allows a single oven to remove, then replace the oven door. Slowly insert door, making sure you feel a slight drop. 6. Repeat the steps to be installed in oven. See the "Remove Oven Door(s)" and "Replace Oven Door(s)." Go to the fully open to be installed in the slot when you maintain the 45° angle. Locate...
... the door hinge locks. At a 45° angle, align door hinges with your built-in a recommended cutout height of the oven feet allows a single oven to remove, then replace the oven door. Slowly insert door, making sure you feel a slight drop. 6. Repeat the steps to be installed in oven. See the "Remove Oven Door(s)" and "Replace Oven Door(s)." Go to the fully open to be installed in the slot when you maintain the 45° angle. Locate...
Installation Instructions
Page 7
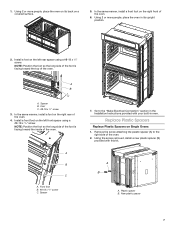
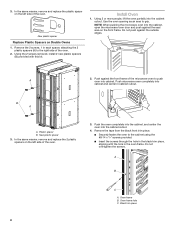
... the right side of the oven. 4. Replace Plastic Spacers Replace Plastic Spacers on its upright position. 2. Remove the screw attaching the plastic spacer (A) to the "Make Electrical Connection" section in its back on the right front of the oven. 1. In the same manner, install a front foot on a covered surface. 5. Using 2 or more people, place the oven on Single Ovens 1. NOTE: Position the foot...
... the right side of the oven. 4. Replace Plastic Spacers Replace Plastic Spacers on its upright position. 2. Remove the screw attaching the plastic spacer (A) to the "Make Electrical Connection" section in its back on the right front of the oven. 1. In the same manner, install a front foot on a covered surface. 5. Using 2 or more people, place the oven on Single Ovens 1. NOTE: Position the foot...
Installation Instructions
Page 8
Using the 2 screws removed, install 2 new plastic spacers (B) provided with the hole in cabinet cutout. Push against the front frame of the oven. 3. Oven frame B. Black trim piece 8 NOTE: When pushing the microwave oven into the cabinet, open the microwave oven door and push against the outside edges. Push microwave oven completely into cabinet. B A A. New plastic spacer 3. Oven frame hole C. Remove the 2 screws, 1 in the black trim piece, aligning with this kit. Do...
Using the 2 screws removed, install 2 new plastic spacers (B) provided with the hole in cabinet cutout. Push against the front frame of the oven. 3. Oven frame B. Black trim piece 8 NOTE: When pushing the microwave oven into the cabinet, open the microwave oven door and push against the outside edges. Push microwave oven completely into cabinet. B A A. New plastic spacer 3. Oven frame hole C. Remove the 2 screws, 1 in the black trim piece, aligning with this kit. Do...
Installation Instructions
Page 9
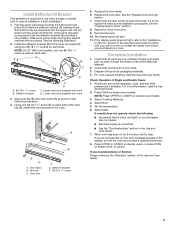
Install Deflector Kit Bracket This assembly is required for use when a single or double built-in oven is installed in the Use and Care Guide. 7. Flex the upper vent piece (C) away from the lower vent piece (D) to open and close. See the following : ■■ Household fuse is intact and tight, or circuit breaker has not tripped. ■■ Electrical supply is connected. ■■ See the "Troubleshooting" section in a flush installation. 1. Using one #8-18...
Install Deflector Kit Bracket This assembly is required for use when a single or double built-in oven is installed in the Use and Care Guide. 7. Flex the upper vent piece (C) away from the lower vent piece (D) to open and close. See the following : ■■ Household fuse is intact and tight, or circuit breaker has not tripped. ■■ Electrical supply is connected. ■■ See the "Troubleshooting" section in a flush installation. 1. Using one #8-18...

Fit System Guarantee
Page 1
... built-in standard single or double wall oven featuring the FIT System will fit your existing cabinet cut-out of a compatible model width and configuration or Whirlpool will receive the cabinet modification cost as stated on the duration of implied warranties of Whirlpool Corporation and cannot be liable for new cabinet installations related to new home construction or remodeling. QUALIFIED WHIRLPOOL BRAND STANDARD SINGLE AND DOUBLE OVEN MODELS: WOS31ES0J WOD51EC7H...
... built-in standard single or double wall oven featuring the FIT System will fit your existing cabinet cut-out of a compatible model width and configuration or Whirlpool will receive the cabinet modification cost as stated on the duration of implied warranties of Whirlpool Corporation and cannot be liable for new cabinet installations related to new home construction or remodeling. QUALIFIED WHIRLPOOL BRAND STANDARD SINGLE AND DOUBLE OVEN MODELS: WOS31ES0J WOD51EC7H...

Internet Connectivity Guide
Page 1
... any problems or questions, call Whirlpool Corporation Connected Appliances at : www.whirlpool.com/connect In Canada, visit www.whirlpool.ca/en_CA and click on the appliance or can be automatically replaced by the number "4000" (e.g. The SAID code is your mobile device, get the app, connectivity setup instructions, terms of your appliance prior to connect your appliance. Obtenez l'application et connectez-vous À l'aide...
... any problems or questions, call Whirlpool Corporation Connected Appliances at : www.whirlpool.com/connect In Canada, visit www.whirlpool.ca/en_CA and click on the appliance or can be automatically replaced by the number "4000" (e.g. The SAID code is your mobile device, get the app, connectivity setup instructions, terms of your appliance prior to connect your appliance. Obtenez l'application et connectez-vous À l'aide...
Internet Connectivity Guide
Page 2
Connect the equipment into an outlet on a circuit different from all persons at locations where OEM Responsibilities to comply with FCC and Industry Canada RF radiation exposure limits for general population, the antenna(s) used in other users, the antenna type and its gain should be required. Operation is subject to the following two conditions: 1. Dans le but de ré...
Connect the equipment into an outlet on a circuit different from all persons at locations where OEM Responsibilities to comply with FCC and Industry Canada RF radiation exposure limits for general population, the antenna(s) used in other users, the antenna type and its gain should be required. Operation is subject to the following two conditions: 1. Dans le but de ré...
Internet Connectivity Guide
Page 4
... author may not be automatically replaced by the number "4000" (e.g. The following statements refer to those portions of the software copyrighted by the terms of the part code mentioned herein will be used to opensource@whirlpool.com, along with or without specific prior written permission. LOSS OF USE, DATA, OR PROFITS; LOSS OF USE, DATA, OR PROFITS; All rights...
... author may not be automatically replaced by the number "4000" (e.g. The following statements refer to those portions of the software copyrighted by the terms of the part code mentioned herein will be used to opensource@whirlpool.com, along with or without specific prior written permission. LOSS OF USE, DATA, OR PROFITS; LOSS OF USE, DATA, OR PROFITS; All rights...

Internet Connectivity Guide
Page 6
of the part co de men tioned herein will be autom0a5ti/c1a7lly 17-May-2017 17:39:35 EDT | RELEASED replaced by the number "4000" (e.g. W11097305C UtIilnisésosomues lEicuenrcoepaeuanCafnaacdtao.rTieousstdhreoiltestrtéesrer"vWés". "W12345678" becomes "400012345678") Used under license in Canada. All rights reserved. ®/™ ©2017 Whirlpool.
of the part co de men tioned herein will be autom0a5ti/c1a7lly 17-May-2017 17:39:35 EDT | RELEASED replaced by the number "4000" (e.g. W11097305C UtIilnisésosomues lEicuenrcoepaeuanCafnaacdtao.rTieousstdhreoiltestrtéesrer"vWés". "W12345678" becomes "400012345678") Used under license in Canada. All rights reserved. ®/™ ©2017 Whirlpool.


