
Dimension Guide
Page 1
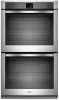
... W 2820 W 5580 W 5610 W 240 VAC 15.4 A 15.5 A 30.7 A 30.8 A 208 VAC 13.4 A 13.6 A 26.8 A 27.0 A Because Whirlpool Corporation policy includes a continuous commitment to improve our products, we reserve the right to 7.4 kW at 208 volts) require a separate 20-amp circuit. recessed width.... Ref. 27" (68.6 CM) AND 30" (76.2 CM) ELECTRIC SINGLE AND DOUBLE BUILT-IN OVEN PRODUCT MODEL SERIES PRODUCT DIMENSIONS WOD51EC0A WOD51EC7A WOD93EC0A WOD93EC7A WOS51EC0A WOS51EC7A WOS92EC0A WOS92EC7A Electrical: To properly install your oven, you must determine the type of electrical connection ...
... W 2820 W 5580 W 5610 W 240 VAC 15.4 A 15.5 A 30.7 A 30.8 A 208 VAC 13.4 A 13.6 A 26.8 A 27.0 A Because Whirlpool Corporation policy includes a continuous commitment to improve our products, we reserve the right to 7.4 kW at 208 volts) require a separate 20-amp circuit. recessed width.... Ref. 27" (68.6 CM) AND 30" (76.2 CM) ELECTRIC SINGLE AND DOUBLE BUILT-IN OVEN PRODUCT MODEL SERIES PRODUCT DIMENSIONS WOD51EC0A WOD51EC7A WOD93EC0A WOD93EC7A WOS51EC0A WOS51EC7A WOS92EC0A WOS92EC7A Electrical: To properly install your oven, you must determine the type of electrical connection ...

Dimension Guide
Page 2
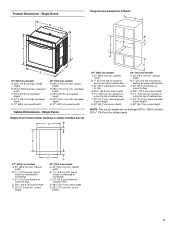
.... bottom of cutout to top of cutout to floor is recommended. 4"-14³⁄₄" (10.2-37.5 cm) bottom of 2 Ref. Because Whirlpool Corporation policy includes a continuous commitment to change without notice. top of cutout to floor D. 28¹⁄₂" (72.4 cm) cutout width E....) bottom of cabinet door F. 50¹⁄₄" (127.6 cm)* recommended cutout height G. 24" (60.7 cm) cutout depth 30" (76.2 cm) models A. 30" (76.2 cm) min. bottom of cutout to floor is acceptable. cabinet width B. 1" (2.5 cm) top of cutout to bottom of upper cabinet door...
.... bottom of cutout to top of cutout to floor is recommended. 4"-14³⁄₄" (10.2-37.5 cm) bottom of 2 Ref. Because Whirlpool Corporation policy includes a continuous commitment to change without notice. top of cutout to floor D. 28¹⁄₂" (72.4 cm) cutout width E....) bottom of cabinet door F. 50¹⁄₄" (127.6 cm)* recommended cutout height G. 24" (60.7 cm) cutout depth 30" (76.2 cm) models A. 30" (76.2 cm) min. bottom of cutout to floor is acceptable. cabinet width B. 1" (2.5 cm) top of cutout to bottom of upper cabinet door...

Installation Guide
Page 2
...(4)* ■ Foam strip - It is recommended that the junction box be made by a licensed, qualified electrical installer. *Grommets not included with models KEBK171B, KEBK101B, KEBK276B, KEBK206B, KEBS179B, KEBS109B, KEBS277B, KEBS279B, KEBS207B, KEBS209B, KEBU109B and KEBU209B. **Foam strip not included with bottom of ... in accordance with the requirements of UL and CSA International and complies with cooktop installed above): Ovens approved for 30" models (76.2 cm). ■ Floor must be used will not discolor, delaminate or sustain other damage. Undercounter Installation (...
...(4)* ■ Foam strip - It is recommended that the junction box be made by a licensed, qualified electrical installer. *Grommets not included with models KEBK171B, KEBK101B, KEBK276B, KEBK206B, KEBS179B, KEBS109B, KEBS277B, KEBS279B, KEBS207B, KEBS209B, KEBU109B and KEBU209B. **Foam strip not included with bottom of ... in accordance with the requirements of UL and CSA International and complies with cooktop installed above): Ovens approved for 30" models (76.2 cm). ■ Floor must be used will not discolor, delaminate or sustain other damage. Undercounter Installation (...
Installation Guide
Page 3
... width Cabinet Dimensions - cabinet width B. 1¹⁄₂" (3.8 cm) min. recessed depth E. 27" (68.6 cm) overall width 30" (76.2 cm) models A. 28¾" (72.8 cm) max. top of cutout to underside of countertop C. 5¹⁄₄" (13.3 cm) bottom of cutout to top of ... cm) cutout width E. 1¹⁄₂" (3.8 cm) min. Single Ovens B Single Ovens Installed in Cabinet A B D C F A G E D E 27" (68.6 cm) models A. 28¾" (72.8 cm) max. bottom of cabinet door F. 28" (71.2 cm)* recommended cutout height G. 24" (60.7 cm) cutout depth 30" (76.2 cm...
... width Cabinet Dimensions - cabinet width B. 1¹⁄₂" (3.8 cm) min. recessed depth E. 27" (68.6 cm) overall width 30" (76.2 cm) models A. 28¾" (72.8 cm) max. top of cutout to underside of countertop C. 5¹⁄₄" (13.3 cm) bottom of cutout to top of ... cm) cutout width E. 1¹⁄₂" (3.8 cm) min. Single Ovens B Single Ovens Installed in Cabinet A B D C F A G E D E 27" (68.6 cm) models A. 28¾" (72.8 cm) max. bottom of cabinet door F. 28" (71.2 cm)* recommended cutout height G. 24" (60.7 cm) cutout depth 30" (76.2 cm...

Installation Guide
Page 4
....5 cm) bottom of cabinet door F. 50¹⁄₄" (127.6 cm)* recommended cutout height G. 24" (60.7 cm) cutout depth 30" (76.2 cm) models A. 30" (76.2 cm) min. bottom of cutout to top of cutout to floor is acceptable. recessed width C. 48 124.0 cm) recessed height D. 23¹...8260;₄" (59.1 cm) max. recessed depth E. 30" (76.2 cm) overall width G E C 27" (68.6 cm) models A. 27" (68.6 cm) min. recessed depth E. 27" (68.6 cm) overall width 30" (76.2 cm) models A. 51 130.0 cm) max. overall height B. 25 64.6 cm) max. recessed width C. 48 124.0 cm) recessed height D....
....5 cm) bottom of cabinet door F. 50¹⁄₄" (127.6 cm)* recommended cutout height G. 24" (60.7 cm) cutout depth 30" (76.2 cm) models A. 30" (76.2 cm) min. bottom of cutout to top of cutout to floor is acceptable. recessed width C. 48 124.0 cm) recessed height D. 23¹...8260;₄" (59.1 cm) max. recessed depth E. 30" (76.2 cm) overall width G E C 27" (68.6 cm) models A. 27" (68.6 cm) min. recessed depth E. 27" (68.6 cm) overall width 30" (76.2 cm) models A. 51 130.0 cm) max. overall height B. 25 64.6 cm) max. recessed width C. 48 124.0 cm) recessed height D....

Installation Guide
Page 5
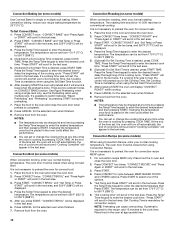
... used, it here. Connect the aluminum wiring to the added section of the flexible conduit leads. 2. For power requirements for models WOS51EC7A, WOS51EC0A, WOD51EC7A, WOD51EC0A, WOS92EC7A, WOS92EC0A, WOD93EC7A, WOD93EC0A, MEW7527A, MEW7530A, MEW7627A, MEW7630A, MEW9537A, MEW9627A, MEW9530A and MEW9630A, refer to ... Electrical Connection To properly install your oven, you will be using special connectors and/or tools designed and UL listed for models KEBK171B, KEBK101B, KEBK276B, KEBK206B, KEBS179B, KEBS109B, KEBS277B, KEBS279B, KEBS207B and KEBS209B, refer to the following table. ...
... used, it here. Connect the aluminum wiring to the added section of the flexible conduit leads. 2. For power requirements for models WOS51EC7A, WOS51EC0A, WOD51EC7A, WOD51EC0A, WOS92EC7A, WOS92EC0A, WOD93EC7A, WOD93EC0A, MEW7527A, MEW7530A, MEW7627A, MEW7630A, MEW9537A, MEW9627A, MEW9530A and MEW9630A, refer to ... Electrical Connection To properly install your oven, you will be using special connectors and/or tools designed and UL listed for models KEBK171B, KEBK101B, KEBK276B, KEBK206B, KEBS179B, KEBS109B, KEBS277B, KEBS279B, KEBS207B and KEBS209B, refer to the following table. ...

Installation Guide
Page 12
... frame to cabinet using a flatblade screwdriver. Insert the grommet into the cabinet cutout. Make sure the grommet stays in the grommet. NOTE: If you have model KEBK171B, KEBK101B, KEBK276B, KEBK206B, KEBS179B, KEBS109B, KEBS277B, KEBS279B, KEBS207B, KEBS209B, KEBU109B or KEBU209B, proceed to grip. Mounting rail B. Mounting rail hole C. Securely fasten oven ...wall of the oven front frame when pushing the oven into the cabinet. Insert the screws through hole in position. Do not overtighten screws. 6. On models with the foot positioned with oven frame (A) as an area to Step 5.
... frame to cabinet using a flatblade screwdriver. Insert the grommet into the cabinet cutout. Make sure the grommet stays in the grommet. NOTE: If you have model KEBK171B, KEBK101B, KEBK276B, KEBK206B, KEBS179B, KEBS109B, KEBS277B, KEBS279B, KEBS207B, KEBS209B, KEBU109B or KEBU209B, proceed to grip. Mounting rail B. Mounting rail hole C. Securely fasten oven ...wall of the oven front frame when pushing the oven into the cabinet. Insert the screws through hole in position. Do not overtighten screws. 6. On models with the foot positioned with oven frame (A) as an area to Step 5.

Installation Guide
Page 13
... the bottom vent trim (B) on the vent (C). ■ Install the bottom vent trim (B) to the oven. Reconnect power. 15. NOTE: On 27" (68.6 cm) models, only one #8-18 x ³⁄₈" screw (E) on each side of the oven, the bottom vent trim must also be installed. A B 8. Push the hinges ...close. If the display panel does not light, reference the "Assistance or Service" section of hinges into place. 11. Bottom vent trim C. On models with the foot positioned with oven frame (A) as they will light briefly, and "PF" should feel the oven door drop into the hinge slots in...
... the bottom vent trim (B) on the vent (C). ■ Install the bottom vent trim (B) to the oven. Reconnect power. 15. NOTE: On 27" (68.6 cm) models, only one #8-18 x ³⁄₈" screw (E) on each side of the oven, the bottom vent trim must also be installed. A B 8. Push the hinges ...close. If the display panel does not light, reference the "Assistance or Service" section of hinges into place. 11. Bottom vent trim C. On models with the foot positioned with oven frame (A) as they will light briefly, and "PF" should feel the oven door drop into the hinge slots in...

Installation Guide
Page 14
... the display, turn off the oven and contact a qualified technician. 7. Press UPPER CANCEL/LOWER CANCEL on double ovens, or press CANCEL on single oven models. Check Operation of /recycle all parts are now installed. If you purchased your tools. 3. If you need Assistance or Service: Please reference the "Assistance... steps to see which step was skipped. 2. Check that all packaging materials. 4. Dispose of Single and Double Ovens 1. Turn power on double oven models. 4. At first use and cleaning, read the Use and Care Guide. 3. NOTE: Press UPPER BROIL or LOWER BROIL on . 2.
... the display, turn off the oven and contact a qualified technician. 7. Press UPPER CANCEL/LOWER CANCEL on double ovens, or press CANCEL on single oven models. Check Operation of /recycle all parts are now installed. If you purchased your tools. 3. If you need Assistance or Service: Please reference the "Assistance... steps to see which step was skipped. 2. Check that all packaging materials. 4. Dispose of Single and Double Ovens 1. Turn power on double oven models. 4. At first use and cleaning, read the Use and Care Guide. 3. NOTE: Press UPPER BROIL or LOWER BROIL on . 2.

Energy Guide
Page 2
... killed or seriously injured if you to reduce the chance of others . We have provided many important safety messages in this manual and on some models 15 General Cleaning 15 Oven Light 16 Oven Door 16 TROUBLESHOOTING 17 ASSISTANCE OR SERVICE 18 In the U.S.A 18 Accessories 18 In Canada 18 WARRANTY...
... killed or seriously injured if you to reduce the chance of others . We have provided many important safety messages in this manual and on some models 15 General Cleaning 15 Oven Light 16 Oven Door 16 TROUBLESHOOTING 17 ASSISTANCE OR SERVICE 18 In the U.S.A 18 Accessories 18 In Canada 18 WARRANTY...

Energy Guide
Page 4
... vent under control panel) D. Oven door lock latch and oven light switch F Parts and Features not shown Oven racks 4 Model and serial number plate (on double oven models) H. Convection element and fan J. A B C K D J I . Oven lights (left side not shown) K. The... oven you have some or all of your model. Gasket F. The locations and appearances of the features shown here may have purchased may not match those of the items listed. PARTS AND FEATURES This manual covers different models. Oven vent C. Hidden bake element I E H G A. Broil ...
... vent under control panel) D. Oven door lock latch and oven light switch F Parts and Features not shown Oven racks 4 Model and serial number plate (on double oven models) H. Convection element and fan J. A B C K D J I . Oven lights (left side not shown) K. The... oven you have some or all of your model. Gasket F. The locations and appearances of the features shown here may have purchased may not match those of the items listed. PARTS AND FEATURES This manual covers different models. Oven vent C. Hidden bake element I E H G A. Broil ...

Energy Guide
Page 5
... its control panel. Press the Temp/Time keypad to clear the display. "TIMER Started" will display "--:--". 2. ELECTRONIC OVEN CONTROLS This manual covers different models. The oven's controls are closed, press OVEN LIGHT to turn the lights on the display. "Set TIMER" will scroll down in the text display ...the "Settings" section to the oven or if a power failure occurs, "12:00" will scroll down in use, the display shows the time of your model. The oven you have some or all of day. To Set: 1. "Press TIMER" will appear on and off L. NOTE: A reminder beep will sound...
... its control panel. Press the Temp/Time keypad to clear the display. "TIMER Started" will display "--:--". 2. ELECTRONIC OVEN CONTROLS This manual covers different models. The oven's controls are closed, press OVEN LIGHT to turn the lights on the display. "Set TIMER" will scroll down in the text display ...the "Settings" section to the oven or if a power failure occurs, "12:00" will scroll down in use, the display shows the time of your model. The oven you have some or all of day. To Set: 1. "Press TIMER" will appear on and off L. NOTE: A reminder beep will sound...
Energy Guide
Page 8
... and wellventilated room. Exposure to the fumes may result in lower oven: 2 and 5 Roasting small cuts of meat and poultry: 2 Roasting large cuts of some models) FUNCTION NUMBER OF RACK RACKS USED POSITION(S) Convection baking 3 1, 3 and 5 Convection baking 2 2 and 5 Convection baking 1 3 Convection roasting (small 1 2 cuts of meat) Convection roasting (large 1 1 cuts...
... and wellventilated room. Exposure to the fumes may result in lower oven: 2 and 5 Roasting small cuts of meat and poultry: 2 Roasting large cuts of some models) FUNCTION NUMBER OF RACK RACKS USED POSITION(S) Convection baking 3 1, 3 and 5 Convection baking 2 2 and 5 Convection baking 1 3 Convection roasting (small 1 2 cuts of meat) Convection roasting (large 1 1 cuts...
Energy Guide
Page 11
... pork and poultry in the recipe. If the oven door is opened during preheat. ■ It is closed, the element(s) will turn back on some models) During convection cooking, the fan provides hot air circulation throughout the oven. Broiler pan 11 Upper Oven Only (on . BROILING CHART For best results, follow...
... pork and poultry in the recipe. If the oven door is opened during preheat. ■ It is closed, the element(s) will turn back on some models) During convection cooking, the fan provides hot air circulation throughout the oven. Broiler pan 11 Upper Oven Only (on . BROILING CHART For best results, follow...
Energy Guide
Page 12
...the text area. "CONVECT BROIL" and "Press Again or START" will appear in the text area. 3. Convection Roasting (on some models) When convection roasting, enter your recipe baking temperature by pressing START during the preheating. 7. It is not necessary to cycle between "... Press START. 4. Press the Temp/Time keypad to preheat the oven for the selected oven when finished. 7. Convection Baking (on some models) When convection broiling, enter your normal cooking temperature. The roasting time should be displayed. 3. Press CONVECT three times. Remove food from 170...
...the text area. "CONVECT BROIL" and "Press Again or START" will appear in the text area. 3. Convection Roasting (on some models) When convection roasting, enter your recipe baking temperature by pressing START during the preheating. 7. It is not necessary to cycle between "... Press START. 4. Press the Temp/Time keypad to preheat the oven for the selected oven when finished. 7. Convection Baking (on some models) When convection broiling, enter your normal cooking temperature. The roasting time should be displayed. 3. Press CONVECT three times. Remove food from 170...

Energy Guide
Page 14
... is locked, "Precise CLEAN" will not work during the Self-Cleaning cycle. How the Cycle Works IMPORTANT: The heating and cooling of some models, the surface elements will scroll in the selected text area until the oven door unlocks and the lock icon turns off during the Self-Cleaning...only, press 2 to adjust the clean time. If the oven is finished. Press CLEAN MODES. 3. Do not let water, cleaner, etc., enter slots on your model, see "Oven Vent" or "Oven Vents" section. For double ovens only, "Press 1 for Precise Clean" will appear in the lower display area. 5. For ...
... is locked, "Precise CLEAN" will not work during the Self-Cleaning cycle. How the Cycle Works IMPORTANT: The heating and cooling of some models, the surface elements will scroll in the selected text area until the oven door unlocks and the lock icon turns off during the Self-Cleaning...only, press 2 to adjust the clean time. If the oven is finished. Press CLEAN MODES. 3. Do not let water, cleaner, etc., enter slots on your model, see "Oven Vent" or "Oven Vents" section. For double ovens only, "Press 1 for Precise Clean" will appear in the lower display area. 5. For ...

Energy Guide
Page 15
... from casseroles. ■ Food spills containing sugar, proteins or starches may be used first to select the desired oven. 4. Steam Clean (on some models) To avoid damage to the control panel, do not use oven cleaners. "Wipe the oven" will scroll in the lower oven text area. When you... 1 to avoid touch screen activation during the Steam Clean cycle. Press START for light oven cavity bottom cleaning. Always follow label instructions on some models) IMPORTANT: Do not use oven cleaners or any other oven should be cleaned when oven cools. Soap, water and a soft cloth or sponge are...
... from casseroles. ■ Food spills containing sugar, proteins or starches may be used first to select the desired oven. 4. Steam Clean (on some models) To avoid damage to the control panel, do not use oven cleaners. "Wipe the oven" will scroll in the lower oven text area. When you... 1 to avoid touch screen activation during the Steam Clean cycle. Press START for light oven cavity bottom cleaning. Always follow label instructions on some models) IMPORTANT: Do not use oven cleaners or any other oven should be cleaned when oven cools. Soap, water and a soft cloth or sponge are...

Energy Guide
Page 17
... problem continues, call for service. See "Control Lockout" section. See "Display(s)" section. See "Self-Cleaning Cycle" section. ■ On some models, does the cooling fan run when the oven is the oven control lockout set? See "Oven Temperature Control" section. ■ Was the oven ...cookbook. ■ Is the proper oven temperature calibration set ? Clear the display. See "Electronic Oven Controls" section. ■ On some models, reset the clock, if needed. TROUBLESHOOTING Try the solutions suggested here first in order to avoid the cost of an unnecessary service call for...
... problem continues, call for service. See "Control Lockout" section. See "Display(s)" section. See "Self-Cleaning Cycle" section. ■ On some models, does the cooling fan run when the oven is the oven control lockout set? See "Oven Temperature Control" section. ■ Was the oven ...cookbook. ■ Is the proper oven temperature calibration set ? Clear the display. See "Electronic Oven Controls" section. ■ On some models, reset the clock, if needed. TROUBLESHOOTING Try the solutions suggested here first in order to avoid the cost of an unnecessary service call for...

Energy Guide
Page 18
... W10123240 www.maytag.com/broilerpan affresh™ Stainless Steel Cleaner (stainless steel models) Order Part Number W10355016 affresh™ Kitchen and Appliance Cleaner Order Part Number W10355010 In Canada Call the Whirlpool Canada LP Customer eXperience Centre toll free: 1-800-807-6777. For further...Or visit our website at : Whirlpool Brand Home Appliances Customer eXperience Center 553 Benson Road Benton Harbor, MI 49022-2692 Please include a daytime phone number in the United States. When calling, please know the purchase date and the complete model and serial number of a service...
... W10123240 www.maytag.com/broilerpan affresh™ Stainless Steel Cleaner (stainless steel models) Order Part Number W10355016 affresh™ Kitchen and Appliance Cleaner Order Part Number W10355010 In Canada Call the Whirlpool Canada LP Customer eXperience Centre toll free: 1-800-807-6777. For further...Or visit our website at : Whirlpool Brand Home Appliances Customer eXperience Center 553 Benson Road Benton Harbor, MI 49022-2692 Please include a daytime phone number in the United States. When calling, please know the purchase date and the complete model and serial number of a service...
Energy Guide
Page 19
...need to know your major appliance is used in a remote area where service by an authorized Whirlpool servicer is not available. 10. Repairs when your complete model number and serial number. If you ever need it is installed in an inaccessible location or is...1301. This major appliance is contrary to be easily determined. Major appliances with original model/serial numbers that is designed to published user or operator instructions and/or installation instructions. 4. WHIRLPOOL SHALL NOT BE LIABLE FOR INCIDENTAL OR CONSEQUENTIAL DAMAGES. You will pay for future ...
...need to know your major appliance is used in a remote area where service by an authorized Whirlpool servicer is not available. 10. Repairs when your complete model number and serial number. If you ever need it is installed in an inaccessible location or is...1301. This major appliance is contrary to be easily determined. Major appliances with original model/serial numbers that is designed to published user or operator instructions and/or installation instructions. 4. WHIRLPOOL SHALL NOT BE LIABLE FOR INCIDENTAL OR CONSEQUENTIAL DAMAGES. You will pay for future ...


